DIY Bookcase Tutorial (DIY built in, all the details!!)
Hey ya’ll! I’m finally sharing the DIY Bookcase Tutorial in this room….
I know, it’s been a long time coming but so was the bookcase!
And I’ve had my hands a little full….we got a puppy.
His name is Ryder and I’m quite sure you will see him in and around the blog from time to time.
(he’s in and around — and into!– just about everything lol)
I really forgot what it was like having a “baby”. Oh my, I’m too old for this!! haha
I shared about him over on Instagram a couple weeks ago…..
Here are some recent shots of how fast he’s grown…. (top left is most recent)

I even started an Instagram for him too. I thought it’d be a great way for family and friends to keep up with him…and his growth from puppyhood to adulthood.
You can follow along here >> Ryder
Okay, now let’s talk DIY BOOKCASE TUTORIAL, y’all!
I should put a bit of a disclaimer out here right now.
We completed this project over years, yes I said years. (if you’ve been around, you know! )
No reason at all for that except we were busy and kept putting it off. Ugh.
So, with that, the tutorial may not be the best but I’ll try to piece it together for you.
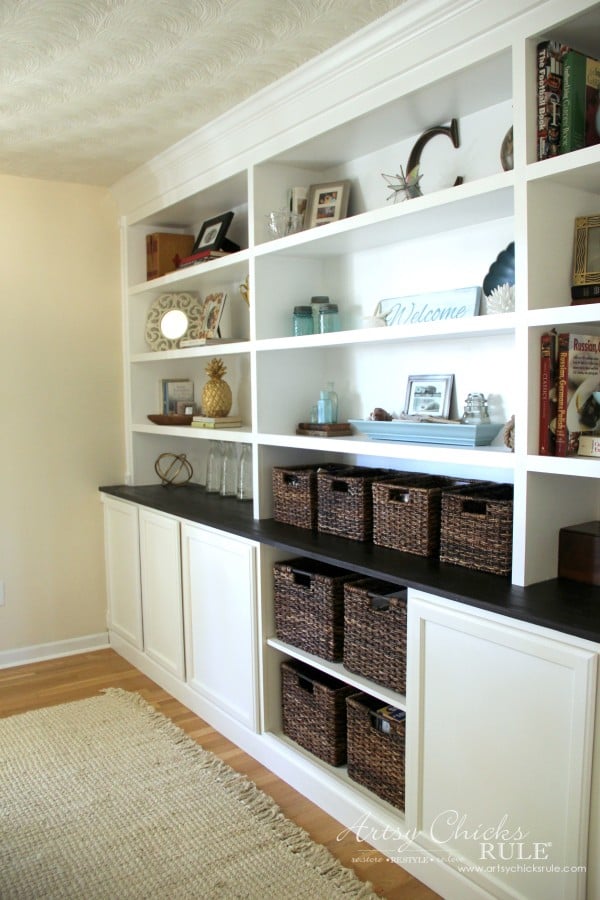
Here’s the finished DIY Bookcase that I’m speaking of…..

I’m so very happy with how it turned out.
It really added a lot to this room.
It definitely looks quite different than when we moved in (and through a few of my own decor adventures!)
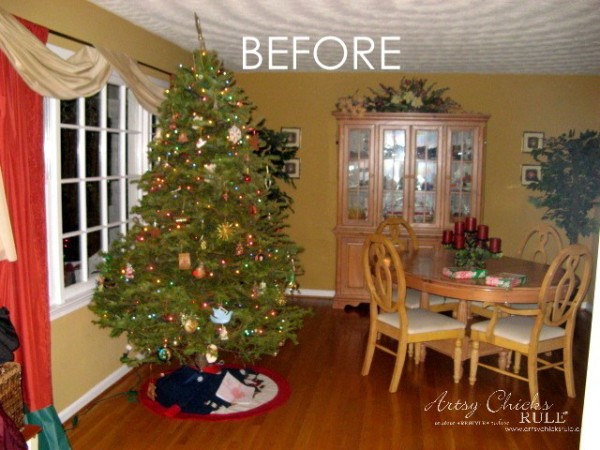
Here’s a refresher…
This was when I used it as a “dining room” instead of a study.
Red and gold, oh my! ;)
You can see more “before” photos, like the previous owner’s take on this room, in the reveal post here >>> DIY Bookcase Reveal
Now onto the tutorial.
I may include some affiliate links for you below. You can see my full disclosure here.
We decided to use ready-to-go cabinets from Lowe’s or The Home Depot.
I don’t remember which now and it doesn’t really matter.
They both have a similar style.
We considered using base cabinets but ultimately, I didn’t want them coming out that far.
However, I did want them to come out a bit farther than what wall cabinets would give me.
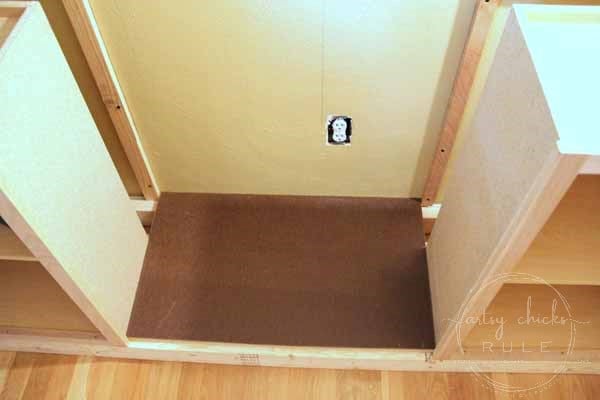
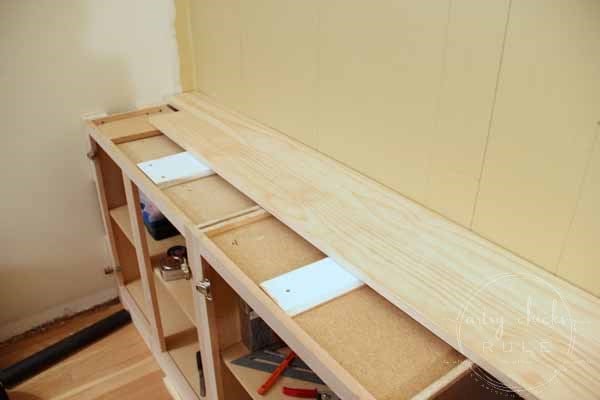
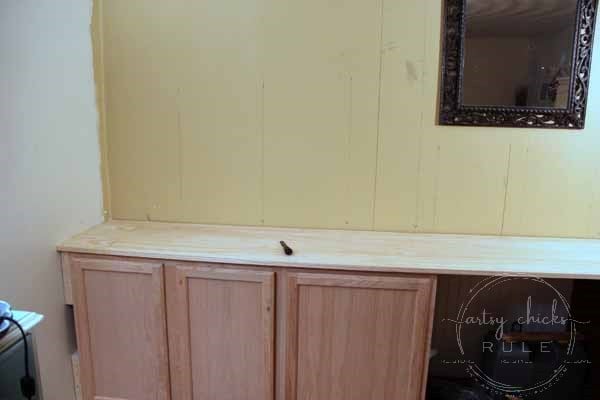
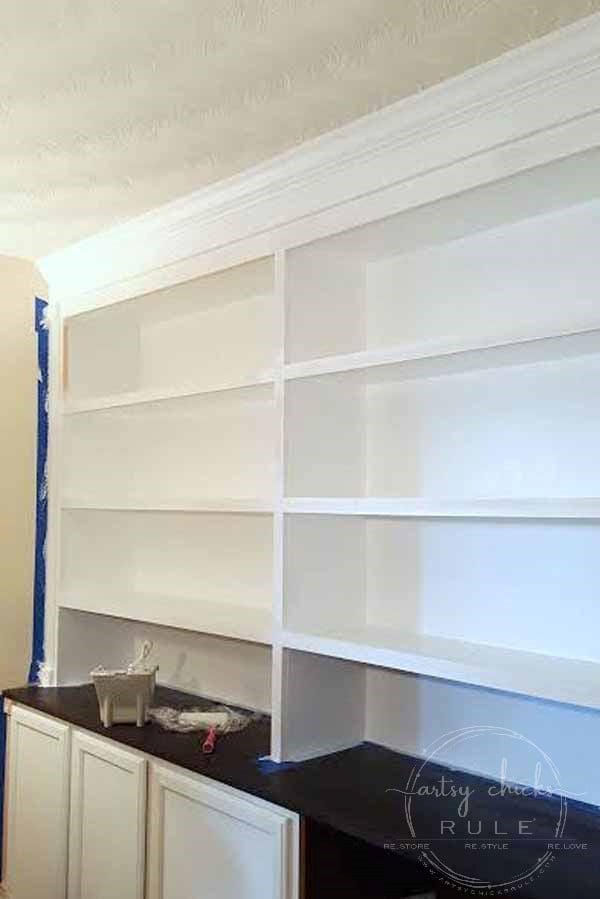
So, we adjusted the wall cabinets depth, like so….
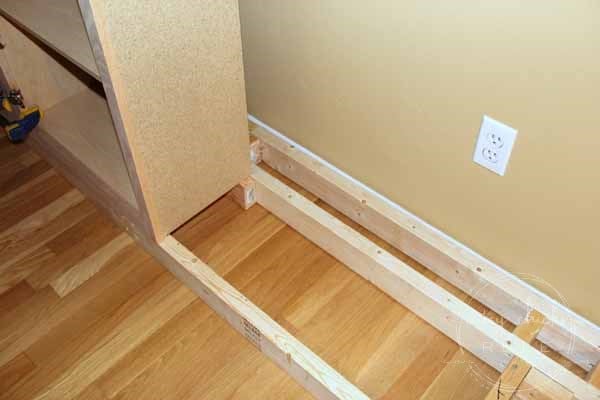
We built a base for them to sit on out of 2×4 pieces of wood.
They were screwed into each other and the wall, not the floor. (just in case the bookcase got removed someday, you never know! )
Then, as you can see, we pulled them away from the wall about 4-5 inches.
We left space on each side of the bookcase to allow for decorative trim.
You can see to the very left of the picture below.
You can measure and use whichever size cabinets your space requires.
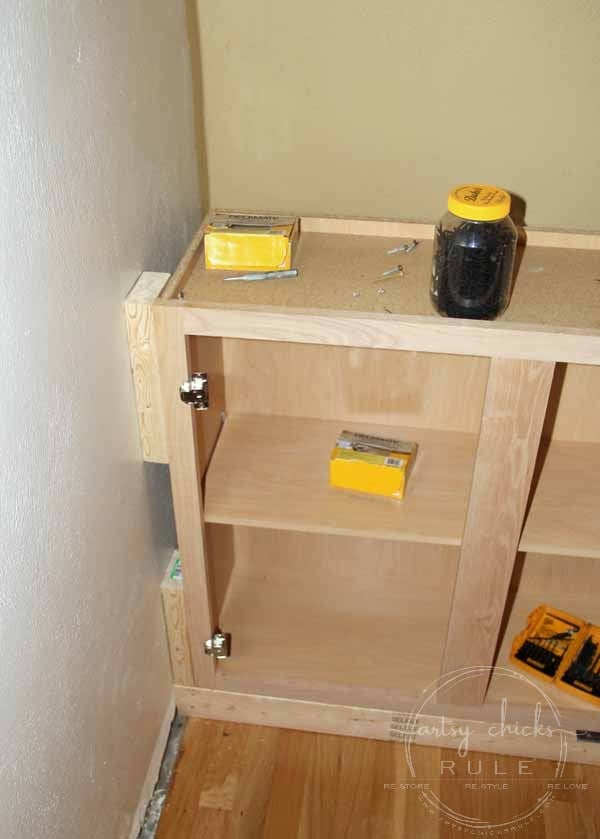
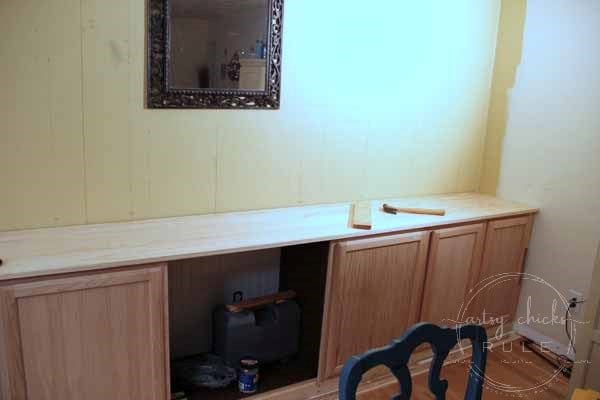
Next, we screwed, and glued, the cabinets to each other.
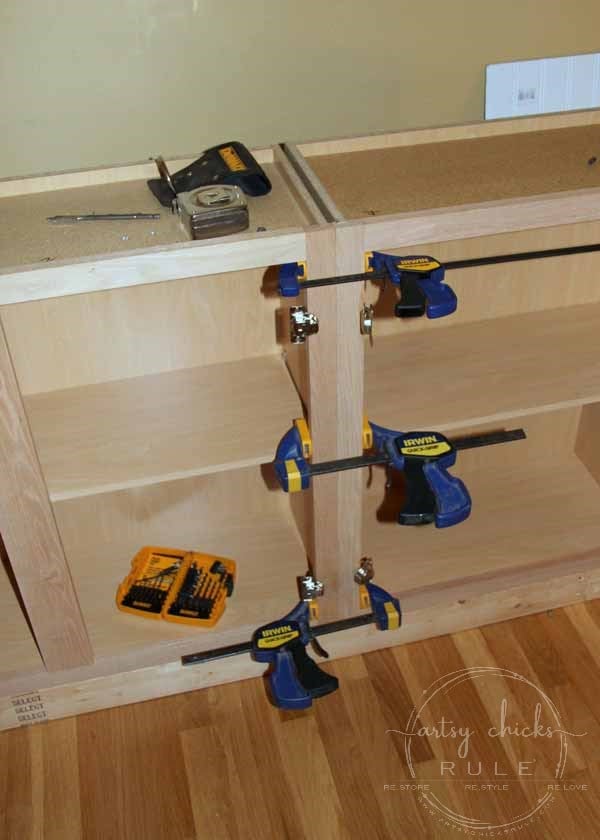
I wanted to break up the bottom section so left a space in the middle open for a shelf and baskets.
We added 1×2 strips of wood to the wall behind as “nailers”.
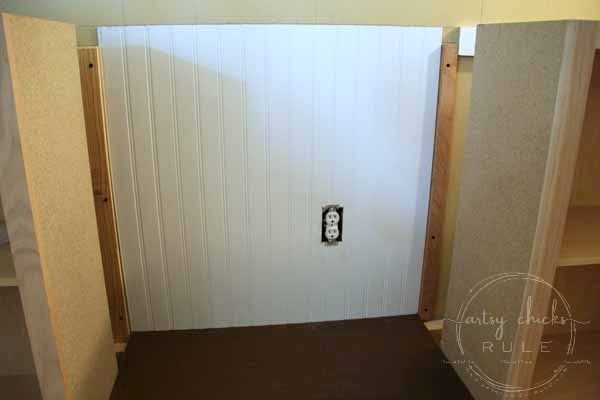
I had originally planned to put beadboard on the entire back of the bookcase but changed my mind.
That’s what happens when you take 2+ years to complete a project!
We had several “change my mind” along the way, haha.
Instead, we used a flat wall panel board.
We removed that bead board at the back and replaced it with the flat wall panel board but don’t have a photo of it.
My husband was thrilled with this change. heh heh
At least the entire wall wasn’t done yet, right?
The middle shelf in that opening, (not shown), is made with 1×6 pieces of wood.
We glued and pieced them together to make one board. (just like we constructed the top below)
Want to see some of these projects in “live” time? Hop on over and follow along with me on INSTAGRAM. I’m always sharing in my stories as I’m doing projects, finding new furniture, fun finds….just all the day to day behind the scenes.
The top…..
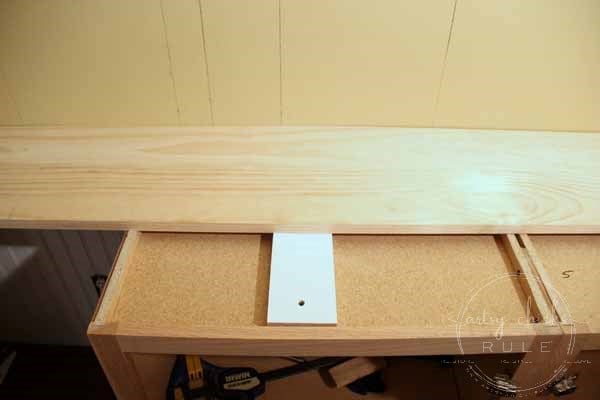
I wanted to have a dark-stained wood top so my husband and I made one.
For support, we added 1×4 pieces of wood on the tops of the cabinets. (shown above in white)
The top was made out of 1×6 pieces that we glued together. (3- 1×6, 1 – 1×4)
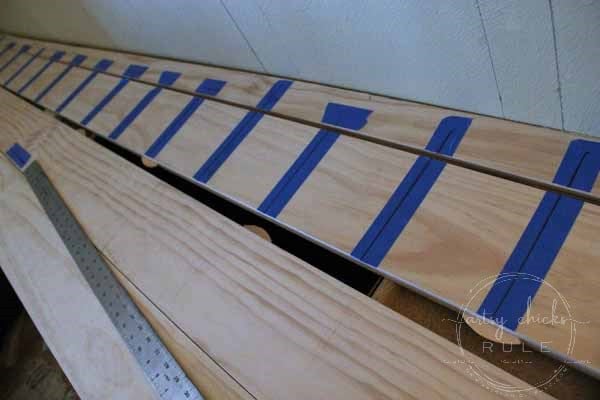
Lining up the pieces with painter’s tape to glue the biscuit joiners.
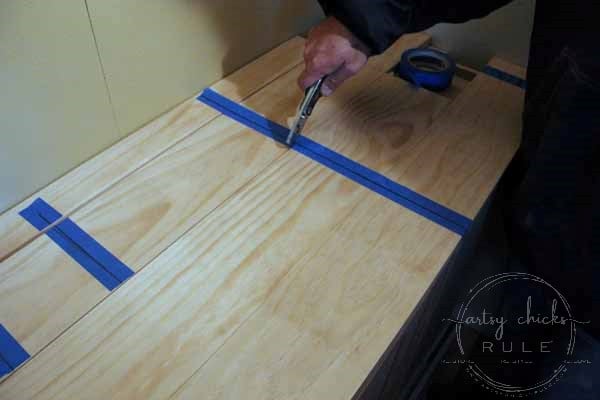
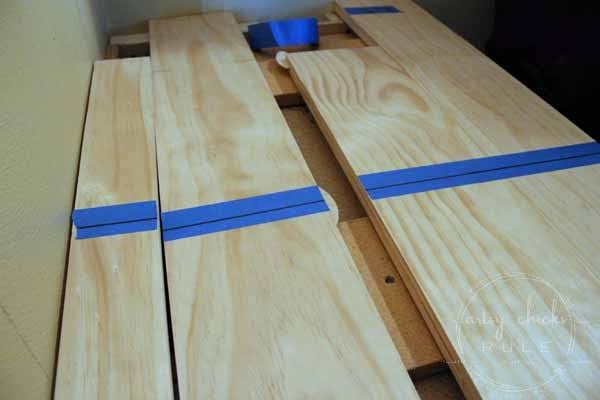
We used biscuits to join the wood.
Marking where they are…..
Once it was complete, we screwed it to the base from underneath. (from inside the cabinets)
The tops/shelves were made from 3/4 inch cabinet-grade plywood that my husband ripped down.
He recommends using 1×12 pieces, however. It’s easier!
Nailed together and ready for paint. (I used my paint sprayer, so easy!)
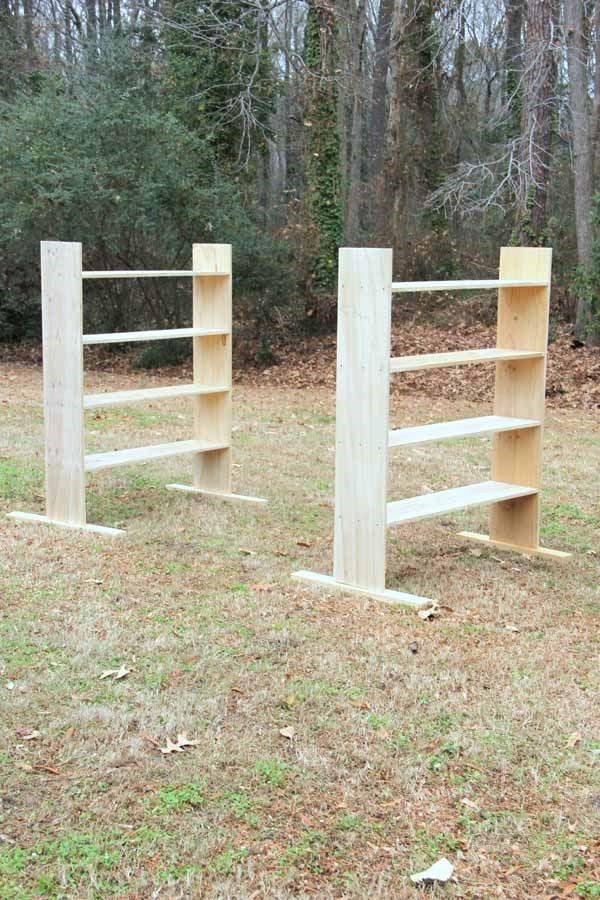
You only see two, um, because there were only two. Until I changed my mind….again.
I was going to have an open space in the center of the upper cabinets for a large print/painting originally.
I decided I wanted to keep it “easy” and just have shelves go all the way across.
So we ended up building another one of these to go in the center.
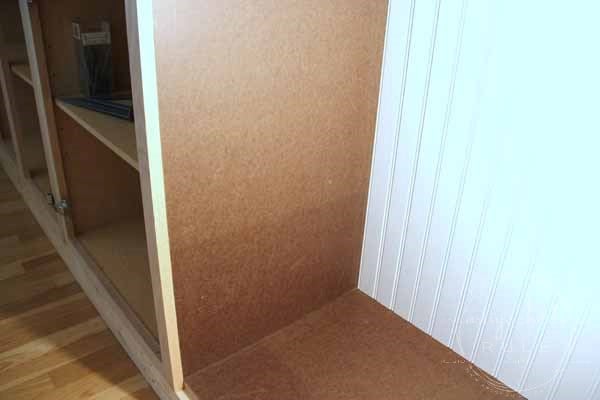
I also considered just painting the back wall and not having a back on these.
Old house, nonstraight walls, etc.
That really wasn’t going to look very nice so we opted to add those flat, smooth wall panel boards to the backs of these.
No photos of that, sorry. At this point in the game, I just wanted them done and my house put back together!
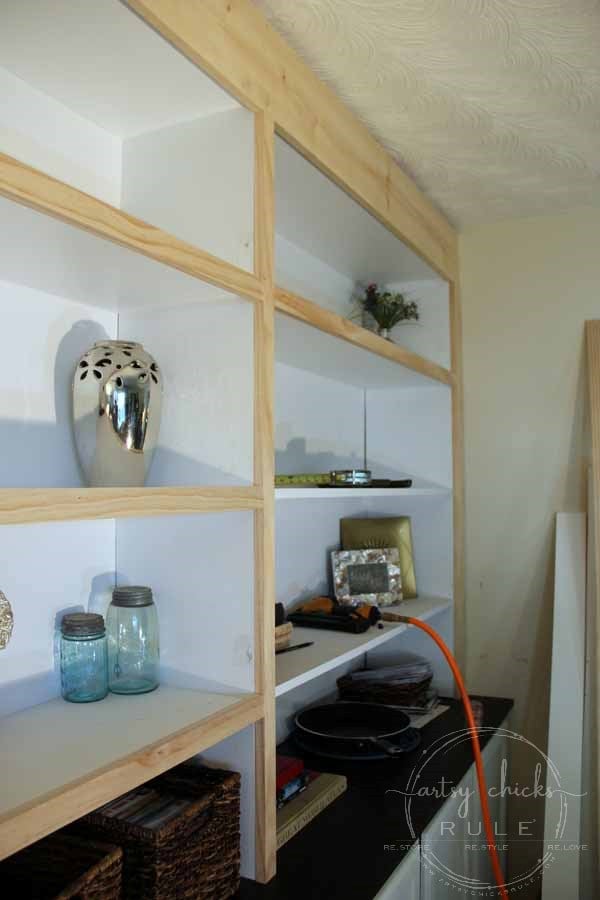
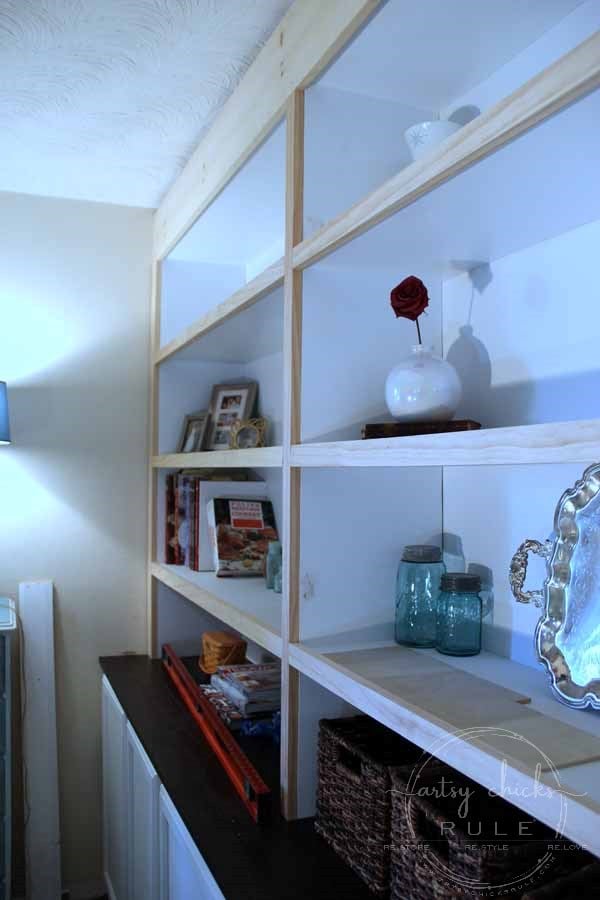
I also don’t have pictures of installing these shelving units, etc.
Basically…we slid them into place and then screwed them to each other and the wall.
Yes, I have “stuff” on the shelves. You would too, if it was a 2-year project.
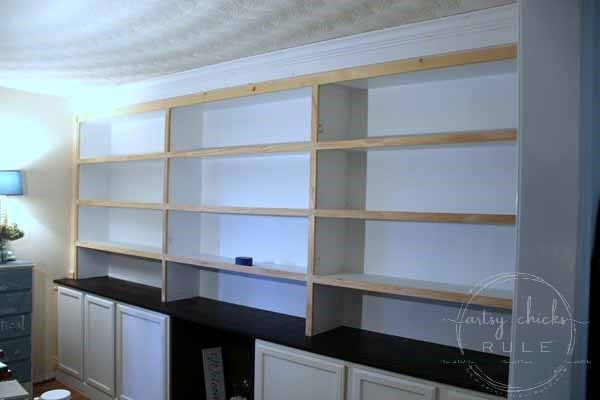
But anyway, you can see how they are “put together” above.
Not very attractive, huh? But wait.
You’ve gotta add the trim to make it pretty and finished.
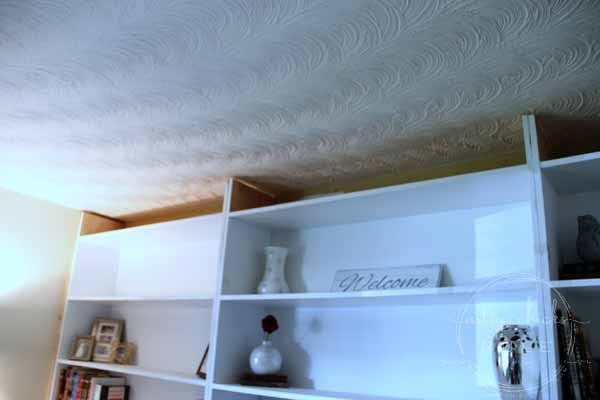
We used 1×2 inch pieces for the shelves.
The shelf sections ended up with a little “lip” area. I like the look that was created.
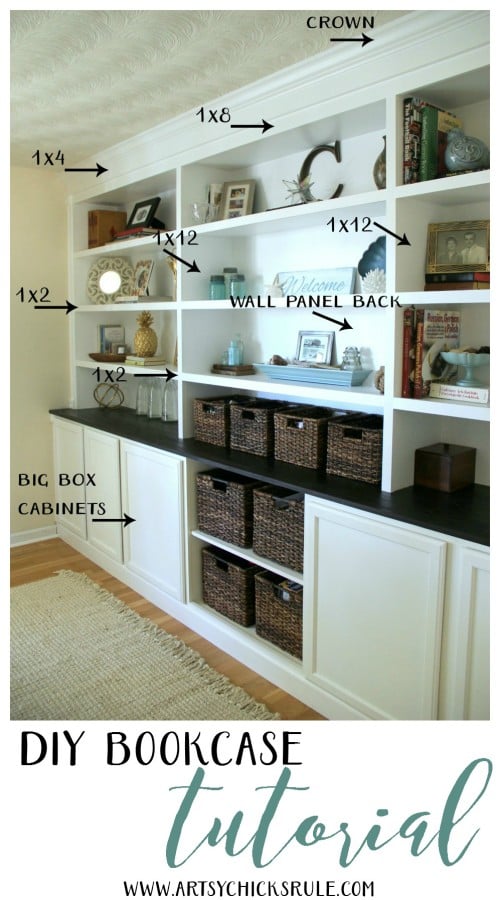
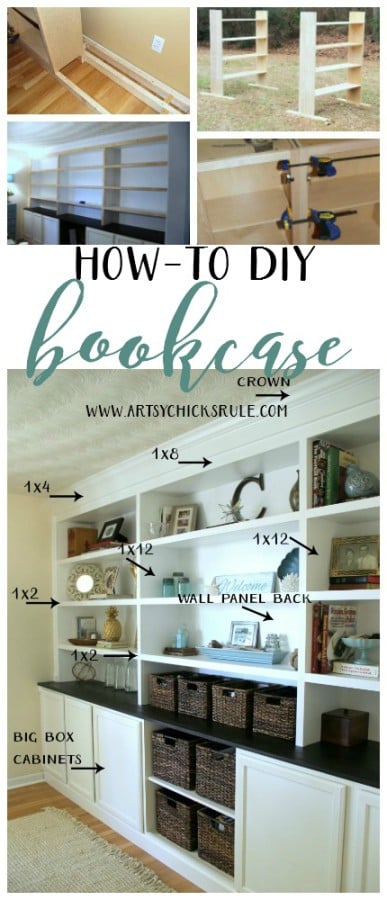
The very top got a 1×8 that didn’t need to go to the ceiling because we were adding crown molding there.
Yes, that’s a frying pan. ;)
You can see I have some caulking to do too.
I stained the top piece with Java Gel Stain. It’s a little darker than I wanted.
I should have mixed it with Antique Walnut (my fave go-to blend).
Oh well, I’ve gotten used to it and it’s staying that way now!
For the sides, we used fluting and rosettes to add a decorative touch.
(both above and below)
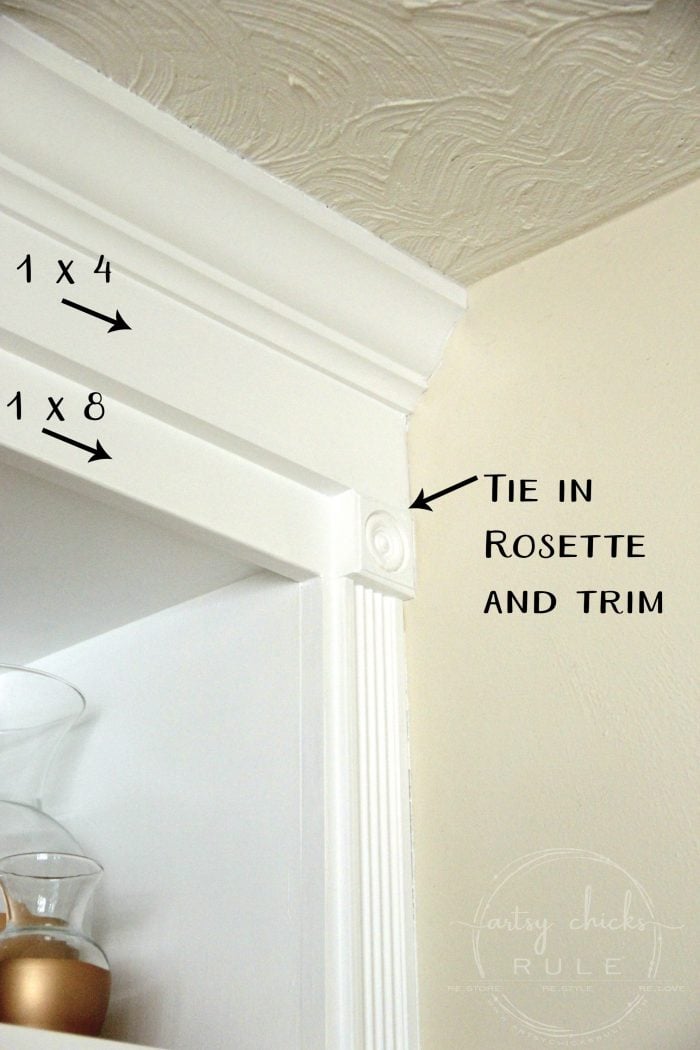
We added 1×4 over the 1×8 to help tie in the decorative fluting and rosette.
Otherwise, it would have looked awkward just “hanging out” at the top.
All caulked and ready for finish paint…..

Caulk really is your friend with things like this. I love a seamless look!
A recap to PIN and save for later.
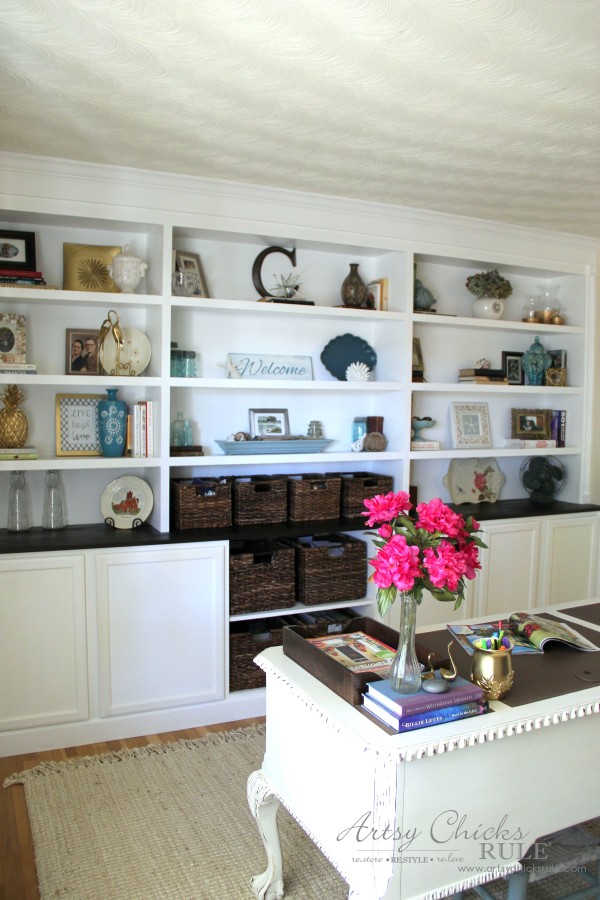
Decorated and done….yay!
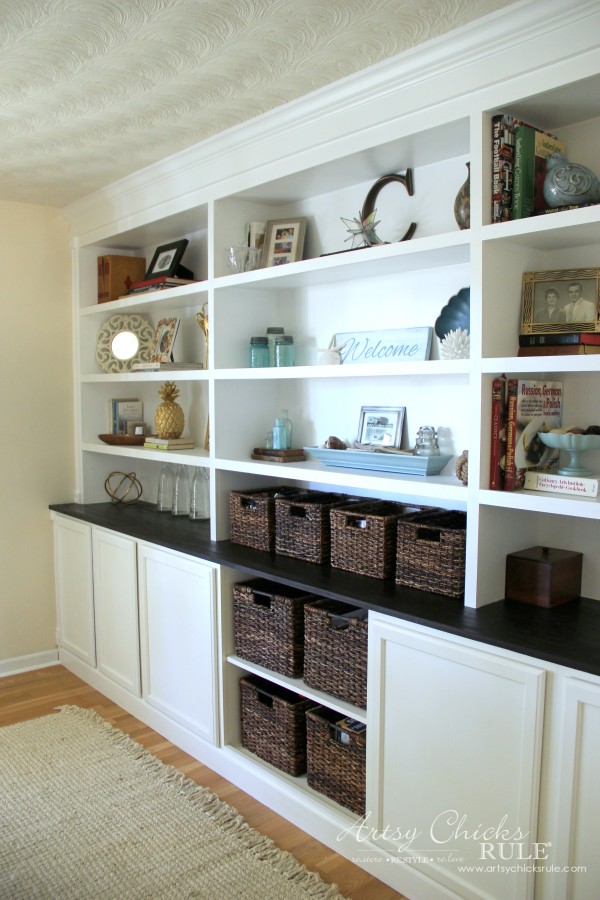
I love having a place for all my pretty baskets.
You can find them here…
Milk Crate small
Milk Crate large
And I love that it breaks things up a bit too.
More finished photos here >>> DIY Bookcase Reveal
EDITED TO ADD: We have since changed this room back to a dining room. See how it looks now, here: Coastal Dining Room Reveal
PIN this so you can build a DIY Bookcase too!
So even though it took us for forever and day (or 300!) it’s totally do-able.
Busy was the only reason it didn’t get done in a timely manner.
I don’t even care, I’m just glad it’s done.
More home DIY tutorials we have shared here:
- DIY Faux Shiplap (get the look, without the expense!)
- DIY Faux Board & Batten (simple and quick!)
- How To Make a DIY Wood Countertop
- Build Your Own Kitchen Island With Big Box Store Cabinets
- How To Install Laminate Flooring (tips and tricks)
- DIY Crown Mold (easy way to get that wide custom look!)
- Build Your Own Built In Bookcase – Tutorial (you are here)
- Chalk Painted Kitchen Cabinets
- How To Use Gel Stain On Your Stairs
- How To Paint Light Fixtures Without Removing Them
- How To Build a Permanently Attached Wall Coat Rack
- DIY Floating Shelves Tutorial
- How To DIY a Tile Backsplash
- How To Build a Custom Closet
- Remove Popcorn Ceilings The Easy Way
- How To Remove Peeling Paint
- DIY Wood Mantel
- How To Paint a Tile Floor (it works!)
- How To Hang Peel and Stick Wallpaper
I hope the DIY Bookcase Tutorial made sense.
If you have any questions at all, please don’t hesitate to ask!
I’m working on the shelves for the dining room (at the poly stage, yay!)
Hopefully, they’ll be up and decorated soon so I can share those with y’all next.
Have a great rest of the week friends!!!
xo


")
")


hey girl love the post! Ryder is just so cute! congrats. And the bookcase is so cool!
Thanks friend!! :)
xo
Nancy
Awe your new puppy is adorable, lovely story how it all came together Nancy so happy you found him. The bookcases look great thanks for sharing !!
Hey Sandra!
Thank you, me too!! :)
xo
Nancy
Great job on the bookcase…it looks fantastic! Congrats on adopting Ryder! When you lose a wonderful dog that you have loved for years, a new dog in the house has a healing quality for your heart! Of course, you will never forget the one who passed, but Ryder will make it a little easier to live with the loss.
Thank you Dorothy! You are so, so right. Thank you for the wise and thoughtful words!
xoxo
Nancy
Love the bookcase….do you have an idea of how much you spent in materials? Thanks for sharing!
Oh that is a good question Judi! Having done this over such a span of time, I don’t. BUT I will figure it out and list it here in the post soon!! :)
Nancy
I love the way these turned out. I have painted bookshelves around my fireplace and seeing the rosette and fluting you added gave me some great ideas on how to make it more special. You do such amazing work and I’ve taken much of your advice in my own painting furniture and decorating my home. Love your blog!
Aw thanks Michele!! :) Very kind of you to say!!!!
xoxo
Nancy
I forgot to tell you that I think your new puppy is adorable. I hear you about what a void they leave when they cross the rainbow bridge and how getting a new addition can be so healing. I did the same thing as you did, my rescue is now 10 but she was such a blessing at a time when I really needed her, we adore her. God bless you Nancy and your family.
Thank you :) He is a blessing, really.
Happy for you and your sweet 10 year old girl too!!
They are just so very special in their own, unique way!
xo
Nancy
MY first thought on seeing how you extended the cabinets from the wall and didn’t take the bookcases all the way up tight to the ceiling was, ‘what a cool way to make a secret compartment!’ I remember a bookcase that had lots of crown molding and the ceiling and the floor (all shelves, no cabinets) and the crown molding pieces were HINGED, with magnetic catches, which added almost an extra 2 shelves’ worth of space.
Your puppy is beautiful – what a face! my fur baby was recently sick and I’m just not ready to say goodbye – he’s all better but gave us a scare!
Oh that is awesome!! I need to do that!!! ;)
I love it!
And thank you, so happy your fur baby is all better!!
xo
Nancy
Wow, I am impressed, this project looks so “finished” and professional, besides being beautiful. Thanks for posting~ It is an inspiration for me~~~
Thanks so much Sue! :) So happy to hear you say that!!
xo
Nancy
This is EXACTLY what I have been looking for for my front room. THANK YOU!. Pinned and emailed to the hubby!
Oh yay! Glad you like it! :)
xo
Nancy
I know it took forever and a day to get this project done, but it was worth it! They look so good and your how to was very easy to follow! XOXO
Yes it was, thanks!! But never again that long!! ;)
xo
Nancy
Love the bookshelf and Ryder!! He’s adorable!!
Thanks so much Crystal! :) He’s a sweetie!
xo
Nancy
The bookcase is absolutely beautiful, Nancy! That’s really all I can say… just gorgeous! And Ryder… oh my, I’ve completely fallen in love with your new baby! I checked him out on Instagram… he’s just a little doll!
Oh, and if you think you’re too old NOW for a puppy… just wait until a few MORE years down the road when you have your first grandbaby! That’s when you will really feel old! :D
Enjoy your new built-ins… and especially enjoy that new baby! Kiss him for me! xo
Aw thank you Karen! :) Oh I bet!! But it’s hard work, lol!! Lots of women have babies later in life these days…I don’t know how they do it!!
And yes, I’ll give him extra kisses!!! I sometimes wonder if I get on his nerves will all my kisses…(I might kiss him nonstop ;) ) ….but too bad, he’ll have to get used to it!! lol
xo
Nancy
You guys did such a great job with this project! I know that it drove you nuts to have it partially completed for so long but boy-oh-boy was the wait worth it.
We want to do something similar to your project in our office. I’m definitely showing this to my husband and perhaps it will motivate him to get started on our project.
I love seeing your precious puppy. Enjoy him!
Thanks Paula!!! It may not motivate him since it took us so long!! haha
BUT the project is so do-able and can really be completed in a reasonable time frame.
And thank you, he’s a love bug!! :)
xo
Nancy
Question on the length of the shelves that you made. We have a space of 48 inches and would love to make one solid shelf but are afraid that may be too long and not have enough support. What is the length of your shelves? What do you recommend the maximum length being? Have you had any issues with heavier objects bending the shelves?
Hi Kevin,
Ours are 48 inches in between. We’ve had no issues with weight or bending. If you use thick enough shelving, that should not be a problem. Also, we created a “box” and secured it from the sides and back before securing it to the wall.
There are 2 ways that I suggest doing it.
One, you could build a “box” sort of like we did with a frame for the shelf to be secured too. Basically, take two side panels of wood and secure your shelf to those with screws from the outside. Then add a back panel of wood and secure your shelf to those with screws as well. Then place that inside your opening and secure it to the wall with screws. Fill the screw holes, caulk and paint.
Second, you could skip the wood panels and just add the shelf to the wall and side walls using a Kreg Jig. Using a stud finder and the Kreg Jig, screw up into the wood shelf and into the stud to secure.
Hope that is helpful for you!!
Nancy
I am IN LOVE with this bookshelf!!! I have been looking for a detailed how-to like this for a while. The hubby and I are going to attempt it! I have a question for you about tools. We have drills and hammers and a circular saw but I am wondering if we will need a table saw and/or a miter saw? Thanks again for the fabulous tutorial!!!! Also, Ryder is so adorable! We have 2 goldens and I just love love love them. I followed Ryder’s Instagram! I miss them being puppies!
Hi Luella!!
I am so sorry I missed this comment! I received a new comment on this post and I then saw yours. So, yes, a miter saw would be a good addition for this project.
And thank you for the sweet comments about Ryder too! :) Again, sorry so late in replying! xoxo
Hi. What was the point of leaving space between the wall and cabinets? I’m a new diver and just want some clarification before I tackle a project like this. BTW, your built-ins are magnificent!!
This tutorial is so helpful! I like your idea of extending the cabinets out an extra 4-5 inches. What did you do inside with the shelving to prevent things from falling down the back?
Hi Bri!
So glad it’s helpful to you! :) Only the bottom cabinets are extended out. They are “wall” cabinets so are a bit skinnier. I wanted to have the bottom stick out further than the top shelves so we moved them out a bit. The tops are against the wall. Hope that helps! :)
Love your bookcase
I can see why it took so long to get at it
You had nothing important to put into it
All that work for what
I am sure you will come up with a useful space
Love your dog
I had one like it but had to give it away
Hi Cecile,
Thanks so much! Actually, I consider what I have in our bookcase quite important. I have photos of my paternal grandmother, maternal grandparents, my parents, my children, etc. I have rare, very old books (from the 1700s & 1800s), our Bibles, a special wedding gift given to us 26 years ago and quite a few other things that have special meaning to us. Wouldn’t you consider those things important?
Sorry you had to give your dog away!
Nancy
Love your puppy. I have a Golden too. They are the best dog ever!
Thank you! and I so agree! :)
Using this design as inspiration for my daughters room. When you secured the bookcase to the wall, did yo just secure them to the sidewalk and each other? Or did you secure them to the back wall? Just wondering how I could accomplish that. I am using hardboard backing on my shelves.
Hi Scott,
They are secured to the back and sides. If you look at the photo of the shelf assembly outside, you will see the top pieces extend above the top shelf. A small board was nailed to the back of that just above the top shelf and then nailed to the wall in the studs. Then the side pieces (also up above the top shelf) were nailed into the side walls. That area above the top shelf where those boards extend were covered up with a 2 boards and crown molding so you don’t see it. But it is very secure this way. :) I hope that made sense.
Thank you so much for the detailed tutorial! I am going to start this project tomorrow. Using cabinets is a great way to get a head start! I have a question. How did you attach the trim pieces? Glue and nail gun? Thank you!
You are so welcome, Amy! :) Yes, we glued and nailed in the trim pieces. (And caulked and caulked. Caulk is king ;) ) Good luck on your project! I know you will love it, it made a world of difference in our room and we enjoy having it so much! xo
Thank you for the detailed tutorial. Of the hundreds of similar tutorials on Pinterest your presentation and pictures proved an inspiration. I just finished my small office space and pleased how it all came together. Thanks! for inspiring me.
So happy it was helpful to you! :)
Thank you for your level of detail! I have had this pinned for months and finally pulled the trigger for our office. We modified it for our space and availability and it was totally worth it. So satisfying :D
That’s so great to hear! Thanks for letting me know. So glad it worked out for you and your space. :)
Was there ever a cost figure? Sorry if I missed it.
Hi Melissa, no, I don’t think you did. We did this over a span of a year or two and so I didn’t keep track of it. I will try to get an approximate cost and update the post!
Nicely done! I know this is about 6 years after the fact – but I’m about to update our fireplace, wrap the upper half (brick) with sheetrock and build in custom shelves on each side. Nice to see the way you tackled your project. Looks great.
Jon
Thanks so much, Jon! Good luck with yours, sounds like it’s going to look great! We have really enjoyed ours.
Real curious about the cost of the project. I have a wall in my finished basement that would be prime for this sort of treatment!
Sorry we don’t have it broken down in price but do have what we used listed. Pricing would probably be different today than when we did this project though. I can tell you, we saved a bunch using cabinets from the Lowe’s and doing it ourselves. Wouldn’t hesitate to do it again. It added a lot to our home, aesthetically and storage-wise. Our daughter just moved into her first home, we are even thinking about building one for her similar to this. I think your finished basement would be a great place to build this!
Hi, I’ve been working on a similar project for 4 years (many delays due to anxiety and analysis paralysis). My husband’s books have been in storage this whole time :(.
Base is done, time to bite the bullet and get the shelves done.
I have one thing I can’t figure out. I want to pre build the cases like you did and then set them on the counter instead of stick-building in place. But to do that means double support sides/verticals for the shelves in the middle since each case would have a side and I would be placing them next to each other. That would mean a thickness of about 1.5 inches if I’m placing two pieces of 3/4 in plywood side by side.
1×2 trim is milled to slightly less than 1.5 inches – so it seems like 1×2 trim might not totally cover the inside verticals? Did you have any issue with this?
I had so many issues with trim sizes doing the base that I’m afraid to start the shelves until I get this figured out. I hope this question made sense. I know it’s been years and years but you did a beautiful job and explained so well that yours is the post I keep coming back to. Can you please help? If you remember from so long ago?
Hi Joni! I totally understand! Here is what my husband said: “A nominal 3/4-inch plywood sheet actually measures about 23/32 inch (approximately 0.718 inches or 18mm), slightly less than its labeled size due to sanding during manufacturing. This slight difference from a true 0.750″ is standard. Each bookshelf uses 3/4 inch plywood on the sides and on the shelf. When those are placed vertically side-by-side, it will be slightly less than an inch and a half. If you take two pieces of 3/4 inch plywood, which are actually 23/32 inch that comes up to 1.4375 inches which is slightly less than 1.5 inches. So the 1 x 2 covers the 3/4 inch plywood pieces. Reach back out if that needs more explanation.”
I hope that helps! If you need anything else or don’t understand any of that, please do let me know!
Nancy