Beach Condo Update (and how to remove popcorn ceilings)
I’m sharing an update on our beach condo today (and how to remove popcorn ceilings!).
Hello beautiful friends!
We have been busy, busy, busy the last two weekends at the beach condo so I thought I’d give an update of all that we have been doing.
If you follow along on Instagram you’ve seen it all! ;)
If not, let me show you a little bit below.
But first…if you missed how it looked “before”, check out this post >>> here.
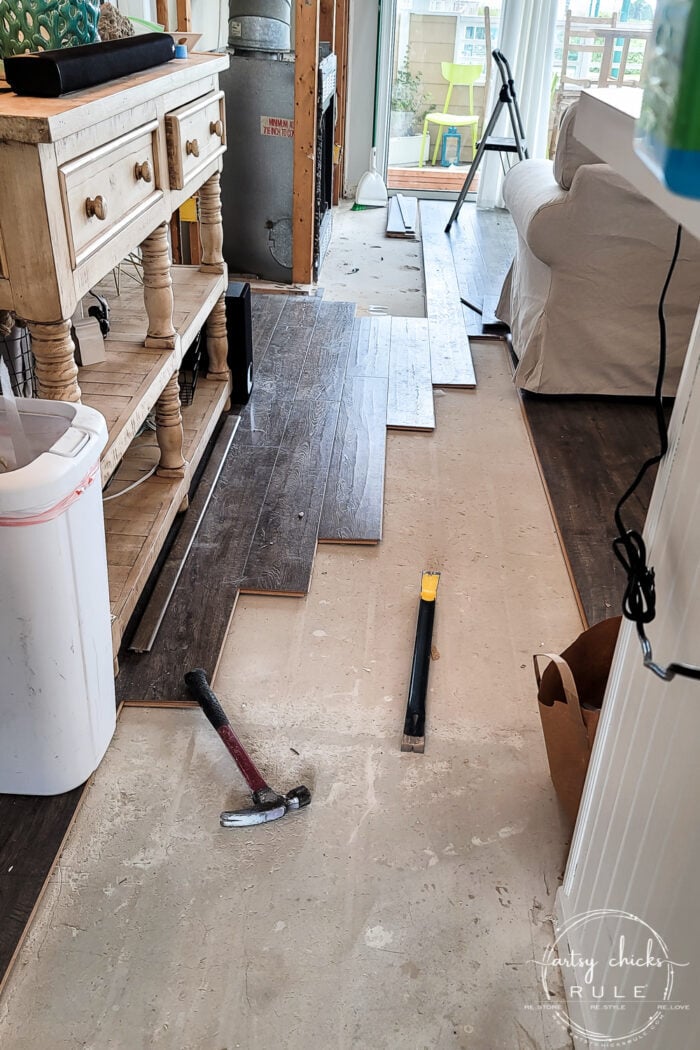
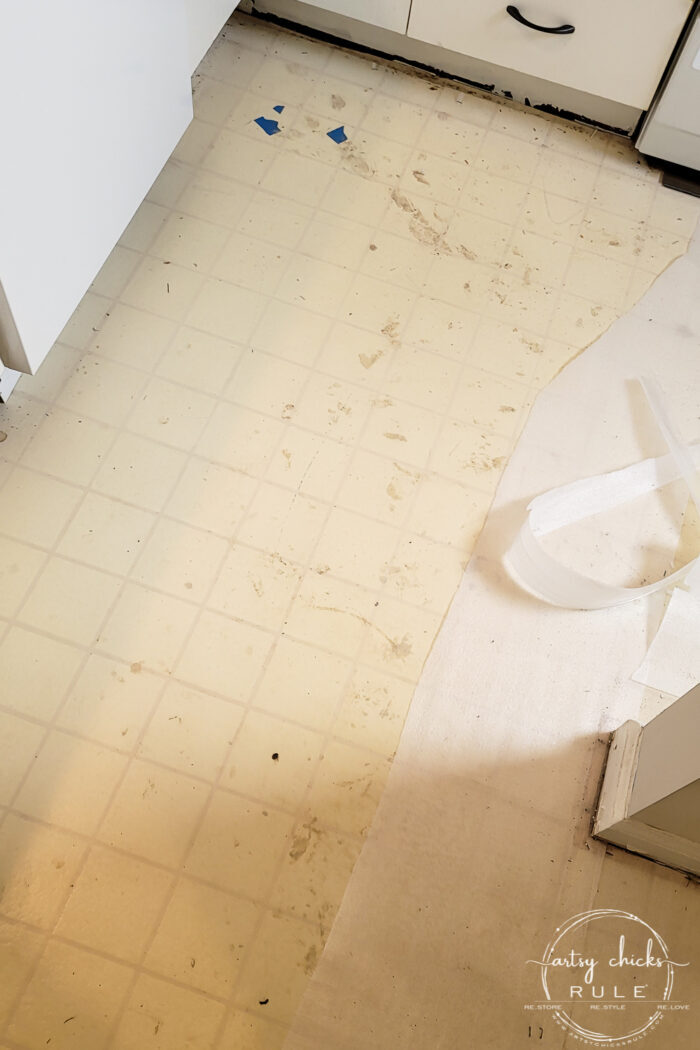
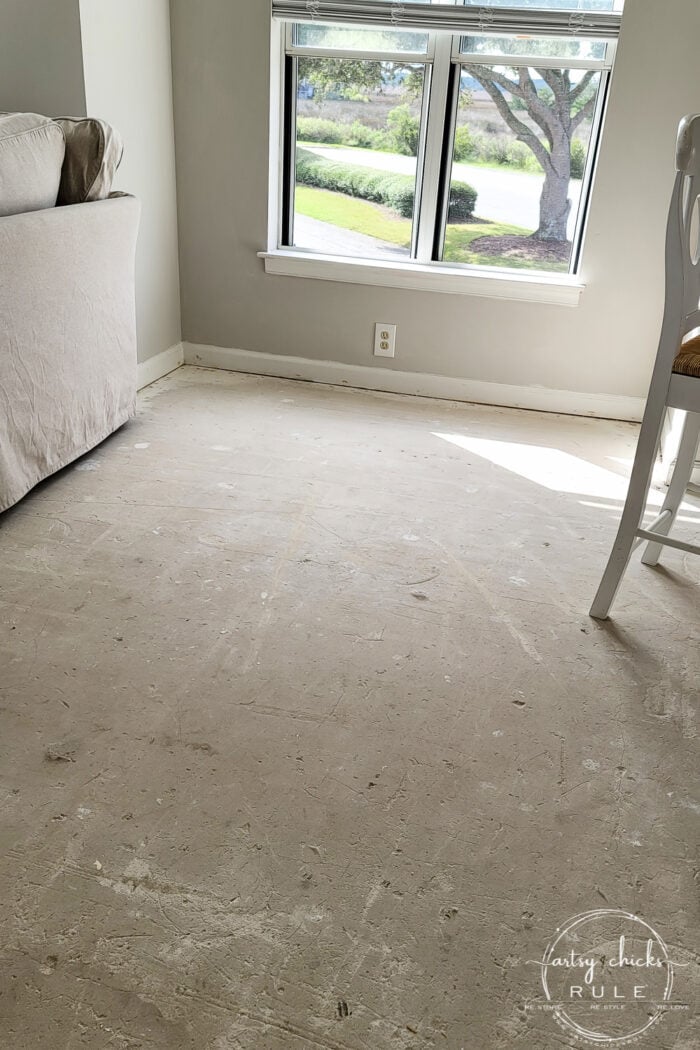
We have removed all flooring…new and old. (even the original 1990 vinyl underneath) We gave the good flooring to our HVAC person which worked out well. Hate to see it go to waste! And so glad he could use it.
The 90’s vinyl underneath.
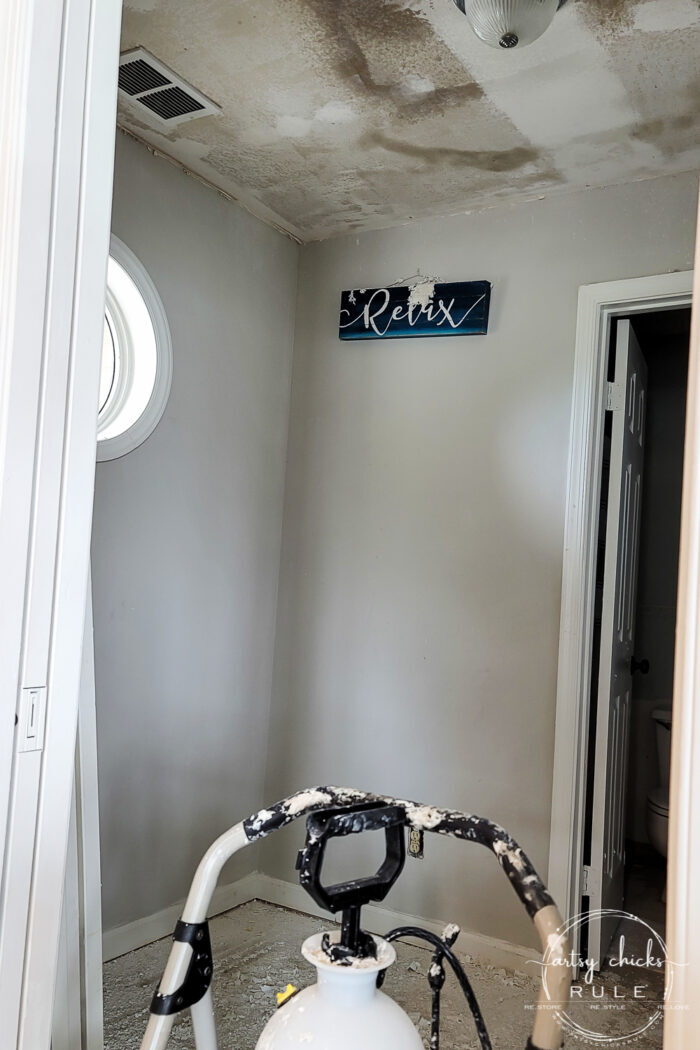
So glad we removed it all because we found some mold in the bunk room.
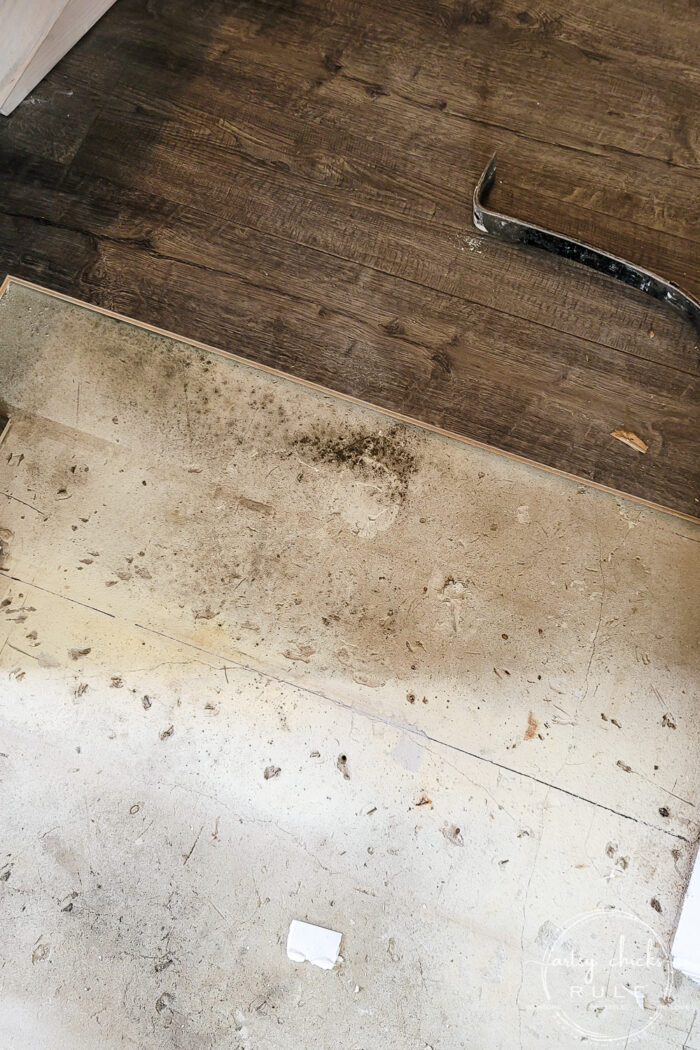
Yuck. (the washer and dryer are in here…to the right over there where it looks like it came from…so I’m guessing a leak at some point)

We treated it with mold killer but we wouldn’t have even known it was there unless we removed that flooring.
Now we start with a clean slate.
I can not wait to share the flooring that we are planning to put in here.
I’m so excited about it! Stay tuned.
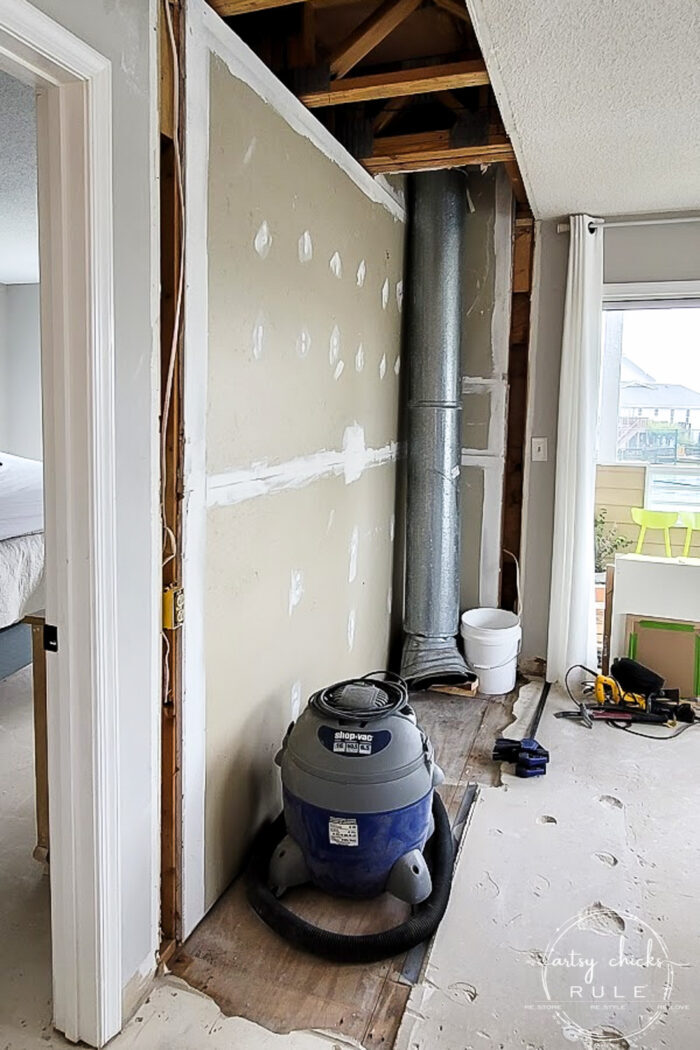
AND…we removed the fireplace and wall around it.
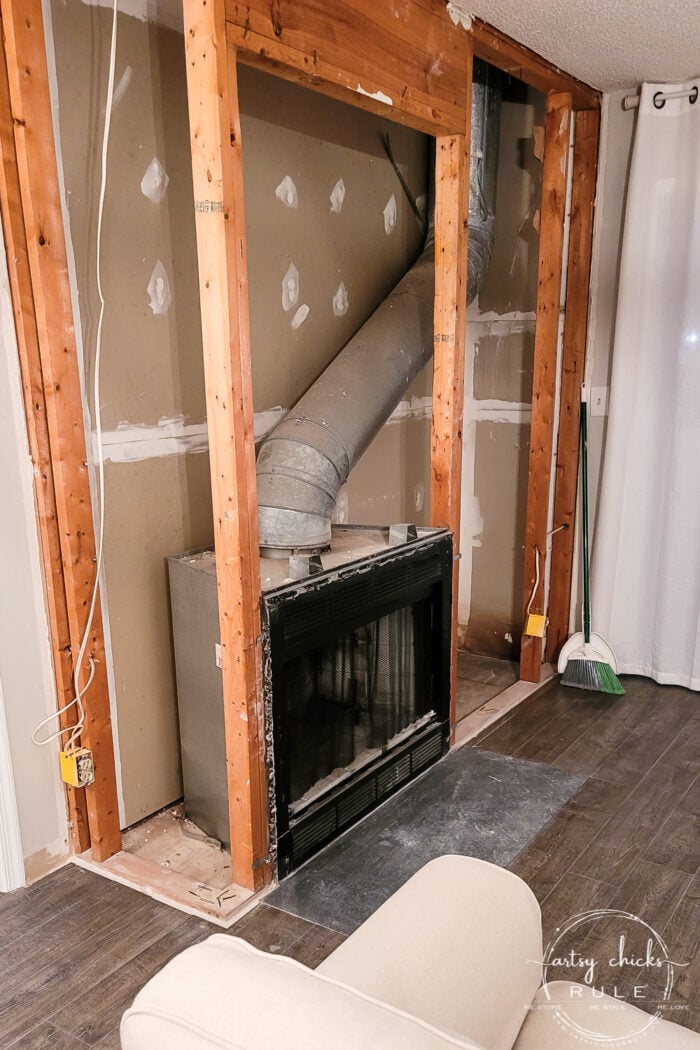
WOW, how different and more open the room feels now.
I love it!
We did have a small issue…a leak so we are having to wait to get that fixed before we can really proceed there. (so glad we opened up that wall and found it though!)
You can see it in the corner there (above photo). The darkened areas on the floor and wall. We noticed that and then it just so happened to heavy rain that night…and plop, plop, plop came the water. It’s a small leak, thank goodness, and probably why it went undetected.
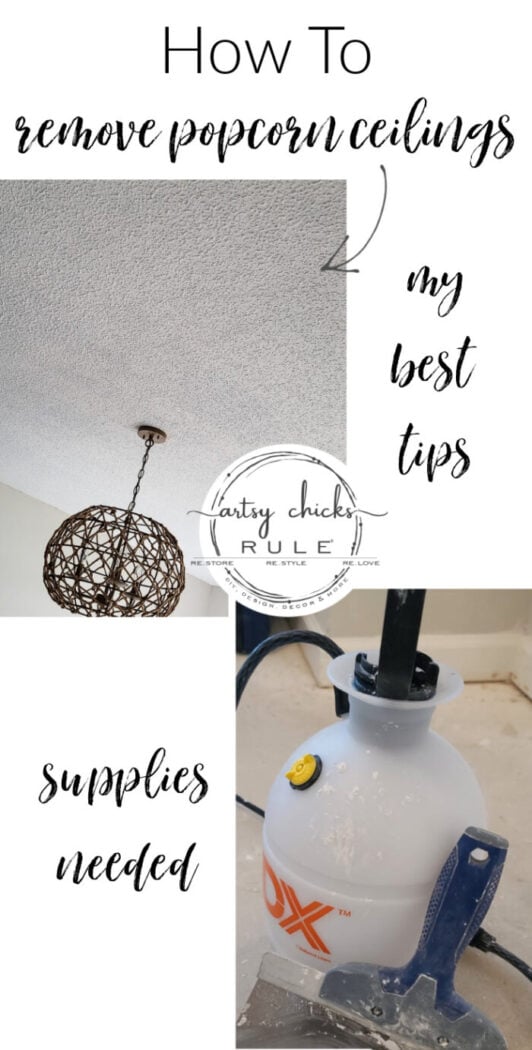
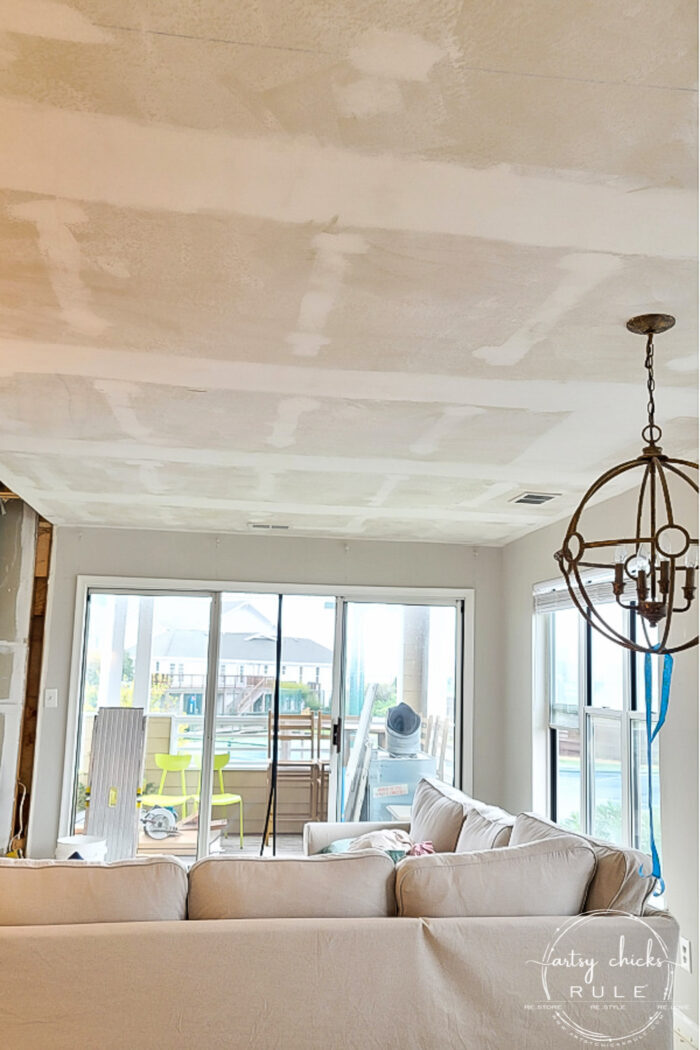
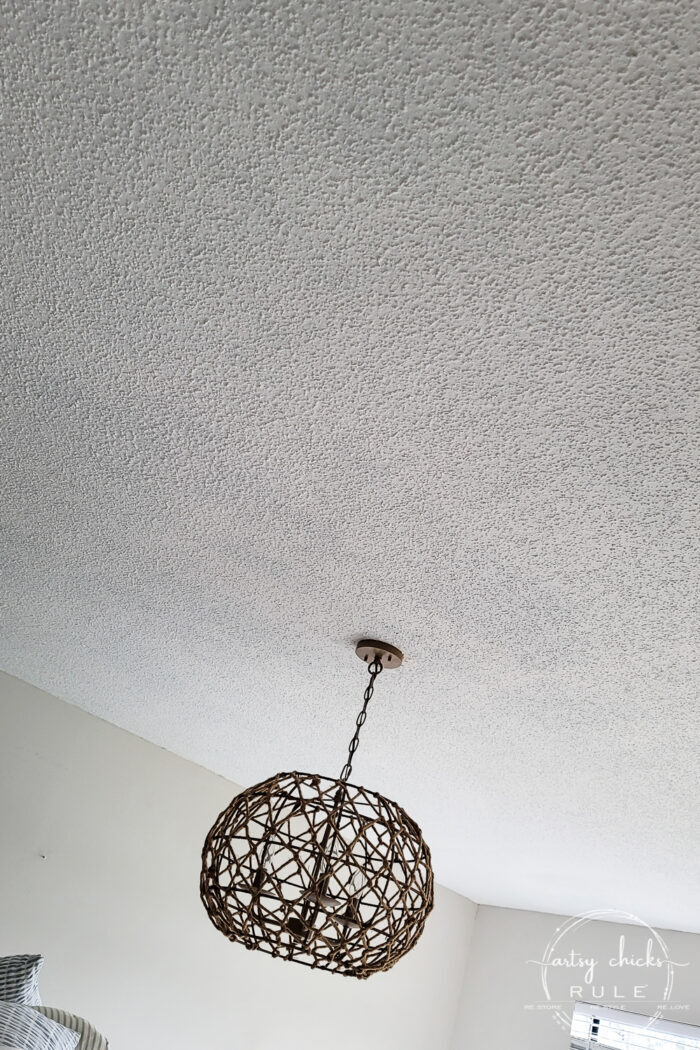
But we did get another thing done instead…removing all the popcorn ceilings.
………………………………………………………………………..
I had a bunch of people message me about how to remove popcorn ceilings. I’m no expert but I thought I’d share here how we did it and a few tips.
It’s a job…and a messy one at that. So glad it’s done!
So be prepared for the mess.
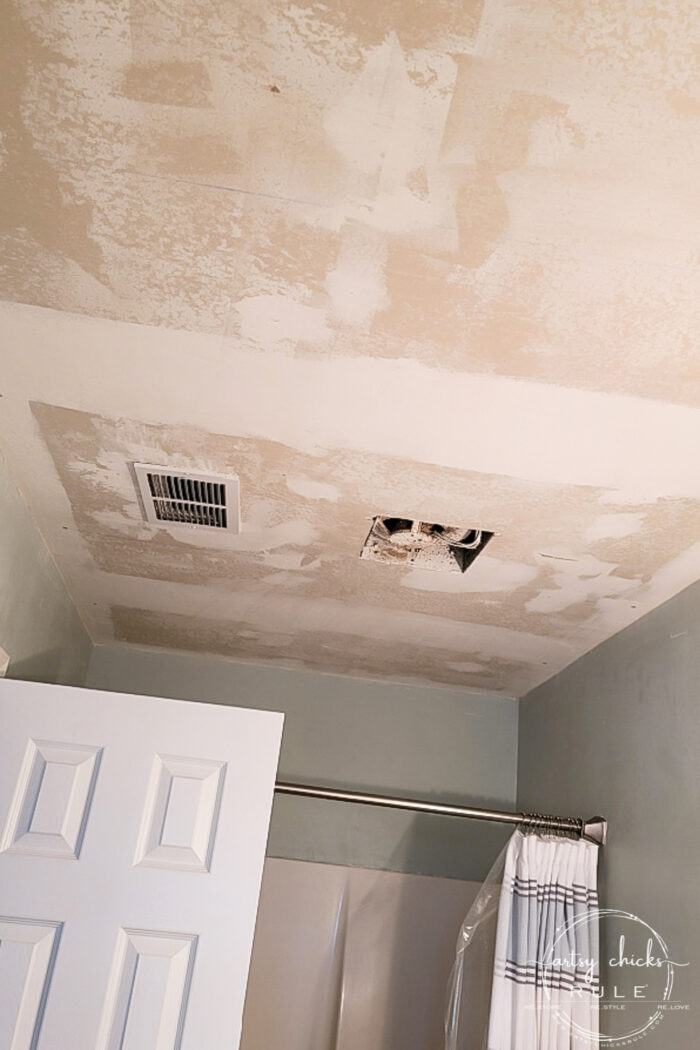
But what difference it makes.
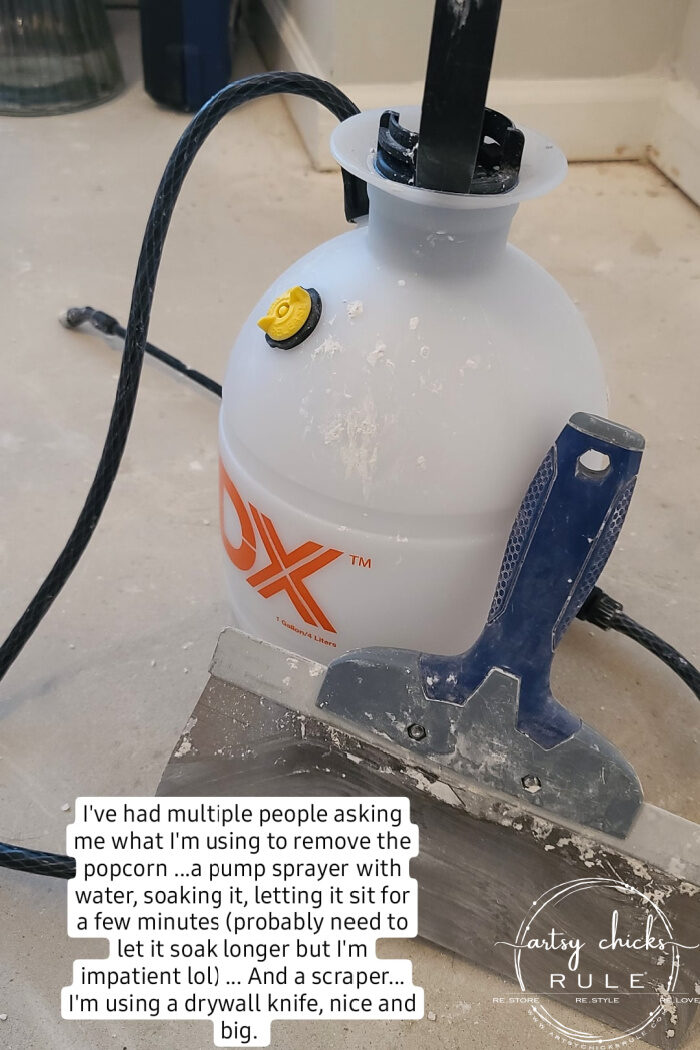
What you’ll need to remove popcorn ceilings:
- Pump Sprayer
- Drywall Knife ( or other similar scraper)
- Step Ladder
- Plastic Drop Cloths
- Tape
- Pole Sander (and pole)
- A whole lot of patience! ;)
NOTE: If your home or condo was built before 1980-ish, you could have asbestos in the popcorn ceiling. Keep that in mind and hire out, if so!
Steps to remove popcorn ceilings:
- Be sure to cover all of your furniture, cabinets, counters, floors, etc with plastic drop cloths before you get started. Use tape to attach it to the wall, cabinets, etc.
- Work in small-ish sections (4×4, 5×5 etc) spraying to wet the popcorn ceiling. You want to saturate it pretty well but not soaking.
- Let it sit for a few minutes before scraping. If it feels like it has dried give it another spray.
- Be careful not to gouge the drywall underneath.
- Once done and dry, go back with drywall mud and cover any gouges or imperfections.
- Lastly, sand any areas that need smoothing (patched areas, rough areas, etc) to ready it for painting. Use a pole sander to do this.
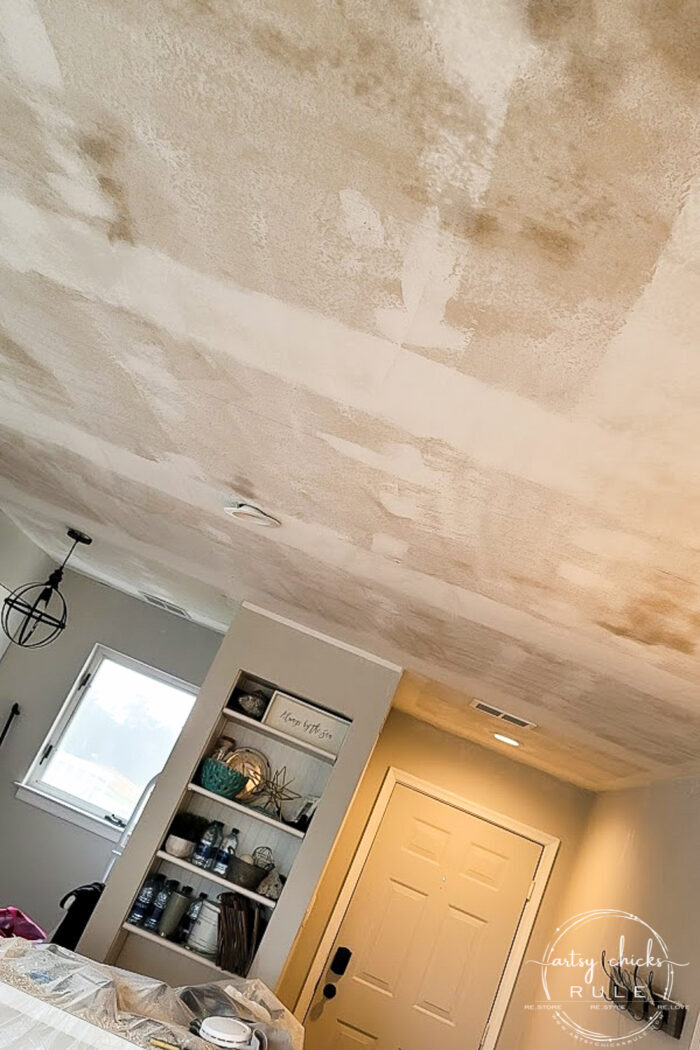
We’ll be sanding and hopefully also painting this ceiling this weekend.
TIP: Be careful not to spray electrical lighting etc. Tape around them to protect them. Cover and/or tape anything you don’t want to get covered in popcorn ceiling debris. (it will go everywhere)
TIP: I have read that you can use a dash of dish soap (and someone even mentioned vinegar to me) in with the water to help in the removal. I did not use either of these so cannot say whether it helps or not. We had great luck with water only.
Except in the bedroom.
We ended up not removing the popcorn in the main bedroom because it was painted over several times and was an absolute bear to remove. The water just dripped off, it did not soak in. Once it was scraped (which only knocked the tiny points off) and sprayed again, the water was able to get underneath a bit and it came off but it was a lot more work than the rest and wasn’t worth the effort.
So in this case, you must either suck it up and use that elbow grease or decide to do something else. (as in not remove it but cover it up)
Thankfully none of the rest of the condo ceiling had been painted. We are going to do something else on the bedroom ceiling instead…maybe some sort of ceiling planks to cover it up.
Stay tuned for that!
TIP: As I mentioned already, it’s a very messy job. One thing that kept me sane and kept the mess down a bit was cleaning up little by little instead of all at the end. For example, I worked from one end of the room to the other. Once I had finished about 1/3 of the space I swept, cleaned up, removed plastic-filled sheets, and then moved on. It made it so much more manageable. Once done I went back over the whole floor with the shop vac to get anything I might have missed.
ALSO…it’s much easier to remove when it’s still damp than when it dries and re-sticks to things.
………………………………………………………………..
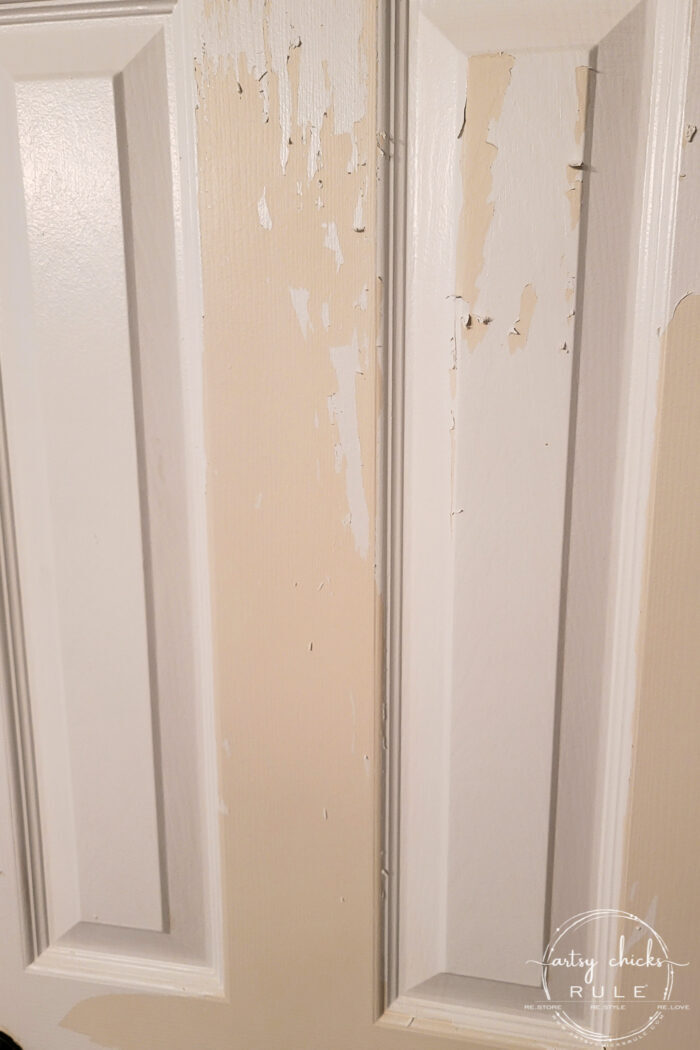
And lastly, I’m still trying to decide what I’m going to do about these doors (we have 9 to redo) with the peeling paint. I think they possibly painted over oil-based paint without a primer and it’s all peeling off terribly. (and all the trim too…ugh) I have a few ideas and suggestions I’ve been given to work with this. We’ll see how it does. I’m going to test out a thing or two when we go back down this weekend. I’ll let ya know! (watch my Instagram stories as I’ll surely share there)
More home DIY tutorials we have shared here:
- DIY Faux Shiplap (get the look, without the expense!)
- DIY Faux Board & Batten (simple and quick!)
- How To Make a DIY Wood Countertop
- Build Your Own Kitchen Island With Big Box Store Cabinets
- How To Install Laminate Flooring (tips and tricks)
- DIY Crown Mold (easy way to get that wide custom look!)
- Build Your Own Built In Bookcase – Tutorial
- Chalk Painted Kitchen Cabinets
- How To Use Gel Stain On Your Stairs
- How To Paint Light Fixtures Without Removing Them
- How To Build a Permanently Attached Wall Coat Rack
- DIY Floating Shelves Tutorial
- How To DIY a Tile Backsplash
- How To Build a Custom Closet
- Remove Popcorn Ceilings The Easy Way(you are here)
- How To Remove Peeling Paint
- DIY Wood Mantel
- How To Paint a Tile Floor (it works!)
- How To Hang Peel and Stick Wallpaper
I hope you will enjoy following along with us on this remodel. I’m so excited about the plans we have for it and I can’t wait to get it done!
I’ll see you back here on Thursday with our porch all decorated for fall. I don’t usually do a whole lot of decorating on our porch so this might be the most I’ve ever done. I am really enjoying it all dolled up!
See you then.
Have a great week!
xo


")


It is important to note that if your condo was built in 1979 or earlier do not remove the popcorn ceiling on your own as asbestos is in the ceilings. After 1979 the laws were changed and asbestos was not used so you must hire a professional if built prior to 1979!
Yes! I actually meant to include that as I was writing but forgot. That is very important to note, for sure. Am editing my post now. Thanks for the reminder! :)
Nice to see your updates in the condo. Don’t envy you having to remove the popcorn ceilings. We recently updated our 70’s style home and that included the ceilings. After looking over the outrageous estimates, my husband decided to tackle the job himself. We followed the same method as you, but attached a plastic bag to the scraper. It really cut down on the clean up. So satisfying to have a smooth, clean, ceiling with fresh paint. Looking forward to seeing more of your updates!
What an undertaking! Smooth ceilings make such a difference! I love seeing your progress. Ya’ll surely do have a lot of patience! Thanks for the suggestions and ideas you share each week.
Yes!! It’s a bit of one, for sure. But the smooth ceilings are night and day! :) xo
Wow you guys have gotten a ton done! Good thing you decided to make those changes and found the leak and the mold. I am enjoying seeing the progress…it is going to be beautiful! XOXO
Yes!! It’s a little overwhelming at this point but we are working through it!! haha xo
Wow, I admire you tackling all that hard work! Definitely a labor of love, and I’m sure it will be a beautiful space for your family to enjoy when you are done. Look forward to seeing how it turns out!
Thanks, Vicki! Yes, a labor of love and you definitely have to see the “end” while doing it or it’s likely I’d walk out and say bye!! haha My sister came by to see it this past weekend and I don’t think she could leave fast enough! It’s a mess with the gypcrete (very chalky and messy) floor, sanding the ceilings, and that mess with everything covered in plastic, etc. I know it looked overwhelming, to say the least. Can’t wait to finish up (and at least get that floor covered back up…yikes, I’ve never dealt with that stuff before) xo
Loved this post! We are in the midst of doing the same thing except at our farmhouse! Thank you! Ready for the next post! Good job! 👍
Hi Renee! Oh how fun! (well, you know what I mean ;) ) Good luck with yours! xo
Wow! This brings back so many memories of the days when my Dad and I actually sprayed acoustic aka popcorn ceilings in people’s homes in the early 70’s. Who knew it was destined to become undesirable?! It was much easier going up than down! I love “watching” your progress!
Yep. That’s what my parents did in their house — which is my house now. I remember it was the thing to do back then. Bonus: the handyman added sparkles to the popcorn in my room. Lol.
Your condo is gonna be great! Another thing you can do if you have popcorn ceilings is to cover them with drywall, shiplap, tongue & grove, or beadboard. I should take my own advice as I have popcorn, too!
Looking like a LOT of work, don’t forget to add an electrical outlet where the fireplace was, I hate having to use extension cords! I am so glad you are recycling what you can (flooring)! Congrats to both you and your husband for doing what you can do!
It is!! But will be worth it, I know. (keep telling myself that! ;) ) And yes!! We actually are doing exactly that because we are putting our tv up there on that wall. Thanks, Mary! xoxo
I noticed the scaffolding! Huge difference using the scaffolding to remove popcorn ceiling!! Both of my daughter, a boyfriend, my sister and I helped remove the popcorn ceiling prior to moving into a new condo!
August and prior to air being turned on!!!
We looked like nasty snow people !!
But we got it removed!!!
Clearly you know how to have fun!
Oh yes!! haha And oh my gosh yes. I walked into the bathroom and looked in the mirror with my white hair, etc. Such a mess, wow! xo
Great update! I love seeing your progress……making changes is so rewarding! We used faux tin ceiling panels (plastic_ in our house. Light/easy to put up and they look great! The company is ceilume.com. Good luck!
Yes, it sure it!! Especially once they are finished! ;) Oh, that sounds so amazing, I bet they do look great! Will check them out. Thanks! xoxo