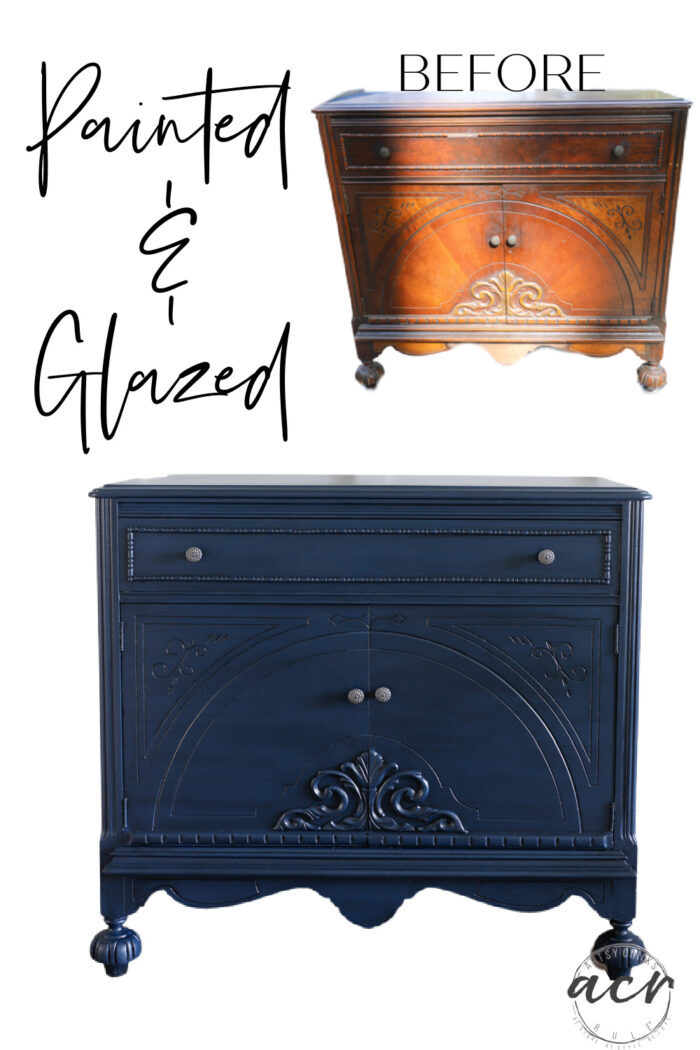
Antique Cabinet Makeover

This antique cabinet makeover got a gorgeous color, Willowbank, and some glaze to top it off and provide depth! A little surprise inside too!
Hello wonderful friends! Today is Trash to Treasure Tuesday and I’m so excited to share this long-time-coming makeover!
I actually found (I think it was the ReStore) this one almost TWO YEARS ago. What?!
Yep!
I started on it and life happened and it got pushed to the side (and buried in the garage, haha, so I couldn’t get to it!).
But we unburied it and cleaned out the garage a bit and decided it was time to finally her done! (and get some space back in my garage)
I’ll be sharing this makeover in 2 parts since there’s a lot I want to share on this one. I replaced trim (I’ll be sharing that part on Thursday so be sure to check back for that), repaired chipped wood, painted, glazed, decoupaged the drawer and shelf, etc. So lots to see and talk about!
Don’t forget to scroll all the way to the bottom to see what my friends are up to this month for Trash To Treasure too!
Antique Cabinet Makeover
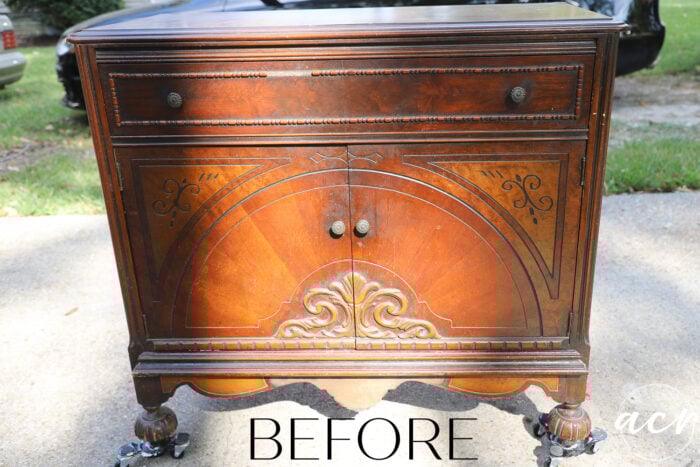
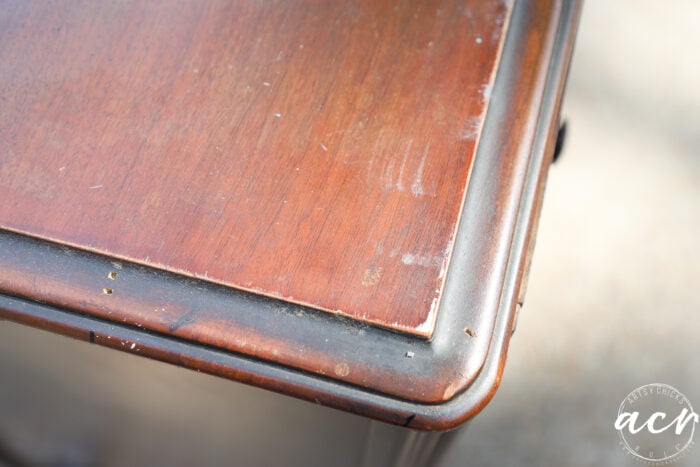
This is how it looked when I found it.
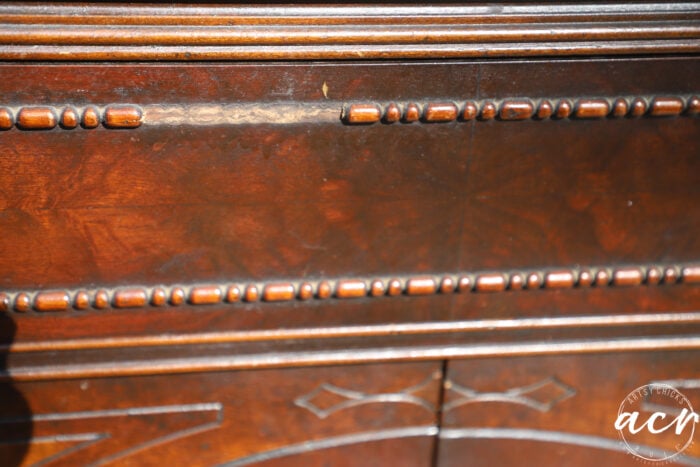
Missing trim in two places. (on the drawer and the very bottom trim)
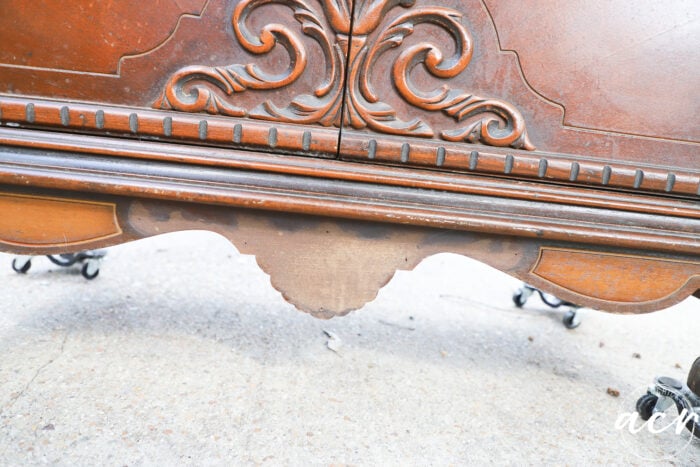
I didn’t really think I’d miss the bottom trim once it was painted so just filled the nails holes and left it as-is.
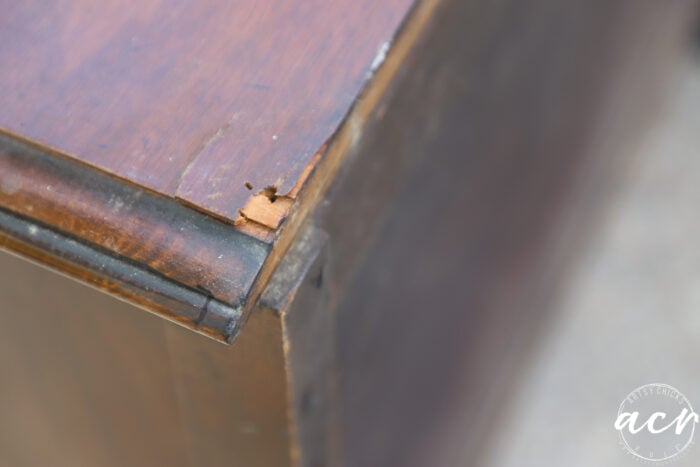
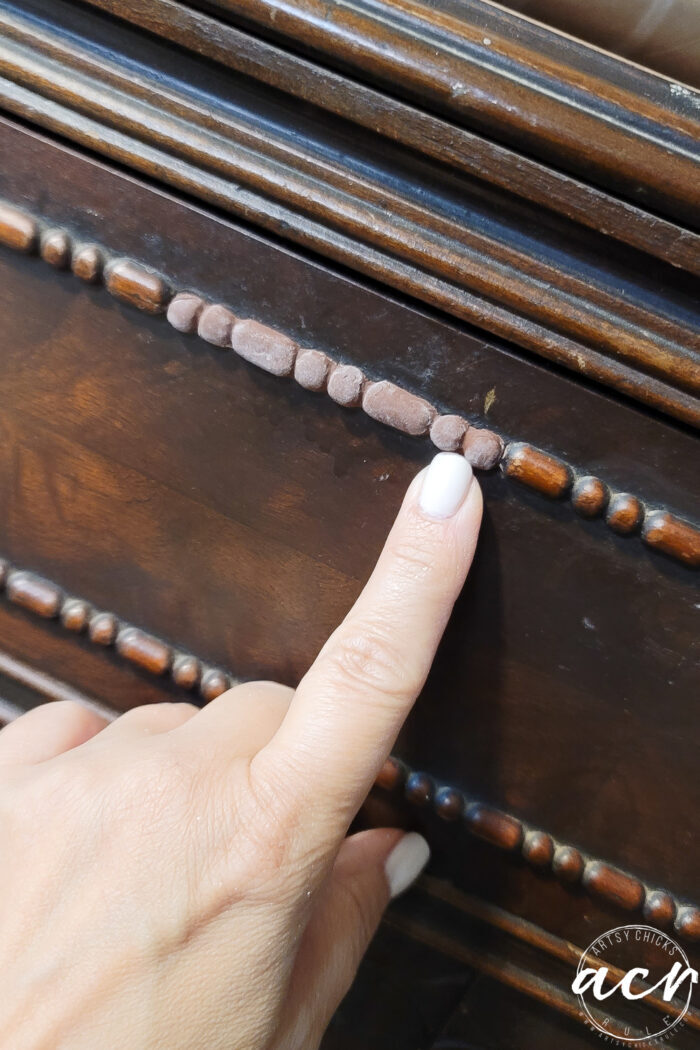
But still had lots of imperfections to be repaired/filled.
Loose veneer…
Nail holes all the way around the top…
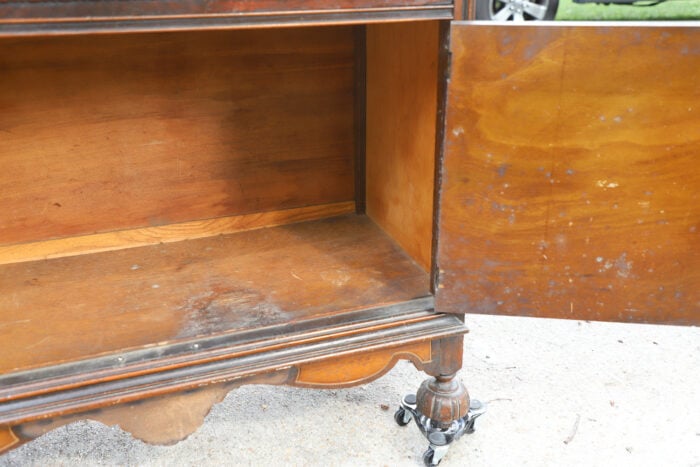
Inside was looking a little rough.
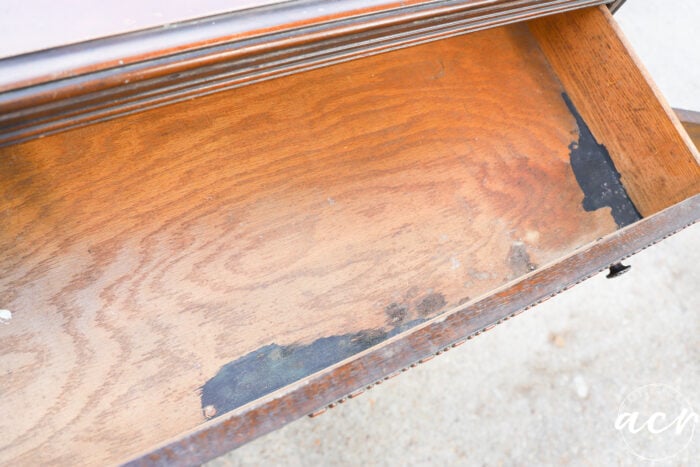
Ink stains in the drawer…
Step 1. Clean
I used TSP Alternative to wipe it down all over.
Step 2. Fix and Repair
I glued loose trim and created trim to replace what was missing. (see my post coming up on Thursday)
Step 3. Paint Exterior & Interior
I used a new color in the shop! It’s gorgeous!
So pretty!
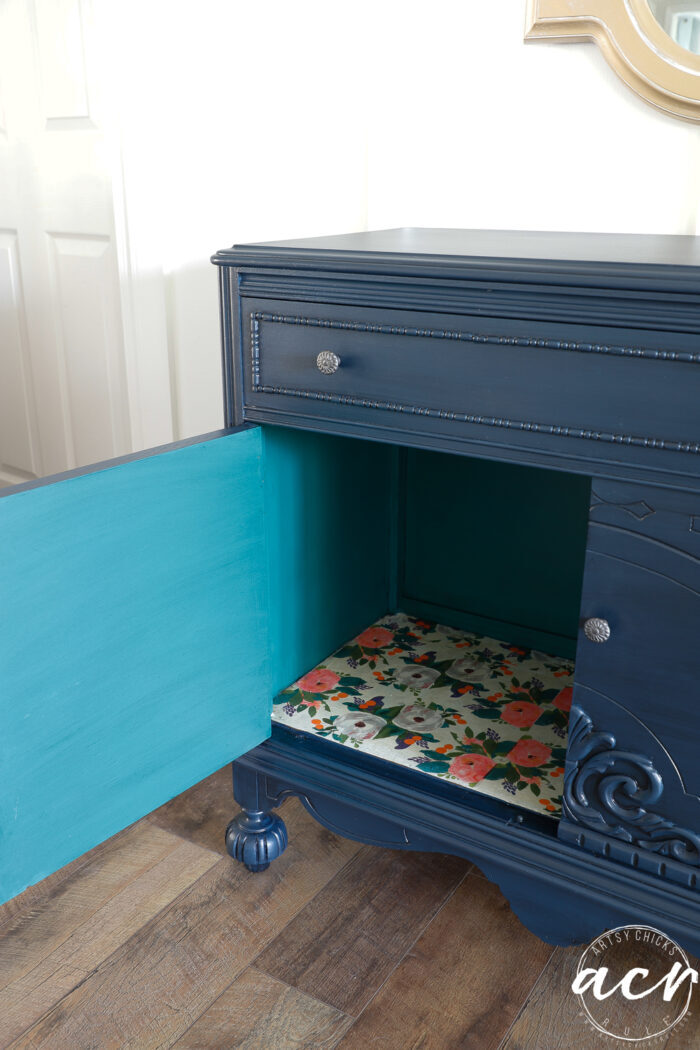
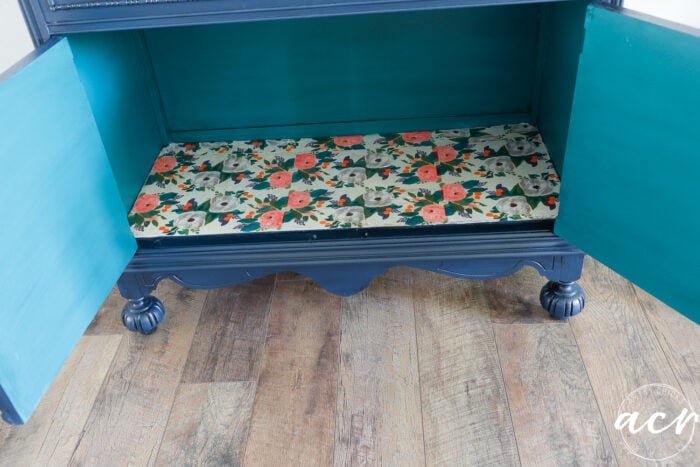
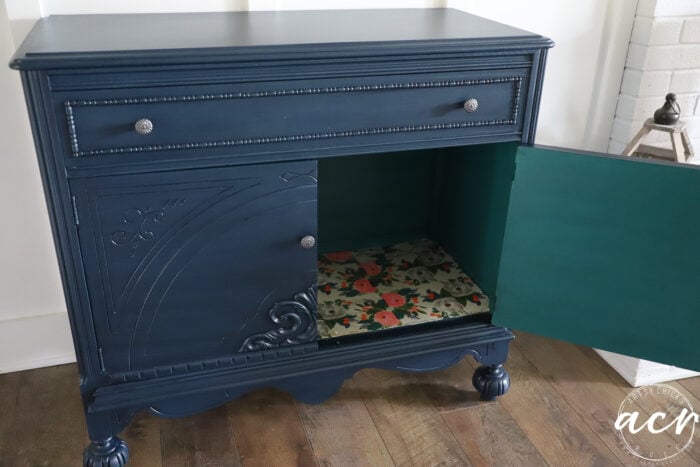
I painted the inside with Renfrew Blue for a fun pop of color!
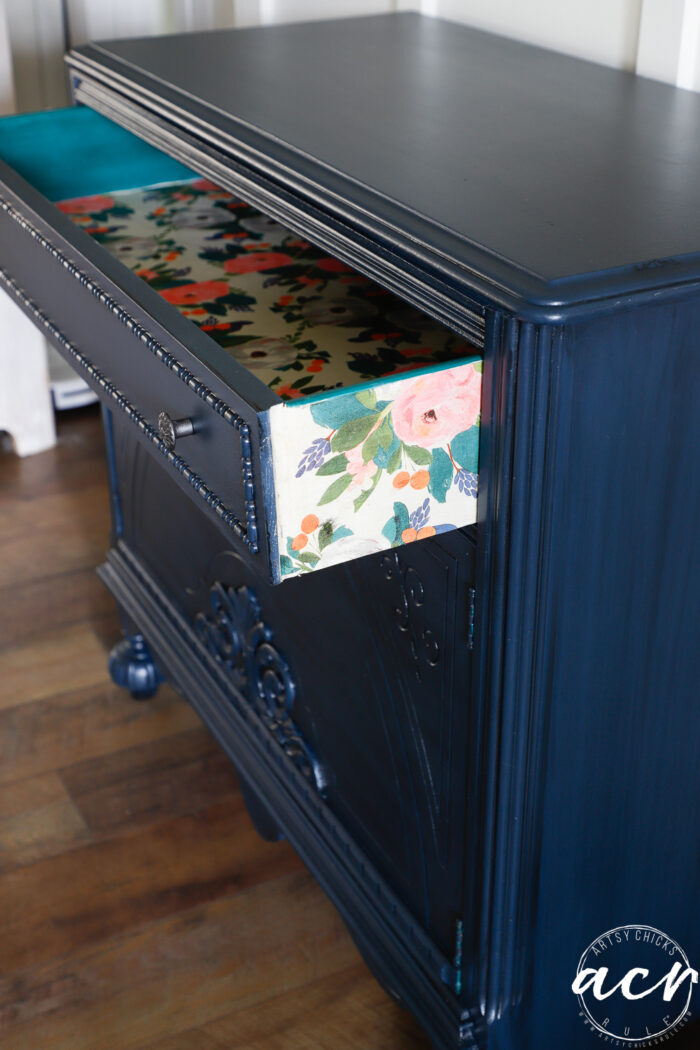
Step 5. Decoupage
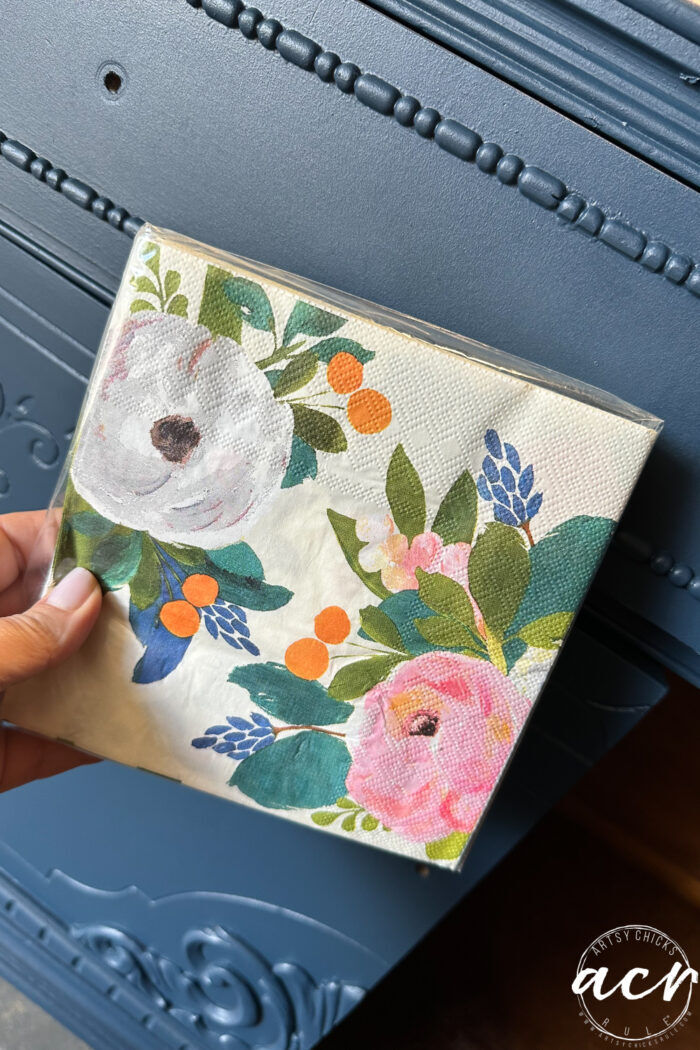
I found these pretty and colorful napkins here. That is actually how I decided upon the interior color. Some of that same color was in the napkins I chose along with the pretty blue shade.
I decided to line the drawer and inside cabinet both.
I used our Decoupage & Transfer Gel to attach the napkins.
Step 5. Seal Decoupage
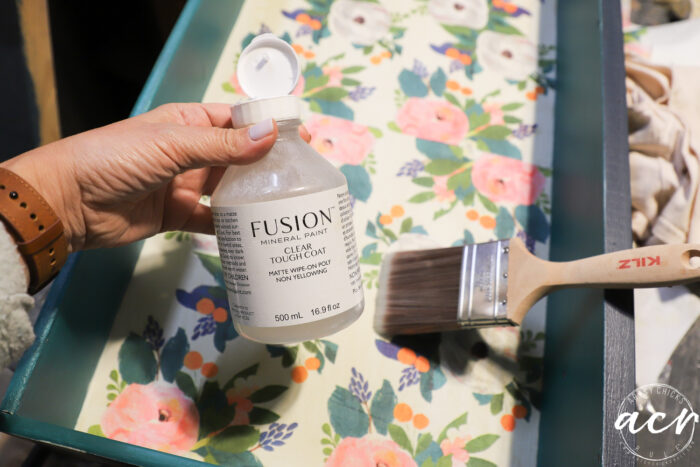
Once that was dry, I finished the decoupaged areas with a coat of Clear Tough Coat Topcoat.
By the way, I used Shellac Zinsser primer to seal the ink stains in the drawer and base of the cabinet. I painted the drawer and base of the cabinet in Raw Silk before decoupaging which matched the cream color of the napkin perfectly.
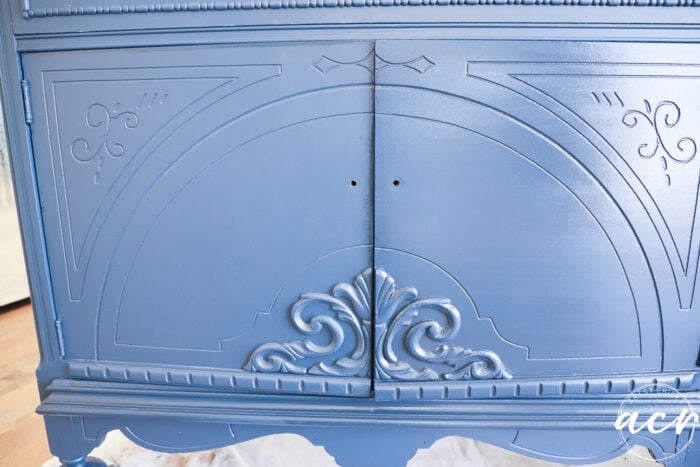
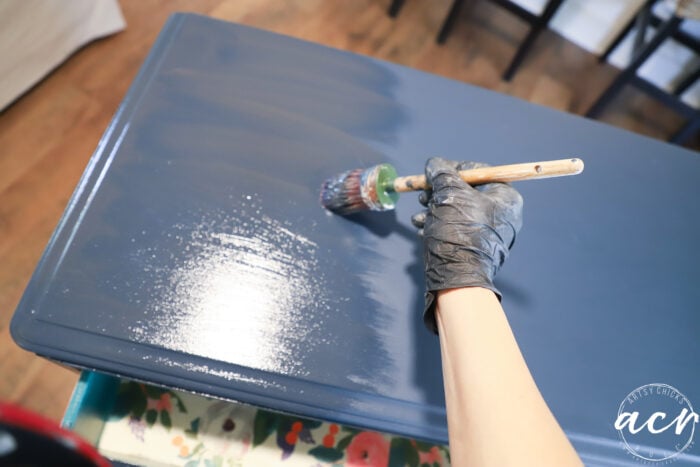
Step 4. Glaze
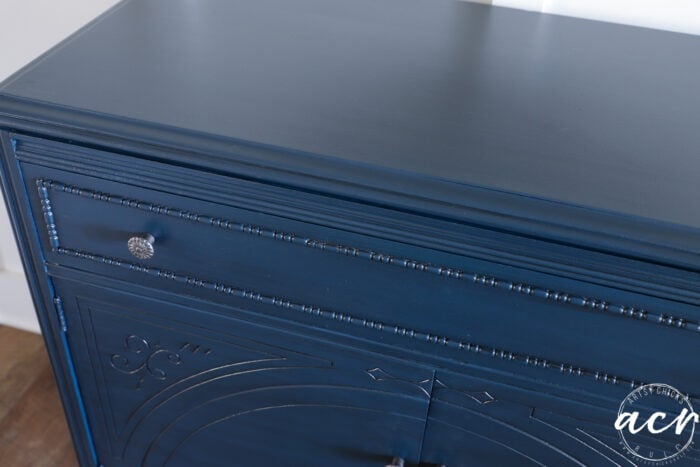
But I wanted to give it a little depth so I glazed the paint with a tinted black glaze I made.
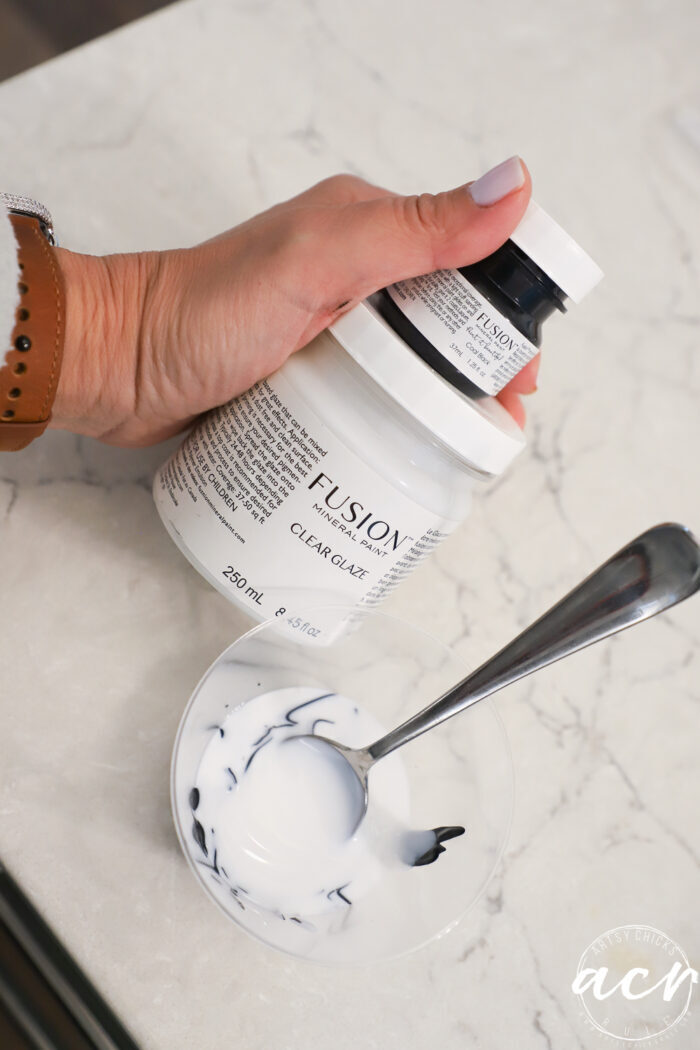
I used Clear Glaze and Coal Black Paint, 3 parts glaze to 1 part paint.
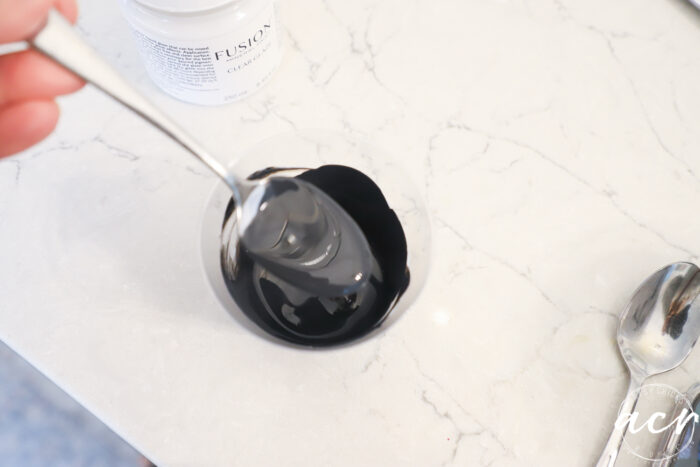
I applied it with my brush …
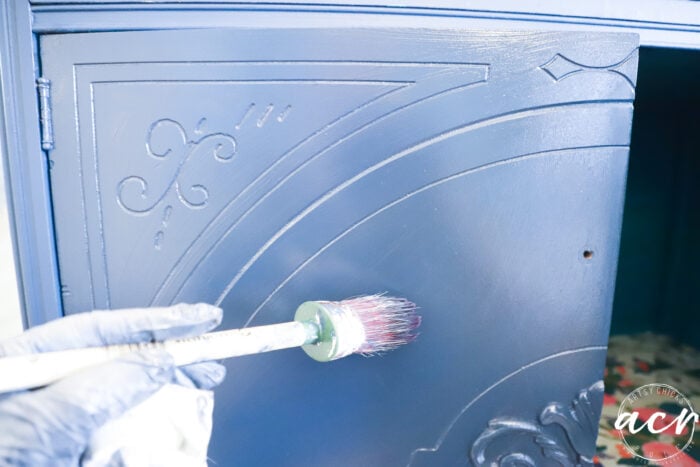
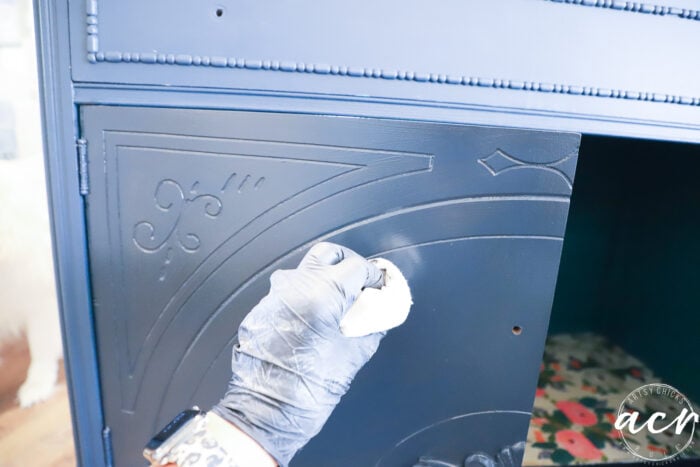
…and then wiped back somewhat.
You can tell, however, how different the glaze makes it look by seeing the drawer above (unglazed) and the door (glazed).
See the difference it makes?? Isn’t that wild?
I did the same to the top and sides.
I added glaze to the inside and outside paints.
I like that it toned down the Renfrew Blue a bit. It is a pretty color but can be somewhat bright.
I’m pretty happy with how it turned out.
I’ve been really loving wood and wood-stained, bleached, natural furniture. But sometimes it is just best to paint.
Plus, I do still love painted furniture too! I think there is a place for all kinds.
Old ones with this kind of beautiful detail can be so pretty painted. But I also love to leave it with the wood showing whenever possible.
I feel like this one just had too many obstacles to overcome to leave natural. I did consider it.
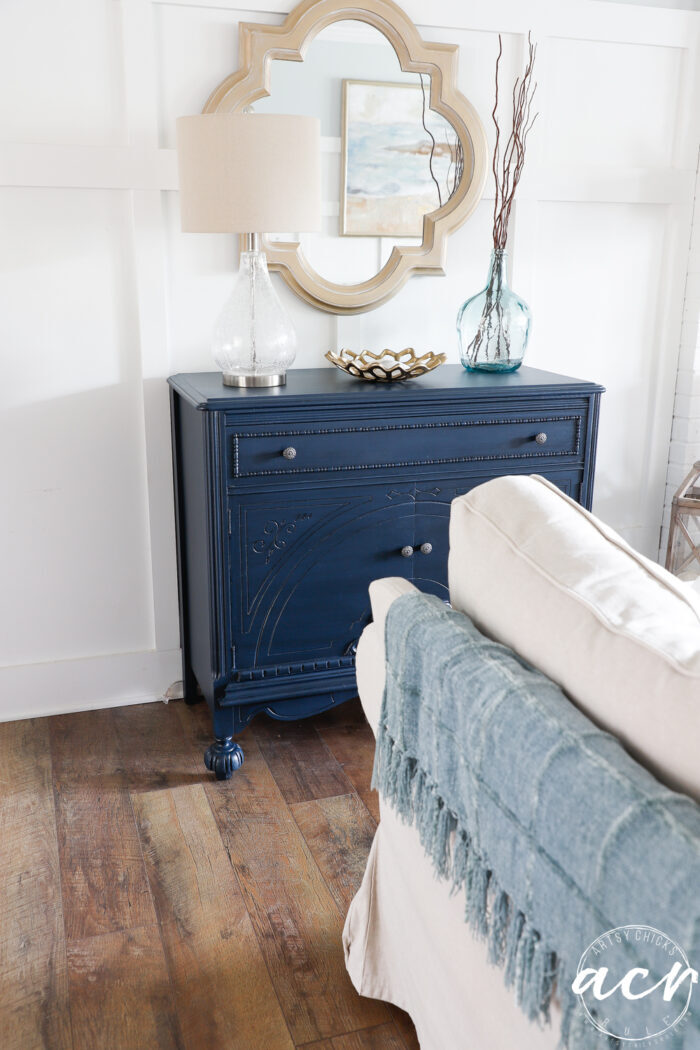
Anyway, I think she’s a stunner in that blue.
And love the pop of color surprise you get when you open it up. Not to mention the napkins for another pop of fun!
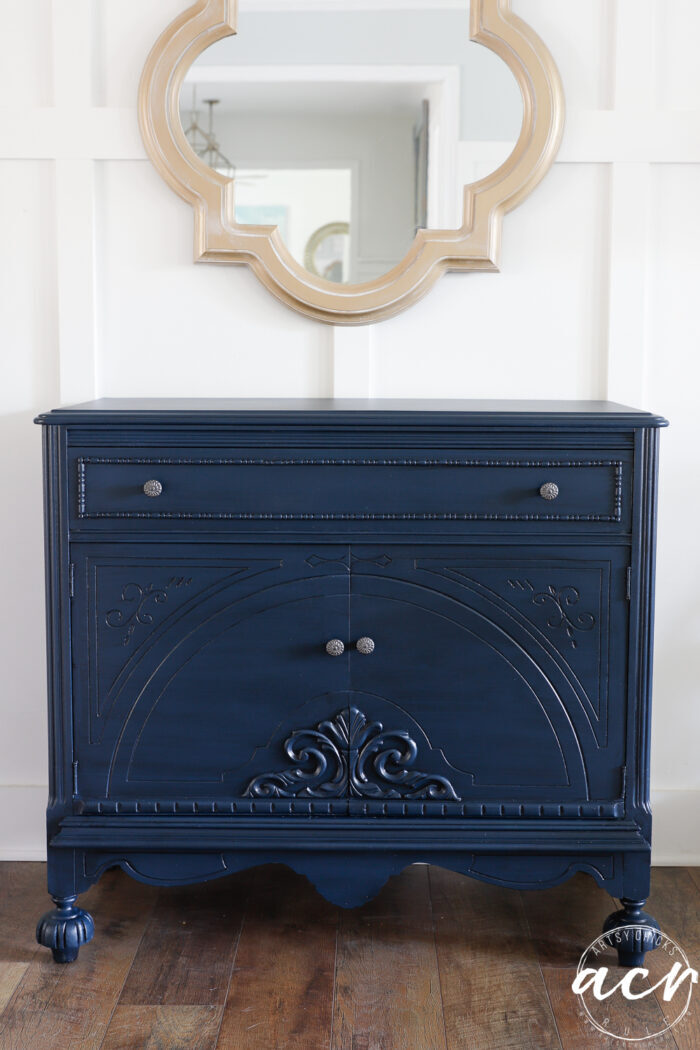
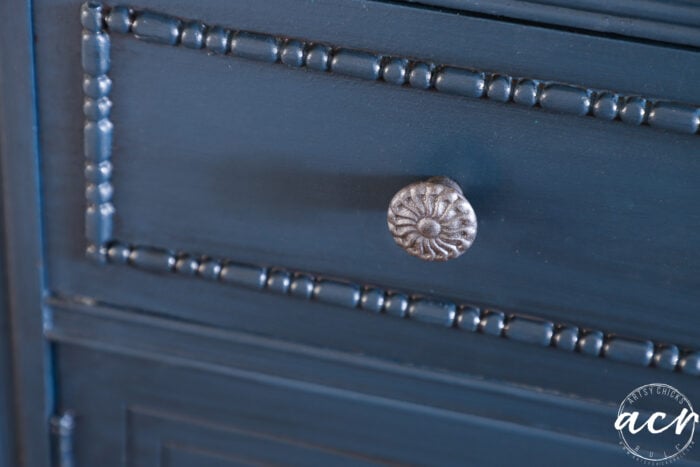
Oh, I forgot to mention that I kept the same hardware. I just gave them a quick spray with this spray paint (Soft Iron).
My one tip would be to wipe back more than you think you need to. When the glaze is wet it doesn’t really look dark at all. The darkness comes when it dries. So you might not realize how dark you’re leaving it.
So, I do wish I had wiped back just a bit more to just leave a hint of shade on the main areas of the cabinet and dark in the crevices, etc. The glaze does have longer workability which is nice, so I will definitely do that next time.
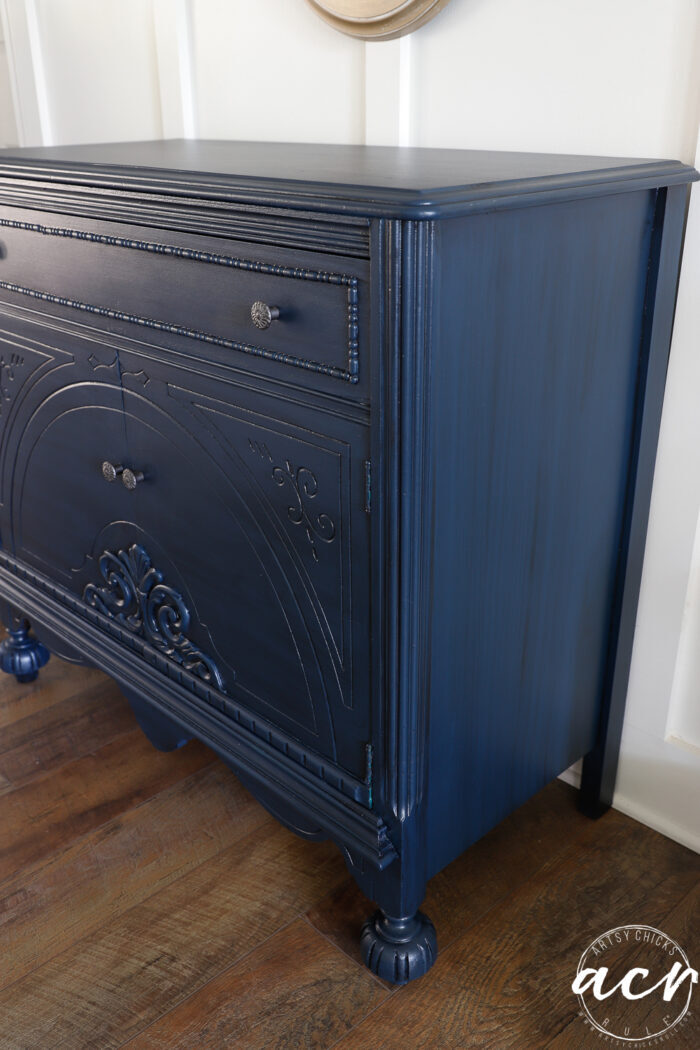
I just love the depth that the black glaze gave this piece…and that sheen!
I decoupaged the sides and bottom of the drawer so you’d see it from the outside when the drawer opens.
Fun, fun.
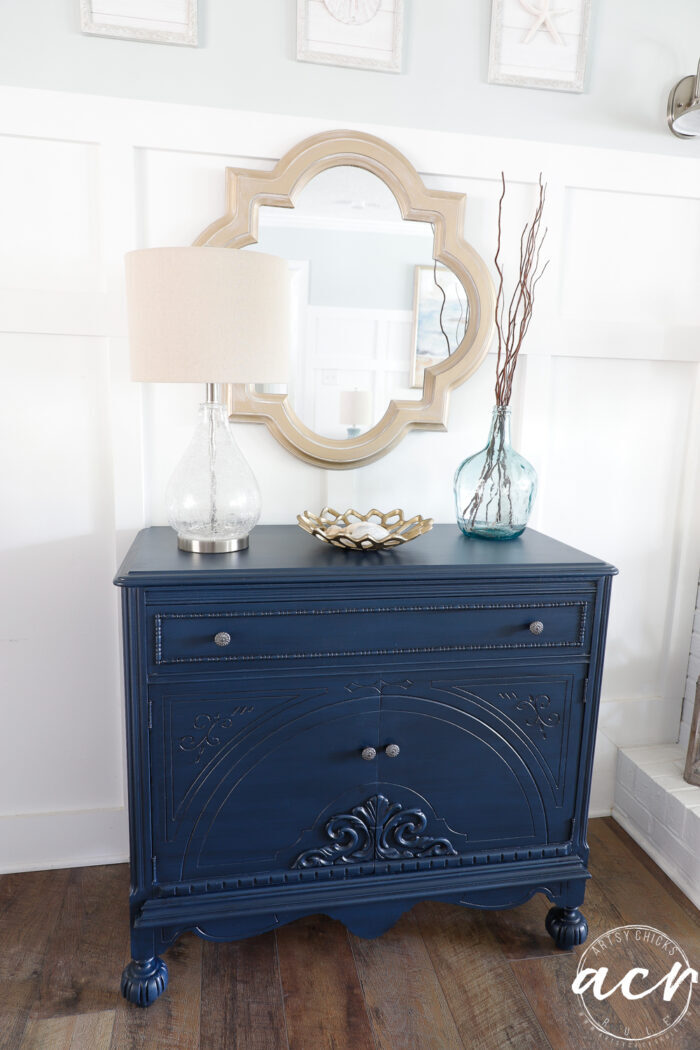
And although I’m not keeping this one, she sure looks pretty right here and goes great with the colors in this room.
This was Ryder as I was snapping photos. Haha!! See the eye roll?? He’s so content and half asleep!! lol (with his “paci” in his mouth…his very first baby bed when he was a tiny thing!)
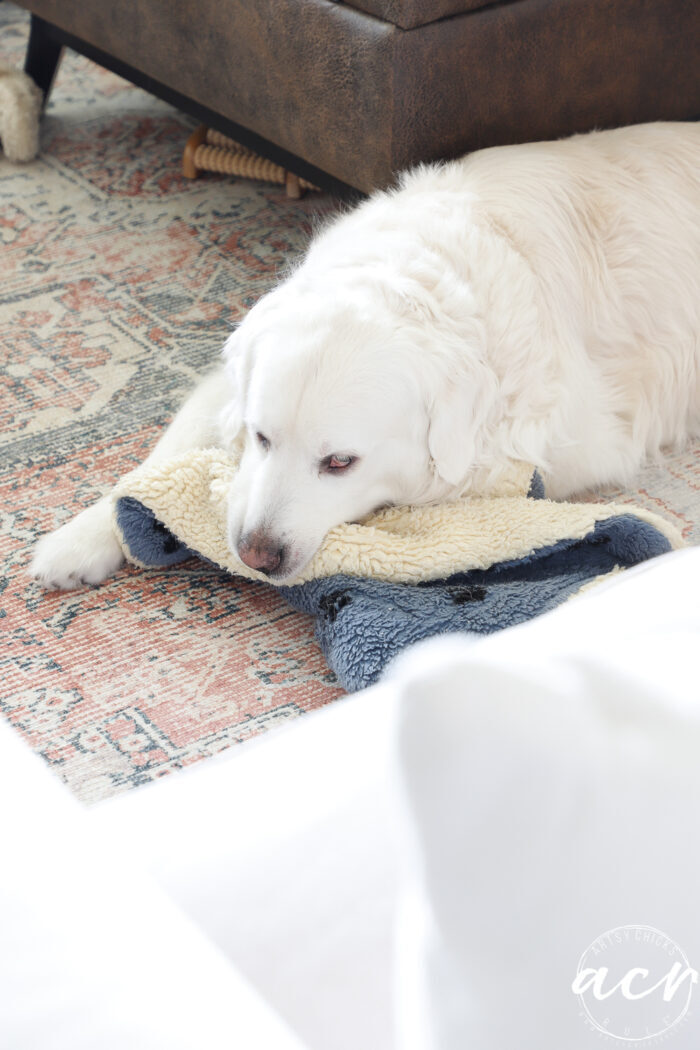
Then I disturbed him when I had to come over and take this angle. Oops! Sorry, Rydey Roo!
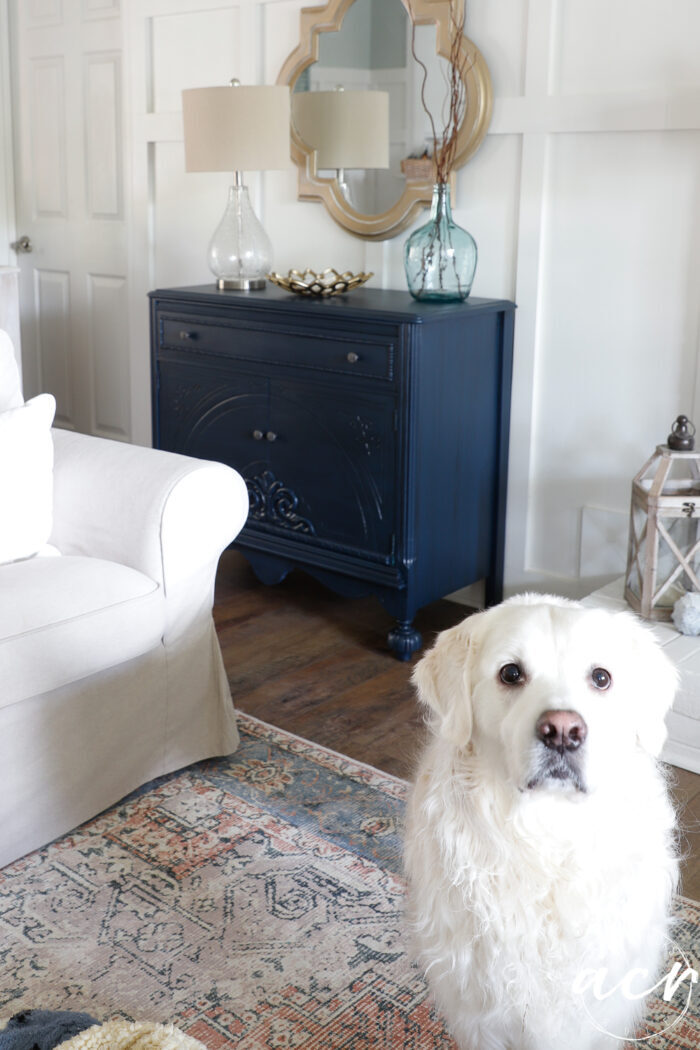
Scootch outta the way big guy!
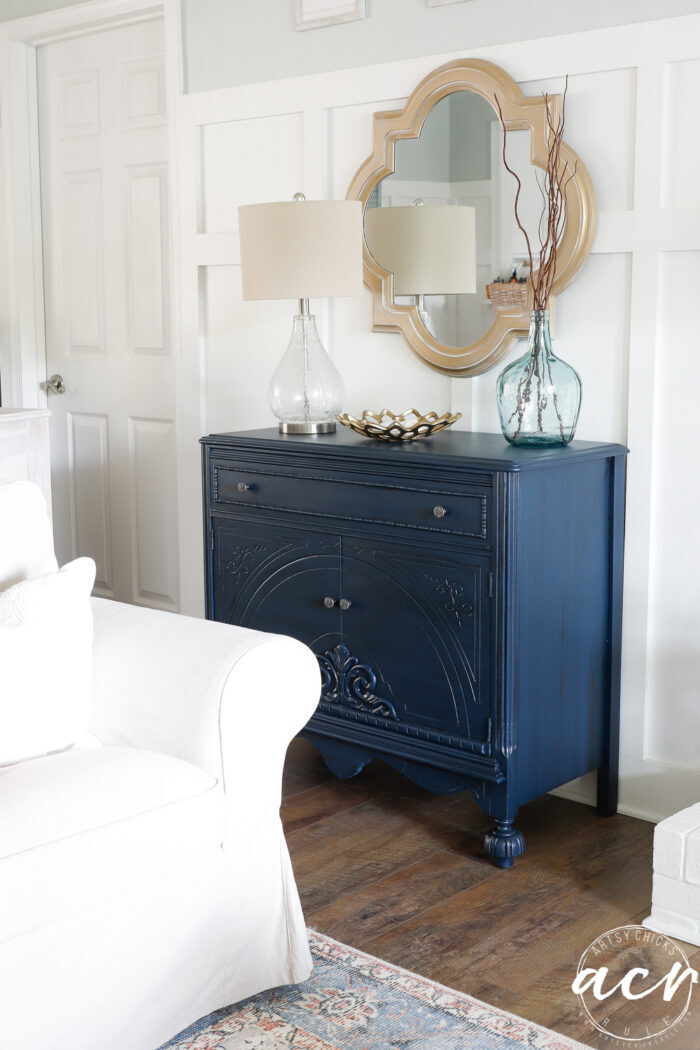
Really love it there! But I have to keep the whitewashed dresser I usually have there as it is a special meaningful piece to me.
Hmmm, maybe it’s time to repaint that one?! Ohh, that is a thought!
This is the one that I’m speaking of, in case you don’t remember…

We’ll see, maybe I will!
I hope you enjoyed this one! (and that gorgeous new blue paint I recently added to the shop)
PIN it to save it!
Don’t forget to hop over and see my friends’ new makeovers too!
Remember to check back in on Thursday for all the details on the missing trim and what I did! If you are new around here, you can subscribe right here so you won’t miss a thing.
UPDATE!! Come find out how here!
See you then!
xoxo


")


")

Ooh…you did it justice, Nancy. The color and paper are perfect.
Thanks, Larissa!! I just adore this color too! :) xo
I would really like to know how you go about deciding which colors or treatments would work best on which pieces of furniture. In selling them, have you noticed different colors selling better than others? Do people seem to prefer certain styles of furniture have a specific range of colors only? I always second guess my ideas so much that it keeps me from going ahead with a project. Any wisdon on this you could share would be much appreciated.
Oh gosh, that is really hard to say! I think anything that is not too far out of the “norm” would sell well overall. White, neutrals, and shades of blue work well but it’s really hard to pinpoint for sure.
Hi Nancy – can you show how you fixed the loose veneer? I have my grandmothers hope chest that I would love to restore some day.
Hi Sherri, sometimes I glue down what’s there and then fill in the rest with wood filler. Sand and paint. I actually took off that loose piece because it looked damaged and just filled in the whole area with wood filler, let dry well and sanded smooth. :)
Beautiful job.
Thank you, Denise! :)
Absolutely gorgeous, thanks for sharing your ideas
Thank you, Carla!! I really adore this blue color!
Absolutely stunning! Would’t change a thing that you did.
Thank you, Carly! That is so sweet of you to say!! xoxo
Gorgeous!! Thanks for all your posts with the step-by-step instructions and inspiration!
Thanks so much Molly Jo! I am so happy to share! xoxo
Nancy, it came out gorgeous. How will you part with it. You always inspire me to think outside the box and wait to try the black glaze on a re-purpose piece.
Thank you, Pam! I know, it will definitely be tough! I am so happy to hear that. It’s fun to try new things! :)
I love love love this one! Blue is one of my favorites. You outdid yourself! And the napkins…perfect!
Thank you, Sherry! The blue is SO rich looking, I just adore it! So happy you like the napkins too! xoxo
This blue piece is so beautiful! Nice job!
Thank you so much, Vicki! xo
Such a gorgeous piece and you made it MORE gorgeous! Love the color and the glaze Nancy! XOXO Pinned
Aw, thanks, Denise! :) xoxo
This is absolutely stunning!! I definitely think you should consider painting your existing piece in that room just like this one. The color is gorgeous! XOXO
Thank you Christy! I am so seriously considering it!! I think my room needs that pop of color! xoxo
Sooooo pretty! Two questions…
1. Did you just glaze right over the paint without a topcoat first? It seems sometimes my paint really absorbs the glaze unevenly.
2. How long did you let the paint dry before adding the glaze?
LOVE how this turned out and I agree that a glaze really adds depth to the piece and makes the detail pop!
Thanks!
Thank you, Jaymie!
Okay, so yes, I sure did, right over the paint. If your paint is absorbing it, maybe you are using a chalk-style paint?? Fusion paint has a built-in topcoat so no need to seal. Which then also makes it nice for glazing like this. No worries of it soaking in like that. But like I mentioned that all goes back to the kind of paint you use. I’ve used chalk-style paint a lot in the past and I would’ve definitely put a topcoat on before doing this type of glaze on that type of paint. So long story short, I would suggest doing just that if you are using that kind of paint. :)
I ended up painting it a while ago so the paint sat for a bit but I would say you could glaze it after it sits overnight. Hope that helps! xoxo
That is one lovely piece of furniture, and what you did made it gorgeous! Good job!!
Aw, thanks a bunch, Caye!! :) xo
I am not a huge fan of painted wood furniture – I’m still old school I guess when it comes to painting beautiful wood… but… I see the benefit when the wood is so distressed after so much love… :-) I have to say this is one of my favorites I’ve seen. The color is so rich and sophisticated. It’s causing me to re-think this! Beautiful job!
I love this so much, Leslie! So happy to hear it. And so humbled that it is one of your favorites! But I totally understand! As much as I love paint, I do really love wood furniture too. There are just some pieces that I could never bring myself to paint! If they are too far gone it certainly makes it easier to do so! :)
She’s a beauty!!! mmmm….I don’t know….the new one is in the perfect spot. That blue is just the right pop of color there too. Couldn’t the sentimental piece go in a bedroom or hallway? Well, whatever you decide I know it will be great in the end!!! ….I too have some special pieces that I can’t part with.
Thank you!
I think so too Addie!! But she has to go!! lol I wish I had more room in our home to put the other one but there’s not one spot left! Boo!
Love the blue!- would you share where you got the trefoil mirror?
Thank you, Laura! I got the mirror from HomeGoods…but it was about 9 or 10 years ago now. It was black, I painted it white and it hung in another room here for a few years…then I painted it gold and hung it here in this room. It’s made its way around this house! lol
It’s beautiful!
Thank you, Lizzy!! xo
It’s beautiful. Love the color.
Thank you, Debra!! I really am loving this gorgeous blue!
Stunning! Love that blue. I want to paint one piece in blue for my living room. This color would look great!
I thought my shepherd was the only one who gnawed on a Blankey! But, better than furniture!
Dawn
Thanks, Dawn, this blue really is so gorgeous!
And oh, that’s so funny, and yes you are so right! Yes, that or shoes, etc!
It’s beautiful! The darker blue with the glaze is perfect! the details show up really well, and I wondered how that would turn out. Thanks for the inspiration.
Thank you, Melba! It’s amazing how much adding the glaze really changed it up! xo
I love the color on this! Just beautiful. Can I ask what color you have on the walls in this room? I have been looking for a soft grey like this and would love to get a sample.
Thank you, Tracy!! Yes, the color is Sea Salt by Sherwin Williams. It’s an amazing color!! We have it in our foyer, living room, and guest bath. It’s a blue/green/gray shade. It changes depending on the lighting in the room etc.
What a beautiful piece of furniture, and I adore the blue! Thanks for sharing!
Thank you, Vicki!! The blue is definitely a stunner!! :)
Such a gorgeous color. I like it with or without the glaze.
The Fusion glaze looks so much easier to use than the one I’m currently using. How long does it take to lose the tackiness if a second coat is needed?
I am tired of the pink color on a dresser that I’m using for craft storage, and this blue with the glaze is just what I’m looking for.
Thanks for the inspiration again.
Cherylinne
Yes, this color is gorgeous both ways, for sure, Cheryl!
It was really easy to use. It did take longer than say a topcoat would take to dry. I think that is why it is so great as it has a good amount of workability to it. But yes, does take longer to dry. I don’t really have an exact timeframe as I only did one coat. But if I had to guess, you could probably recoat after about 24 hours or so.
Yes, give your dresser a whole new look. :)
I think I love that new color but on my phone almost every picture was a different shade of blue. I’m always happy when furniture isn’t painted white! LOL
Oh, wow!! I will say that some of the “in process” photos will look different because it doesn’t have glaze on it yet. So maybe that was it?? Either way, it’s an awesome shade of blue!! :) And I hear ya!!
Very very pretty, color, carvings, those feet!, and I love the surprise of different napkins!
Thank you, Celia! Aren’t those carvings so pretty?? I just love that! xo
Wow, Nancy – it looks amazing.
That blue hue is so trendy too right now.
Looks awesome. Well done, ma’am!!
Thank you, Michele! Blue is always a win in my book! :) xoxo
It is indeed a beautiful piece now. My question is how did you repair the missing beaded trim? Somehow it is a perfect match; so, maybe that piece of trim was hiding in a drawer?
Thank you, Robin! Yes, isn’t it so cool?? Nope! No missing pieces in the drawer. I made it…and I just finished writing the post for tomorrow to show how. :)
It had lovely style before you got it and now is improved! You enhanced the beauty!
Thank you, Rose! I really love this new blue so much! :)
Absolutely LOVE the color, glaze, and the fantastic fix! Great post. Thank you!
Isn’t that blue color just stunning?! I love it! Thank you, Lisa! xo
Nancy, what a beautifully made piece, and so pretty in that deep blue color with fun napkins too! xo
Thank you, Jen! xo
Beautiful job as always! I have to say it flattered your room in a major way. I would definitely paint your existing piece that way at least the outside part. That color is gorgeous and pulls that deep color from your rug. Girl your talent is endless!!!
Aw, thanks, Debora! You are so sweet! And yes, I think it flatters the room too. I am trying to figure out a way to either keep it, OR?? We’ll see! xo
Hi Nancy!! Willowbank is such a beautiful color. I have used it on smalls but not furniture yet. I just bought a sample jar but this piece came out so rich and pretty. Great job!!
Hi Cheryl! Isn’t it? I just love it! Give it a go on something larger, I think you’ll love it just as much on that as the smalls! xoxo