How To Replace Missing Trim On Furniture
Don’t pass up those oldies because they are missing trim/molding! Let me show you how to replace missing trim on furniture!
Hello friends!
I’m back today to share how I fixed the missing trim on the antique cabinet I shared on Tuesday.
If you missed that, you can see it right here>>> Antique Cabinet Makeover
It really is easier than you think. So I hope to show you that if you come across a piece with missing trim in the future, you won’t immediately pass it by!
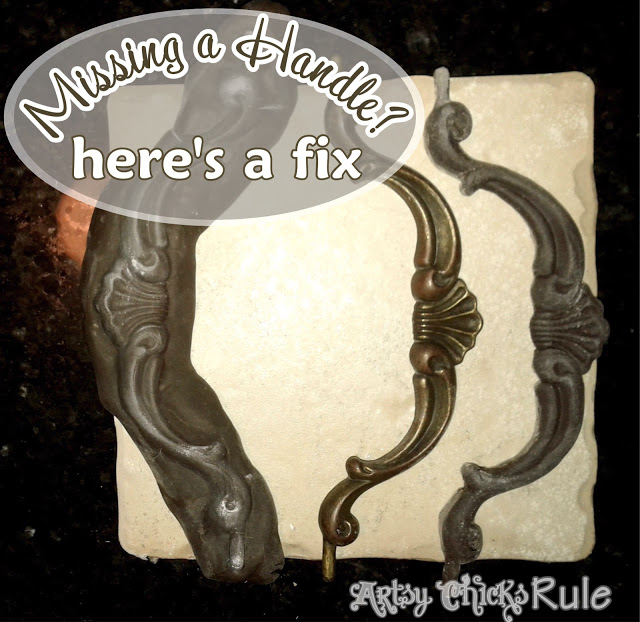
This is not the first time I’ve done something like this. I actually created a missing handle many, many years ago!
You can check out how I did that here >>> Missing Hardware?? Here’s a Fix!
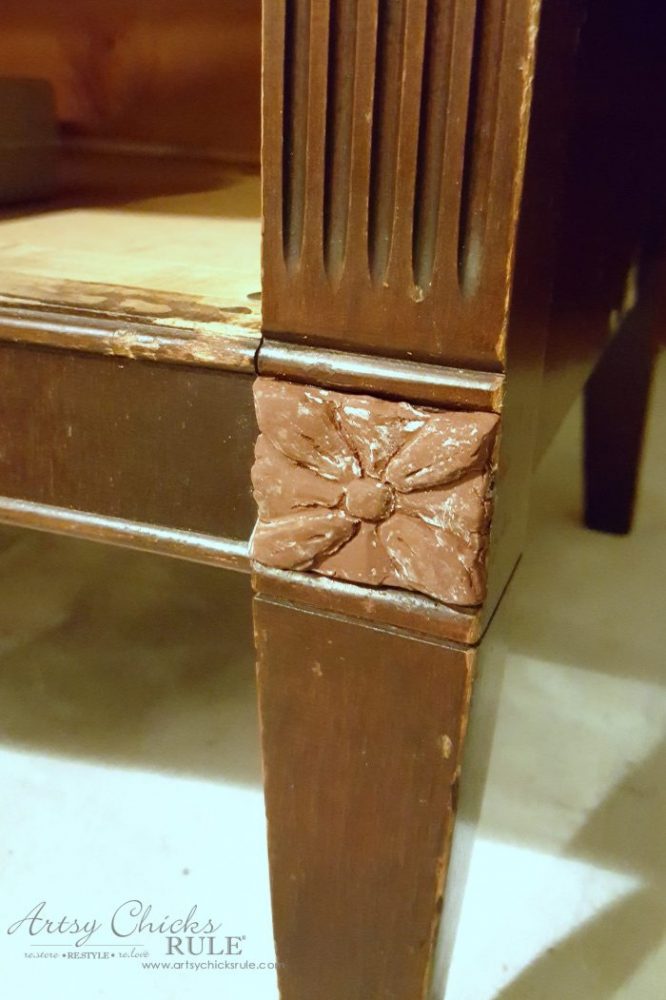
AND making and replacing missing trim/molding on this dresser saved the day! >>> Giverny Chalk Paint Makeover Dresser
Isn’t that neat???
How To Replace Missing Trim On Furniture
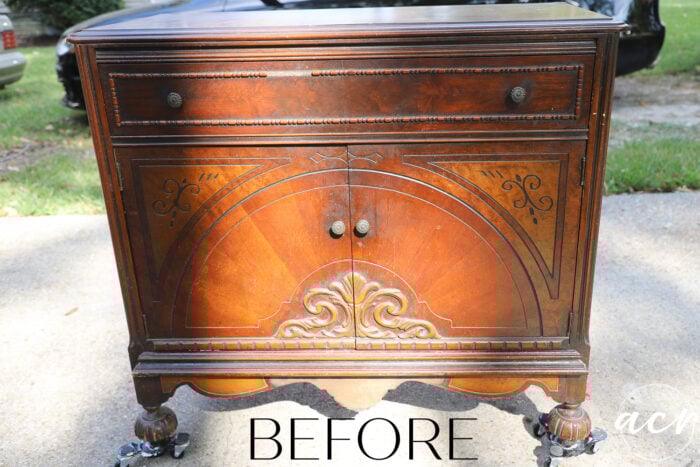
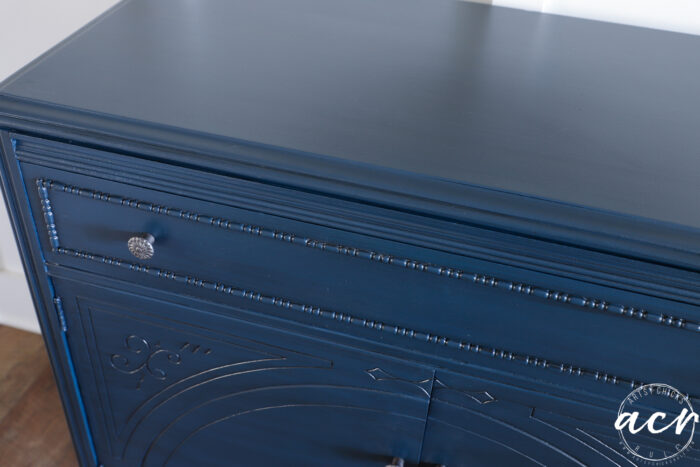
Here is the cabinet before…
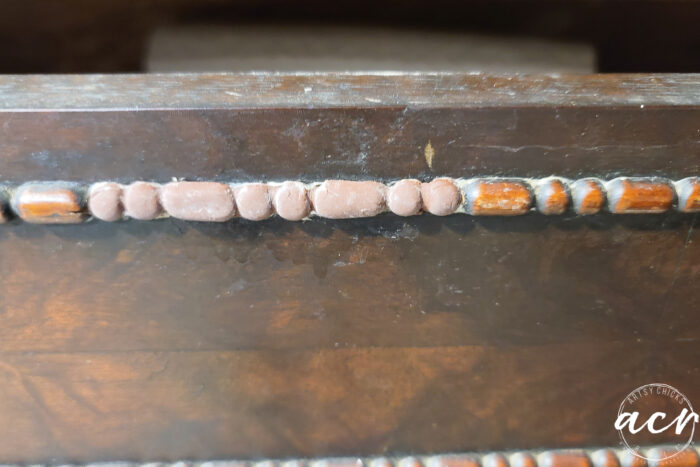
And a close-up of the missing trim…
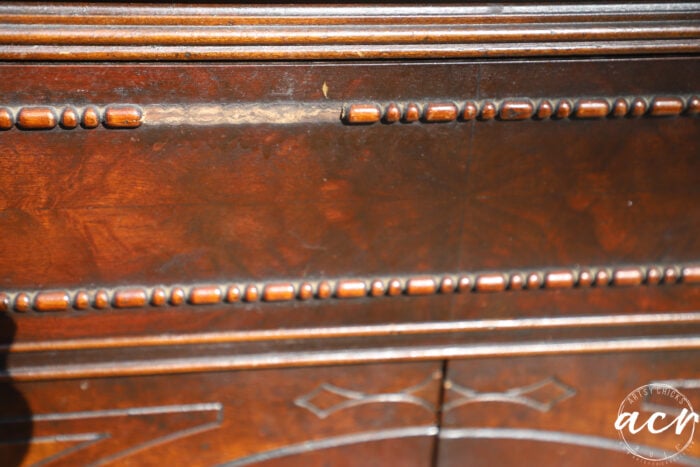
Totally not a problem!! Well, if you want to paint it, it’s not a problem, if you want to stain it… well, that’s a problem.
So, if you come across these pieces that you have to make trim for, just know that you’ll probably be painting it.
Here’s how I did it.
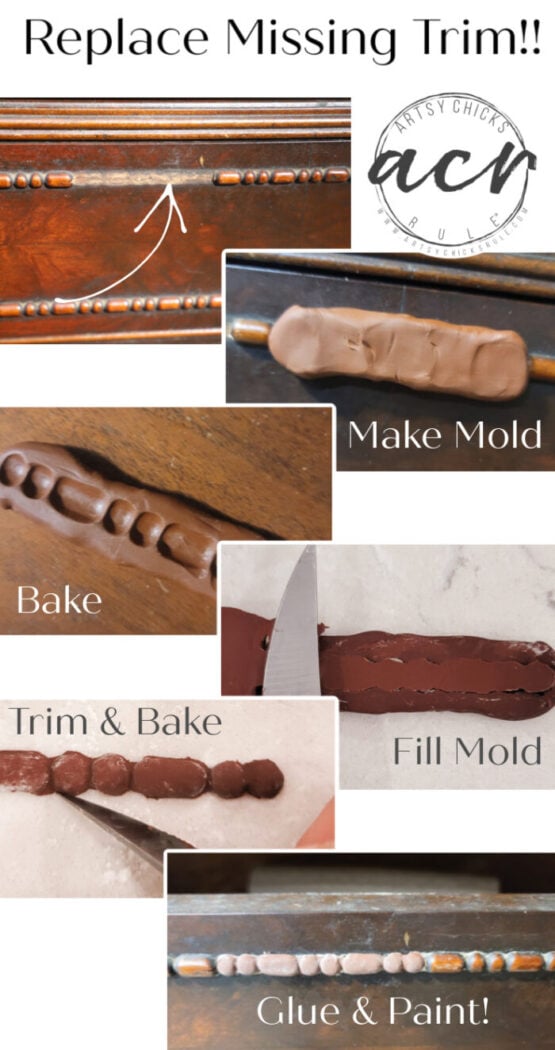
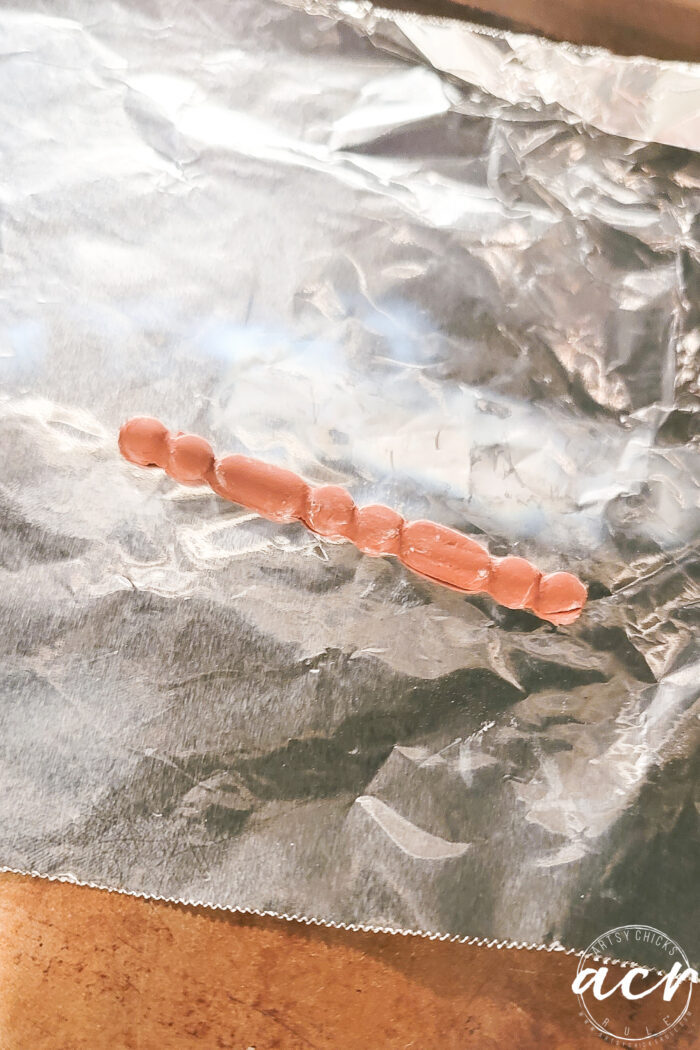
Step 1. Make a mold of existing trim to match
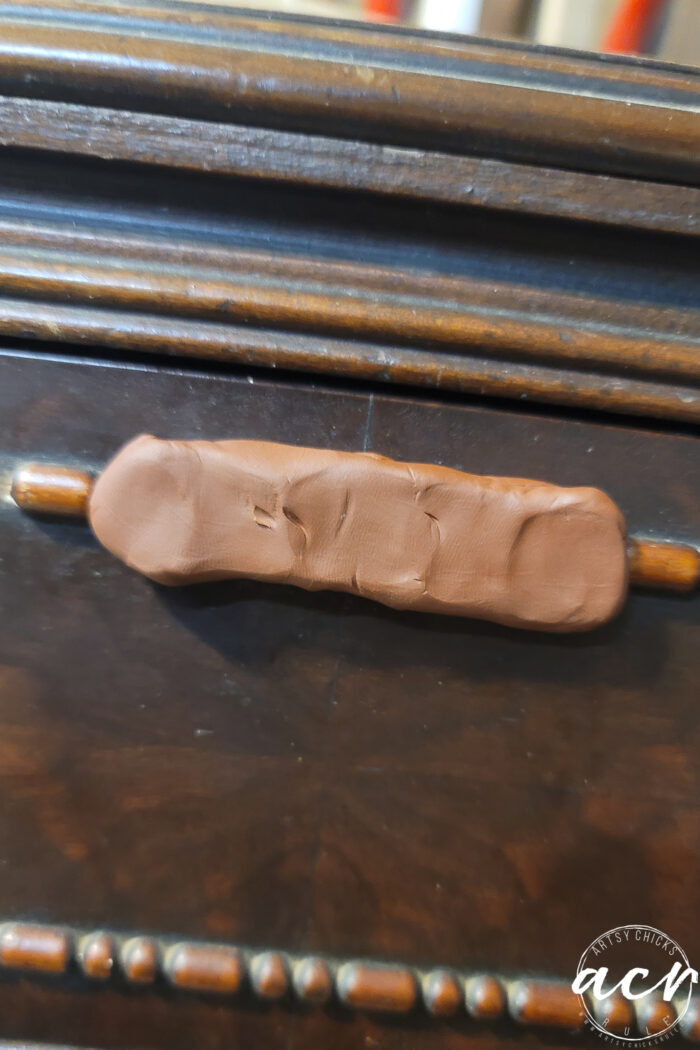
Get some clay like this Sculpy Clay to make the mold.
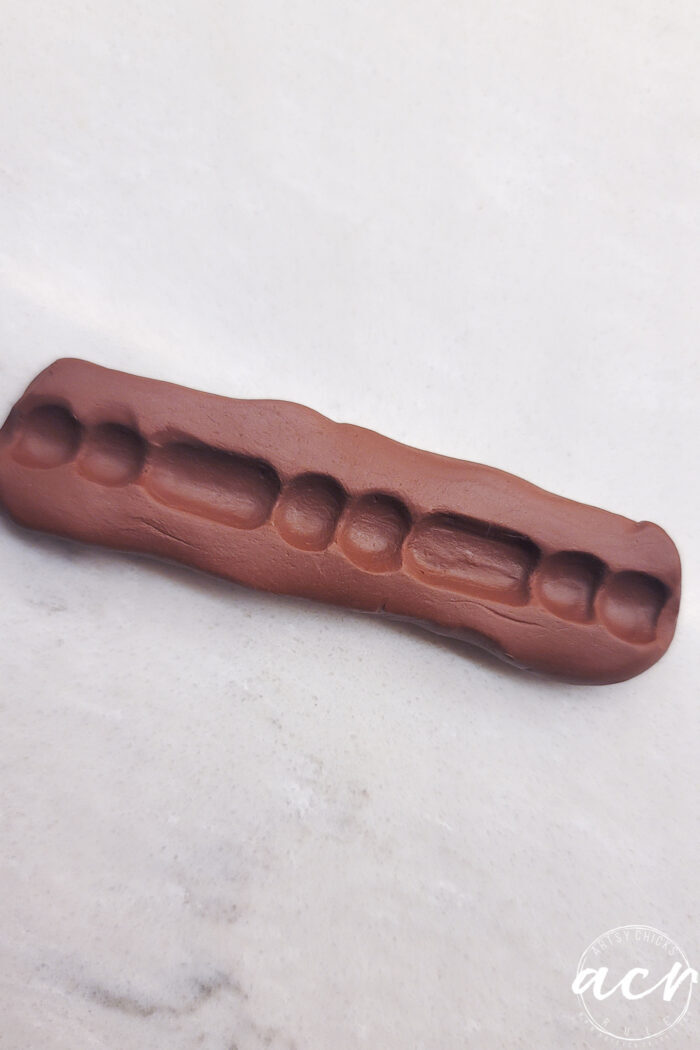
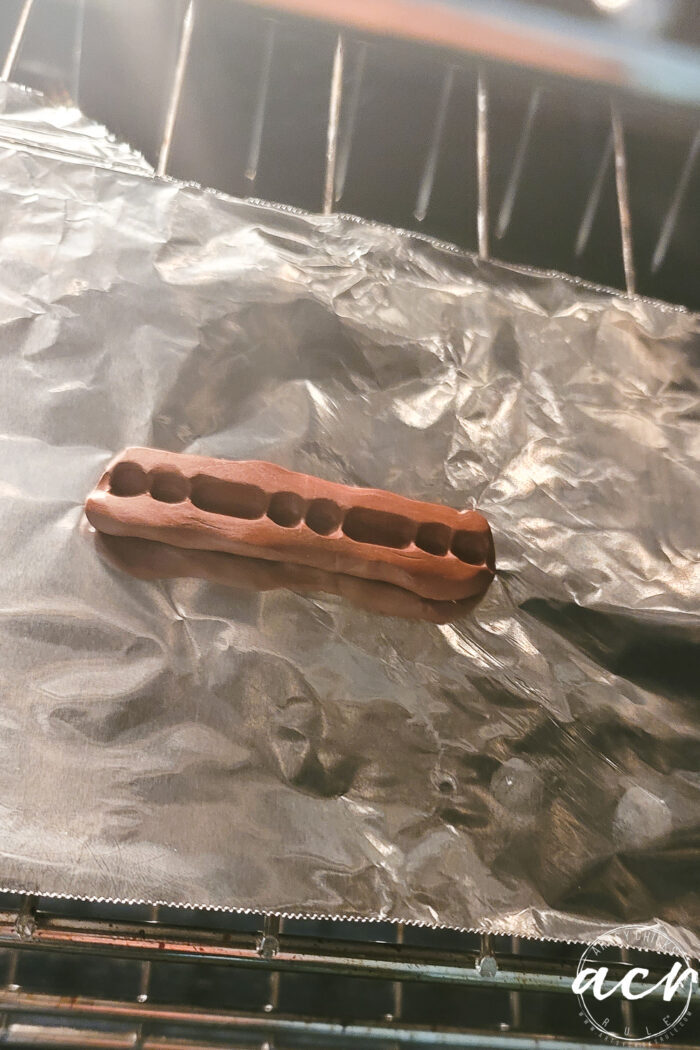
Step 2. Bake in the oven to harden it
Step 3. Fill the baked mold with more clay
Dust with powder before filling so it won’t stick.
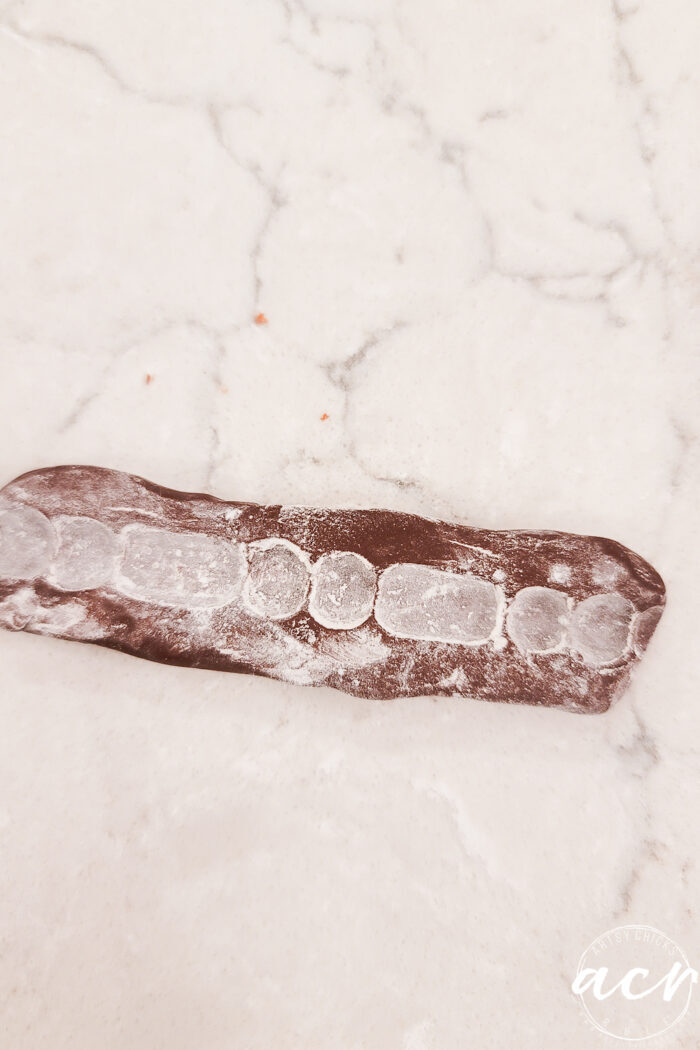
Then fill it and scrape away the excess.
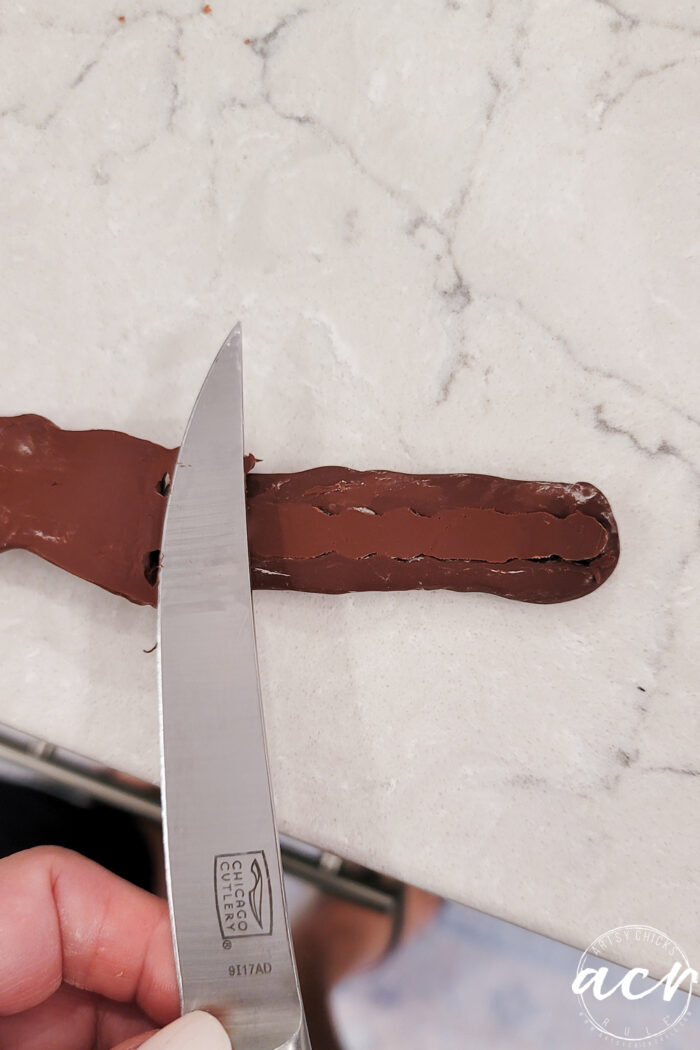
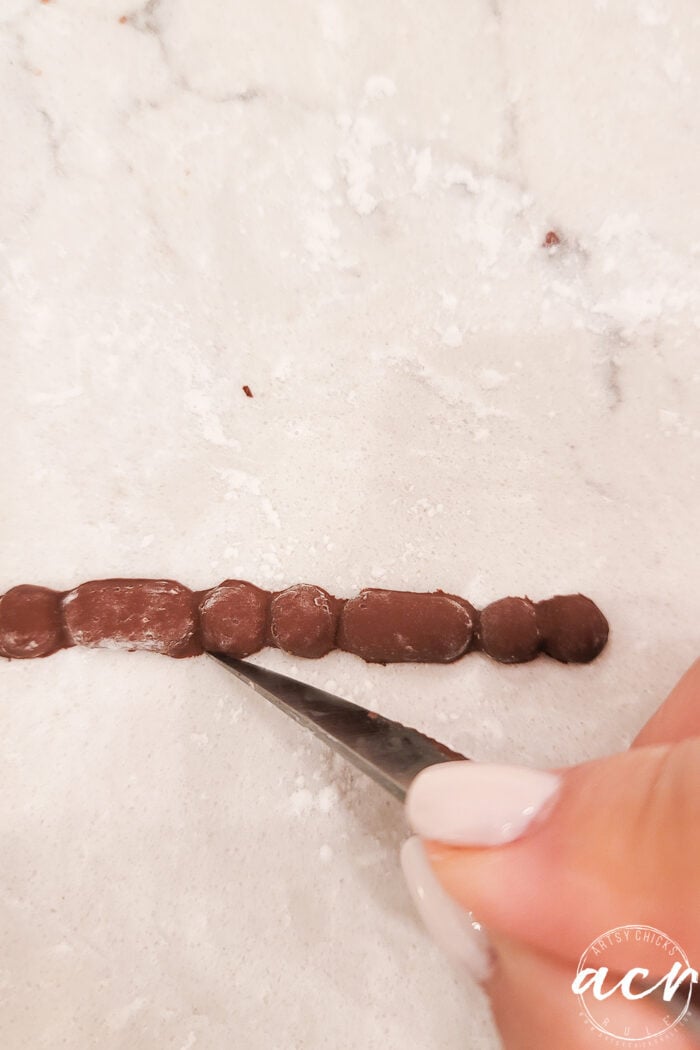
Take it out of the mold and trim to neaten it up.
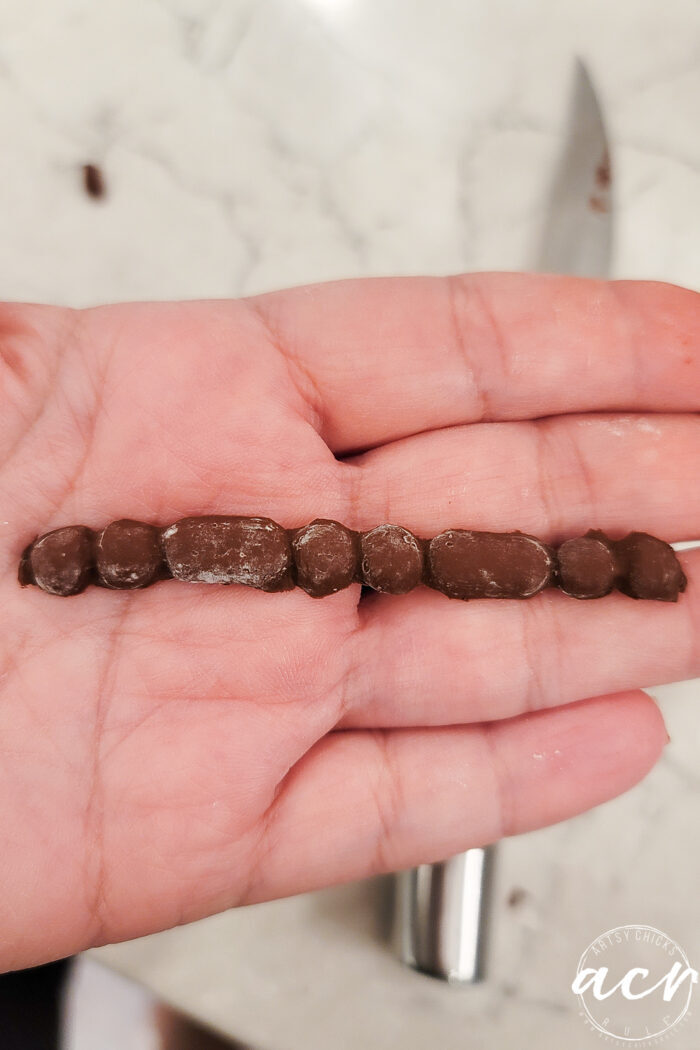
Step 4. Bake to harden it
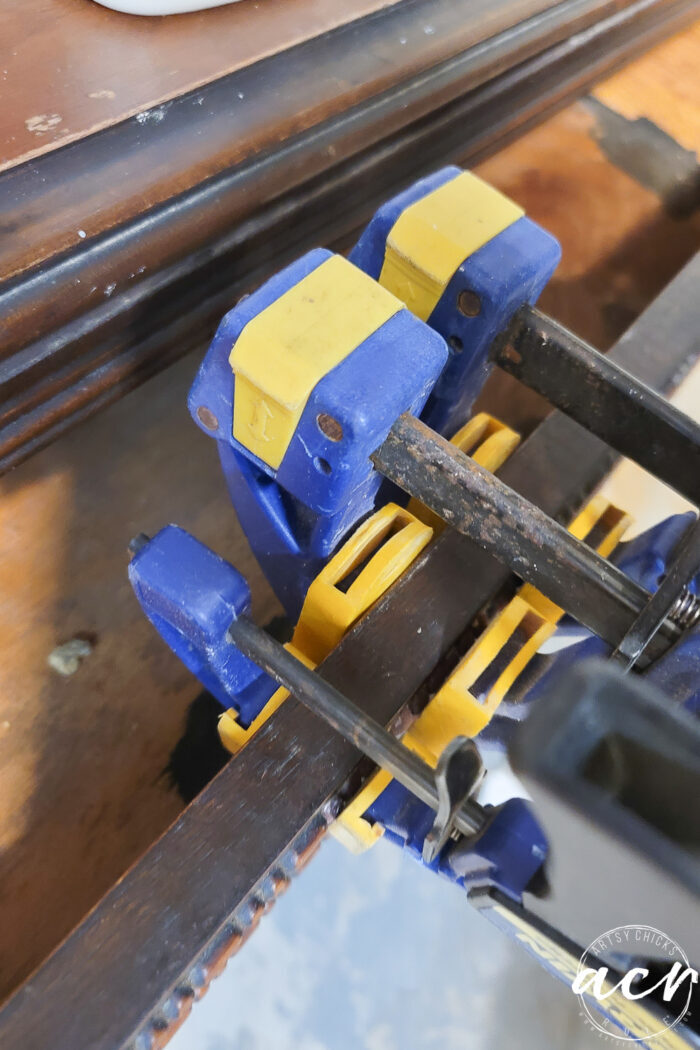
Step 6. Glue to furniture with clamps
I used wood glue and clamps like this.
And that’s it!
It might seem like a lot of steps but it’s really not a big deal at all!
Have some missing trim?? Give this a try!
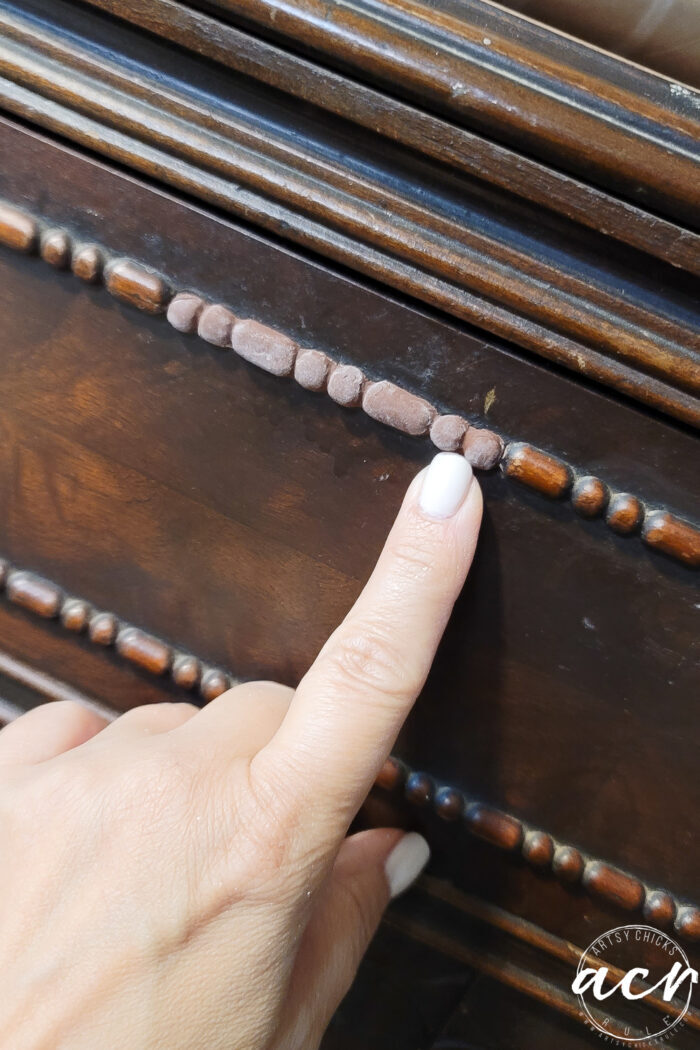
Once painted, you will never know.

Where is it???
Can’t tell, can you??
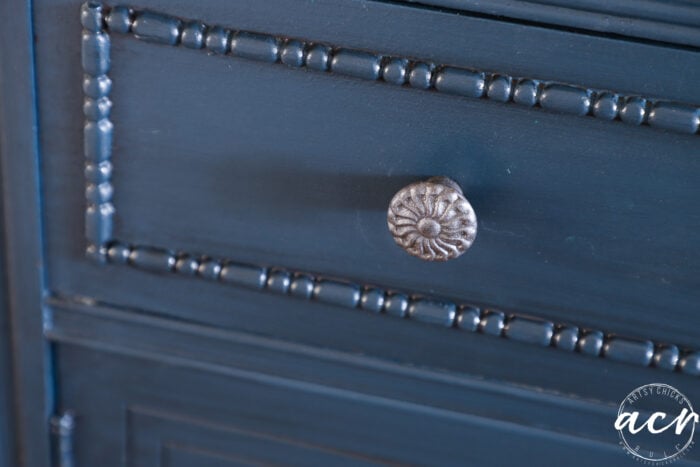
Isn’t that the coolest thing??
I love how simple it is!
There are SO many of these old pieces floating around out there. And many, many of them are missing trim pieces. This is a great way to fix that problem!
PIN it to save it!

I hope you have an amazing weekend! Yay for warm weather and sunshine!
xoxo


")

")


Fabulous! Thanks for sharing.
Thanks, Amy! :)
Love the color! Absolutely beautiful.
Thank you, Diana! This color is just stunning. xo
I know this post is from a couple years ago. I’m glad I came across it because I just bought a beautiful antique medicine cabinet that is missing a small area of trim
Around the glass door. I’m going to try to make the mold and then I can use gel stain (which is like paint but in different wood stain colors) to match the rest!
Yes!! It will be great! I love that all these old pieces are able to be repaired with this simple fix. :)
Thank you for the explanation and pictures. I love that you share your amazing talent!
Aw, thanks so much, Pamela! :) xo
Nancy,
When I started reading this, I was saying to myself, how can you fix what is missing. Wow what a great tip and it looks like it was never missing in the first place. Thanks for this lesson, I will definitely open my eyes to other possibilities.
Thanks, Pam! Yes, it works really well for this! Definitely don’t pass up those pieces in the future! xo
Great fix. Thanks.
Thank you, Lane! :)
Amazing !! What is that crystal looking material you put in the mold to actually make the mold piece; and what kind of powder did you use for nonstick of results to mold housing. All blessings to you
Thanks, Willie! I think you might be talking about the aluminum foil when I placed it in the oven. I just used regular body powder actually, I think it was Burt’s Bees! :)
Thank you ❤️
That is genius! I know they sell moldings and trim pieces but they are pricey and unlikely to find one that completely matches. I also would like to know what type of powder to use.
Thanks, Debra! It works really well! I hope you give it a try.
I used regular powder, I think it was Burt’s Bees.
You make it look so easy, Nancy! I have a beautiful piece that’s badly damaged and I’ve been considering trying this fix. I’d be delighted if it turned out as well as yours. The color you chose, along with the glaze, make the cabinet so much more appealing than it was originally.
It really is so easy, Marcie! Just a lot of steps, but definitely easy. Oh, I hope you try this on it! Thanks, Marcie! xoxo
That’s awesome! Thanks for the tutorial. Pinned!
Thanks, Lizzy! :) xo
The clay fix is wonderful, you did a fantastic job! I really like this piece of furniture and with the color you chose for the exterior I think it looks sophisticated. Yes, there is a but, just my opinion..that inside pop of color just does not fit nor does that extremely colorful shelf. I really can’t believe you did that, it seems so unlike the work you do.
I think your dog is beautiful, he looks like a little baby you just want to pull onto your lap.
Yes! It works so well, Mary! And yes, I understand. Things are fluid when making things over sometimes. And what I mean by that is, I found the napkins that had a similar blue color in them, then decided to use the turquoise color in the napkin as the paint color for the interior to bring it all together. I’m actually glad about your reaction as I like to mix things up every once in a while! ;)
And thank you! Yes, he is exactly that! And will try to sit in your lap (as big as he is) if you will let him! lol
AMAZING!!!! Seems so easy too!!!…..AND you did it all with a perfect (as usual) manicure!!!
Have a good weekend!!
Thanks, Addie! :) It IS easy, I promise! Easier than you think, for sure. Haha!! I don’t think so but thank you!! It’s hard to keep my nails looking nice, I tell ya! Happy weekend to you! xoxo
Fabulous! Thank You!!!
Thank you, Molly Jo! Happy weekend to you! xo
Brilliant! Thank you for sharing!
You are so welcome! :)
Outstanding! What a great tip.
It really works great! :) xo
I have a very old gilded mirror with a damaged corner. I will try your amazing tip. Hope it turns out half as good as yours!
Yay! Yes, it will be great, I am sure! :) xo
What a great idea!!!! What color did you use for the exterior of the cabinet..if you stated I missed it
Michele
Thanks, Michelle! It is Willowbank with a glaze over top. You can read all about that here. :)
thanks so much!!! Love your blog…so many fabulous projects
You are so welcome, Michelle! Thank you for the kind words too, so happy you do!! :) xoxo
How do I go about making a mold or similar to try and recreate a piece that is missing BUT it needs to be a mirror image?? The piece missing is on the opposite side of a headboard, so I need to create an opposite image. I’m mechanically inclined and a troubleshooter but I can’t wrap my head around how to do this! Thanks
(An email response would be great also since I’ll probably forget about this posting)
Oh gosh, I had to think about that for way too long! Mind twister for sure. Okay, I don’t think it’s really possible in the way that I’m showing how to do this. I think you would need to coat the piece you want to mirror with something pretty thin and flexible (silicone? hot glue?), let it dry and flip it inside out. That way you’d have a mirrored “image”. Then you’d somehow need to make the mold from that and create your missing piece. I haven’t really done it or used those items to do something like this so I can’t say for sure how well this will work. BUT if I needed a mirrored fix like this, I’d definitely give it a go!
Wow. What a super cool tutorial for replacing trim details on furniture. I never would have thought of it an it worked perfectly!