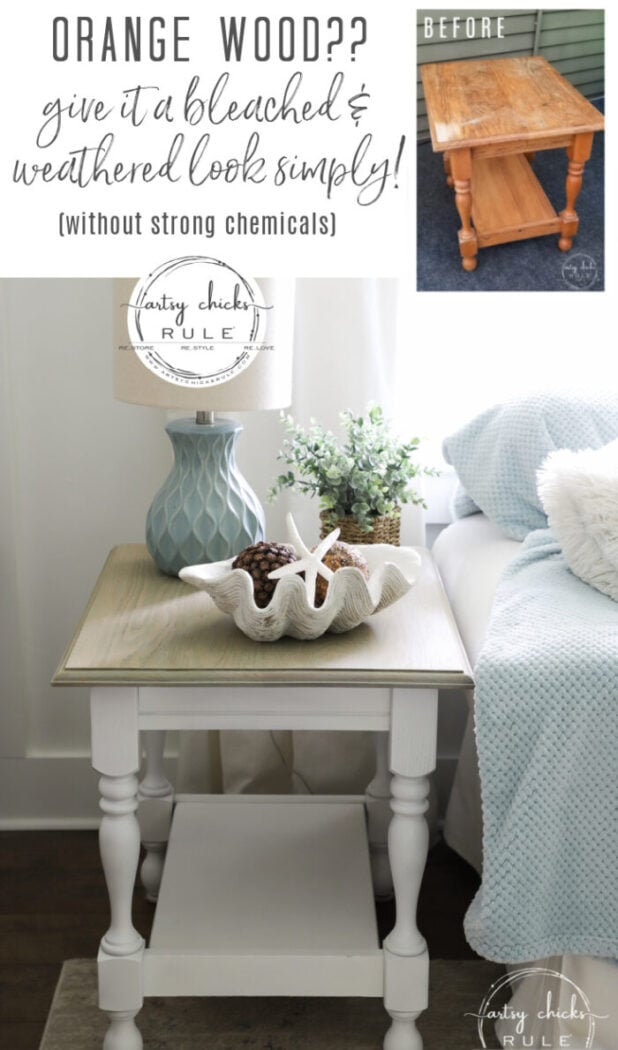
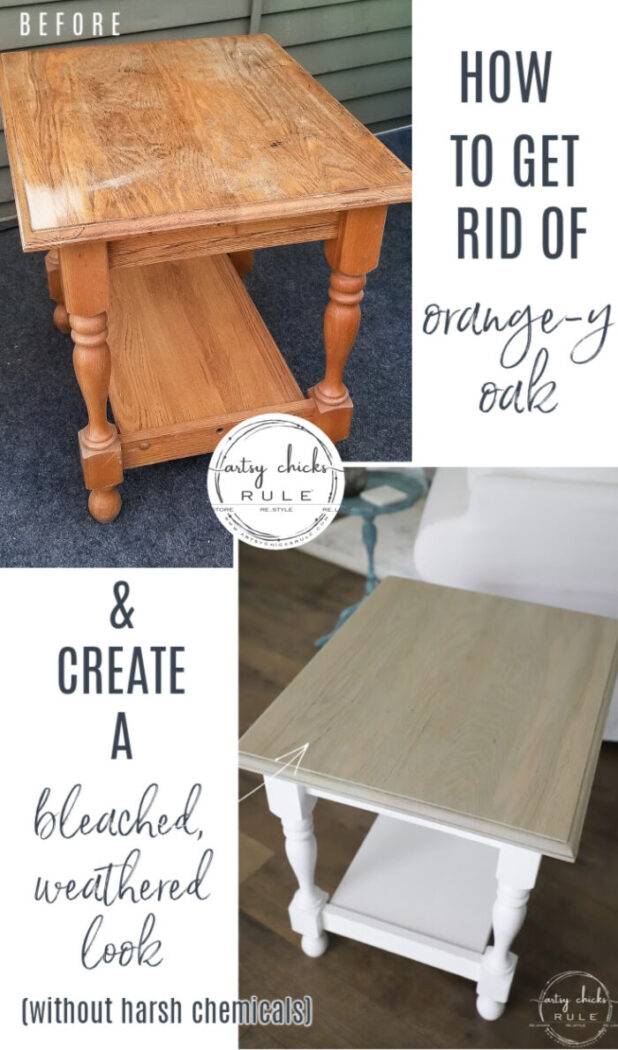
How To Make Orange Wood Look Bleached (without harsh chemicals)
How to make orange wood look bleached with this simple method!! (AND without harsh chemicals)
Updated Sept/2023
Hello sweet friends!
Guess what? I have finished the oak table and chairs set and hope to share it soon. Trying to get that back porch finished too. (that’s where it’s going to live)
UPDATE: You can see the oak table and chairs >>> here.
And see the back porch redo >>> here.
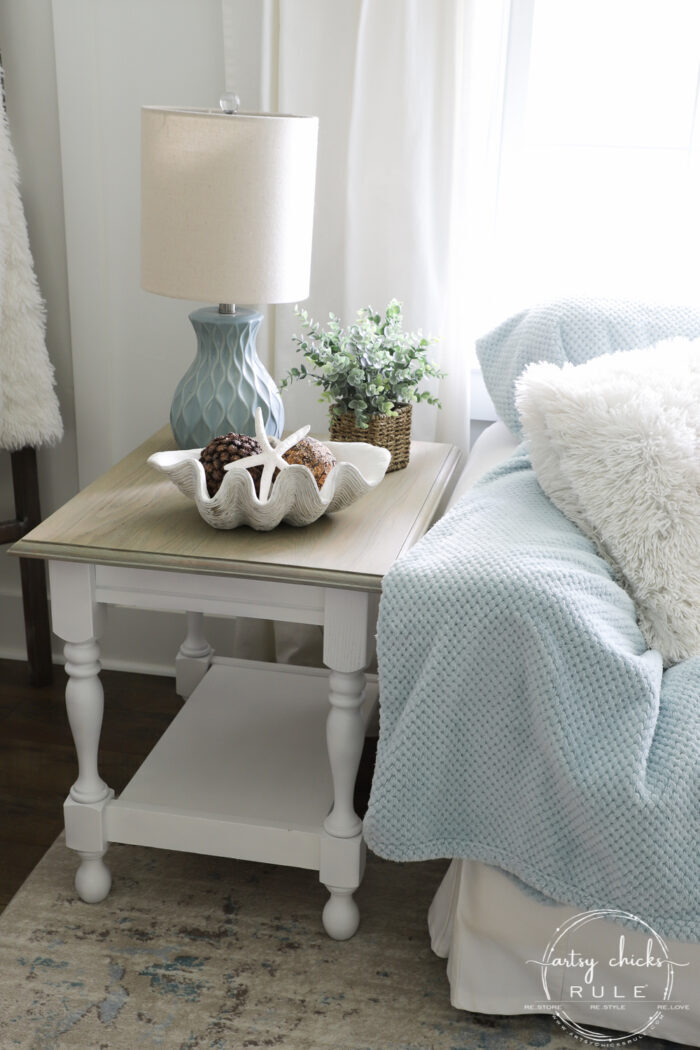
AND, I also finished this pretty little oak end table from my recent haul too.
It was very orange.
But SOLID! And for $10 how can you beat that? Plus, I needed a little end table just like this for our beach house.
Win-win!
So, since it’s going to live at the beach, I knew I was going to make it “beachy” with a weathered, bleach-looking top.
I actually worked on it at the same time I finished up the oak table this weekend. If you follow along on Instagram, you might have seen some sneak peek photos I shared of both. I love sharing as I’m doing my makeovers so keep an eye out in my stories over there.
Here are a few of my other “light” wood projects to check out:
- Easy DIY Light Wood Look
- How To Get The Bleached Wood Look (without bleach)
- Bleaching Wood For A New Look
- How To Get A Pickled Wood Finish
How To Make Orange Wood Look Bleached (and/or weathered, without harsh chemicals)
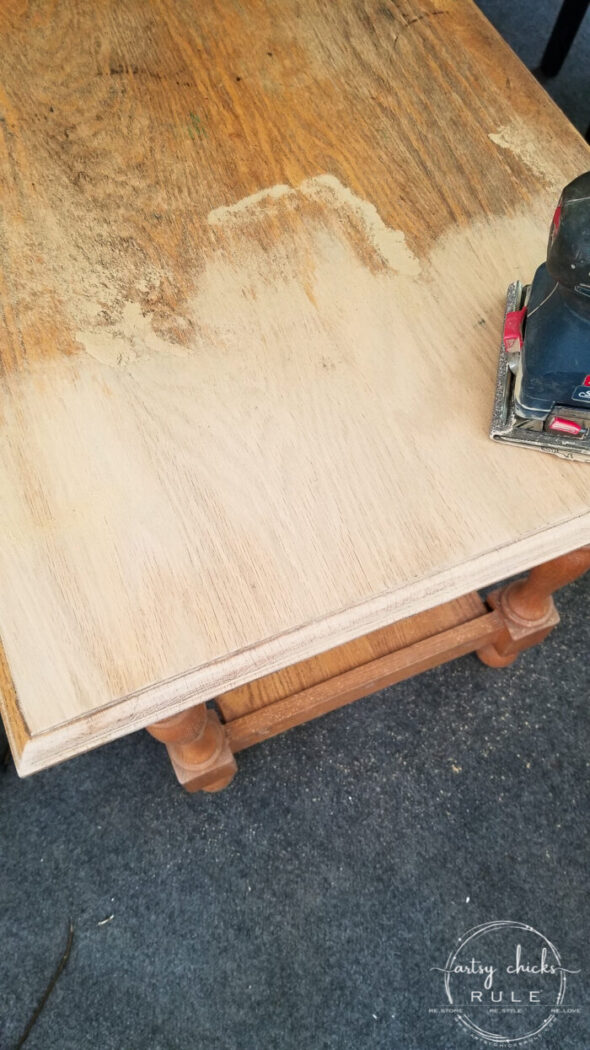
Here’s how this one looked to start…
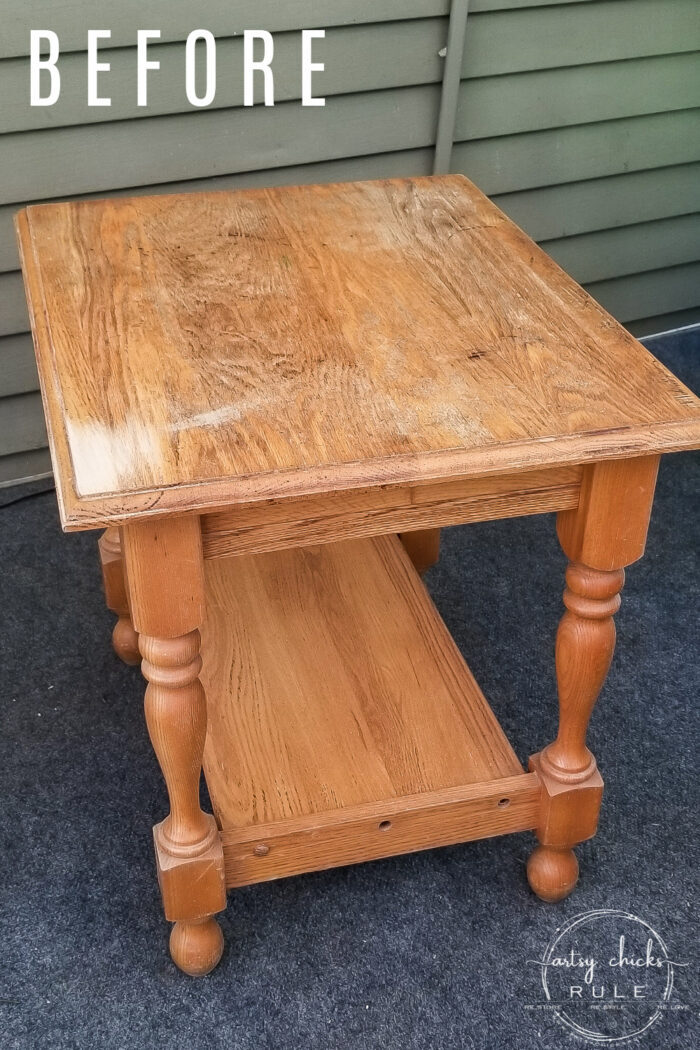
Minus that little corner where I started sanding. Oops.
SAND
But just look at what’s underneath all that orange.
Yes, yes, yes.
I don’t love sanding but you sure can’t beat revealing that gorgeous wood underneath.
Before we get too far ahead let me first mention that I did a similar project that you can see here >>> How To Get The Bleached Wood Look
But I did change a tiny bit this go-round. One thing that’s different is I ended up using the stain almost full strength (because the wood was more orange in color), I used paint to create the “white” instead of white wax and I finished up with poly instead of wax.
MATERIALS LIST
- Sander
- Water-Based Stain (in the color Riverbed) (this is no longer available so try these substitutes here, here, and here)
- White Paint
- Poly Topcoat (Flat Out Flat)
- White Spray Paint (Satin finish)
- Wood Filler
- Fine grit sandpaper
- Chip Brush
- Soft rag
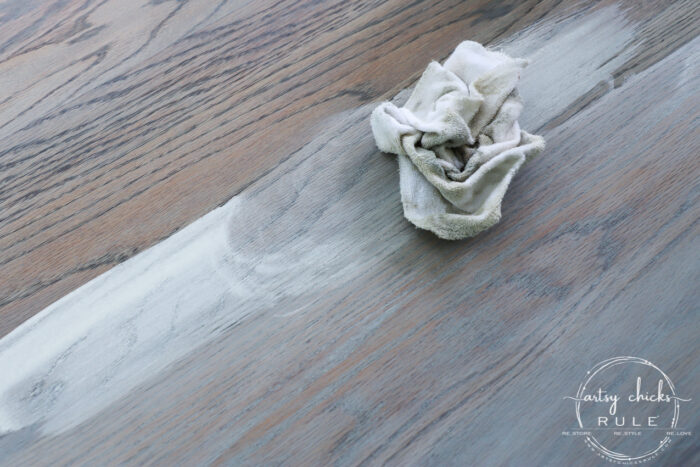
STAIN (to neutralize the orange)
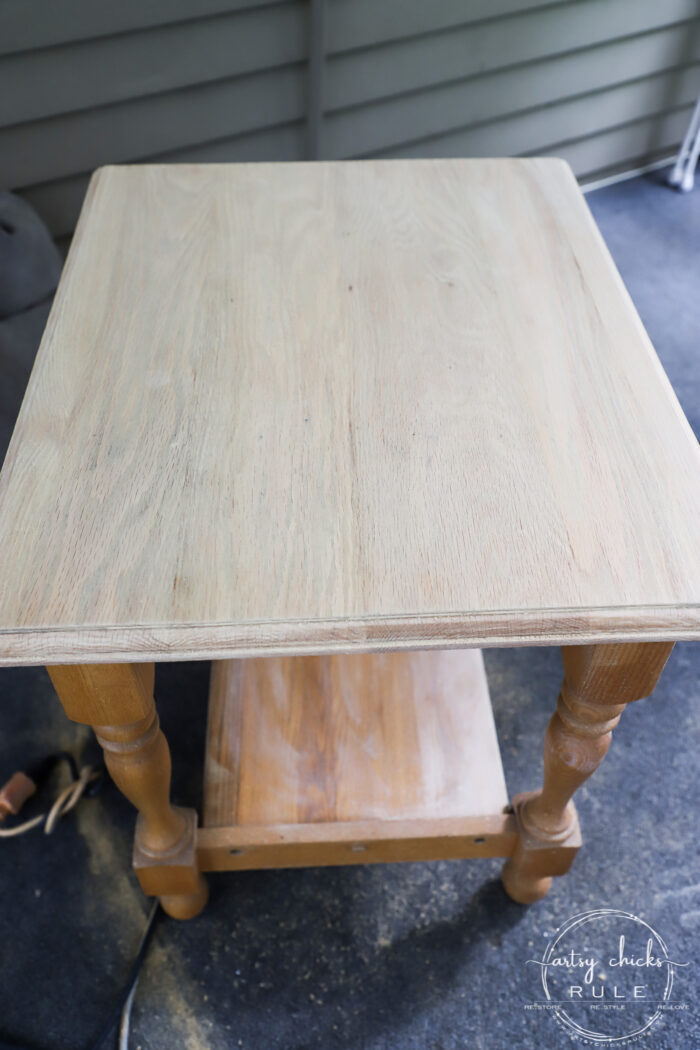
I used a lower grit to remove the finish and then finished up with a finer grit to smooth it out. Once that was done, I watered down a bit of the stain color, Riverbed (see the “Materials List” box above), and applied it with a chip brush.
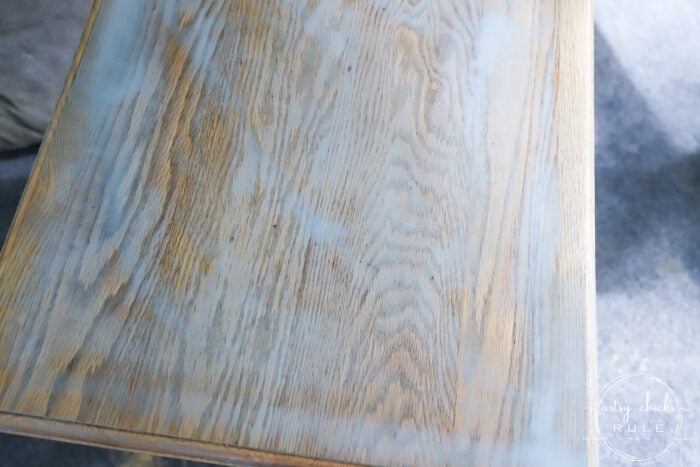
Oak will always look more orange when wet.
For this particular piece of wood, I ended up going back over it with an almost full-strength stain but wiping it away almost immediately.
That worked very well to neutralize those orange wood hues. (the green will neutralize reds/greens) Remember, as I learned from my old hairstylist days (and hair color specifically), green neutralizes red (orange). The same thing applies here.
Here it is wet after applying the stain and wiping it away…
White WASH (to give it the bleached look)
Once it was fully dry, I mixed up a little water/white paint mixture and applied it with a soft rag. (I used a baby washcloth)
Simply wipe it on and then lightly wipe away the excess. You need to do this part fairly quickly.
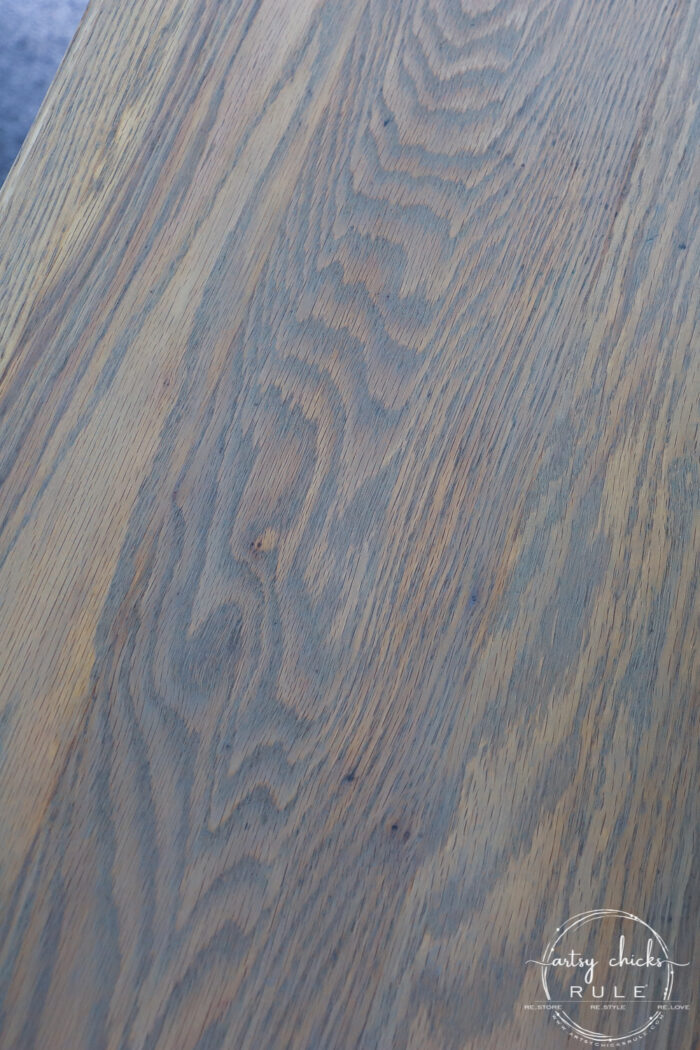
But once you are done and it is dry (remember the oak will “whiten” as it dries), you are left with this…
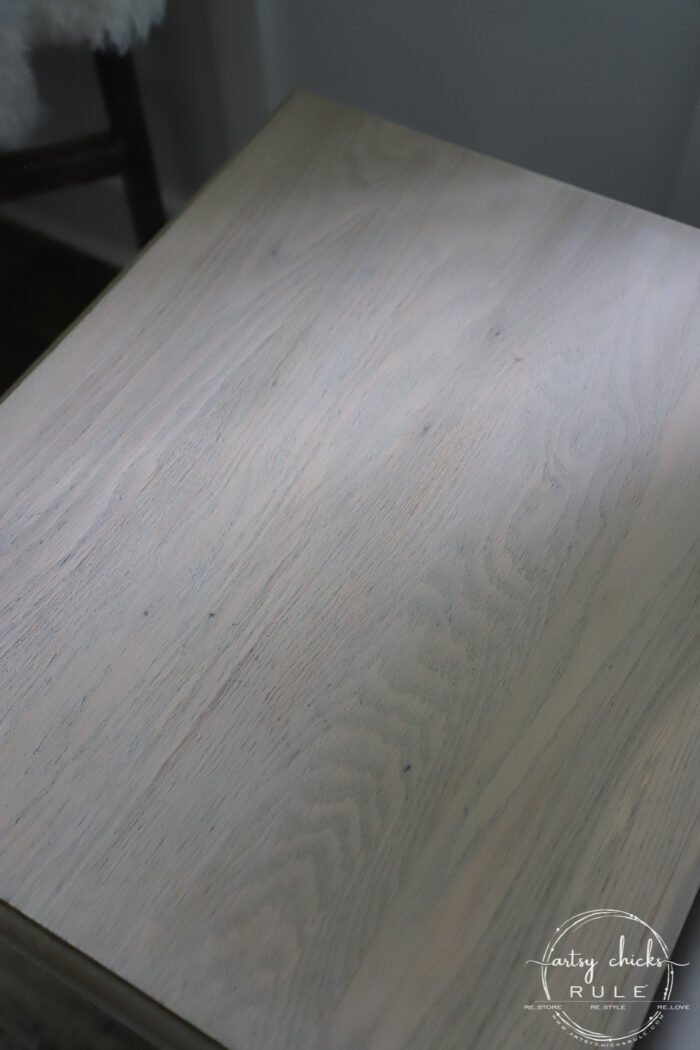
Isn’t that the coolest?
I do think the key is using the “green” stain to help counteract all of that orange.
That’s it! That’s all there is to this process and no harsh, bleachy dangerous chemicals. Yuck.
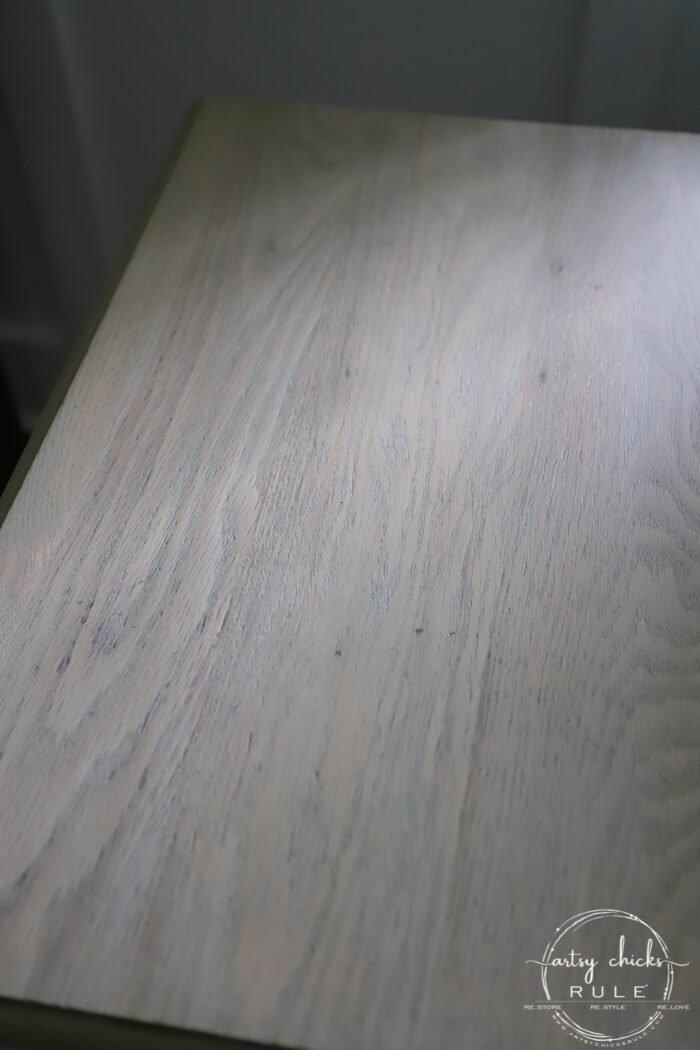
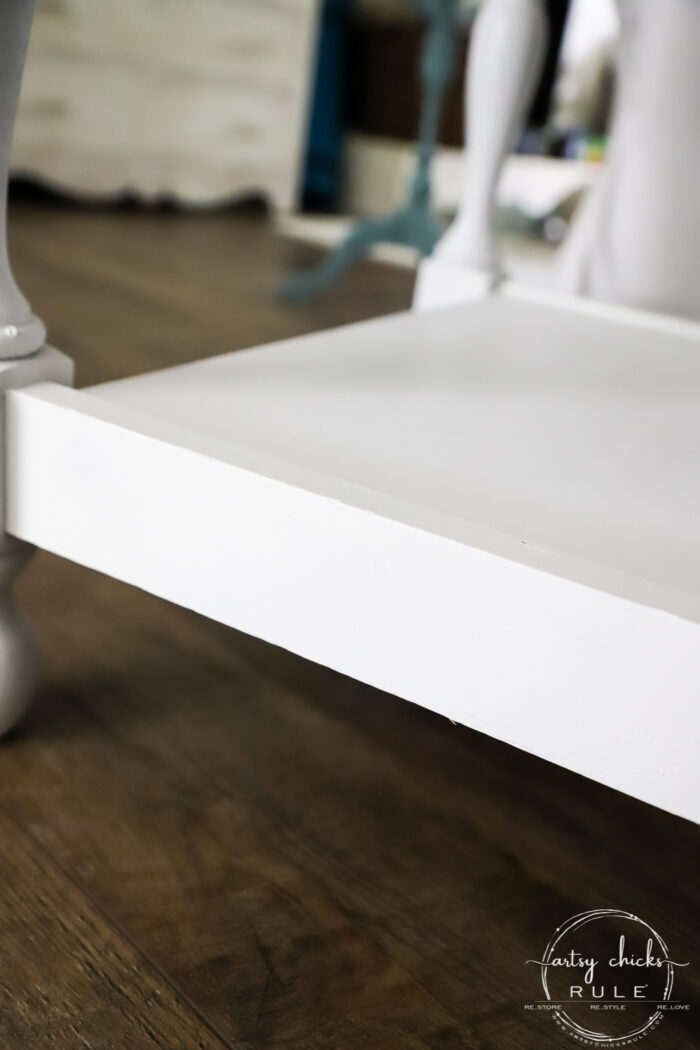
SEAL – TOPCOAT
Once it was dry I finished up with two coats of Flat Out Flat (linked above in the box), sanding lightly in between with a fine-grit sandpaper. (I used 220)
Up close…
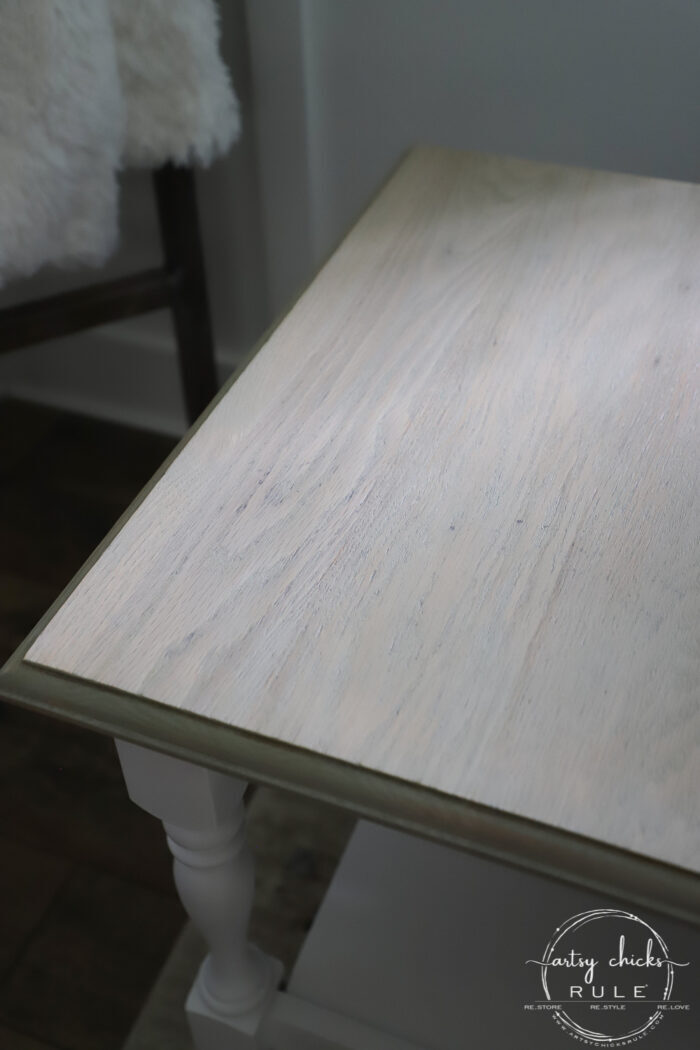
For the bottom, I simply sprayed it white with a satin finish spray paint. Easy!
Oh, and I also filled in these…
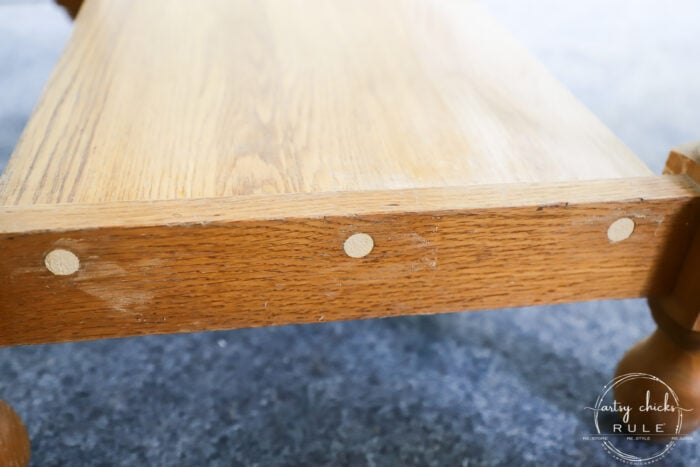
Much better…
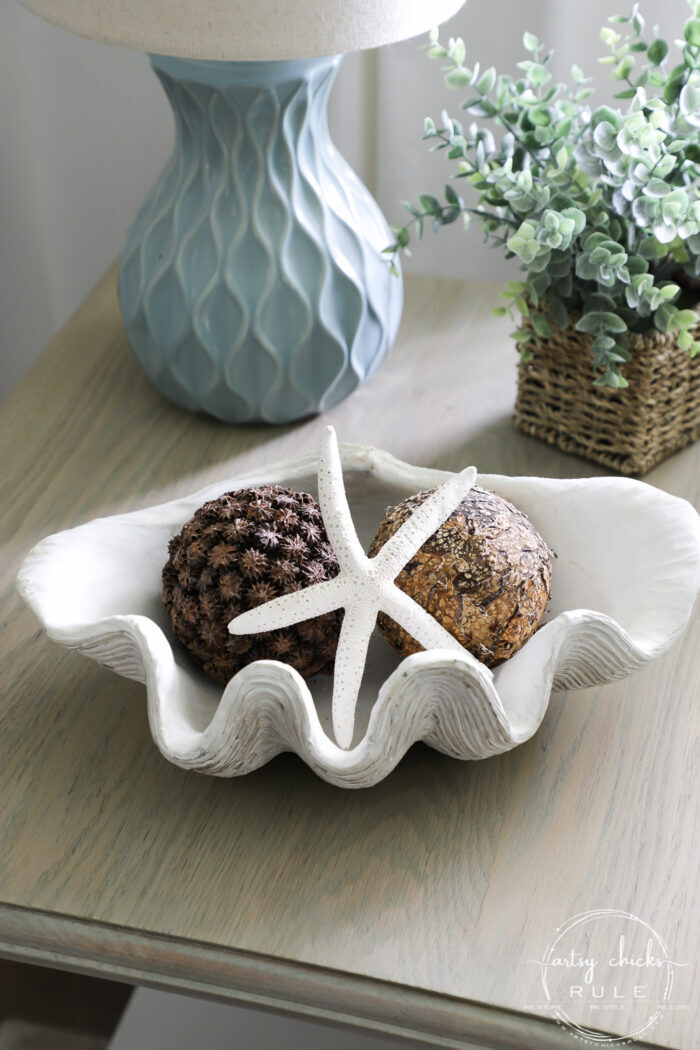
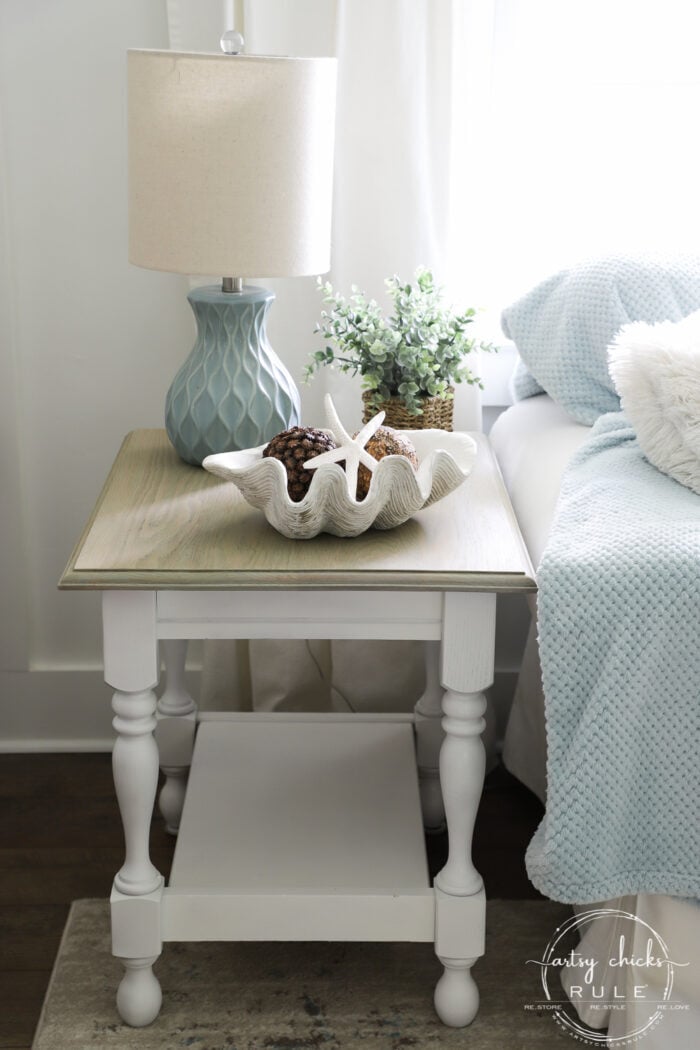
I love that this table has that bottom shelf. It’s great for baskets and such.
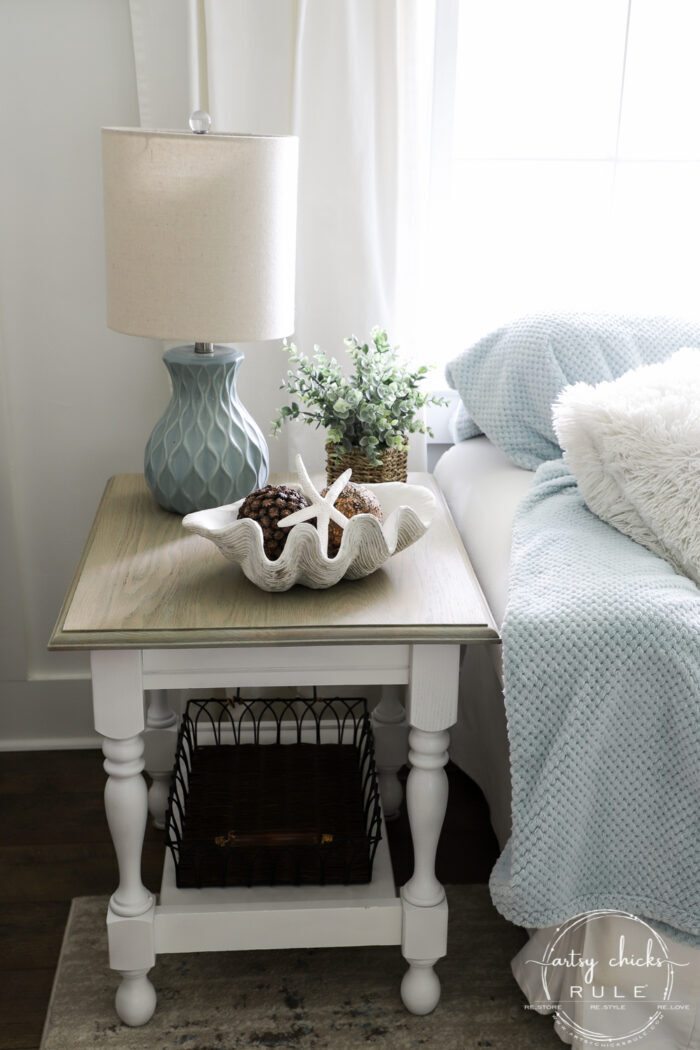

But especially great for our purposes because we are putting this on one end of our sectional at the beach house.
And that happens to be where the modem, etc., equipment is currently sitting on the floor. The bottom shelf will be the perfect spot to hold those items.
Update… you can see it here doing just that in our beach condo!
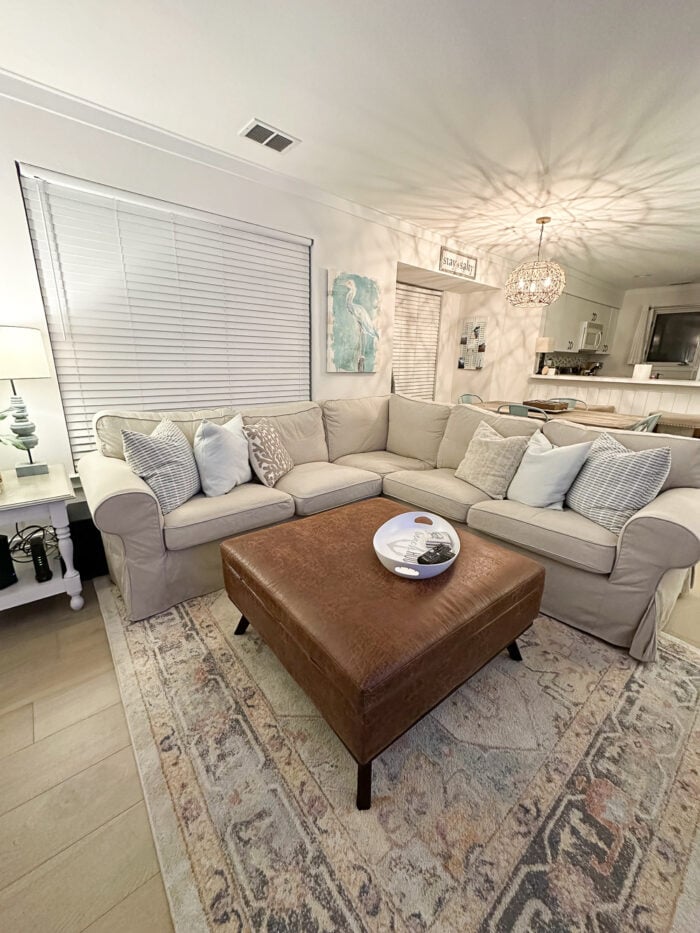
You can find this rug, here.
I can’t wait to get it over there.
Watch for my Insta Stories because I’ll be sharing a picture or two of how it looks in its new home. (see above!)
Have you considered trying “bleaching” wood furniture to give its old orange wood a new look?
Let me know! I’d love to hear about it.
More posts in the “back to basics” series:
- How To Create Faux Verdigris (and video)
- How To Create Faux Patina (and video)
- How To Dry Brush
- 26 Different Types of Chalk Style Paint
- Pros and Cons of Chalk Paint For Furniture
- 5 Top Ways To Seal Chalk Paint
- How To Chalk Paint Furniture & More!
- How To Transfer Images
- How To Import Images Into Silhouette
- How To Restain Wood Without Stripping
- How To Use Gel Stain
- How To Bleach Wood
PIN it to save it!
Missed any of the rest of the haul’s makeovers? Check them out here:
- Pink Rose Tray Makeover (with Prima transfers)
- Aqua Plant Stand Makeover
- Dog Toy Basket (Personalized)
- How To Make Orange Wood Look Bleached (end table) ( you are here!)
Stay tuned for this one next…
UPDATE!! See it now, here!
Hope you all have a wonderful weekend!
xoxo


")

Excellent job!
Thank you, Denise! :) xo
😍 Beautiful!! The link to the ‘Riverbed’ stain says unavailable. 🥺 Will you provide the Brand? Hoping to find it elsewhere or a close substitute.
Thanks! It looks like it might’ve been discontinued. I was able to find a very close substitute, Minwax River Stone water based stain.
Thank you!! I’ll be picking that up today!! 🥰
You are very welcome!!
I was going to ask this same question, so THANK YOU!
You are very welcome, Laura!
Hi Nnlancy! I love these old, solid pieces. Now I know how to turn orange into this. Thank you. Pinned
Hi Cheryl! Yes! Bye bye orange! ;) xo
Nancy, when I saw the photo of the top after you put the Riverbed stain on it, I said “wow” out loud. Then, after the white wash, I said “WOW!!”. It is a wow makeover for sure. Love the white base with the beachy top. Beautiful job!! I know it looks great at your beach place.
Enjoy!!
Oh, haha, I love that, Christina! I can’t wait to get back down there and see how it looks where I plan to use it. Excited! :) xo
Love the end table. I have one almost identical. Question: I am having trouble finding the Riverbed Water-based stain. The link doesn’t show this color option. Varathane is by Rustoleum and I don’t see it there as an option. Do you have more info for finding the Riverbed color?
Thanks – love to see the great things you do!
Oh fun, Kim! What are you going to do with yours?
And no, the Riverbed is a color it comes in and you have to have it mixed at the store. (I hope they still offer that color…it was in store that I bought it) Okay, I just clicked over to the link and if you click the bottom collection of colors (the colorful ones) you will see it. It’s all the way on the bottom row in the middle…and it looks GRAY! LOL Which is why I chose it in the first place at the store. But when mixed it looks much more green which I was not happy about BUT it’s worked out so great for these other projects. :) xo
Turned out beautiful! Could you please clarify or repost the flat out flat top coat you used. When I click on it, the dixie belle drop cloth paint comes up instead. Thanks!
Hi Catherine! I’m so sorry, I had several messed up links today. OOPS! I usually proofread better than that. It’s by Gen Finishes and I have fixed the link so it should be good to go! :) xo
Thanks so much. I love your work and always interested in the product you use!
Thanks, Catherine!! So happy you enjoy the blog! :) xoxo
Hi Nancy – always happy to see “orange-y” go away – excellent job.
What brand of Poly Topcoat do you use? (the link goes to DB paint)
Thanks,
Sheila
Oh yes, you and I both, Sheila! And yes, I’m sorry about that! I didn’t proofread as well as I usually do. It’s by Gen Finishes and I actually had several links goofy but they are all fixed now! xo
That is gorgeous! TFS your technique.
Thank you, Tracy! :) xo
I love this!!! So pretty!
Thank you, Maria! :)
I don’t why, but at first glance of the make-over picture, my brain refused to believe it was the same table. I knew it was, but my brain kept saying. I had to go back to the original picture and actually compare the the tables to believe it.
For the first time you wow’d me so completely, I did not believe you! LOL
Awesome job on this one. I love it!
Aw, yep! Same table!! Isn’t that the most fun thing about making over old finds? And haha…that’s great! I am so happy to hear I have wow’d you that much! Yay!!! :) xoxo
Beautiful! Thanks for sharing your technique!
You are very welcome, Vicki!! And thank you as well. :) xo
From drab to fab. I love it!
You got it!! Thanks, Lizzy! xo
That is awesome!!! Do you think that technique could work on orange pine furniture?
Thanks, Marty! Yes, I do! But keep in mind, all varieties will turn out a little differently. Some will be lighter and some with be darker, etc. But you can control that a little too with the finish white wash coat and you’ll see why when I post my oak table and chair set. ;) xo
I love it!! This will be perfect at your beach house!! XOXO
Thank you!! I think so too! :) xo
I love your table what a transformation! I have two pine end tables that need a redo..how did you prepare the bottom half ? Did you sand it first ?
Thank you, Denise! :) I cleaned it up well, then quickly ran the fine grade sandpaper lightly over it by hand, then spray painted it.
A definite improvement. I far prefer this look!
Thanks, Rose!! I think so too! :) xoxo
Thanks for the stain tip!
You are very welcome, Sharon! :) xo
Hi! I am late to the party and the link for Riverbed stain no longer shows any info, even brand. Any chance you could tell me what brand it was, and whether it was transparent, semi-transparent or solid? I’m sure I can find something similar if I know what I/m looking for. Thank you for this awesome information – I have a whole wall of dark orange wood bookshelves.
It was Varathane water-based stain mixed in the color “Riverbed”. I can’t seem to find it anywhere online, I wonder if they discontinued?
I just came across this…WOW! Did the legs or have a glossy finish before you lightly sanded? I have old Broyhill Fontana pine coffee table in the garage that is in great shape but it’s orange😝 and has a finish. Will light scuff sanding allow the white paint to adhere to the legs or should I use primer after scuff sanding, then paint. Thanks so much.
Hi Lulu! They had a bit of gloss but not terribly so, if I remember right. A light sanding usually suffices for most paint though! You just want to be sure you take the shine down/off. Then clean the dust well and paint. :)
Thank you! Your projects are amazing!
Love the redo….but here in Arizona I don’t have a beach house!!! Looks great at yours though!
OH!!!! Poor baby Ryder!!! That is a huge scar…..hope he is feeling better and all his tests come out perfect!!! He is such a cutie and appears to be a real love bug. Bill, my dog, sends his love and get well wishes.
Thanks, Addie! That’s true, isn’t it! Desert themes there I guess?! I’ve never been but would love to visit Arizona one day!
And yes, it was a larger scar than I was expecting. Poor guy. He’s doing great though! Tell Bill thank you!! :) xo
That looks amazing in your beach home, Nancy!!!
Thanks, Michele!! It’s just perfect there!! xo
Thanks for sharing your beautiful pics! Love that rug! May I ask where you got it? Ryder is an adorable baby doll! I’m praying for his speedy recovery. Just love him❤️
Thank you, Nancy! Sure! Here’s the link to the rug.
And thank you for the prayers! He is doing really great! Haven’t heard anything back yet but soon, I hope! xo
This came out so pretty. Perfect finish. Positive thoughts for Ryder!
Thank you, Debra! He’s healing well! xo
I love the new look! So much better!
Thank you Rose!! xo