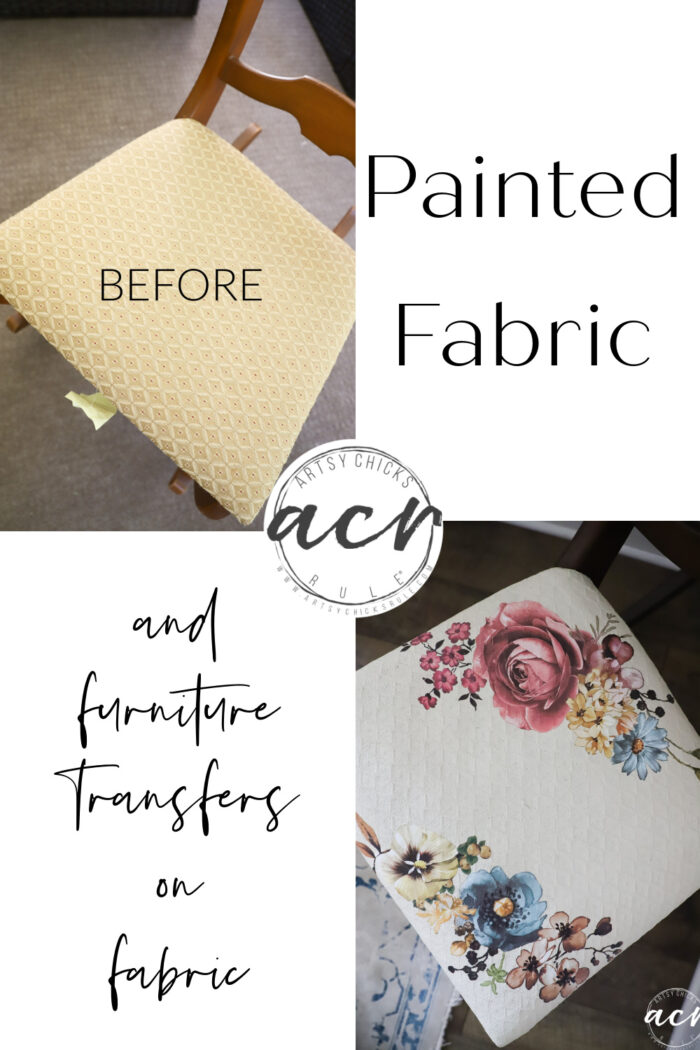
Let me show you how to paint fabric with Fusion Mineral Paint! It’s so easy to do and change up your project in a new way!
Hello my friends!
I hope you had a wonderful weekend! We had a nice quiet one (well, quiet because of the weather but it was not quiet actually also because of the weather! ha!) Tropical Storm Ophelia made her way through here and it was quite windy and rainy. Our electricity went out for a few hours and lots of small limbs and leaves on the ground but that’s about it, thankfully! Other parts of our little town were flooded (tide) but thankfully we live on the higher side and don’t see that often. Mostly back to normal on Sunday.
I did do a little work on this one that I’m sharing today to finish it up.
How To Paint Fabric With Fusion Mineral Paint
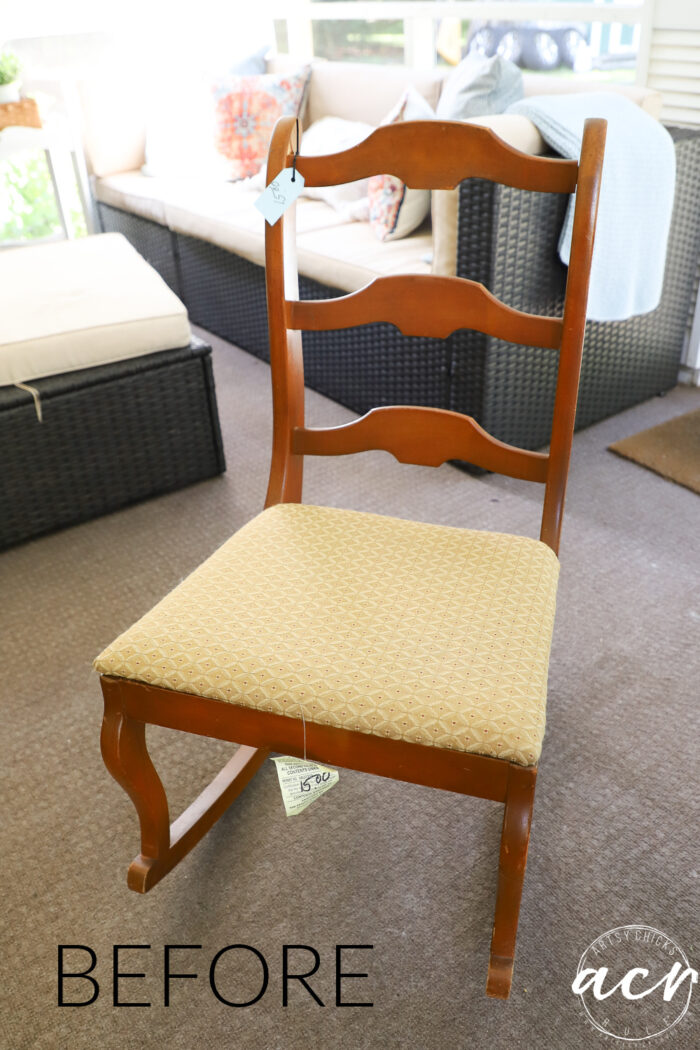
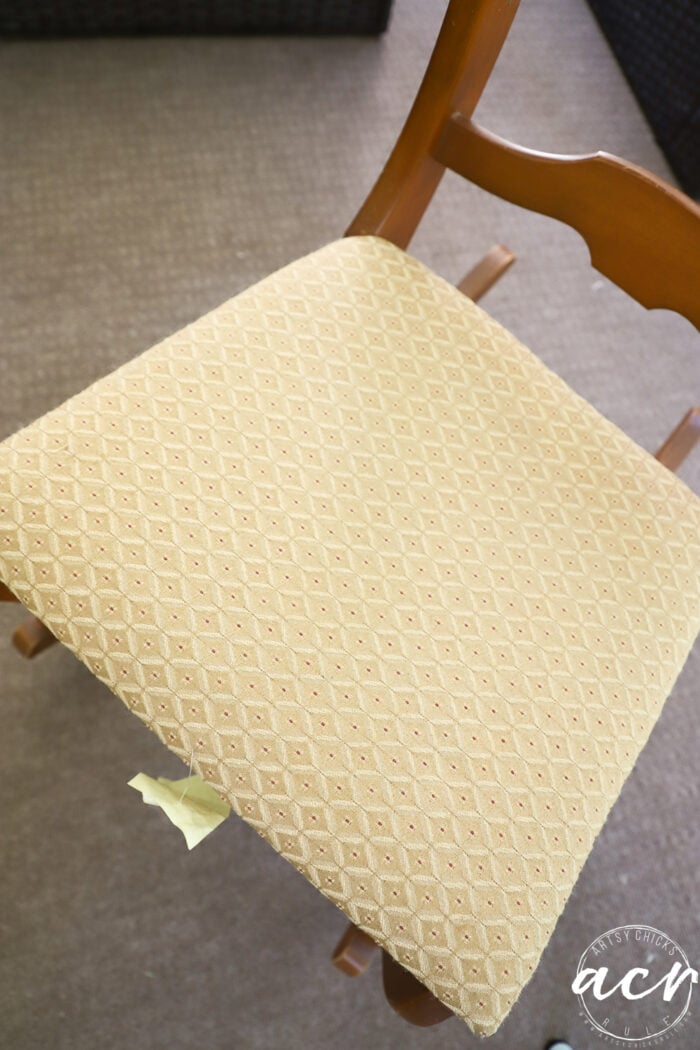
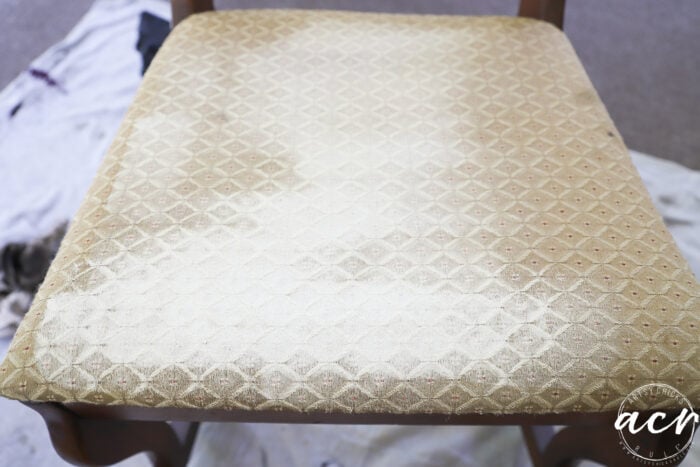
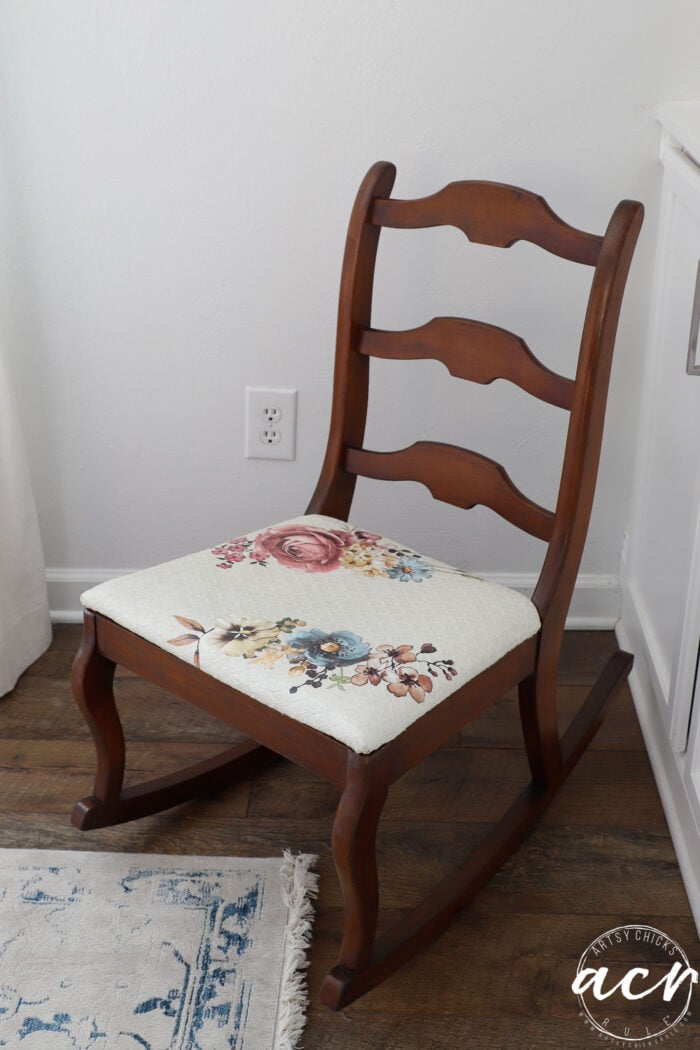
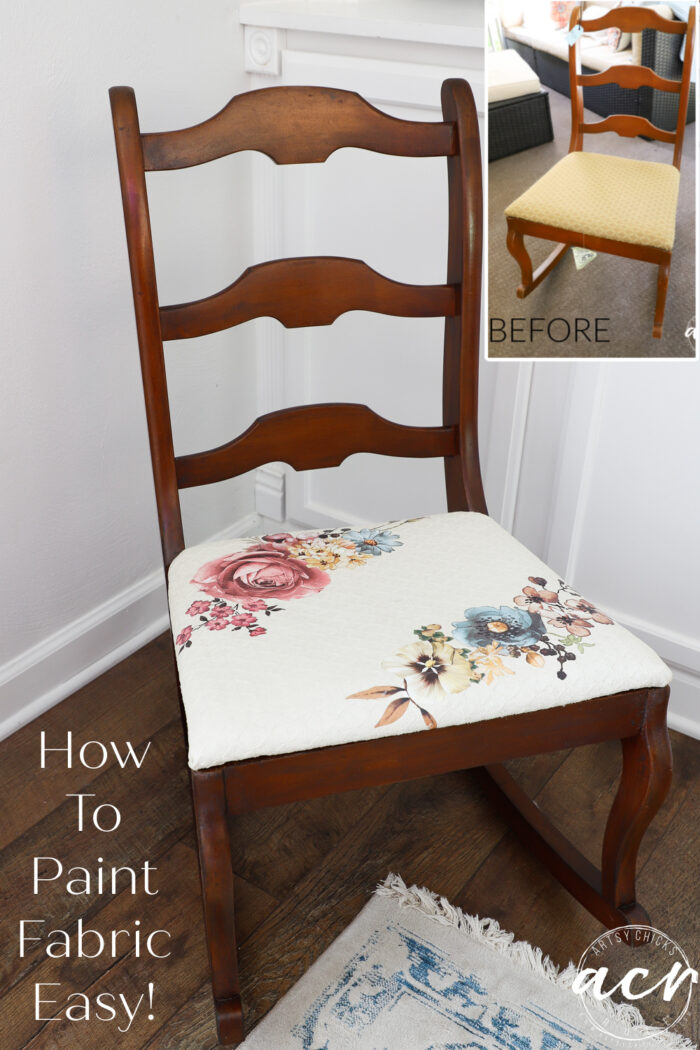
Remember last week I shared this rocker I found??
$15
A little beat up but the seat was in good condition. I just didn’t love the mustard color, etc.
So I considered what to do. I thought about just changing it out but then I thought I’ll just paint it instead!
And that’s exactly what I did.
I mean, hey, this ain’t my first rodeo! ;) I have painted fabric quite a few times in the past. But I hadn’t tried it with Fusion yet so here we are! I had to know if it would also work well. And it does!
Here’s a few other painted fabric projects I’ve done (with other paints):
I wanted to keep the wood look too. I could’ve easily painted it but decided to keep it stained.
I could’ve also sanded it all down and restained it. But who has time for that?? lol
Kidding! Totally doable but ugh all those surfaces would’ve been a pain to do. You know what I’m saying.
So I decided to use our Stain and Finishing Oil in the color Cappuccino instead.
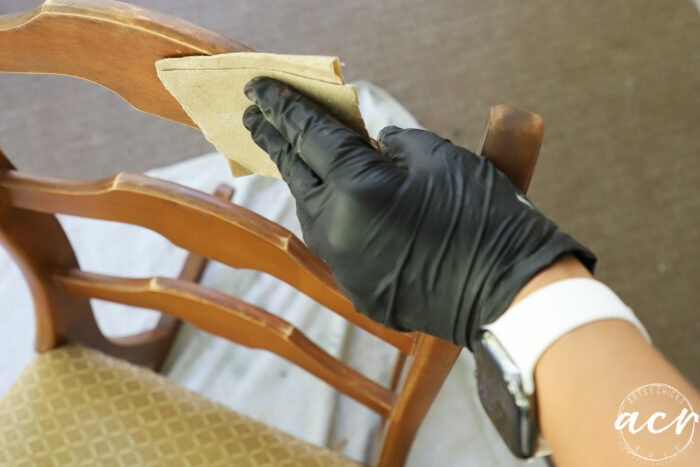
I lightly sanded the entire rocker. After doing that I wiped it all down very well to remove the dust, etc.
STAIN
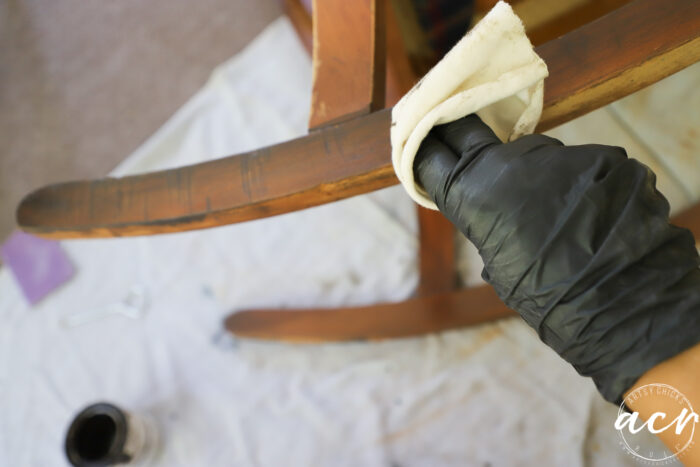
Once dry, I applied the Cappuccino Stain and Finishing Oil all over with an old t-shirt.
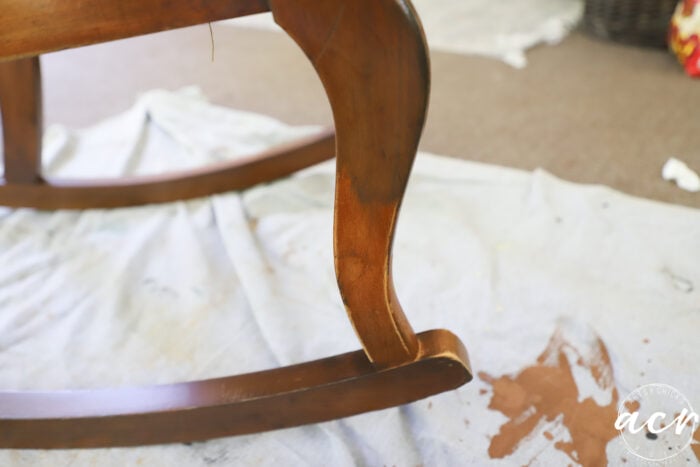
You can see the difference between the original orangey finish and the new finish on the leg below.
You can see where I’ve applied the stain on the leg and where I haven’t yet.
PAINT THE FABRIC
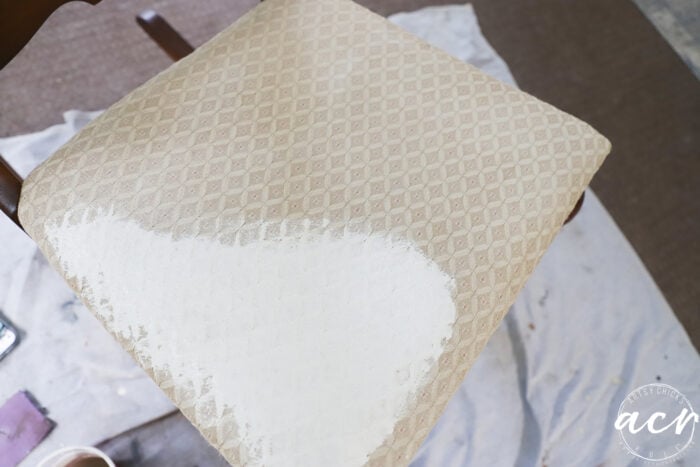
After applying that and letting it sit for a day or two I got to work on painting the fabric.
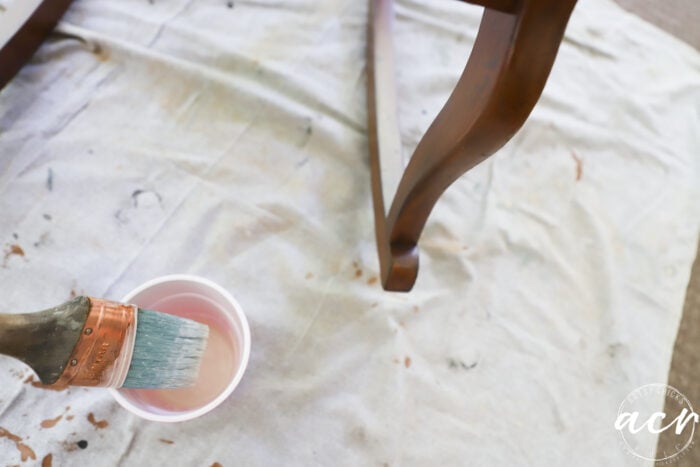
To begin, I mixed the paint with water. About half and half.
It’s pretty watery but you’ll want it watery so it can soak into the fabric. You really don’t want it to just sit on top.
It almost acts as a stain.
Just apply it with a brush like you would paint any other furniture piece.
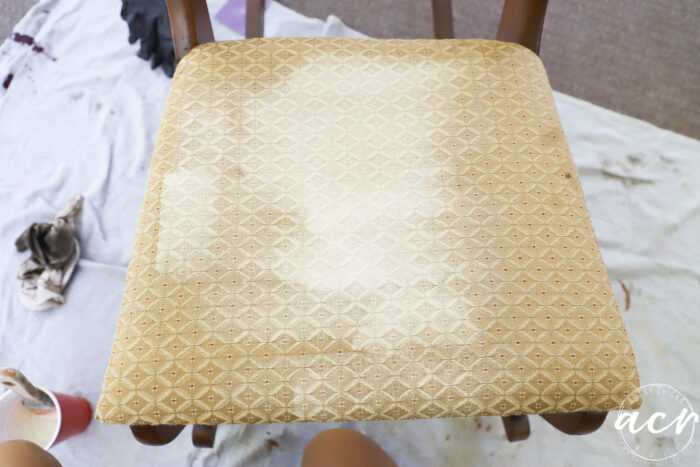
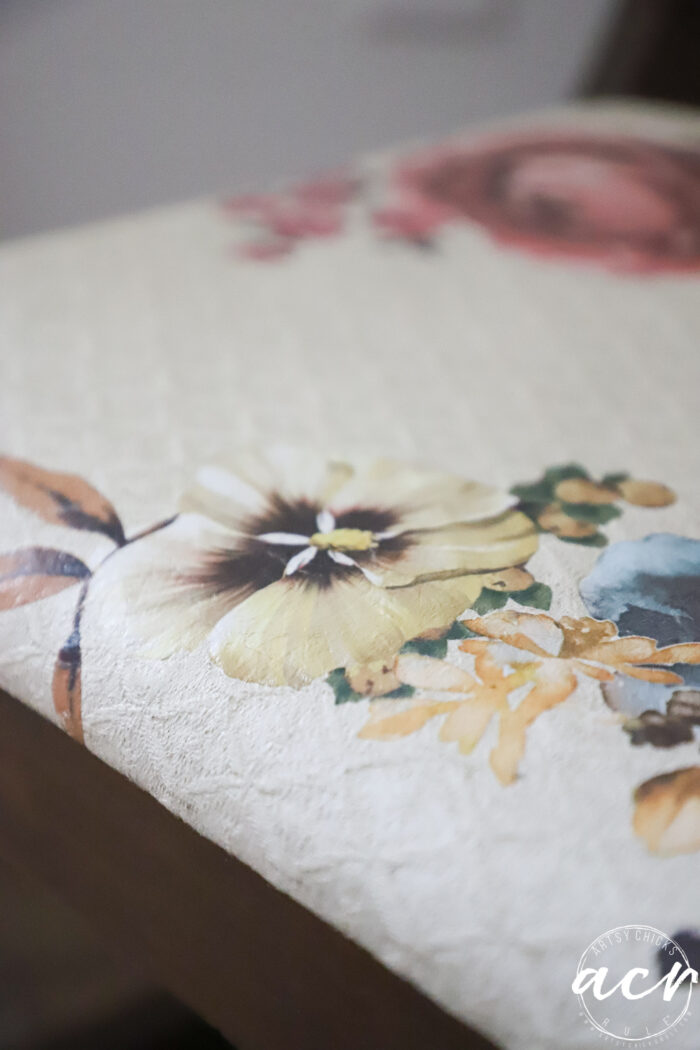
It looks like it has more coverage than it will have when dry when you first apply it. As it soaks in it becomes more transparent.
Let that coat dry and go again. This time with a mixture of about 1/3 water and 2/3 paint.
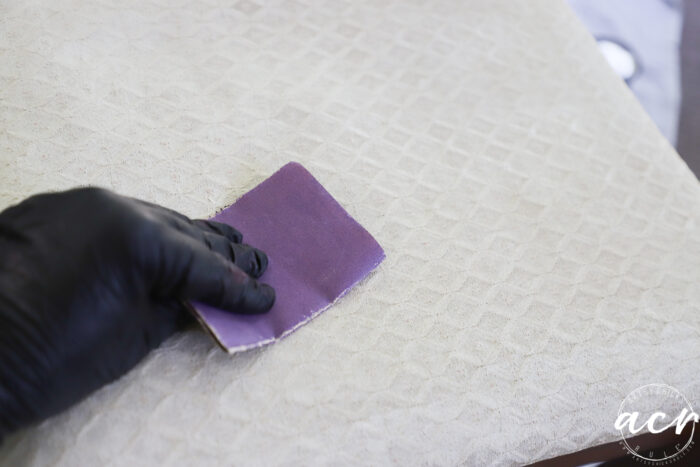
Once that coat is fully dry, I lightly sanded it all over to remove the roughness. This will give the fabric a smooth feeling.
I touched up a few areas that looked like it needed it and that was it! Lightly sand one last time.
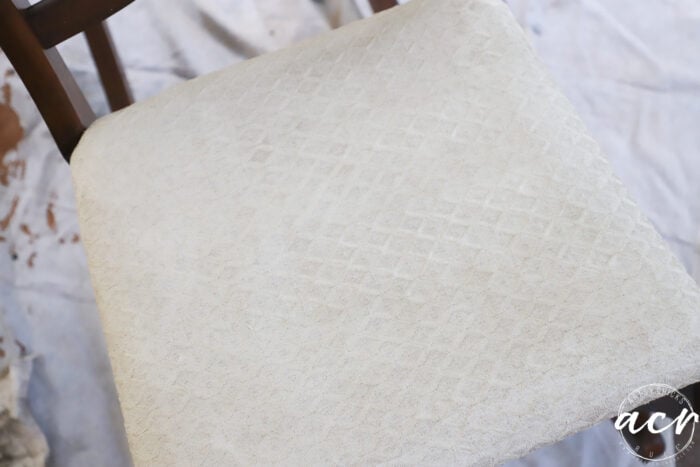
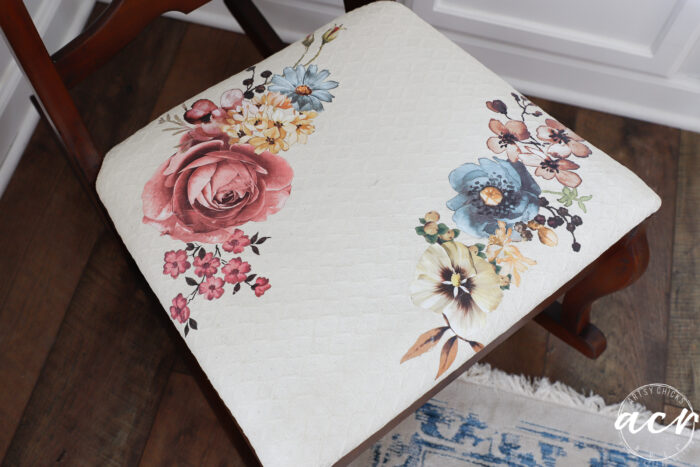
So as you can see, I was going for an antique look. Darker wood and a creamy, soft-colored seat.
But I wanted to take it a step further.
I decided to add a furniture transfer to it. I had never put a furniture transfer on fabric so thought I’d give it a go!
I love how it turned out! Who knew?!
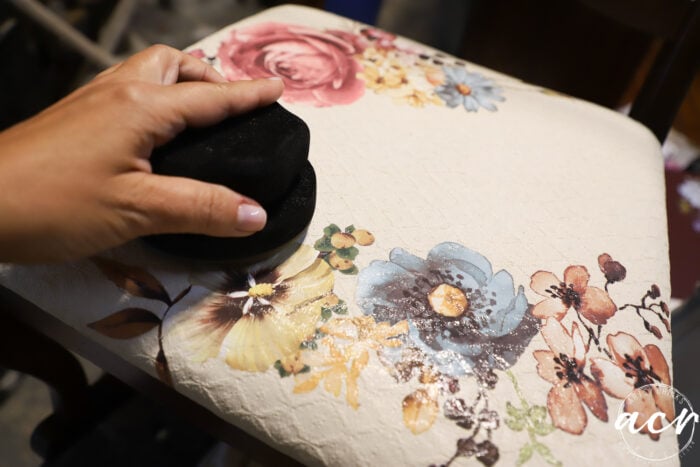
TOUGH COAT TOPCOAT
After that, I simply added a coat of Tough Coat Topcoat over the seat with my handy sponge applicator, and done.
Love this sponge applicator! (you can find them in our shop here and the link is also in the box above, “Materials List”)
Now, in all honesty, it wasn’t quite that simple as in I wasn’t sure what I was going to seal it with. I considered wax.
I also always seal paint on fabric (and leather like on this ottoman here) with wax. It’s just a softer more pliable finish. BUT with a transfer, I just felt like the Tough Coat poly would be better. I was a little concerned about how the fabric would feel once dry but I needn’t have worried! It was fine.
And well protected now too. It only took me 5 days of mulling it over back and forth to come to this decision! lol
By the way, if I were not using a furniture transfer on this fabric, I’d have used wax.
Isn’t she sweet?
I can see using this in a corner of a guest room. Or even in a young girl’s room.
I’ll be back on Thursday with all the transfer details!
Absolutely LOVE this. Reminds me of the lovely embroideried tapestries you see on antique chairs, hardly seen anymore because it was so time-consuming to create. Just lovely.
This chair is so beautiful the transfer really put it over the top. Would never have guessed you can put transfer on fabric. This really great. You are very talented.
A vast improvement! I am covering a little footstool with a plain sturdy cotton fabric and planning to use dark wax to stencil a design. Would the tough top coat be a better protection for this than a clear wax? Thank-you!
Hi Ruth! If you are using wax to do the stencil then you’d need to use wax to seal. You can’t put a poly topcoat over wax unfortunately. I think the wax will be fine! I just did a wax seal on todays project. 🥰
Love the rocker! I’m trying this! Question: why didn’t you strip the wood before applying the stain? I have an old Broyhill fontana orange pine side table $3) that I’d like to refinish for our guest room. Can I skip stripping it? Thanks
Thanks Lulu!! I didn’t really feel like stripping it! You can but don’t have to. You just want to sand a bit to give it some “tooth” to grip onto. And it also depends on the look you want. There are times that I will absolutely strip beforehand. (I think stripping and starting fresh is going to give you a nicer finish most of the time…but I was okay with “imperfections” on this one because I was going for that antique look) Hope that helps!! xo
This turned out so pretty! I love that the texture of the fabric still came through. Also, I had no idea you could just lightly sand and use the stain and finishing oil to change the color of orange wood. This opens up all kinds of possibilities! Great makeover!
Hey Vicki! Yes it sure does!! You’ll want to sand enough to give it a little “tooth” to grip onto. But yes, no need to sand all the way down. And thank you!!xo
Dumb question, maybe. But can you actually USE the chair? It’s beautiful as an accessory alone. But an an extra chair In the dining room, can it be pulled to the table and sat on now and then? I would be too terrified to let anyone use it!
Hey Jaymie! No dumb questions at all! Yep, you sure can. Will be more stain resistant than any of the rest most likely! ;) Anything spilled would wipe right off. Don’t be afraid to use it for sure! xo
Want to be inspired, learn new skills, discover all the tricks to furniture makeovers, creating new out of the old and more? You'll also receive my FREE ebook "Creating Fabulous Finishes" PLUS access to my private Printables Resource Library, too!
Sign up to get the Weekly Newsletter! Our emails include an unsubscribe link and you may opt-out at any time. Your information will *never* be shared or sold to a 3rd party.


")


Absolutely LOVE this. Reminds me of the lovely embroideried tapestries you see on antique chairs, hardly seen anymore because it was so time-consuming to create. Just lovely.
Yes, it really does!! Thank you, Sheila!!❤️
That transfer is beautiful! Can’t wait for the details on that!
Thanks Michelle! I posted today all about it!!💗
This chair is so beautiful the transfer really put it over the top. Would never have guessed you can put transfer on fabric. This really great. You are very talented.
Aw thanks, Sue!! So fun and opens up a ton of possibilities! xo
A vast improvement! I am covering a little footstool with a plain sturdy cotton fabric and planning to use dark wax to stencil a design. Would the tough top coat be a better protection for this than a clear wax? Thank-you!
Hi Ruth! If you are using wax to do the stencil then you’d need to use wax to seal. You can’t put a poly topcoat over wax unfortunately. I think the wax will be fine! I just did a wax seal on todays project. 🥰
Wow! That really looks terrific! I love the way the fabric pattern shows through, and the transfer really puts the finishing touch on it!
Thanks, Audra!! I like that too!! 🥰
I love what you did to the seat! It is so pretty! Would love to see the wood painted one of the blue shades in the flower.
That would be pretty too, Rose! 🥰
Wow, she’s so pretty now!
Thank you, Michele!! ❤️
So cute!!
Thanks, Cheryl!!❤️
Love the rocker! I’m trying this! Question: why didn’t you strip the wood before applying the stain? I have an old Broyhill fontana orange pine side table $3) that I’d like to refinish for our guest room. Can I skip stripping it? Thanks
Thanks Lulu!! I didn’t really feel like stripping it! You can but don’t have to. You just want to sand a bit to give it some “tooth” to grip onto. And it also depends on the look you want. There are times that I will absolutely strip beforehand. (I think stripping and starting fresh is going to give you a nicer finish most of the time…but I was okay with “imperfections” on this one because I was going for that antique look) Hope that helps!! xo
Wow! I would never have thought of doing this. It is really beautiful. Thanks for all your ideas and inspiration.
Thank you, Carol! It really opens up some possibilities, doesn’t it?! xo
This turned out so pretty! I love that the texture of the fabric still came through. Also, I had no idea you could just lightly sand and use the stain and finishing oil to change the color of orange wood. This opens up all kinds of possibilities! Great makeover!
Hey Vicki! Yes it sure does!! You’ll want to sand enough to give it a little “tooth” to grip onto. But yes, no need to sand all the way down. And thank you!!xo
Dumb question, maybe. But can you actually USE the chair? It’s beautiful as an accessory alone. But an an extra chair In the dining room, can it be pulled to the table and sat on now and then? I would be too terrified to let anyone use it!
Hey Jaymie! No dumb questions at all! Yep, you sure can. Will be more stain resistant than any of the rest most likely! ;) Anything spilled would wipe right off. Don’t be afraid to use it for sure! xo