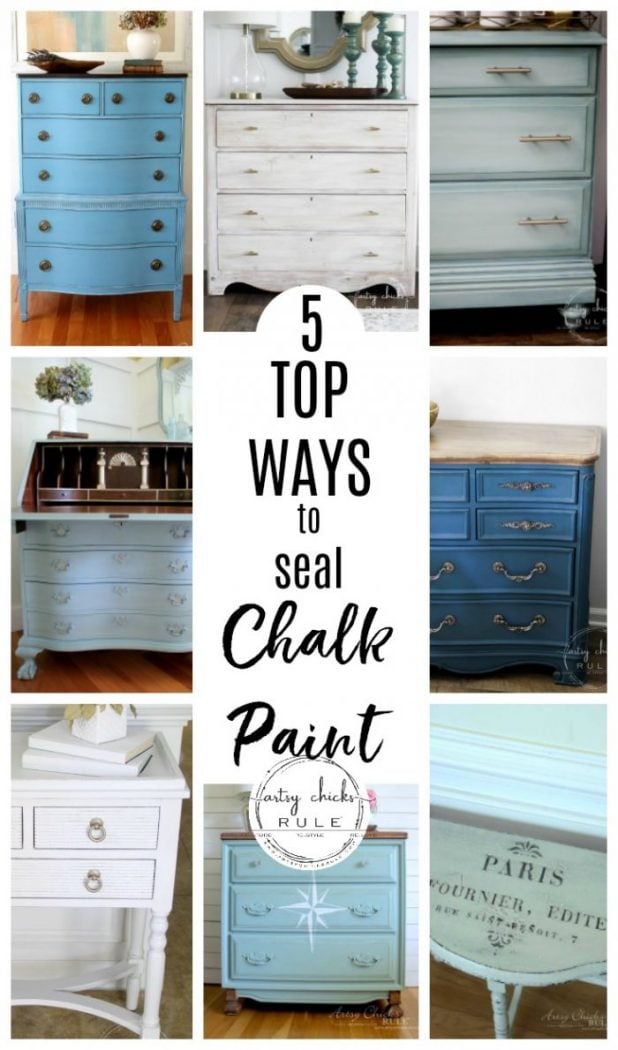
The 5 Top Ways To Seal Chalk Paint (or Milk Paint!)
I love using Chalk Paint to paint furniture, and just about anything. So today I’m sharing the 5 top ways to seal Chalk Paint (plus pros and cons of each)!
I’ve had a long love affair with Chalk Paint.
I’ve been painting and refinishing furniture (and just stuff) for so many years, I can not even count.
So when I first heard about this Chalk Paint stuff, I had to try it out. That was at least 8 or so years ago.
I mean, how fun is it to try something new when you’ve been using the same ole, same ole for years?
So much fun.
Well, the Chalk Paint led into so many brands and types, which then led into Milk Paint and so on and so on. But today it’s all about Chalk Paint.
However, these tips for how to seal Chalk Paint can also go along with sealing Milk Paint, too.
So keep that in mind if you are a Milk Paint lover. I never really got on board with that much.
I do have a few pieces on my blog that are milk painted but I didn’t fall in love with it.
Although, I do still plan to do a few more pieces with it! (I have more samples to use over here and want to try a few things)
Of course I started out using wax to seal Chalk Paint because that is how I was told to do it.
I quickly, very quickly, decided to try poly instead. I had good luck with it (and at the time, wasn’t even sure if it was supposed to work or not because I hadn’t really seen anyone using it as a sealer for CP)
Wax and I have not always had a love affair. ;)
It’s a love/hate relationship, for sure. And for many reasons.
As I go through the top 5 ways to seal Chalk Paint today, I’m also going to give the pros and cons of each, that I’ve found along the way, plus a few product options.
You’ll find there is no “perfect” sealer. They all have pros and cons.
It just depends on the look you are after, the durability you are after, and the amount of work you’d like to put into it.
I hope this post will be helpful to you in your future makeover adventures!
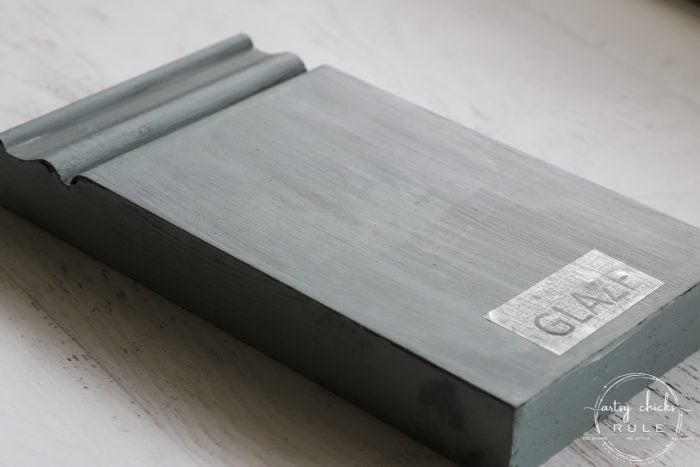
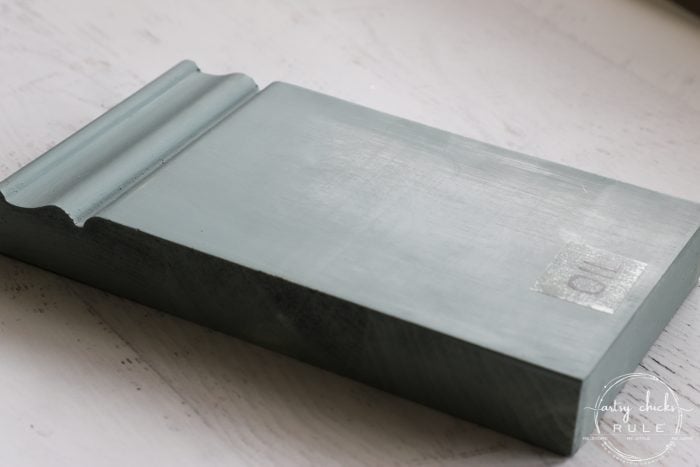
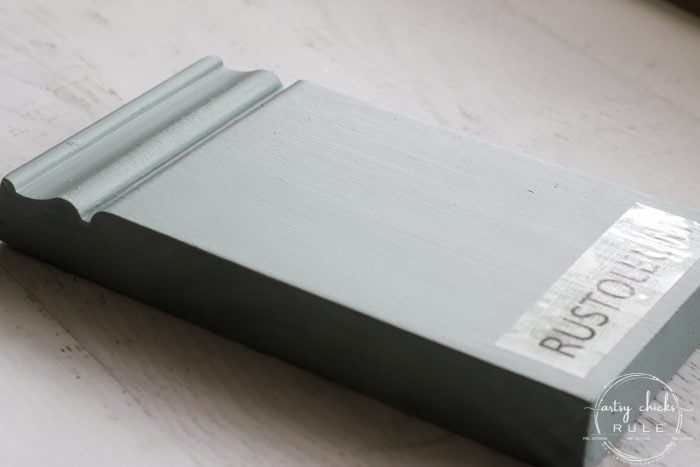
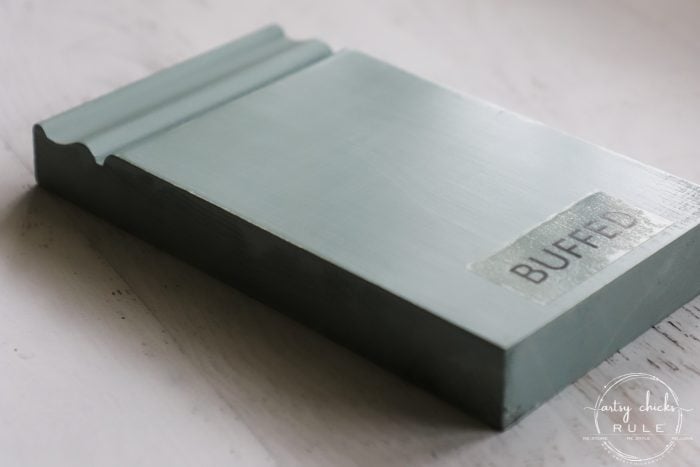
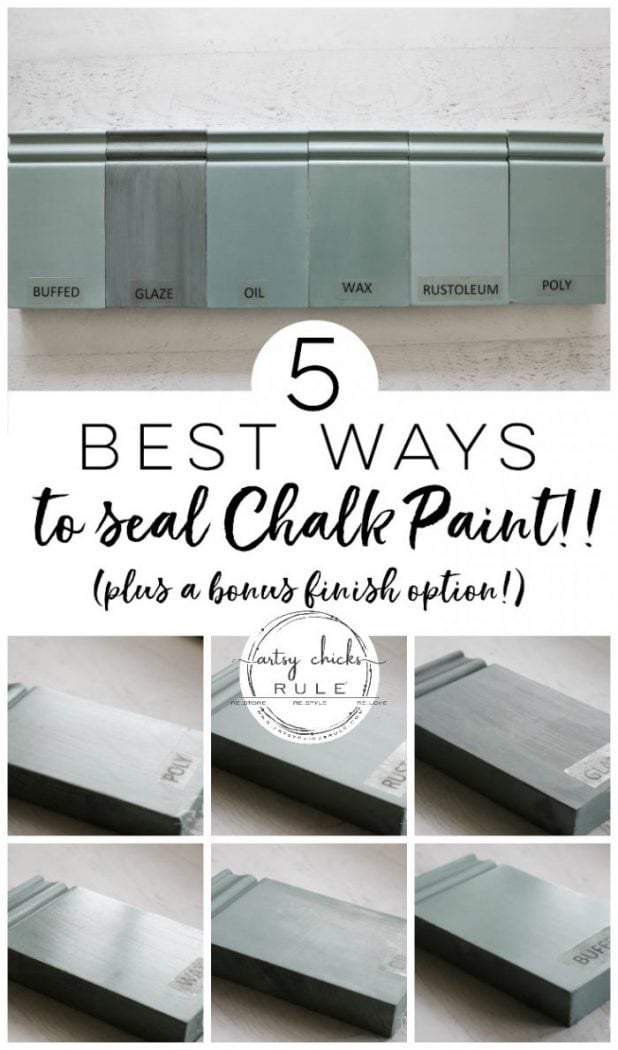
I finished 5 boards with Chalk Paint and varying sealers so you can see (somewhat anyway, it’s hard in photos) what the different finishes look like. (AND how the different finishes change the look of the paint)
I really should be calling this 6 but one is not an actual sealer that I’m sharing today but it can be used as such…if you accept the cons that go along with it.
5 Ways To Seal Chalk Paint
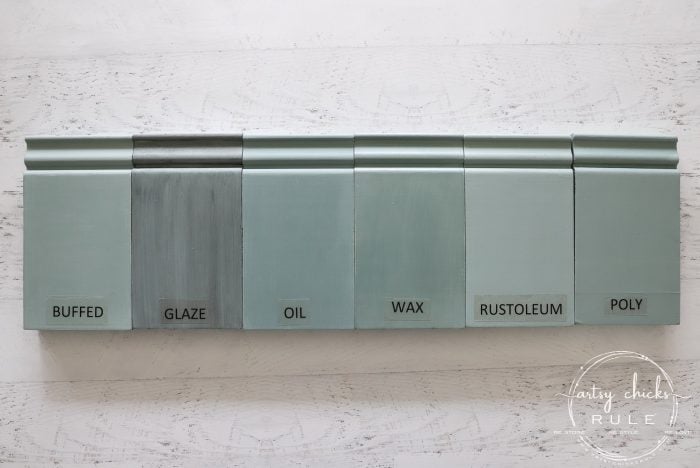
Isn’t it amazing how each top coat gives the paint a completely different look?
That is something else to keep in mind when deciding on a top coat for your project.
By the way, I used Duck Egg Blue (Annie Sloan Chalk Paint) on the sample boards.
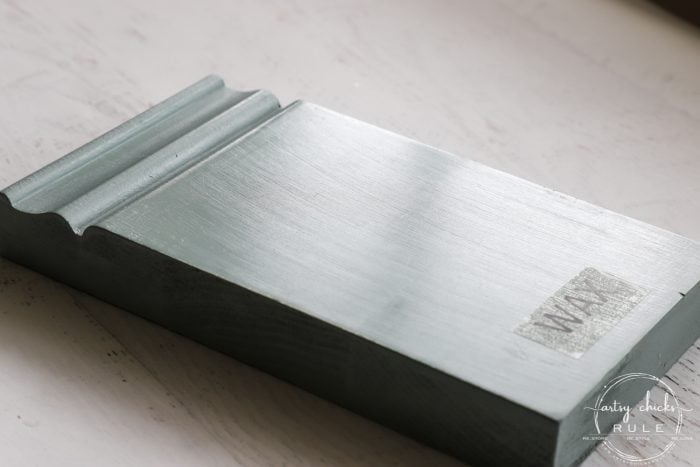
1 – Wax
Well, you know we had to start there, right?
PROS-
- gives a beautiful, unmatched sheen and luster
- feels so smooth
- paint can be added for a variety of color options
- resists water
- fairly durable wear
- usually won’t yellow over time
CONS-
- takes a bit of “elbow grease” to apply and buff
- more time-consuming to apply
- needs touch-ups and repeat applications over time
- not impervious to heat
- can not be repainted over, except with more Chalk Paint
Some waxes to try:
- Dixie Belle Wax
- Americana Decor Creme Wax
- FolkArt Home Decor Wax
- Annie Sloan Wax
- Miss Mustard Seed’s Wax
- Briwax
- Fields of Lavender
- Beeswax
2 – Polyacrylic
I’m going to be talking about water-based poly, not oil-based. Oil-based is similar but it has more of a tendency to yellow over time so I don’t use it often.
You can use polyacrylic sprays or liquids.
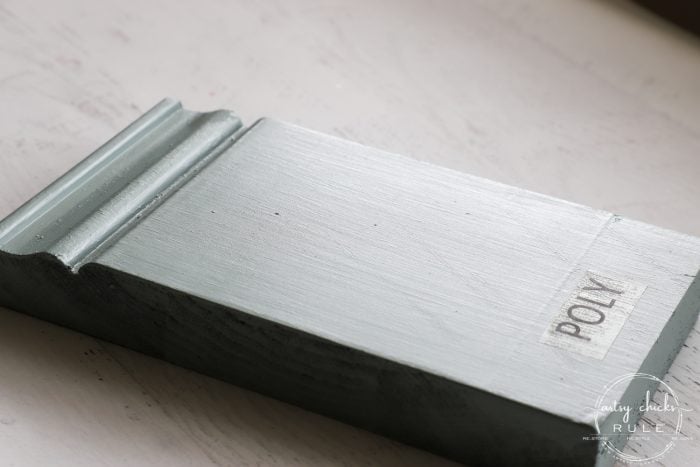
PROS-
- multiple finish options, shiny to matte, and even flat
- very durable
- you can spray, brush, or roll the product
- quicker application time
- paint color can be added to create an array of finished looks
- can be painted over
CONS-
- even though it’s water-based, it can yellow over time changing the color of your paint
- stains can sometimes appear in the underlying Chalk Paint
- might need more than one coat
- brush strokes are possible if using a brush
Some polys to try:
3 – Glaze
Glaze is a fun finish if you want to change the color of your project, subtlety.
PROS-
- a variety of colors are available
- similar to apply as poly but a brush or rag can be used
- adds dimension and interest
- can be painted over
CONS-
- doesn’t give as durable a finish
- glazes are usually colored, (white, brown, black, etc) so the color of the glaze will affect the final finish color
Some glazes to try:
- Winter White Glaze
- Van Dyke Brown Glaze
- Rustoleum Smoked Glaze
- Rustoleum Aged Glaze
- Clear & Antiquing Glaze
4 – Oils
Oils work well with Milk Paint but they can also be used with Chalk Paint. I don’t really use oils to seal Chalk Paint but it is a popular choice.
It works well on reviving old wood too!
PROS-
- similar sheen as wax
- not as durable as wax or poly
- less toxic to use
- easy application
- can add extra coats for more sheen, durability
CONS-
- painting over it can be a problem
- doesn’t have the same smooth, finished “feel” as wax and poly
- the color of the oil can impart color onto your painted piece
- oil can “age” over time and yellow
Some oils to try:
- Miss Mustard Seed’s Hemp Oil
- Van’s All Natural Wood Finish
- FolkArt Finishing Oil
- Hemp Oil Wood Finish
5 – Rustoleum Matte Finish
I gave this one its own category because I find it to be a bit different from the other polys I’ve used.
To me, it’s more of a blend, not fully poly-like.
PROS-
- easy application
- durable
- nice sheen, more like wax
- quick dry time
CONS-
- although durable, it doesn’t seem quite as durable as regular poly
- nice matte finish
- additional coats may be needed
- the jury is still out on whether this yellows over time
Get it here >>> Rustoleum Matte Finish
And last, but not least, number 6 which doesn’t really count as it’s not a “sealer”…but I’m including it anyway. ;)
6 – Buffing
Say what? Just buffed?
Yes, buffing. Not adding a sealer at all. Did you know that Chalk Paint buffs up really nicely without any top coat??
It creates a lovely, buttery soft sheen when buffed.
PROS-
- easy to do
- buffs to a soft sheen
- more suited for outside items, weathered, etc.
- keeps the color of the paint more “pure”
CONS-
- not suitable for daily use
- not durable like wax or poly
So there they are. The 5 top ways to seal Chalk Paint (or Milk Paint too).
I hope that you find this information helpful!
PIN it to save it!
I’m working on getting back into my “back to basics” series I started last year. So be on the lookout for a few more in this series in the coming weeks/months.
I’ll be adding these links to each post like this below so you’ll be able to find them easier.
More posts in the “back to basics” series:
- How To Create Faux Verdigris (and video)
- How To Create Faux Patina (and video)
- How To Dry Brush
- 26 Different Types of Chalk Style Paint
- Pros and Cons of Chalk Paint For Furniture
- 5 Top Ways To Seal Chalk Paint(you are here!)
- How To Chalk Paint Furniture & More!
- How To Transfer Images
- How To Import Images Into Silhouette
- How To Restain Wood Without Stripping
- How To Use Gel Stain
- How To Bleach Wood
I’ll be adding to these links as I add posts in this series.
I have at least 3 more planned as of now. So stay tuned!
Hope you have a wonderful weekend and happy painting! (and sealing! ;) )
xoxo


")


")
")

")

Perfect post timing! I’d been using wax mostly because I love the finished look… but I guess I’m getting lazy (and impatient..haha) so I’ve been alternating between Dixie Belle’s satin clear coat and Rustoleum’s matte clear coat. So good to see the pro’s and con’s. Thank you Nancy!
Thank you for sharing this! I was debating which sealer to use on my current project and here is the perfect answer!
Yay! So happy you will find this helpful for your project, Diana!! :) Good luck and have fun! xo
Aw, yay!! So happy to hear this Mary! :) I’m telling you, wax is truly a beautiful and unmatched finish. BUT…it is time consuming and not quite as durable overall for me. So nice that we have so many options out there these days, though, right??!! xo
How do you get the chalk paint so smooth? Is it because you water down the second coat or lots of sanding?
Hey Marlene! I don’t water it down for basic painting. (only if I’m doing a specialty finish, etc) Now, that’s not to say that I won’t add a dab of water if the paint becomes too thick over time but I don’t think that is what you are saying. Several things help with brush strokes and that’s have a good applicator…brush. I love Purdy. And yes, you can lightly sand in between coats and just before your finish coat as well. I didn’t on these because I just wanted to show give the gist of the finishes. And if you are careful in how you paint, use a good brush or roller, the light sanding you might do before finish should be just that, a light easy sanding. :) Hope that helps!! xo
great post, thanks!
Hey Julia! So glad you like it! Hope it helps! :) xo
Thank you for this post! I have not yet ventured into the world of chalk paint but would like to try a small project. I have used Rustoleum antiquing glaze in Java over latex paint and love the results. Do you typically apply poly over glazes? I know the can says you can for added protection. I did when I painted and glazed bead-board wallpaper because it was on the end of a lower kitchen cabinet where it would get more abuse, but when I painted and glazed the wood trim around my brick fireplace which gets little to no wear, I did not.
Hey Vicki! You are very welcome!! I hope it helps everyone who may be wondering about some of the different finishes out there. As far as how I apply it, I love that you can really do so many things. You can apply poly over the glaze to set/seal it. Or you can apply poly first and then apply the glaze for a bit more control and distribution of the glaze. You can even tint regular seal coat and use it as a glaze. I think anytime you have somewhere that gets more abuse or wear, it’s also good to add an extra layer of protection. Good choice! :) xo
You weren’t sure if Rustoleum Matte Clear yellows over time, well let me tell you, YES, it does. Like you, I wasn’t fond of all the work involved with wax so I switched to the Rustoleum. I figured, hey it says “Chalked” “Protective Top Coat” on the can so it must be good. I primarily use ASCP Pure White and found out the hard way that over time, it does yellow. Every time I walk past a bench I did, it looks like the yellow is spreading. Now I have to redo the piece. I hate that!
I am also not thrilled with it’s performance as a top coat on a table I did. I applied at least 6 thin coats, and the table still scratches easily. My friend uses General Finishes Flat Out Flat. I’m going to give it a try, but I’m nervous about it.
Ahhh bummer, I was afraid of that. It’s tough to find a truly non yellowing poly sealer. I’ve found some that yellow LESS but none that don’t truly yellow even if it’s just a bit. I did notice that it didn’t seem quite as durable so put that in my “cons” but I haven’t fully tested that out either. Just initial observations to it since I’ve only recently started using that one. I haven’t used the Flat Out Flat on anything that gets a lot of wear but I do love that one on the things I have used it on. It’s perfect for a flat, not sealed “look” finish. My favorite is still the Satin HP Top Coat though, overall. I’ve had the best luck with that one all around. :) xo
Can you provide a link to your favorite top coat for chalk painted projects? Not sure which HP top coat it is. Thanks!
Hi Susan! I just double checked to make sure, but yes, there is a link to the HP topcoat in this post. (it stands for High Performance Top Coat) Sorry about the abbreviations and confusion on that! xo
I chalked my kitchen cabinets. I don’t want the color to change. What sealer do you use the most?
Hi Steve, well, unfortunately, you pretty much have to accept that any sealer you put on chalk style paint is going to darken it somewhat. White, you won’t really notice. Anything with color, will darken to some degree.
I personally do not recommend using wax in a kitchen. My main go-to sealer and the one I probably use the most is General Finishes High Performance Top Coat. Good luck!
So glad I read this, especially the above post about Rust-Oleum. I was considering trying it. I love the feel and look of wax above all. It feels like butter. I always fine sand with 400 grit before applying. Have you ever tried Polyvine Wax Finish Varnish? Very similar to wax finish. I’ve been using this on table tops and anything that will get a little more use. I used it on our kitchen table and chairs a few years ago and they still look great. Have not had an issue with yellowing. I learn so much from your posts!
Hi Susan! Yes, I’ve enjoyed the Rustoleum sealer so far but one of my readers did say it does yellow somewhat. I painted something white with it recently so I’m keeping an eye on that and will report back! I do love the feel of it though. However, I’m with you, nothing really compares to the feel and look of wax.
And no I have not tried that but I’m going to look it up right now! It sounds like something I’d like. Thanks for the tip on that!! And I learned something from YOU (and a few other readers) today! ;) Thank you! xo
I use Howard’s citrus shield from home depot. Is yellow in the can smells wonderful. Easy to apply and buff. I have pieces that are white and other darker colors no yellowing after a yr of having pieces. I’ve found the longer this wax sits the more protected the paint is. I have rocking chairs I use daily and even the seats are holding up well to the use. If I get a scuff Mark our scratch I apply small amount of wax and if cuffs out these marks with little effort.
Oh yes, that’s a great idea! Good to know also! Thank you so much for sharing, Leah. :) xo
Hi did you use the satin finsh on the polyvine?
Hi Susan, I think I have the satin and flat finishes but I have not used them that much yet. I need to remember to pull them out (I always go for my old favorites). I will post more on that brand once I’ve used them a few more times! Stay tuned! :)
I use the Dead Flat finish and it has the slightest hint of a sheen; not like unfinished chalk paint at all. Thinking about mixing the satin and dead flat next and see what I get 😉. I have used the poly vine for years and love it! I have recently tried Dixie Belle’s Gator Hide, specifically for the island in our RV, and it has a nice satiny sheen but more than I like for most of my furniture. I have been using it just for table tops since I have it.
That’s a good idea! I need to try it on a larger piece, I’ve only tried it on smaller items so far. :)
Polyvine is truly the answer. Looks so much like wax but you just paint it on. It is as solid as a rock. I live in Australia and you can’t buy it here. I love it so much that I import it from England which is obviously more pricey than just going to the shop but it is so worth it. Never yellows either. I use the satin finish which is a good wax look alike.
Oh this is so good to hear! I’m excited to try it and will update this post once I do! I actually just received it yesterday and can’t wait to use it! Love finding new (to me) products to try! :) xo
Hello Nancy,
This morning, I received your blog about your entire kitchen renovation. It looks lovely, and being DIY ers, I can appreciate your hard work and effort.
A question about your new cabinets…..Were they RTA cabinets? If yes, did you assemble them yourself? Was it really hard and what brand did you get? I have already refinished my 40 year old “plank look” cabinets twice. The finish still looks quite good, but am getting ready for a change. Your blog this morning was of great interest to me.
Thanks, Sharlee
Hi Sharlee! Thank you! Yes, they were RTA cabinets but we decided to get the already assembled and I am SO glad we did. It was just one less thing, in an already big job, to do. I don’t think they are that bad to assemble but you need some space to do it …and of course, the extra time involved. This is the brand we used…Forevermark. We saved a TON doing it this way and I am telling you, they look just as good as if we’d gone through a “kitchen” store to have them done. (and they’d have been at least triple the price, probably more)
And you sound like me, we added wood trim to our flat front cabinets when we moved in and I painted them. Then I painted them a couple more times over the years….which led to finally needing to go ahead and replaced them. Ours were also 40ish years old. Good luck with yours!! xo
What a great post! So yesterday, I did my first ever chalk project – a standing jewelry armoire, I used Behr paint (a sample size that I had tinted to match a pillow I have in the room) + 2 Tbsp calcium carbonate + 1 Tbsp water. The first coat was so nice and easy. Second coat was a little bit more challenging, only because it was harder to see how much paint was going on since it matched. But my issue is now with the wax. I am using the Chalk-Tique light wax from Amazon. I have put on 2 coats already, and it still feels like there’s no wax on it, like it just soaks it right up. It doesn’t have that sheen that your example has and it feel sort of rough like chalk. Do I need to just keep applying more coats?
Hi Kelly! Thanks so much! And yay, that is great! I don’t know that wax as I haven’t used it. Hmm, wasthe Behr paint you used “flat” paint? If not, it might not “soak in” as you are expecting it to. And have you tried buffing it?? Wax won’t really have a sheen until you give it a little buff. Try that and see what happens. If you don’t get a nice sheen, it sounds like you might not have enough wax yet. Another way to test it would be to place a drop of water on it and see if it beads up…or sinks in. If it beads up, you’ve probably got a good wax coverage, if not, you need more. Try those ideas and see what you find! :)
Hi, I am getting ready to chalk paint my oak mission style dining table and would love to do a weathered wood look, like you get by using a darker wax. However I realize wax is not the product to use for that table. How can I get the wax look and still have a tough poly coat to protect it?
Help
Hey Lori! I don’t use wax for that look. I either paint a darker coat underneath to start, or I’ll add it in layers on top. And finish with poly. Here are a few posts you can see how I do it.
https://www.artsychicksrule.com/coastal-style-chalk-paint-makeover/
https://www.artsychicksrule.com/weathered-whitewash-finish-chalk-paint/
https://www.artsychicksrule.com/diy-weathered-love-signs/
https://www.artsychicksrule.com/grateful-thankful-blessed-diy-weathered-sign/ (if using bare wood)
https://www.artsychicksrule.com/bath-cart-refresh/
Take a look at those as I did each of those a little differently. (but similar) Also, you can do a search for “weathered wood” here on the blog to find more projects I’ve done with similar techniques. :) Good luck and have fun! xo
Can I apply poly after applying the antiqued brown wax?
Sadly, no, you should never really do that as the poly won’t adhere to the wax. You’d have a mess. You can do it the other way around though! Poly first, brown wax second.
Hi! I need help with my dining table chalk paint project! I read your post comparing sealers as well as a few others and as a result I bought the Flat Out Flat. It was so shiny! It looked as if I had used a semi-gloss. I was very disappointed. So I reread the posts and then bought the polycrylic clear matte (sanded in between the two sealers). Still shiny, no where near matte. I don’t know what to do next. I really want the table to keep it’s chalk paint look- do you have any suggestions?
Thanks so much!!
Liza
Hi Liza!
Oh my, you have me stumped! I have personally used Flat Out Flat many times and it is never shiny at all. As a matter of fact, it usually looks as if I’ve done nothing to what I just sealed! That is truly bizarre. I’m not sure the other one you used but that seems odd too. But I do know some manufacturers’ idea of “matte” and “satin” are not the same across the board. So some may be shinier than others. The Flat Out Flat is really surprising to me though. With that, I would probably not recommend using it on a tabletop that gets daily use as I don’t think it will hold up quite as well as a shinier finish would.
Another one I can recommend (but have not had the chance to use yet) is Dixie Belle’s Clear Coat Flat. It is supposed to keep it completely flat with a chalky finish. I think I will have to order and see! ;) I love Dixie Belle paints and products so highly recommend them in general. Hopefully this will be the winner for you!
Hi Nancy,
Thank you for your reply. If I wanted to try yet another sealer (the Dixie Belle one), should I sand off the coats of the others that I have applied? Do I need to put on another coat of the chalk paint? What would you do?
My next project is waiting in the garage and I have already purchased the Dixie Belle paint for it!
Thank you again!
Liza
Hi Liza, you are welcome! Yes, I would give it a light sand by hand. No need to remove it all.
How many coats have you applied? You could lightly sand and go over with another coat of chalk paint also, then the new sealer. That might give you more of the result you are after. You could try applying the Dixie Belle sealer on a small area and see what you think and go from there. That is probably what I would do before I did any of the above. :)
Thank you so much again! I will definitely test the Dixie Belle as you suggested!
Liza
Hi! Thanks so much for the post! Which poly did you use? I have cabinets right now that I just painted with behr dusty laurel and I would love for it to be just a tad bit darker, it looked like poly was the way to go for darker? What would you recommend? Thank you!!!
I used High Performance Top Coat from General Finishes on these samples but any would be similar in effect. The poly won’t really make a latex paint (sounds like you used latex) appear darker like it does with chalk-style paint, however. The reason it makes this style paint look darker is because it is chalky in nature and when a seal or wax coat is applied it takes away that “chalky” effect and it appears darker. Hope that helps!!
I read about the Polyvine above. I’d love to try that on my cabinets. But I’m not sure which one you all are talking about. Is there a link to it? Thanks In Advance!!!!
Hi Demitria! I’ve only used Polyvine a couple of times on small items so I can’t say as to how it would do on a larger project like kitchen cabinets. With that said, you can find it over on Amazon. They have several different finishes to choose from. :) xo
Hi Nancy – this is such a helpful post! Thanks particularly for including those comparison swatches because that really tells the tale of how the finishes compare. I’m relatively new to chalk painting furniture so forgive me for asking what might be an obvious question but…how do you buff the chalk paint itself? I’ve tried googling the technique but every link I find is about buffing *wax* on chalk painted furniture rather than the paint itself. I LOVE the look of the buffed paint and want to give that a try on my current piece. Is there a particular brush you use? Can you describe the technique or point me towards a good tutorial? Thanks for any advice you can offer!
Hi Alli! By buffing, I just mean simply buffing with an old cloth, or t-shirt material. You can use a bristle brush made for buffing after waxing too. There is no certain technique, just buffing (in circles, if you like) until you see the sheen. Keep in mind though, that this will not protect the paint like wax or poly will. If water drops onto it, it will soak in. This is good for outside actually, as it will age and patina. Whereas wax would melt and poly would want to chip, etc. If you are using this method on a piece that you are not worried about getting use, etc, then it should be fine! :) xo
Thanks for the informative post! To add to your data, I just did my old oak bathroom vanity. I sanded the ugly bits, like on the doors and drawers, but not the entire vanity, and I left the main part in place while doing my work. I used Rustoleum chalked ultra matte 50:50 Charcoal and Coastal Blue. Loved how it turned out. I came across your site while wondering about a top coat. I feel it is needed in the bathroom where there is always someone shaking water around =) Anyway, I went ahead and got the Rustoleum chalked ultra matte Clear coat. I had just started when I noticed sections of the paint colour were being removed, right to the wood!! I went on and finished, being super delicate and extra careful, but I still have an annoying bare wood look in places. The clear coat says to let the original paint dry at least 8 hours, but I had finished at least 48 hours ago. Even had blue-grey run out of my roller when done. Just a heads up for future users!
Good tip!! That is definitely something you need to be mindful of. A light hand when applying the sealer and not going over one spot too many times helps. That is where the chalk style paint is a little different than latex, acrylic, etc. Thanks for sharing!! :)
Hi Nanci, thank you for the informative post. I recently painted an old wood bookshelf and dresser using Waverly chalk paint. I applied two coats and a stencil and let it dry for four days. When I try to apply the Waverly wax finish or matte varnish, the underlying chalk paint comes up! I am using as light a touch as possible, I have tried using a lint free cloth and a soft bristle brush. Not sure what has gone wrong, is there a spray on varnish I could use instead? Any advice is appreciated thank you.
You are very welcome, Megan. Hmm, I’ve not used that particular brand so I can’t say definitively. But I can tell you that it is normal to sometimes see a little color on your cloth as you are waxing a piece. (not a lot but yes, some color) Also, be sure you are not going over and over the same spot when applying the wax (rubbing too hard) or poly(too many brush strokes in one spot). You will definitely re-wet the paint with poly so that it comes up if you do that. Chalk Paint is different than acrylic and/or latex paints in that way. It is “chalky” and not really set until it’s waxed or a poly coat is added.
I would say it might also be possible you might’ve needed a primer coat on whatever you painted since it doesn’t seem to be adhering well. (was it a slick finish?) You can use spray polyacrylic (but not over where you’ve waxed…that’s the only issue there if you’ve already waxed) But those tend to yellow more than water-based poly so if you have a light color paint that is definitely a consideration too. Something else you could try is taking a soft cloth and try buffing it a bit, which should help “set” the paint more. Once you do that, go back with your topcoat. (wax or poly) Use a very light hand, as mentioned. Good luck! xo
Hi, thanks for the helpful post. I recently had painting done at my house and it seems like flat paint was used in some of my interior doors but I really prefer a little sheen. I would prefer not to repaint them if I could add the sheen with a top coat. I also don’t want to use anything that would prevent me from repainting them a few years later. What do you suggest or should I just go ahead and paint over with a satin or semi gloss?
You are very welcome! You could add a poly coat to them to add sheen. But if they are white that will tend to yellow over time so I wouldn’t recommend that route. I would just repaint with a semi or semi gloss if it were me. Same amount of work as adding a topcoat really. :)
Hi Nancy, thanks this post! I wondered if you had used a blush pink chalk paint and tried these finishes? I just finished my piano and am worried about ruining it. Eep!!
Sounds like wax might be my safest bet as opposed to the chalked top coat.
Thank you!!
Hi Michelle, I have used blush colored chalk style paints, yes. And yes, along with these finishes.
Why are you afraid of ruining it? Blush would be amazing for a piano! I love that. And you could do wax or a poly. Poly won’t ruin though. (Try the High Performance top coat in Satin or if you want a flat finish try the Flat Out Flat…they are both linked under polys) :)
Can you use a poly over a glaze?
Hi Beth, yes, you can add a protective layer of poly after you have finished with the glaze. You can not put poly over wax though. :)
I am painting bath room vanity blue with chalk paint. I want to use a dark wax achieve the color that I want but also want to seal it as the shower gives off a lot moisture in this bathroom. Do you think I can use a poly spray on top?
Hi Laura! No, you can’t put poly over wax. It won’t adhere. That wax coat should be sufficient.
Also, if you want a little more protection, you can follow with another coat of clear wax.
Hi,
Your blog is very informative. We have painted a kitchen table with black chalk paint and need to seal it. We used a seal that caused the table to look cloudy, so we had to redo it.
We are hoping to get it right this time… Which top seal do you recommend that will not yellow or cloud the black chalk paint and hold up to the daily use of a kitchen table?
Hi Paula,
Okay, first, yes, regular water-based poly over black can sometimes appear milky. Your best bet over that would be an oil-based poly. (one you can wipe on instead of brush is simple to do) You don’t have to worry too much about yellowing over black paint as you won’t really notice it. So that is an option.
Another option is a product I use and love, Fusion Mineral Paint has a “Stain and Finishing Oil” that would work great. (in the color “Natural”) Nice, durable finish, super easy to apply and won’t leave it milky or cloudy. Hope this helps! :)
I am working on my first big piece. I scuff sanded, primed. And painted with chalk paint. It looked beautiful. I started clear coating with poly and yellow stains came through. What did I do wrong? Ugh
Hi Susan, it could be your top coat. What are you using? It could also be the tannins or other coming up from the wood. That actually happens often. You might try a primer with Shellac like BIN primer (with Shellac), and then try again. That should take care of it for you!
Hi. Thanks for this informative article. I especially appreciate that you give your experience on many so options for sealing chalk paint…I’m sure anyone can find what they are looking for. I have just finished using chalk paint for the very first time, on cabinet fronts in a bathroom. After reading your post, I’ve decided I will stick with using the wax to finish my chalk paint project. I do have a question, though. I used Annie Sloan chalk paint. Can/Should I use a different brand of chalk paint wax? It is difficult to get it where I live…I have to drive over an hour to the nearest business that carries Annie Sloan products.
Hi Laura! Yes, you certainly can use a different brand. I carry several in my shop here that will also work. But I am sure you can probably find a suitable one locally too. :)