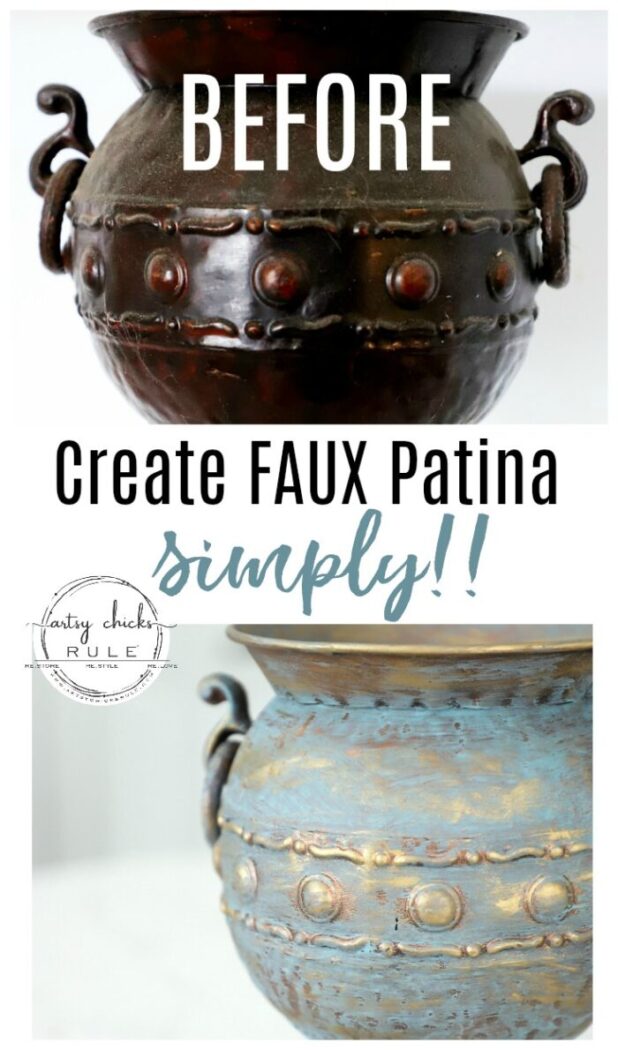
Old Metal Makeover with Faux Patina Finish (so simple to do!)
Creating a faux patina finish is so much easier than you think. You can quickly change the look of your old decor so it can spark that joy again!
Creating a patina finish is really simple. I shared one way to do it in >>> this post, along with a video tutorial.
This time, I’m doing it a little different. Not much, but starting out a little differently anyway.
Creating a Faux Patina Finish…so simply!
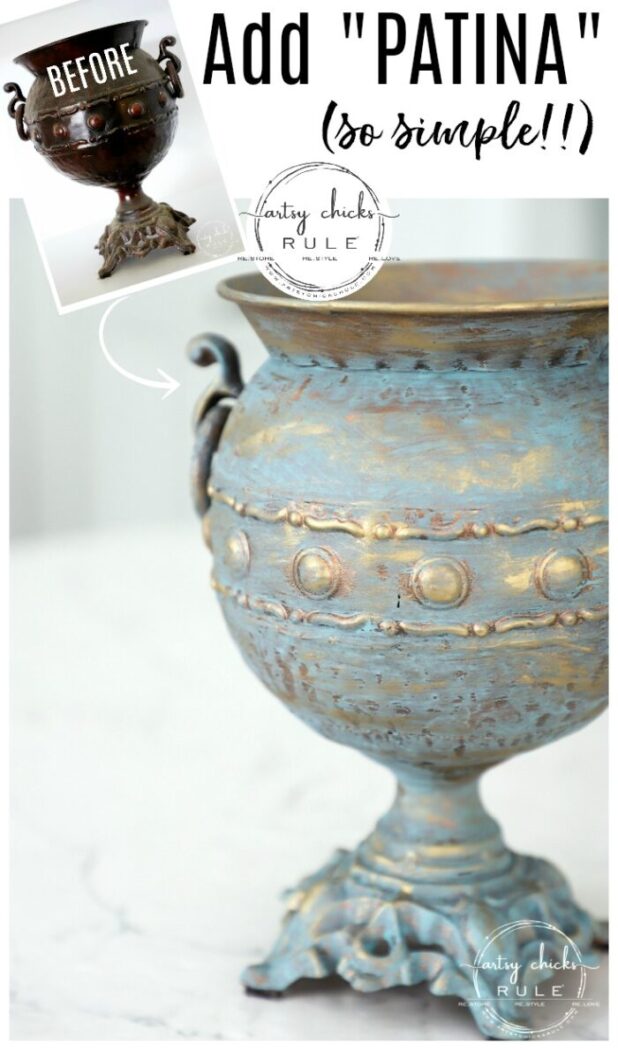
Here’s another old decor piece from my “Tuscan” themed decor….
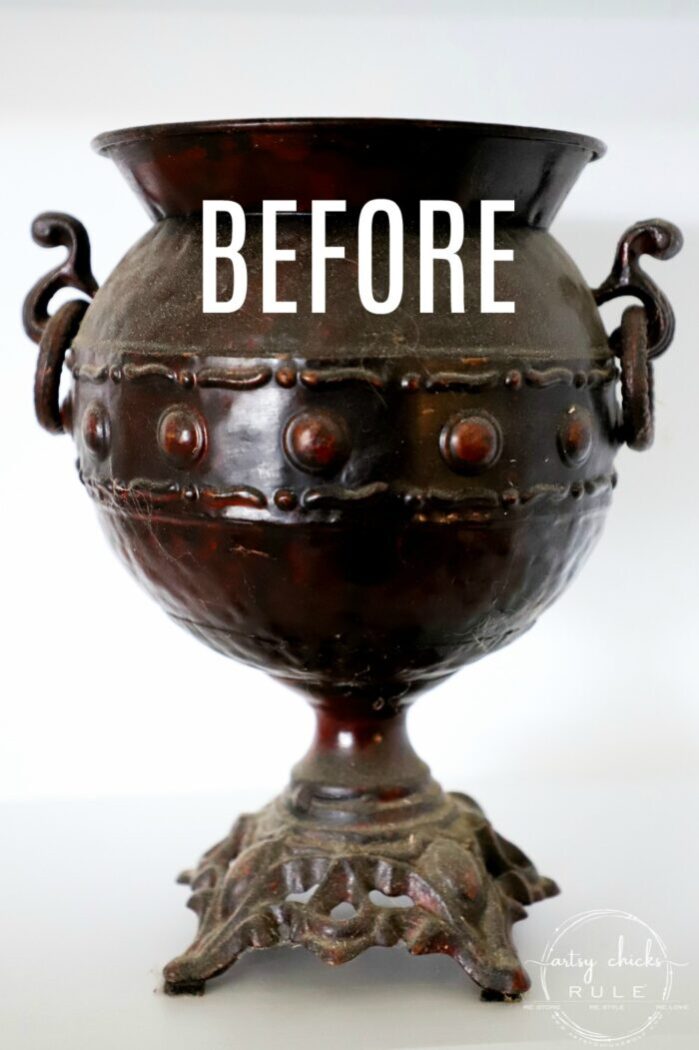
I don’t remember how or where I used it in my home as it’s been so long ago now.
But, as you can see, it sat in my garage and gathered quite a bit of dust in that time! (I did wash it down before I started this project…probably should have before I took the “before” photo but oh well!)
MATERIALS LIST
- Aqua colored paint (a chalk style paint works best, in my opinion…I used Annie Sloan Provence)
- Copper Spray Paint
- Gold Gilder’s Paste
- Clear Matte Sealer
(Want to see even more of my favorite crafty makeover supplies??? Take a look in my very own curated shop, here!)
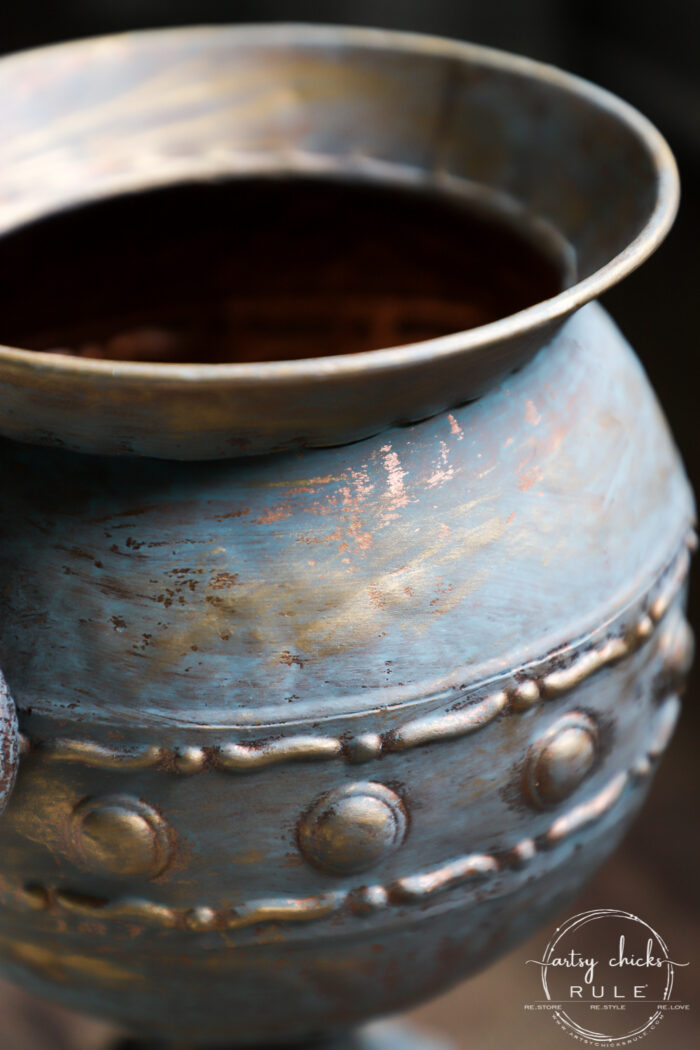
Instead of just starting with the dark above (it was actually a dark red which doesn’t show in the photo well), I decided to spray it, copper.
I considered spraying it a dark bronze but thought copper might be a fun change up and more along the lines of a true patina finish and look.
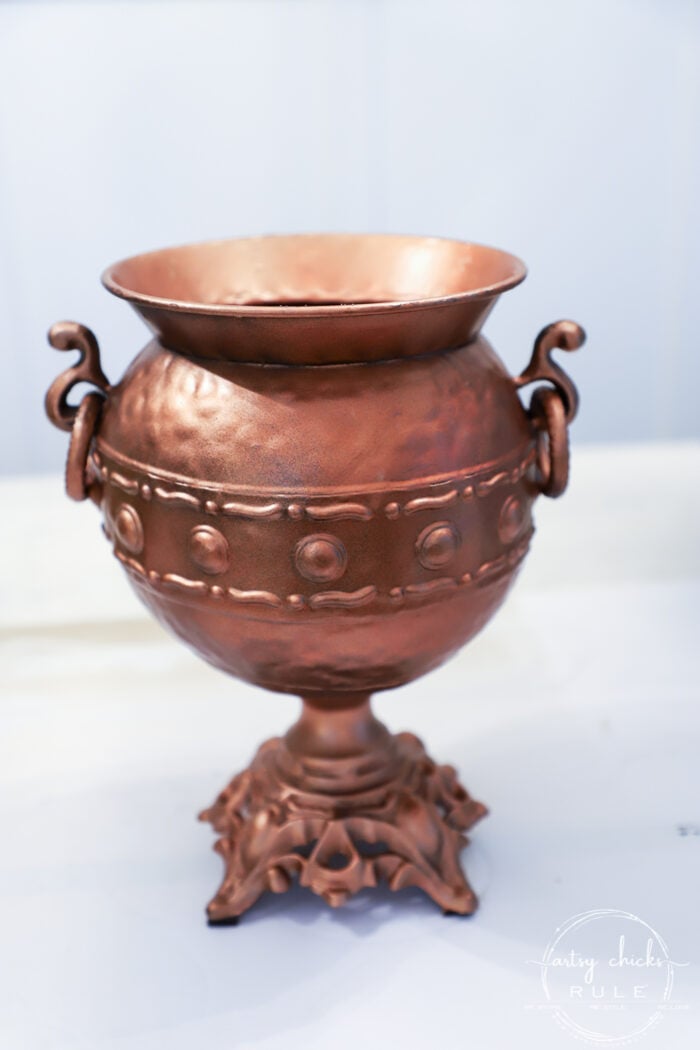
I did one good coat with this color paint not really worrying too much about covering it 100%.
Want to see some of these projects in “live” time? Hop on over and follow along with me on INSTAGRAM. I’m always sharing in my stories as I’m doing projects, finding new furniture, fun finds….just all the day to day behind the scenes.
Then I mixed up some paint and water to apply over top. It would have been better to wait a few days in between because as you can see below the watery paint mixture is not wanting to adhere to the freshly painted vase.
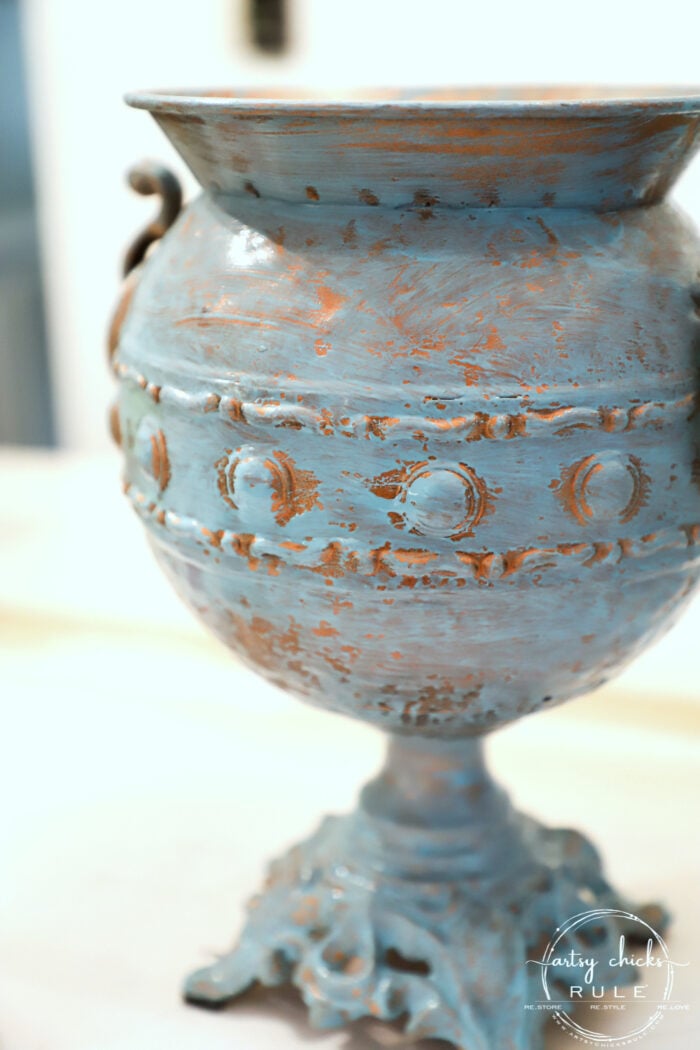
But that actually worked to my advantage as I didn’t want to cover it up completely anyway!
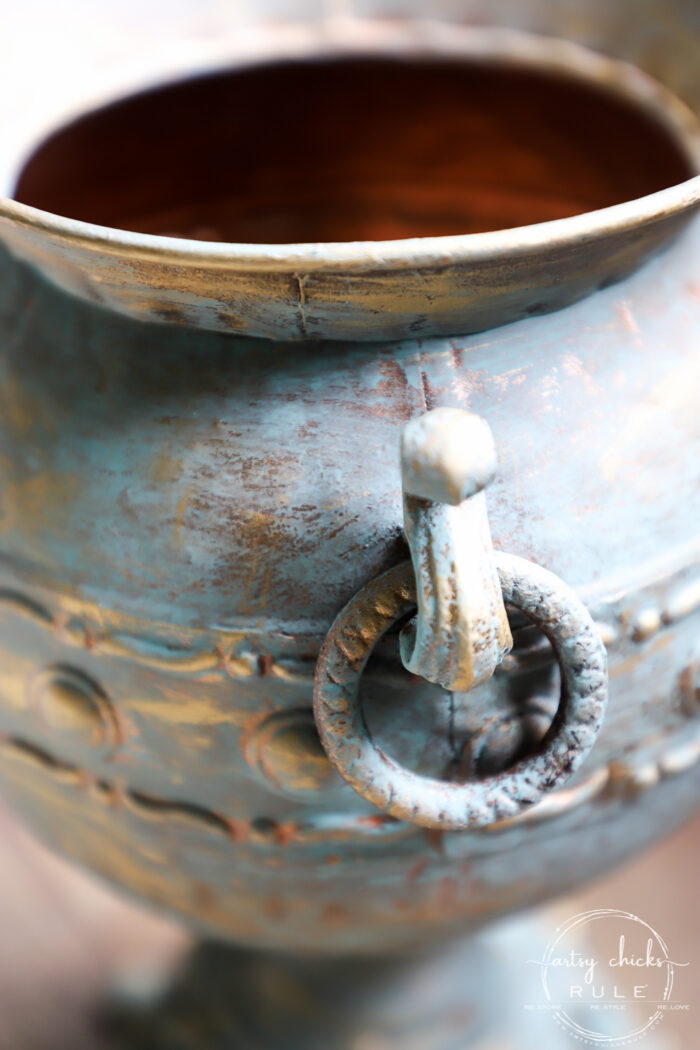
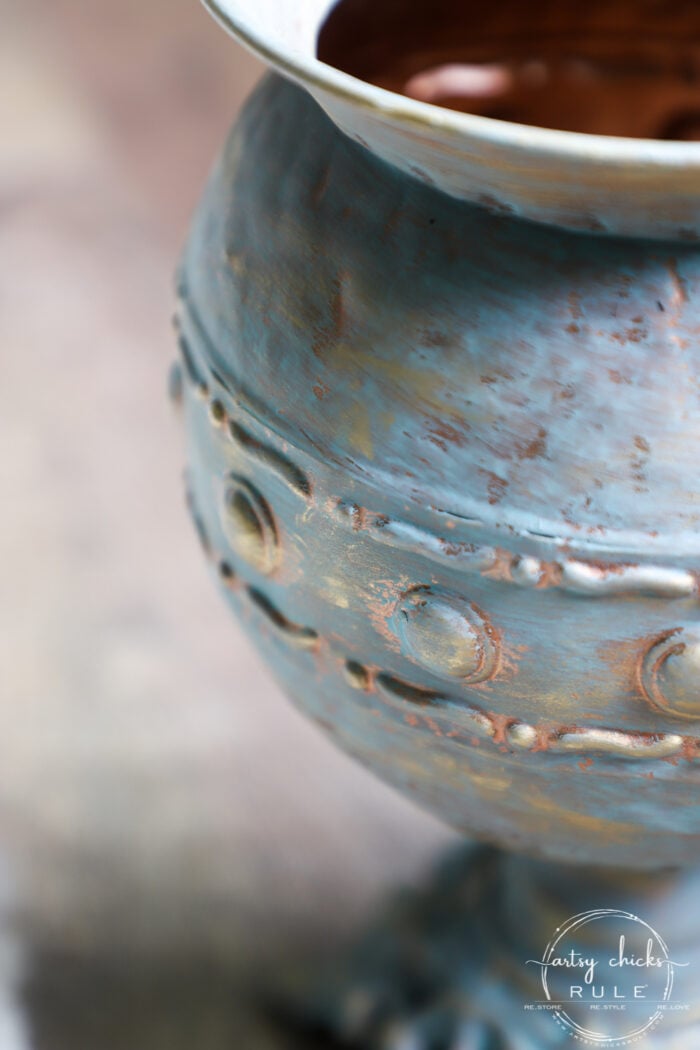
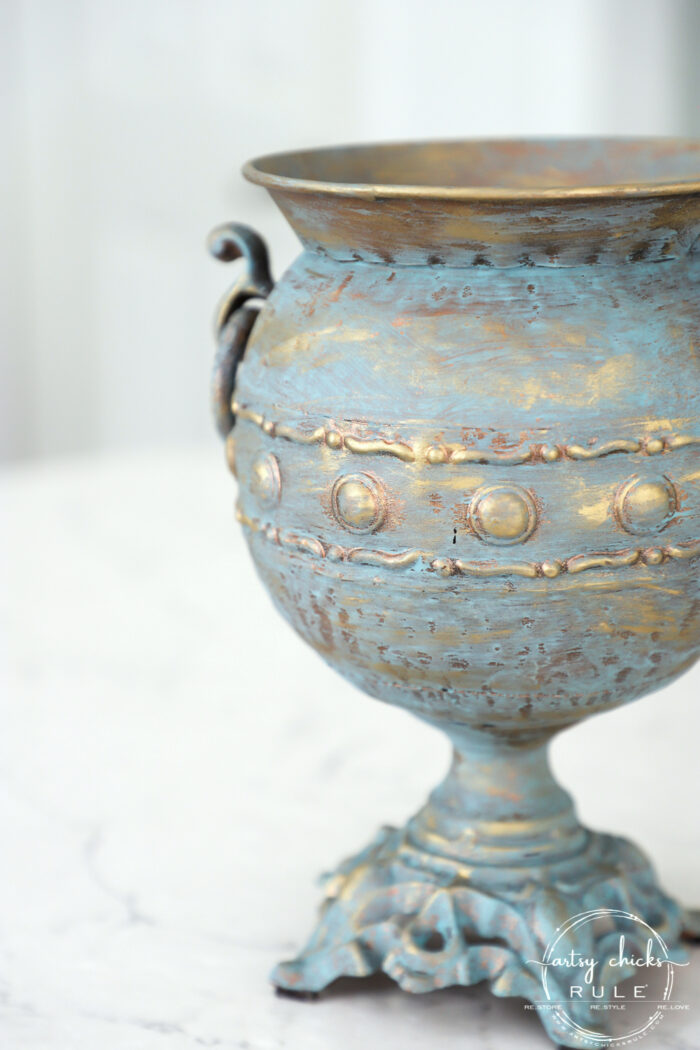
Once that was dry, I went back in and rubbed some of the gold gilder’s paste here and there on some of the high points.
And even some of the flat areas.
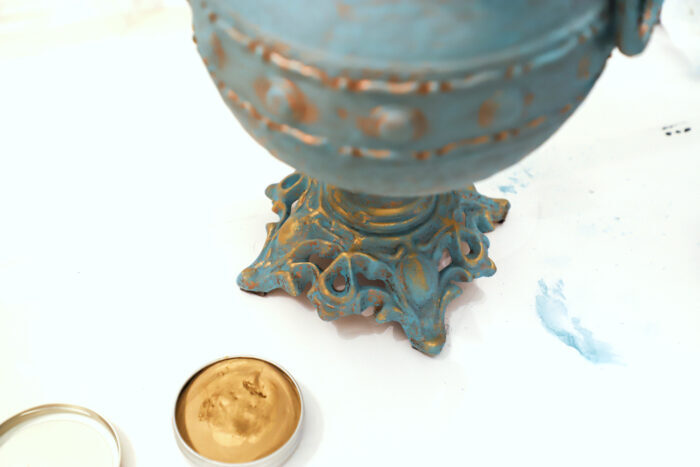
Then I gave it one light coat of a matte sealer.
I didn’t want it shiny so used matte for this one.
Pretty cool effect, huh?
One of my favorite faux finishes to create. So much depth and beauty.
The faux patina finish really changed the look of this one.
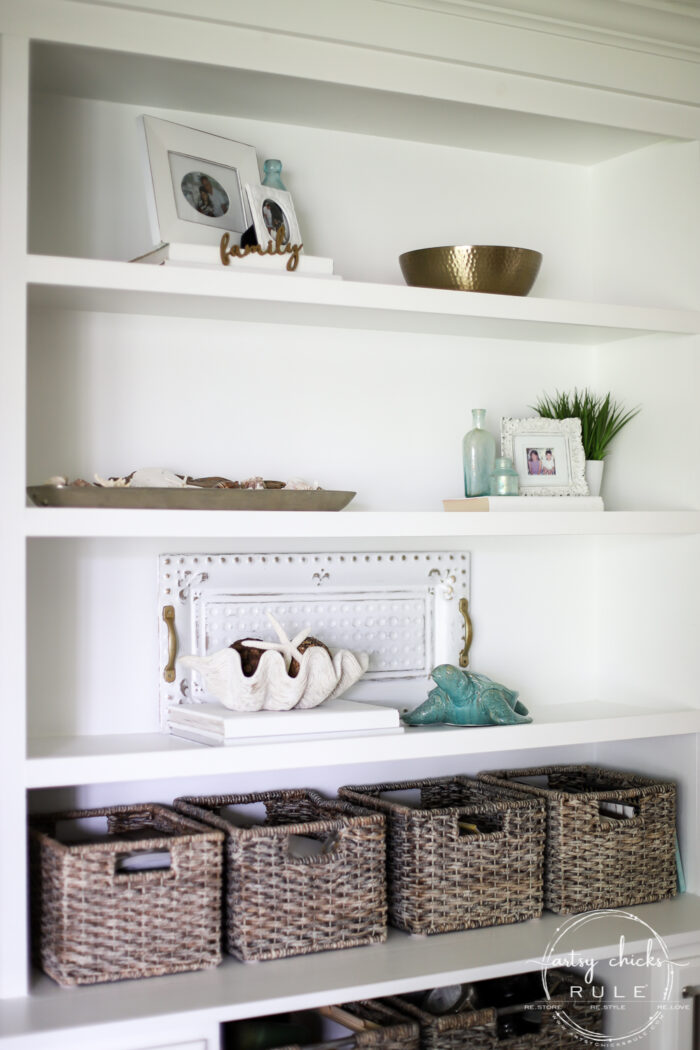
I put it up on my built-in bookcase for photos…
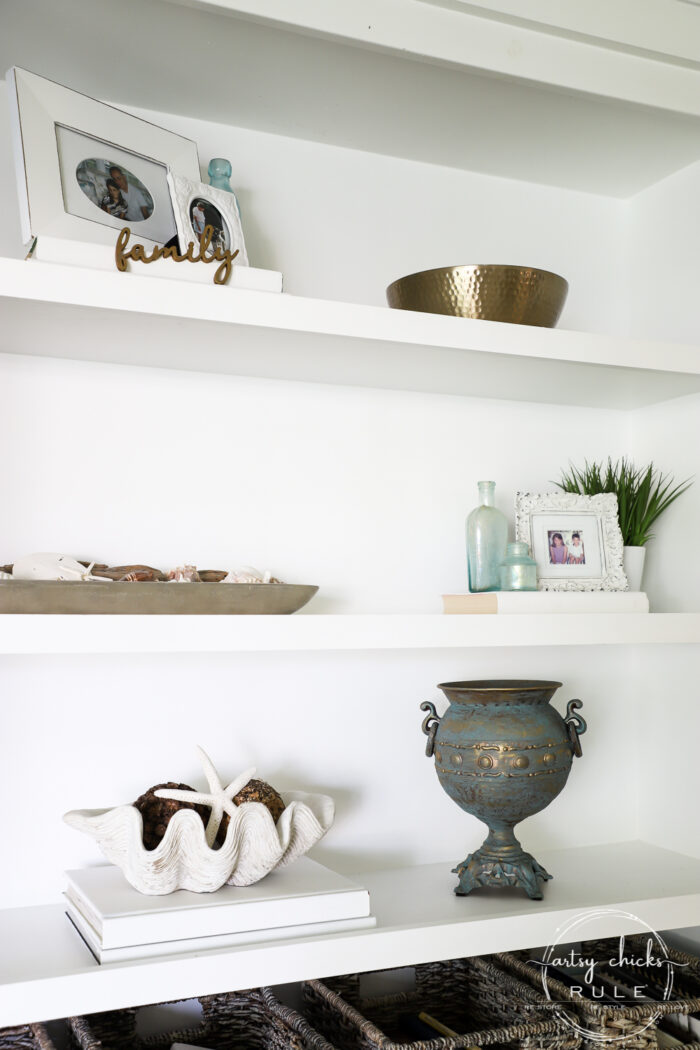
I have to show y’all where I ended up using the recently made over “white and gold tray”… (<<<all the details on it at the link here)
I just love being able to use old decor in a brand-new way, with a brand-new look!
One of my favorite things to do…really.
Not sure if it will stay here but I’m really liking it here for now.
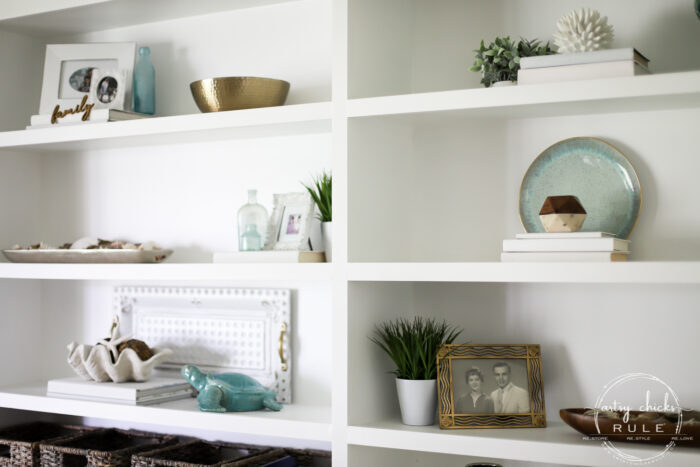
I added more greenery to my shelves since I first restyled them, in this post here. (<<< see what it looked like before at the link here)
And I’m really enjoying how they look.
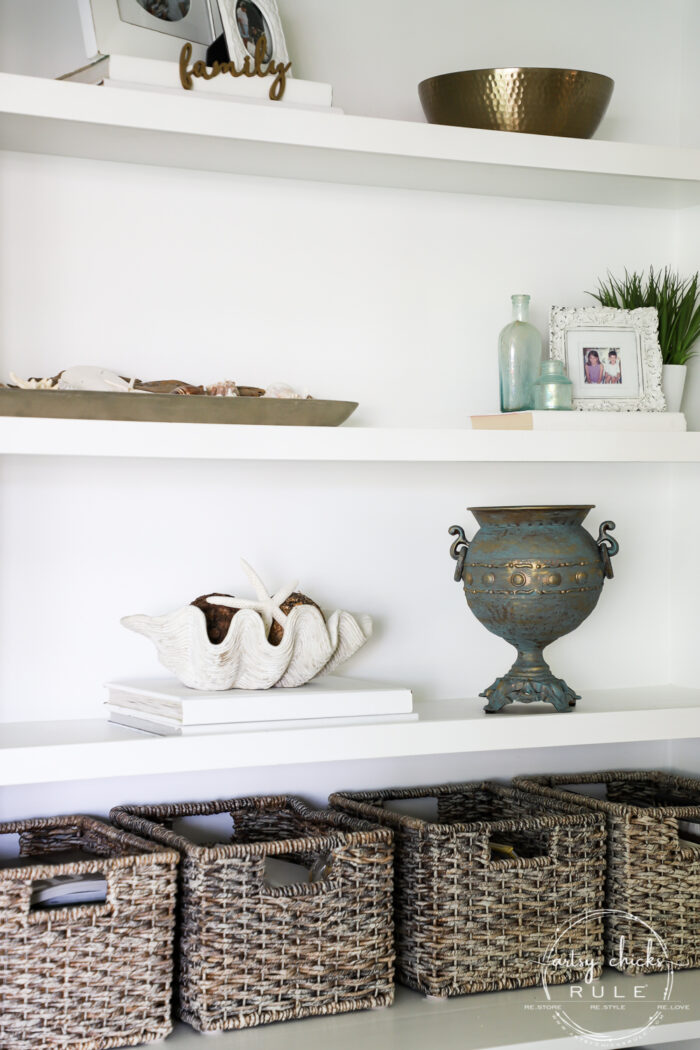
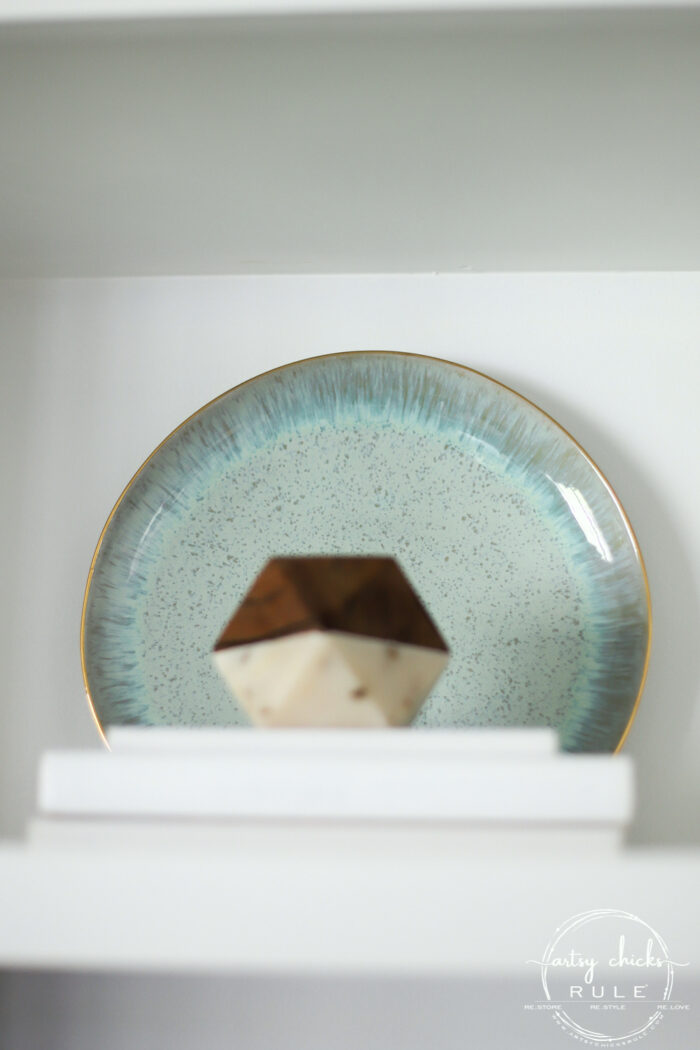
And added this gorgeous plate that my sister-in-law gave me for Christmas.
Isn’t it just beautiful with its aqua and gold?? I just love it!
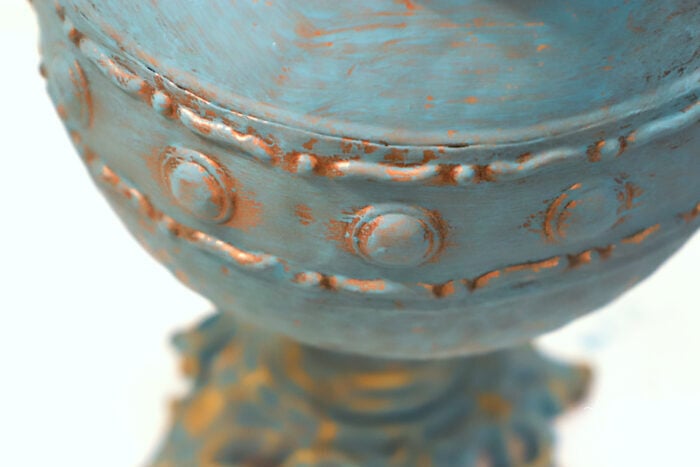
Here are a few close-ups of this patina finish goodness.
This one shows how I left the inside copper colored…
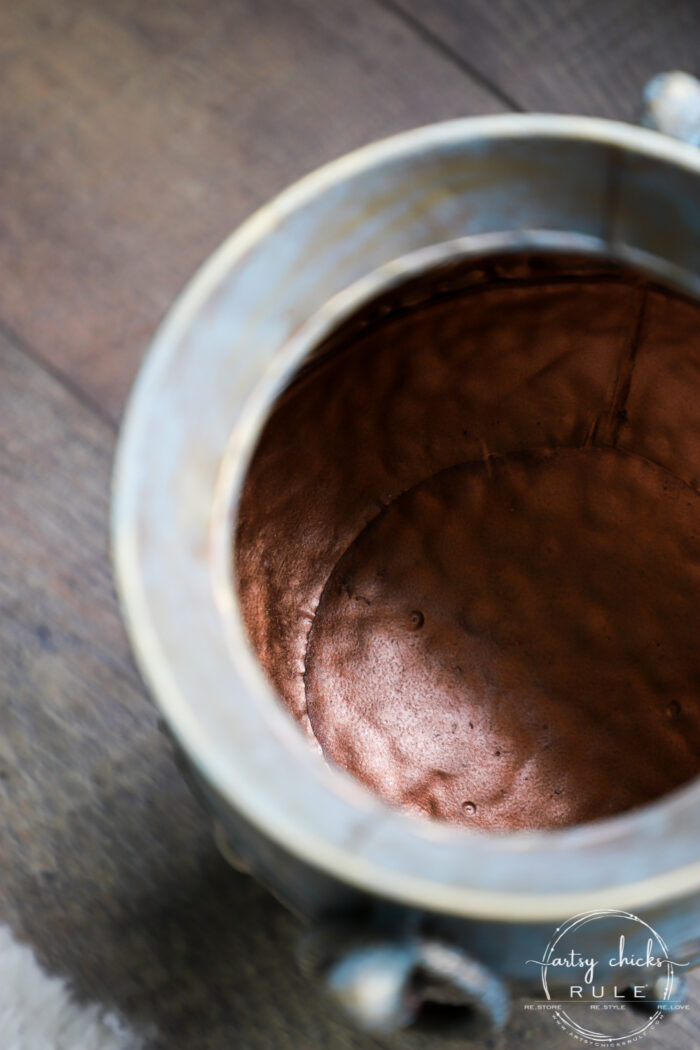
…and the rim all patina’d.
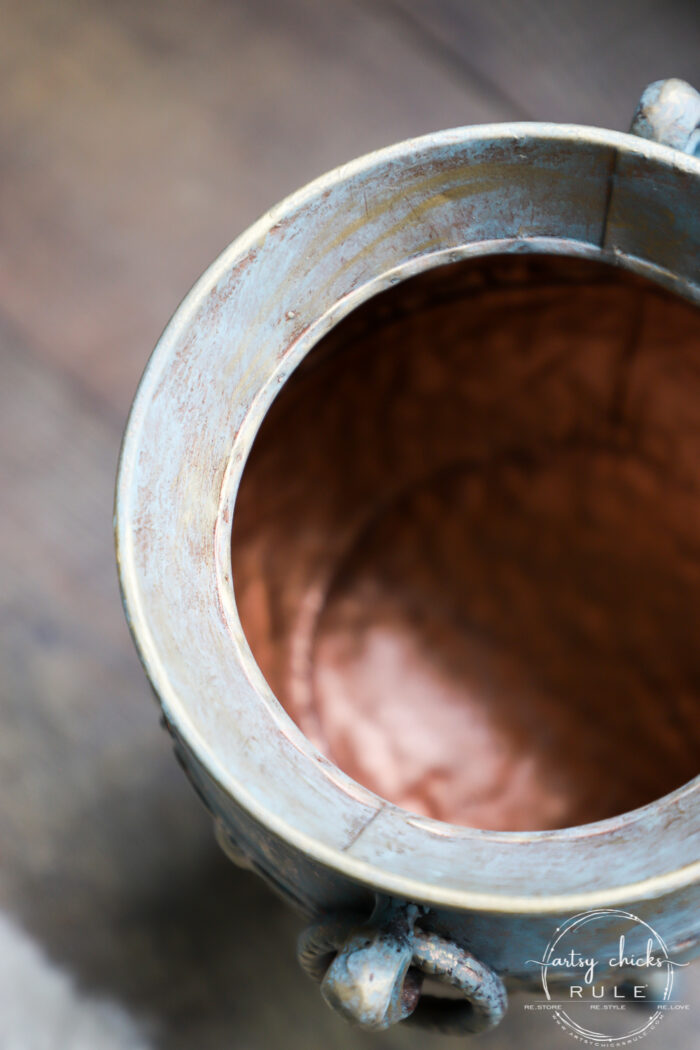
See the copper peeking through?
You don’t have to be neat doing this. Haphazard, here and there actually looks best.
This blend of colors is just magical.
So, as you can see, I gave this one a little different patina finish than the ones I did in this patina finish tutorial video/post. (<<< see it at the link here)
I hope you enjoyed today’s makeover!
If you missed Tuesday’s tissue paper re-makeover, you can see it >>> here.
And here are a few more home decor re-makeovers you might like:
(these are things I pulled from my own decor, not thrift store finds that I made over)
- White and Gold Tray Re-makeover
- Clock Re-makeover
- DIY Coastal Framed Prints Re-makeover
- Mirror Word Art Re-makeover
- Old Is New Again – Whitewash Finish Framed Prints Re-makeover
- Foyer Light Fixture Makeover (while hanging!)
- Re-makeover of a Thrifty Decor Makeover
- Painted Porch Pillows – a different kind of re-makeover
These old decor pieces no longer “sparked joy” for me. But giving them makeovers gave me the opportunity to re-love them.
It’s so much fun to go grab these oldies and make them new again.
And not only new again, but new again with a brand new look too. :)
As much as I love doing furniture (I truly do!) I could sit all day long and re-invent old decor.
I know you guys have bunches of old decor, or at least a piece or two, that’s just begging for something new to be done with it.
Go get it and paint it, tissue paper it, or just do something fun and different with it so you can re-love it too.
Not only is it super budget-friendly, but you’ll also have a ball doing it.
PIN it to save it!
Check back next week when I tackle this little mini-makeover!
Edited to add! See it now, here!!
Happy weekend to you beautiful friends!
And happy re-making too!
xoxo


")

")

")


I always enjoy your faux finish projects, Nancy. Gorgeous and so pretty! Love it on your shelves. It really adds some pretty contrast and interest. Way to go!!!
Have a wonderful weekend!!
Thanks, Christina! They are so much fun. I want to do more, different ones….and more on furniture! I’m venturing out or trying to! ;) Hope you have a wonderful weekend too! xoxo
Oh my gosh what a difference!!!!! It’s beautiful!!!! I love it! 💜
So talented!
Wendy 💜
Thanks, Wendy! :) Creating faux finishes like this is so much fun! I need to do more of them! Happy weekend to you! xoxo
I am in love, wow Nancy this looks so awesome! I love the colors you used too! I was so happy that you shared a photo of how you finished the inside of the urn. Love this one too!
There’s just something about faux finishes and the texture, depth, etc, I think! I am hooked and need to do more! :) Next, on furniture! And urn, oh my gosh, yes! I called it a vase because my brain just could not recall the name for this thing!! That’s it! Haha!! Thank you Kaycee! :) xo
I adore this! It may be my very favorite thing I’ve seen here. What a class act.
Aw, thank you, Helene! :) xoxo
It really was an ugly piece until you did your magic! The little handles on the sides come to life and I like the 2 different metal colors as a contrast. Does it make a difference what kind of paint to water down or will anything on hand work? Thanks for another inspiration and good directions! XOXO
Yes!! And yes, the handles really did…well all the features of this old thing really did come to life afterward. It never ceases to amaze me what paint can do! It really doesn’t matter about the paint. I just like the chalk style paint because it’s not shiny, etc. Happy weekend to you! xoxo
Love this! I see so much of the old brass and bronze decor at garage sales and thrift stores, and I have spray painted my share of it, but would like to try more of an interesting finish line this. Is gilded wax similar to rub and buff? I haven’t used either but have seen rub and buff mentioned by bloggers. I would like to try them. I have a pendant light fixture that was brass that I spray painted but it could use a little more character, and I think the metallic wax might be what it needs.
Thanks, Vicki! Yes, old brass and bronze pieces are just perfect for this technique! Yep, it’s really similar, I just prefer the gilded wax myself. But you could use either. This would really add some depth and interest to your light fixture! It sure did to mine. :) Have fun with it! xoxo
That’s a huge difference! What a great idea. It doesn’t look faux at all. Thanks!
Oh, Yay!! That’s awesome! Love hearing from other’s perspectives since I’m right on top of it! I love doing this finish! Too bad I can’t put it on everything! ;) xo
I really like this and will definitely try it on a couple of things that need updating. Thanks!
Yay! Have fun with it! :) xo
Gosh, Nancy, that is just gorgeous! I love the new look so much more than the original look. That little bit of blue color over the copper is lovely. I HAVE to try this on something. I have a candle holder that might work.
Thanks for the inspiration!
Thank you, Naomi! Those colors are just so beautiful to me too! And yes, you do!! Candle holders would look great like this! :) Have fun! xo
Oooo I loved seeing this one again! I also loved the link to your pendant lights. I see much patina in my future. lol
I love this patina finish! Painting it copper first really does make it realistic. Thanks for sharing all the details on finishing this piece. I also visited your tray makeover again. I love that combination of white and gold. BTW I have one of those trays I bought years ago. I may try what you did as it really can be used just about anywhere. Thanks for those additional pics! I loved, loved seeing Ryder again!! Have a great week.
What brand and color paint did you use? I’d love to try this on a old/vintage brass framed mirror I have!
Hi Lindsey! I have the paints I used listed in the post (they are in the gray box) For the aqua color, I used Chalk Paint but I think most any water-based paint would work okay if you water it down a bit. This would look great on an old vintage brass mirror! :)