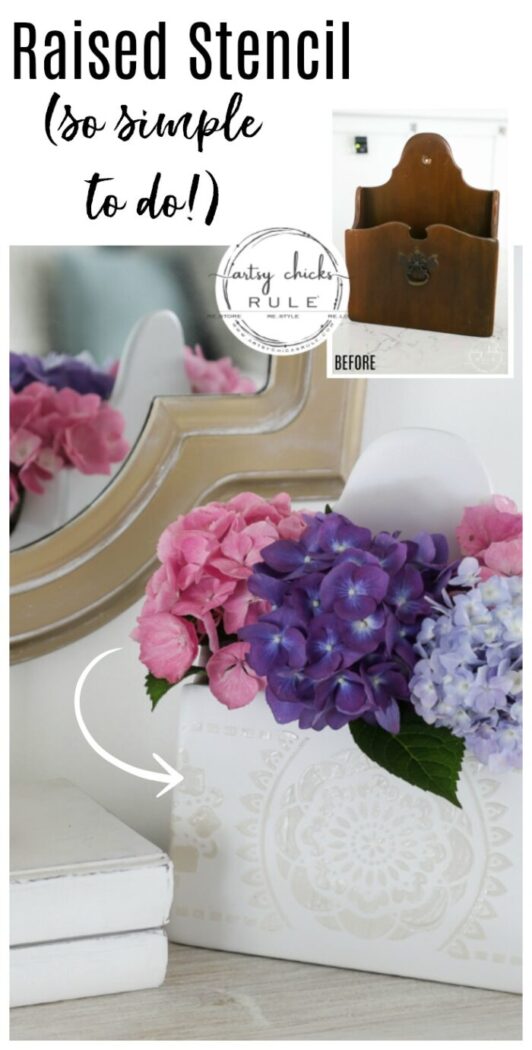
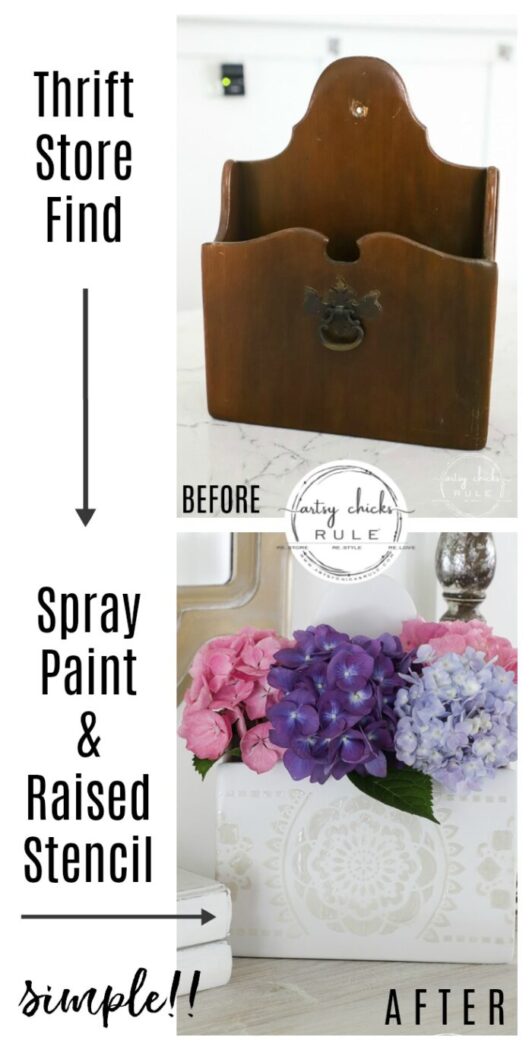
Spray paint, molding paste, and a stencil are all you need to create this sweet thrifted flower display!
Hello, my amazing friends!
Getting closer to being done with my latest haul. Yippee!
One more and I can go shopping again for more. Haha…I can not wait.
I love love love thrift shopping…I might love finding all the goodies more than making things over. lol Nahhh…hmmm, well, maybe! ha!
Here’s what I started with…(and what I’ve completed so far)…
That little lidded box is the last thing to do. I have not done a thing with it yet.
I have an idea…but I’m not sure how it will work out. We’ll see. ;)
Thrift Store Makeover Flower Display
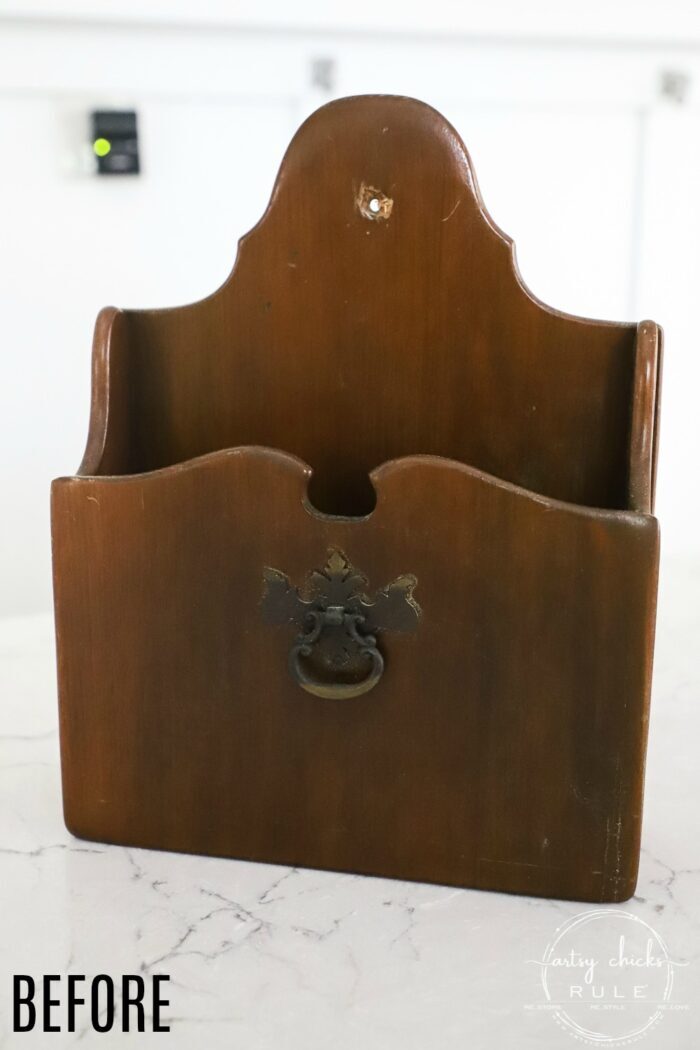
Today I’m sharing the hanging wood…thingy. (For mail perhaps? What is it?)
If you missed it, you can see me actually finding this beauty on my thrift shopping trip (and video) with Christy…. >>> here.
I decided to use it for flowers because I thought it would make a great flower display.
I began by removing the hardware on the front. Buh-bye, old, dated hardware!
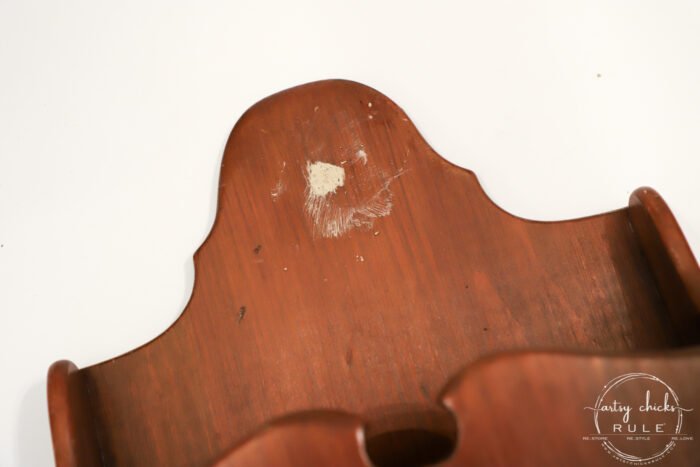
And filling in both that hole and the hole where it was hung at some point.
I used regular wood filler for those.
Once they were dry I simply sanded them and painted it all with white Satin spray paint. (Simple, y’all)
I thought it was a bit plain and needed a little something-something.
I considered a graphic….maybe saying “sweet summertime”…No, then I thought a Prima transfer. No…something else.
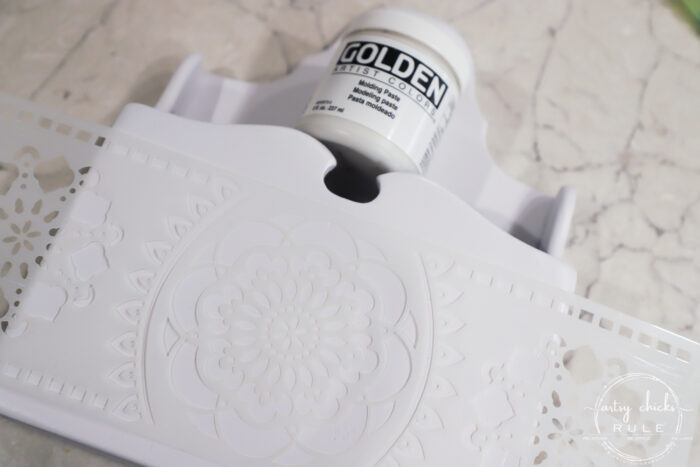
Oh! A raised stencil. Something subtle so the flowers I put in it will stand out.
Yes, that is it.
So I pulled out this same stencil because I apparently love it. lol (it’s the same one I used on this raised stencil project >>> here)
BUT I used a totally different medium this time. And I LOVED it! I think this might be my favorite choice for raised stencils.
Super simple…and very user friendly. (it’s linked in the “materials list” above)
OH…and this is the same paste I used for this completely different project … >>> here.
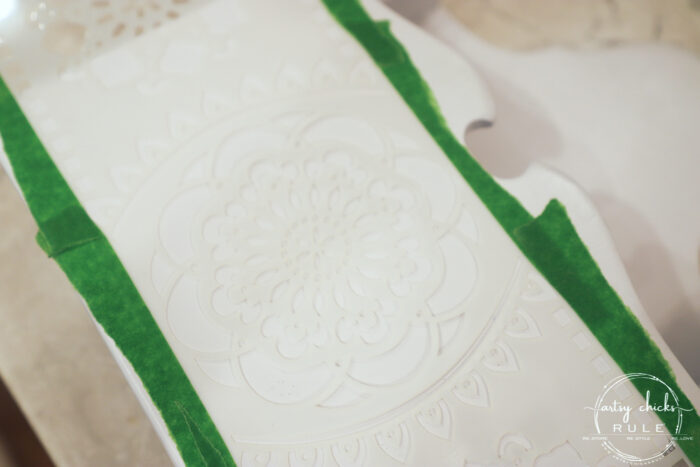
I simply taped the stencil to my project…
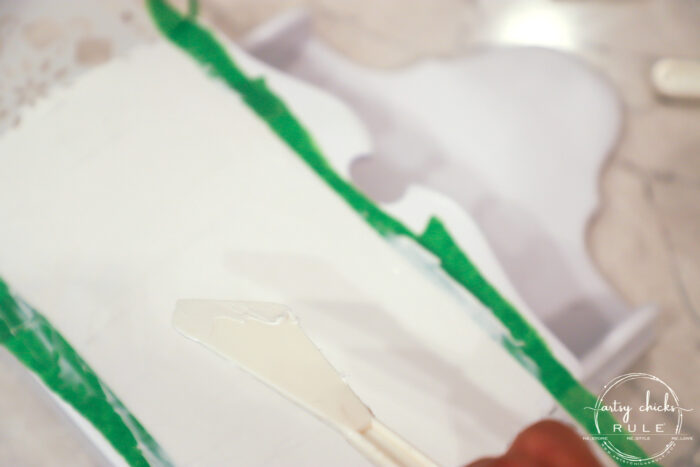
Next, I took one of the plastic spatulas I have and applied the paste right over the top of the stencil.
Just apply, scrape over with the spatula, remove the stencil and voila!
Instant style..and design. Love it.
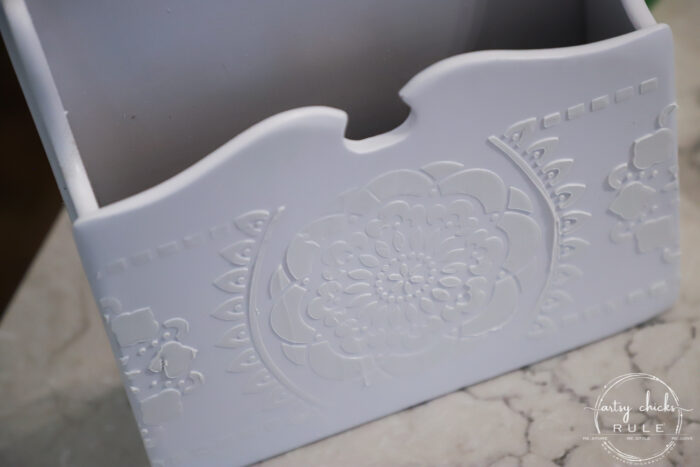
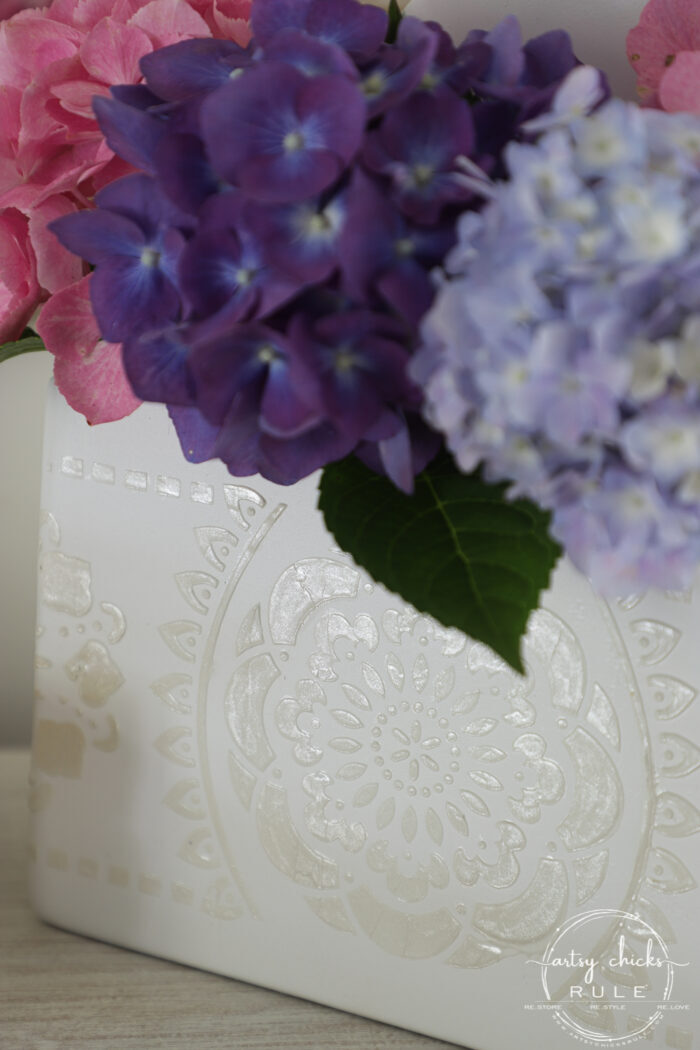
It’s white while it’s wet….but then turns a darker color.
I had planned to paint it with the same white spray paint but decided I liked the contrast so you can see it better.
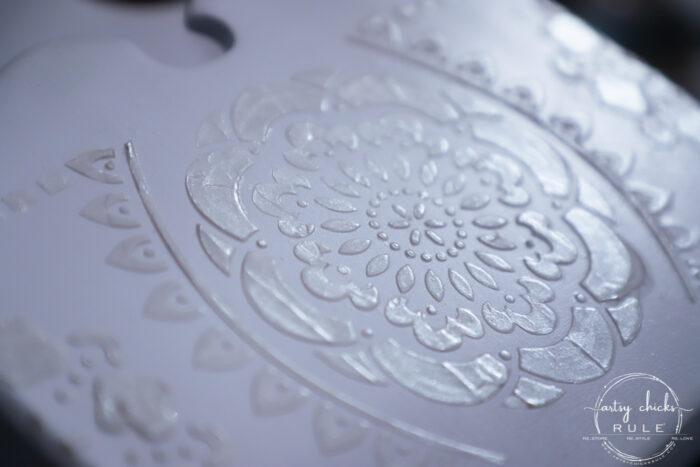
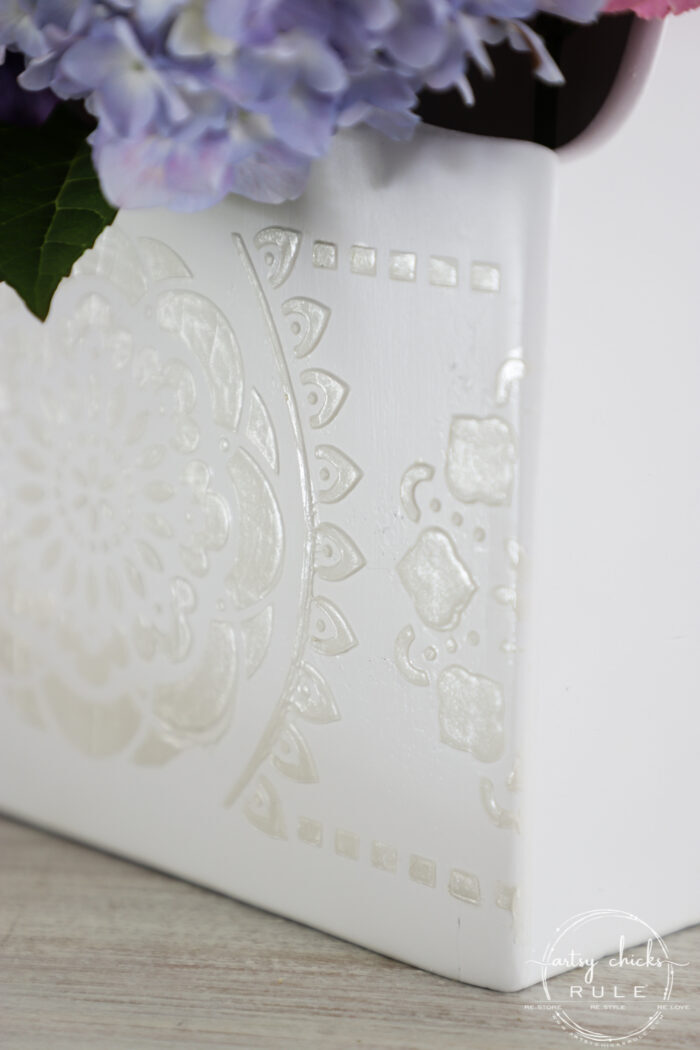
So instead I painted on the pearlescent paint with a small paintbrush to the raised area only.
You can see above where I’ve applied it and where I haven’t. (the pasty/paste color)
And an angled shot so you can see the shimmer.
And that is it. Done!
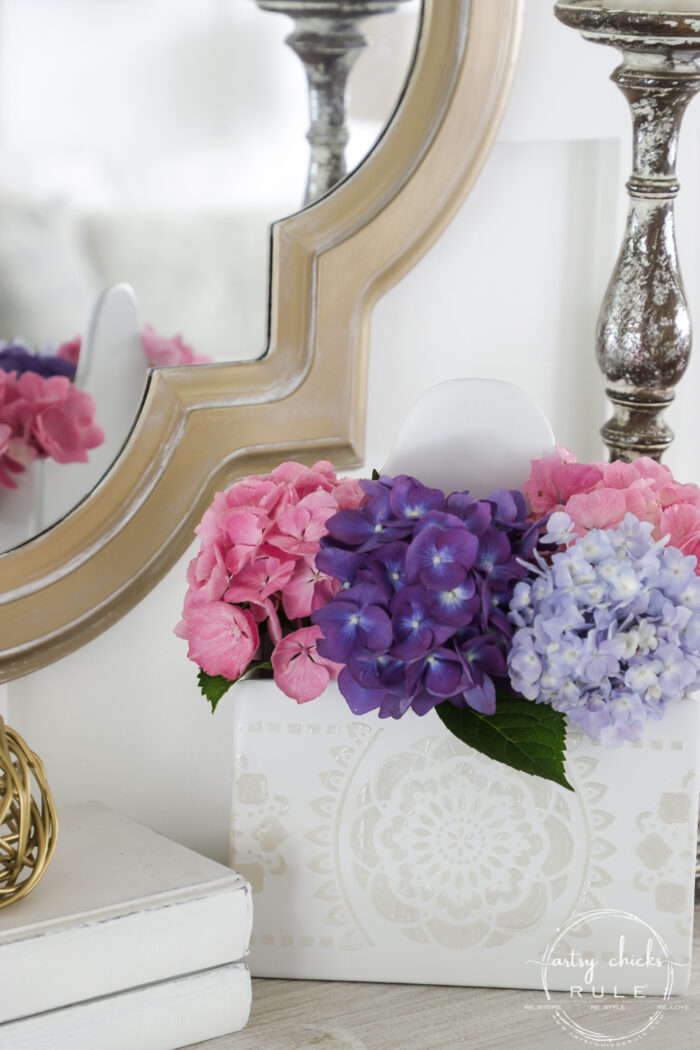
I knew I wanted to use this for fresh flowers but it is very skinny and narrow.
So I got the idea to use old spice containers to hold water and the flower stems…
I save empty ones for other uses…is that any surprise?? haha
And yippee…perfect size!
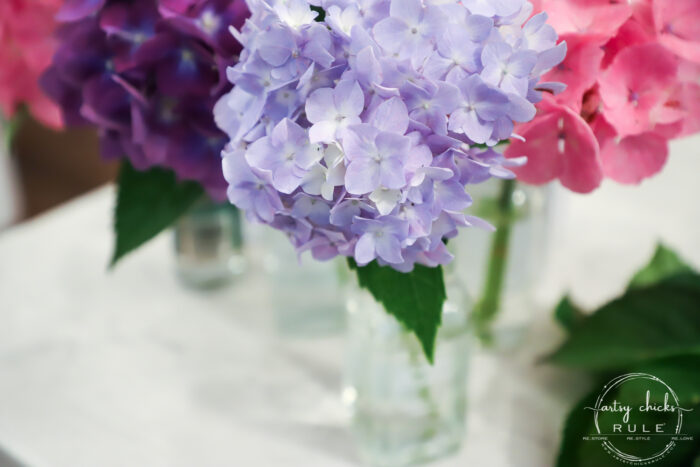
I have 6 hydrangea bushes that we have planted over the years in our yard. The colors range from pale pink, bright pink to blue to purple in varying shades. (and sometimes on the same bush!…odd!)
Anyway, the prettiest and most vibrant blue/purple and pink are in my front yard. And they are very small. So I didn’t cut any of those blooms.
The ones in my backyard (where I cut these) are huge and have tons of blooms.
I filled the small spice containers with water and added the flower stem then placed them down inside my narrow “brand new” flower display.
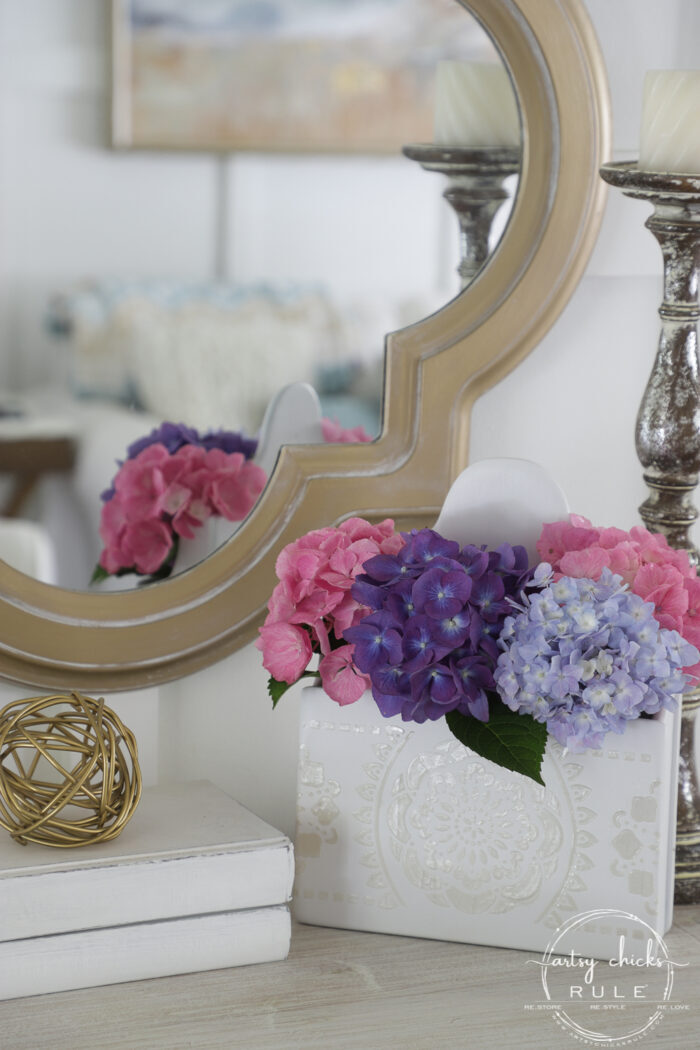
See how dark the raised stencil area/paste is?? I am so glad I didn’t paint that white or it really wouldn’t have shown up as well.
It looks so much more pearlescent in person. It’s hard to capture that in photos.
The light has to hit it just right in order for the camera to catch it.
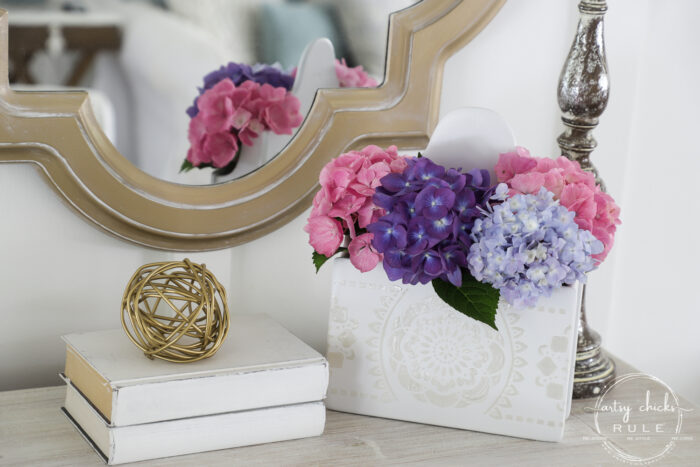
Up close…
Isn’t that pearlescent paint so pretty?? I used it before on this project … >>> here.
I just love it.
You could even add paint to the paste to change the color. Versatile.
This was a really simple project. And how fun is it?? Think about the possibilities.
Furniture…and more!
PIN it to save it!
I hope you enjoyed this really simple project. One that I truly think anyone can do! I love sharing these ideas with all of you and hope they provide inspiration for projects you are considering. :)
Wow, great makeover Nancy! I really like raised stencils and this is beautiful. Love the pearlized paint. FYI if you run out of molding paste you can also use joint compound. :)
Have a great weekend!!
Thank you, Christina! :) I am really loving raised stencils too. And oh yes, that makes so much sense!! Thanks!! I hope you are having a wonderful weekend! xoxo
These are called wall pockets. I found one in a thrift store and researched what it was called. I love what you did with this. The pearl paint made all the difference!
Thanks, Gwen!! Oh no, not at all!! I think it took me about 5-10 minutes (if that!) to hit the raised area with a little paintbrush. Quick, quick, promise! xo
that is so super darling i cannot stand it!!!! now i have to go find something narrow so i can use my spice jars! wish i lived next door to you. we could go junkin’ AND i could shop your booth!
did you do the candlestick in the photo? love that.
Aw, thanks so much, Ruby! Yes!! These are perfect for one stem like this. And oh, wouldn’t that be fun! :)
No, I didn’t do that candlestick, they came that way! xo
Amazing makeover as usual. Love your ideas. I’ve used spackle for raised stencils before and it works great. May have to try this somewhere. I believe it probably was used for mail at one time, but this is such a wonderful use. I hope you kept that “dated hardware” for another fun project in the future. Could be nice painted a great color.
Thank you, Kris! :) That’s a great idea! And much cheaper! Yes, I was thinking mail too. I did keep the hardware because you never know! Happy weekend to you! xoxo
The monochromatic look with the shimmer really is lovely, Nancy. I think it was a mail holder in its previous life, but it looks great holding flowers. And you could use it on a desk for cards or pens/pencils, if you wanted to. Your hydrangeas are fabulous, too.
A so so pretty I have multiple objects I would like to use erase stencil on. But can you tell me what color of that pearlescent paint you used? When I looked it up through your link it came and burnished or tawny. Thanks a bunch and keep on putting out those beautiful crafts
Well the raised stencil is just the bomb! Does this stuff adhere to most everything? I am thinking about a ceramic pot🤔. Your hydrangeas are beautiful. Have a lovely weekend!
Aw, thanks, Cecilia! Isn’t it so much fun?? I think it should without issue. But I haven’t used it on all. I can tell you it is stuck pretty darn good on this! Happy weekend to you too! xo
I love what you did with the box. I have one just like it except the front metal piece is different, after seeing what you did I want to do something like that. Where can I buy the raised stencils, that is such a great idea.
Thanks, Merry! OH yes, do! You can actually use any stencil with this. That’s the great part! The stencil I used is linked in the post under the “Materials List” box. (but can also be found here)
It doesn’t even look like the same box!! I love it!! I was wondering what you were going to do with that one…and I need to come steal some of your gorgeous hydrangeas!! I planted two last summer but they didn’t make it boohoo! XOXO
BEAUTIFUL! I’ve GOT to try this. Once question…(and the answer may be above, but (shhh, I’m at work) I didn’t get to read it thru. My question…when you place the stencil on and apply the paste, do you wait before removing the stencil or remove it asa the paste is applied?
And I am glad to hear I’M NOT THE ONLY ONE WHO SAVED ALL MY OLD SPICE JARS! :)
Haha, thank you Dawn! Nope, I just carefully pulled the stencil right back up. No waiting. I am thinking you wouldn’t want to wait because it will want to stick as it hardens. And yes to saving old spice jars! They are so great for storing small things, etc. Plus you just never know when you might need them…like this! ;) xo
I finally got a chance to get caught up on my emails. Thanks for getting back to me. I look forward to retiring and spending my time experimenting! Always looking forward to more ideas!
Great makeover! The pearlescent paint really is the touch it needed to let the design stand out without competing with those gorgeous hydrangeas. 😍 I, too, save all my empty glass spice jars. They come in handy!
Want to be inspired, learn new skills, discover all the tricks to furniture makeovers, creating new out of the old and more? You'll also receive my FREE ebook "Creating Fabulous Finishes" PLUS access to my private Printables Resource Library, too!
Sign up to get the Weekly Newsletter! Our emails include an unsubscribe link and you may opt-out at any time. Your information will *never* be shared or sold to a 3rd party.


")
")
")
")

")
")

")


Wow, great makeover Nancy! I really like raised stencils and this is beautiful. Love the pearlized paint. FYI if you run out of molding paste you can also use joint compound. :)
Have a great weekend!!
Thank you, Christina! :) I am really loving raised stencils too. And oh yes, that makes so much sense!! Thanks!! I hope you are having a wonderful weekend! xoxo
These are called wall pockets. I found one in a thrift store and researched what it was called. I love what you did with this. The pearl paint made all the difference!
OH yes, I can see that. Definitely describes it well! I think so too…that Pearl paint really brought out the design. :) xo
I love how this turned out. The paint is beautiful. You definitely give me inspiration!
Yay, I’m so happy to hear that! Thank you, Kimberly! xo
It is SO pretty! i love the pearlized paint, but it seems like a very time-consuming job to hand paint it.
Thanks, Gwen!! Oh no, not at all!! I think it took me about 5-10 minutes (if that!) to hit the raised area with a little paintbrush. Quick, quick, promise! xo
Thanks Nancy! it looks so pretty and time-consuming – glad to know it’s not as labor intensive as it looks!
that is so super darling i cannot stand it!!!! now i have to go find something narrow so i can use my spice jars! wish i lived next door to you. we could go junkin’ AND i could shop your booth!
did you do the candlestick in the photo? love that.
Aw, thanks so much, Ruby! Yes!! These are perfect for one stem like this. And oh, wouldn’t that be fun! :)
No, I didn’t do that candlestick, they came that way! xo
Sooo pretty !!! Perfect choice.
Subtle and delicate.
Great stencil.
Thanks for sharing ! I’d love to try this ;)
p
Thank you, Phyllis! Yes, do try it! xoxo
What a transformation! You are such an inspiration. Love your style!
Aw, thanks so much, Mary Ann! xoxo
p.s.
I don’t see any info on the stencil….
any info on it available ?
Thanks,
p
OH yes!! I have added it to the “materials list” in the post but here is the link also. :)
Wow! That turned out so good! I think I have some old dark stuff hanging around my garage I might re-invent! Thanks for the inspiration as always!
Thanks so much, Vicki! Oh yes, bet so!! I have a bunch more waiting on me too!! ;) Happy weekend!! xoxo
Amazing makeover as usual. Love your ideas. I’ve used spackle for raised stencils before and it works great. May have to try this somewhere. I believe it probably was used for mail at one time, but this is such a wonderful use. I hope you kept that “dated hardware” for another fun project in the future. Could be nice painted a great color.
Thank you, Kris! :) That’s a great idea! And much cheaper! Yes, I was thinking mail too. I did keep the hardware because you never know! Happy weekend to you! xoxo
The monochromatic look with the shimmer really is lovely, Nancy. I think it was a mail holder in its previous life, but it looks great holding flowers. And you could use it on a desk for cards or pens/pencils, if you wanted to. Your hydrangeas are fabulous, too.
Thanks, Marcie. :) Yep, mail holder makes sense. And oh yes, I love it for cards and pens/pencils too…great idea! Happy weekend to ya! xoxo
Great effect!
Thanks, Rose! xo
Great makeover! I love the raised stencil. I must try it!
Thanks, Lizzy! Yes, you must!! So fun. xo
A so so pretty I have multiple objects I would like to use erase stencil on. But can you tell me what color of that pearlescent paint you used? When I looked it up through your link it came and burnished or tawny. Thanks a bunch and keep on putting out those beautiful crafts
Oh, shoot! They don’t have it on Amazon right now, it was called “Champagne”. I will have to find and put a good replacement for that there. xo
That is so beautiful, turned out really nice. You gave me an idea with the raised paint, thanks for sharing.
Thank you, Christina! :) xoxo
Well the raised stencil is just the bomb! Does this stuff adhere to most everything? I am thinking about a ceramic pot🤔. Your hydrangeas are beautiful. Have a lovely weekend!
Aw, thanks, Cecilia! Isn’t it so much fun?? I think it should without issue. But I haven’t used it on all. I can tell you it is stuck pretty darn good on this! Happy weekend to you too! xo
(Me screeching) SO PRETTY!!!!! Great idea that molding paste. It really has a subtle pop. Big hug, cat
Thanks, Cat! xo
I love what you did with the box. I have one just like it except the front metal piece is different, after seeing what you did I want to do something like that. Where can I buy the raised stencils, that is such a great idea.
Thanks, Merry! OH yes, do! You can actually use any stencil with this. That’s the great part! The stencil I used is linked in the post under the “Materials List” box. (but can also be found here)
Thank you for the information, I am going to do this with my wall box.
You are very welcome, Merry!! Have fun! xoxo
It doesn’t even look like the same box!! I love it!! I was wondering what you were going to do with that one…and I need to come steal some of your gorgeous hydrangeas!! I planted two last summer but they didn’t make it boohoo! XOXO
Awww….boo!! That sucks! Especially since you had all those gorgeous ones at your last house! Plant some more! :) xoxo
Beautiful work! I love to see all your work you are so amazingly talented.
Thanks so much, Dianne! xoxo
BEAUTIFUL! I’ve GOT to try this. Once question…(and the answer may be above, but (shhh, I’m at work) I didn’t get to read it thru. My question…when you place the stencil on and apply the paste, do you wait before removing the stencil or remove it asa the paste is applied?
And I am glad to hear I’M NOT THE ONLY ONE WHO SAVED ALL MY OLD SPICE JARS! :)
Thanks, Dawn
Haha, thank you Dawn! Nope, I just carefully pulled the stencil right back up. No waiting. I am thinking you wouldn’t want to wait because it will want to stick as it hardens. And yes to saving old spice jars! They are so great for storing small things, etc. Plus you just never know when you might need them…like this! ;) xo
I finally got a chance to get caught up on my emails. Thanks for getting back to me. I look forward to retiring and spending my time experimenting! Always looking forward to more ideas!
Thanks, Dawn
You are very welcome! Happy weekend to you, Dawn! xo
Great makeover! The pearlescent paint really is the touch it needed to let the design stand out without competing with those gorgeous hydrangeas. 😍 I, too, save all my empty glass spice jars. They come in handy!
Thanks, Danica! And yes, those little jars sure do!! Glad I’m not the only one! ;) xo