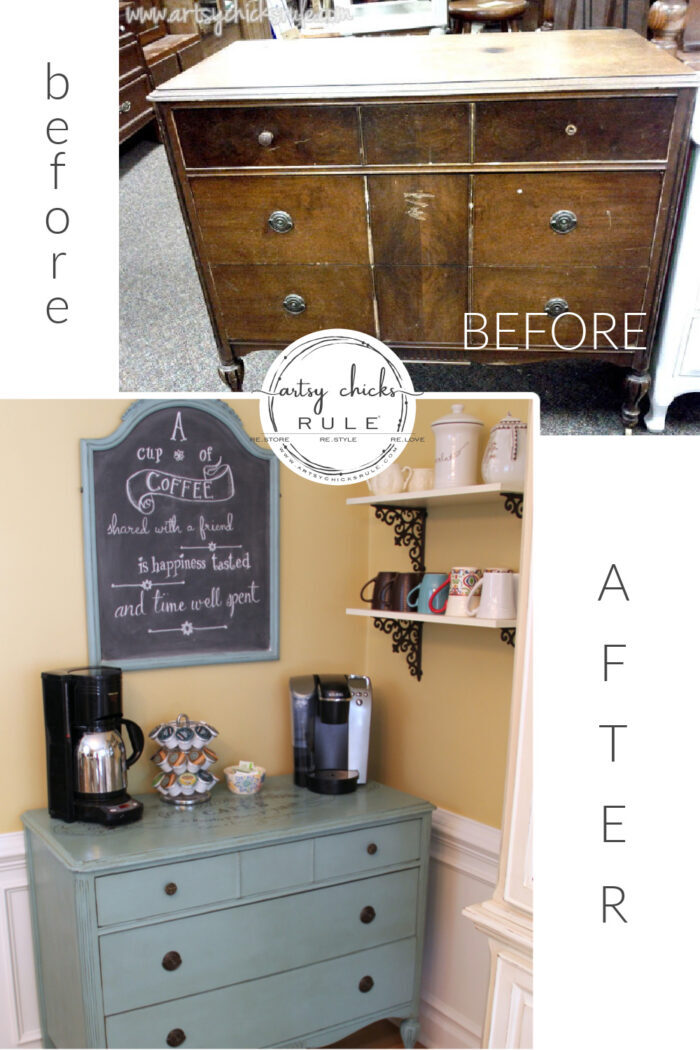
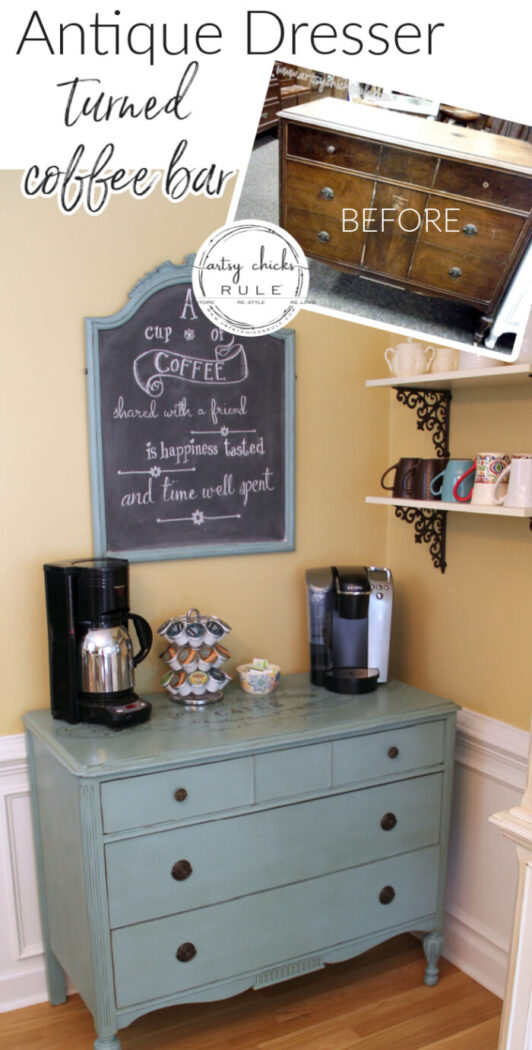
A Lovely Dresser Turned Coffee Server
Ever thought of turning a dresser into a coffee server? You can!
Hello, my sweet friends!
Today, I’m taking you back, way back, for Throwback Thursday!
Remember this old antique (beat up!) dresser I turned into a coffee server for my home years ago?
I loved it and it got lots and lots of use. It was the very first dresser I turned into a “coffee server”.
I’ve since done another one, you can see it here. It’s similar but not all the way the same.
I sold this one to a sweet lady a few years ago. I hope she has enjoyed it as much as we did!
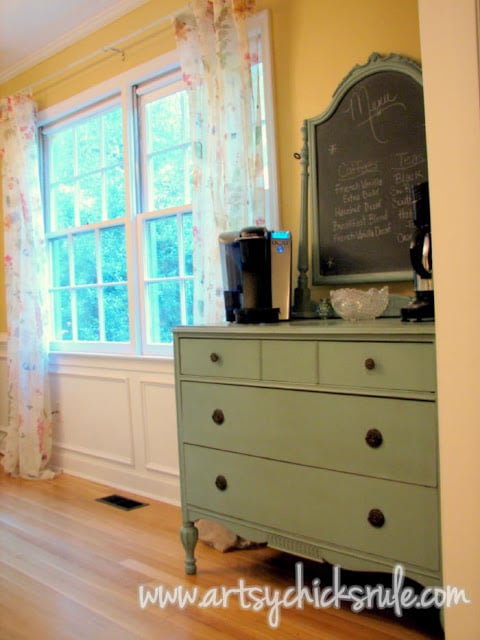
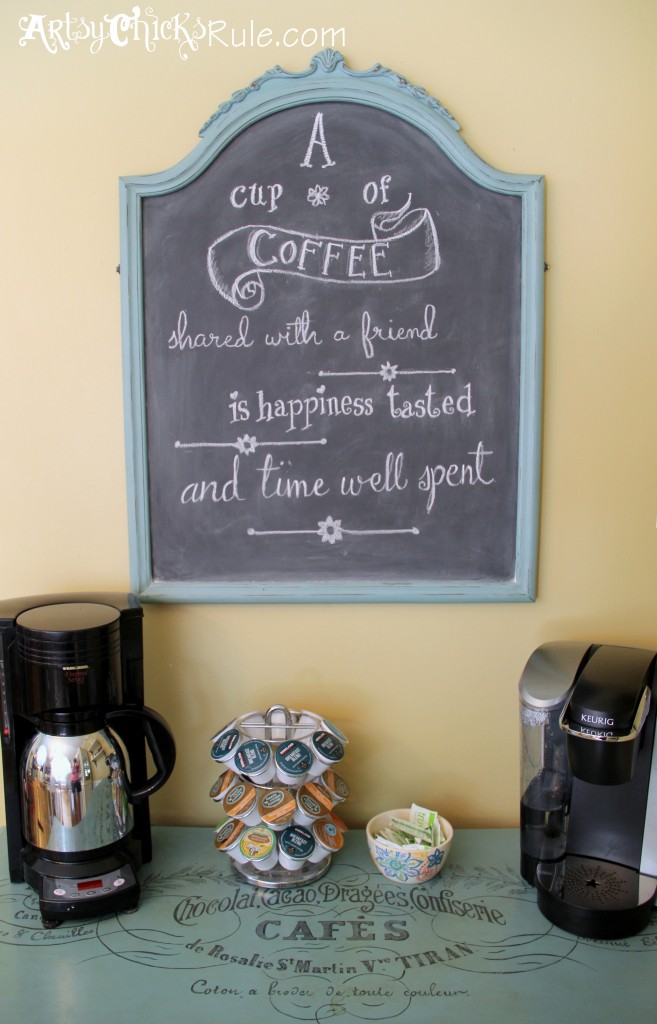
Coffee Server Station
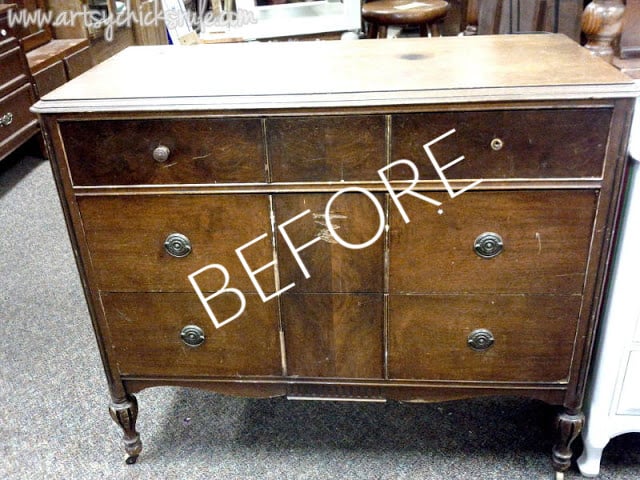
I adore older pieces like this and love it when I find them.
This one was in poor shape, however. Boo! I am not usually one to be deterred though. lol
A knob was missing and one wheel was missing, no biggie!
That’s a bummer, really, but oh well. It works out that way sometimes. I could have replaced them but they wouldn’t have been that “antique” look.
So they were removed.
There were also trim pieces broken and missing from the drawer fronts but I knew it could be beautiful, so home with me, it came.
The trim on the very top drawer was intact, so it stayed.
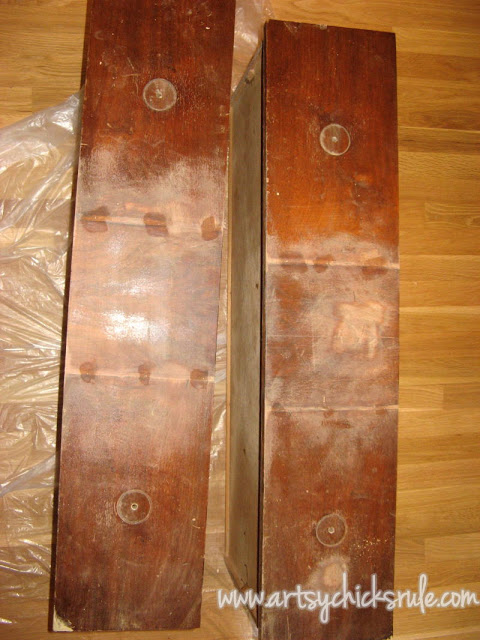
The trim from the bottom 2 drawers was broken with pieces missing.
So I took it off.
It pained me because I really wanted to keep it.
I could have made pieces that matched instead. But at the time I made over this dresser, I hadn’t done it yet. Not sure what I’m talking about?
Check out this post, here … “How To Make Missing Molding”
OR this post where it all began…that time a made a missing handle. “Missing Hardware? Here’s a Fix”
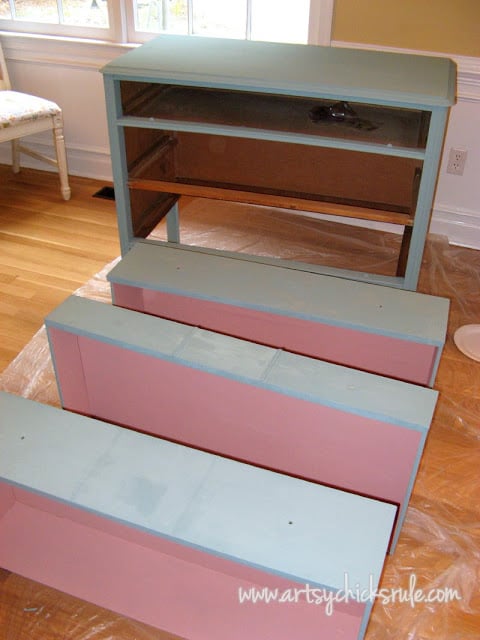
I chose to paint it with Chalk Paint. I used a LOT of Chalk Paint at the time. This was something I mixed up “custom”.
If you like the color, here is a color that is very similar. >>> French Eggshell
Want to see it painted on something?? Check out this post, here.
I used Scandinavian Pink (you can try this color instead) for the insides of the drawers. Isn’t that just the greatest color combo??
And since I was going to be using the drawers for coffee mugs, filters, and such, I sealed the inside of the drawer paint with poly instead of wax.
You could also seal it with this.
Want to know about 26 other chalk style paints?
I’ve got the low down for you right here! >>> 26 Types of Chalk Style Paint For Furniture
I knew I wanted to do more than paint …so decided to add some graphics on to the top of this piece.
And since it was going to be used as a “Coffee Server” I wanted it to say “Chocolate or Cafe” or something along those lines.
I couldn’t find exactly what I wanted so I used parts from 3 different graphics and transferred what I wanted from each.
I found them here… The Graphics Fairy. She has a bunch of really beautiful graphics.
I love to just sit and scroll through them all. I used to use them all the time back in the “early days”.
There are several different ways to transfer graphics to furniture.
I chose to do the projector method below.
Well, that was after I saved the graphics to a flash drive, drove to OfficeMax, and had them make some transparencies for me.
Then I got busy!
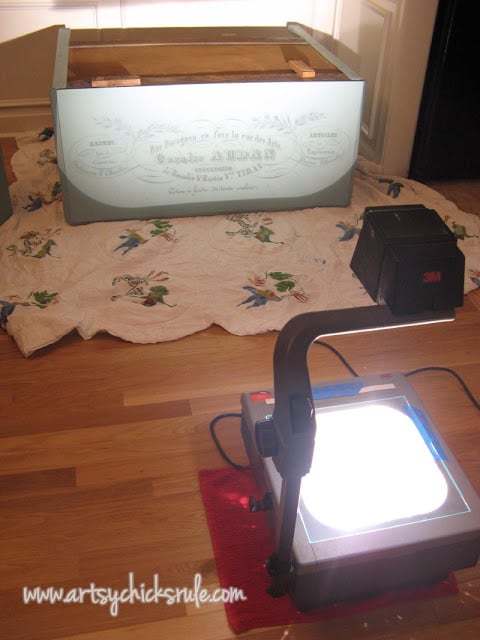
You simply project the image (from the transparency) onto the furniture, then you trace all the things you see.
It is a bit time-consuming but I find it very relaxing to do.
Here it is once I had drawn the graphic from the projector onto the top of the dresser.
I used watercolor pencils to transfer the image.
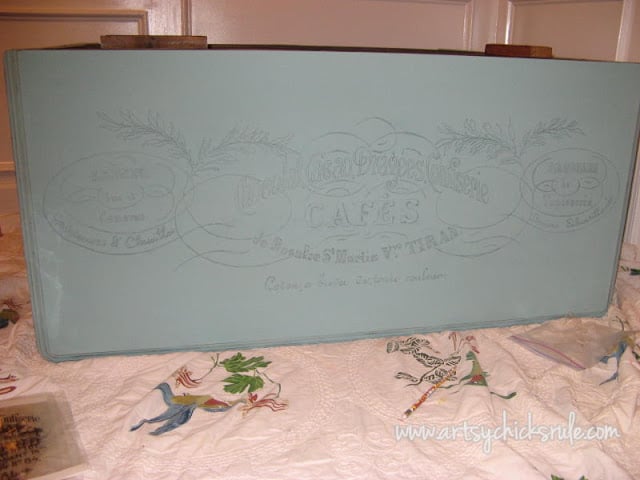
Isn’t that cool?? It really is a great way to copy your things onto large pieces like this.
Then I hand painted in the wording as you see below…
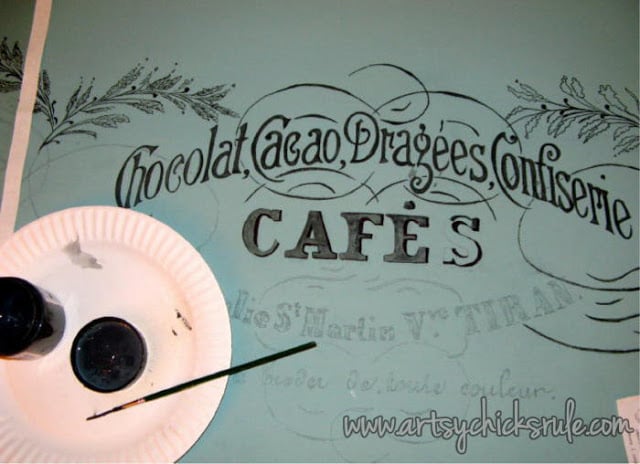
Black paint and my favorite type of paintbrush for lettering.
After I finished painting I used some fine sandpaper and distressed the lettering.
Not too much though!
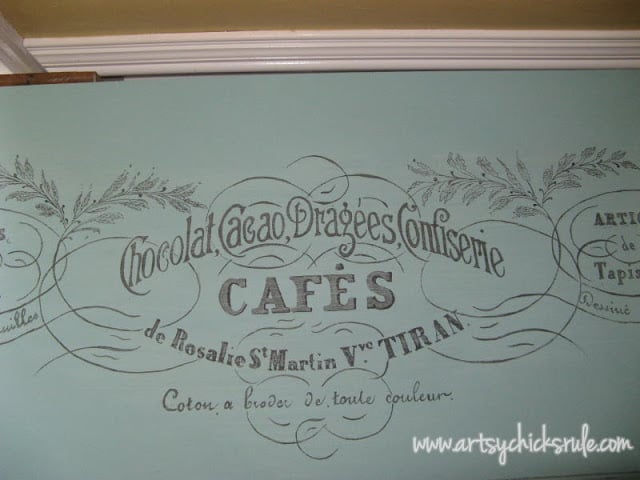
I distressed the entire dresser and finished up with a blend of clear and dark wax.
Mostly clear with just only a tiny bit of dark. A little of that goes a LONG way.
I did 3 coats of wax on the top since I was going to be using this as a Coffee Server station.
It has held up beautifully for the most part. I did sit a hot coffee mug down on it one time and it left a ring.
Bummer!
So, I don’t really use that wax often anymore. I really, really, LOVE a wax finish but it has to be on the right piece and I definitely do not recommend it for table tops that will get a lot of use. (or kitchen cabinets…nope)
I still love my lustrous wax finish, and wouldn’t change a thing, on these two pieces! Here and here.
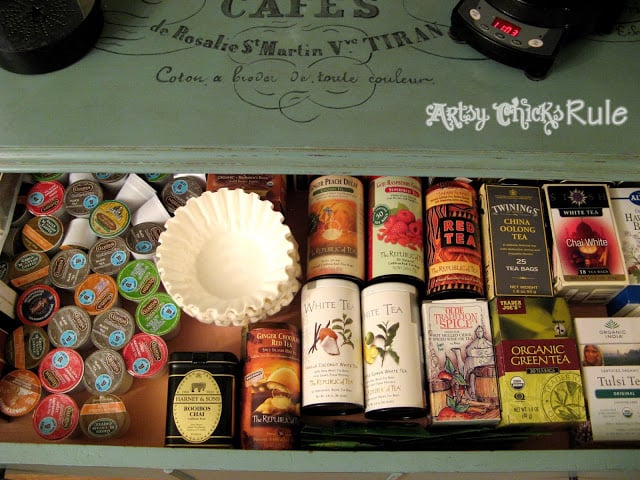
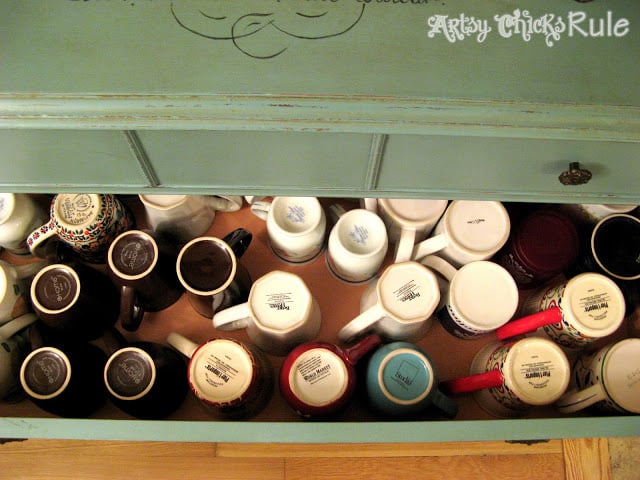
My K-Cups, coffee filters, and such were in the top drawer.
Mugs are in the second drawer and travel mugs are in the third.
Perfect!
 And the second drawer…
I no longer use a Kuerig. Oy! I went through 2 of those things and finally got this type instead and love it!
I’ve had it for years. Wait, I actually switched to this one next and realized we never really used the big pot so went to the single serve instead.
Love it…it’s great for coffee and tea.
Here are a few close-ups…
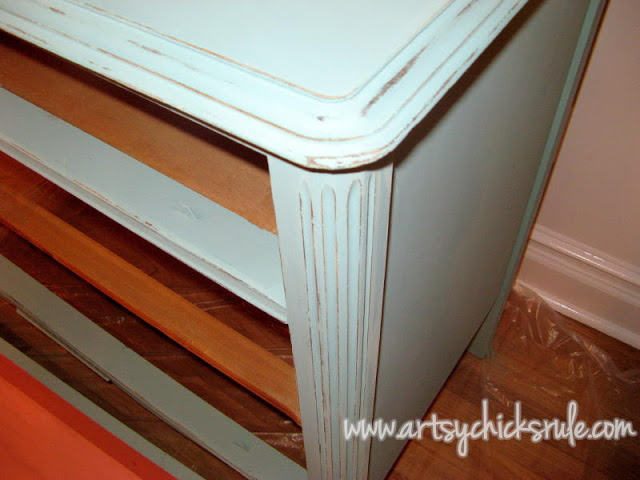
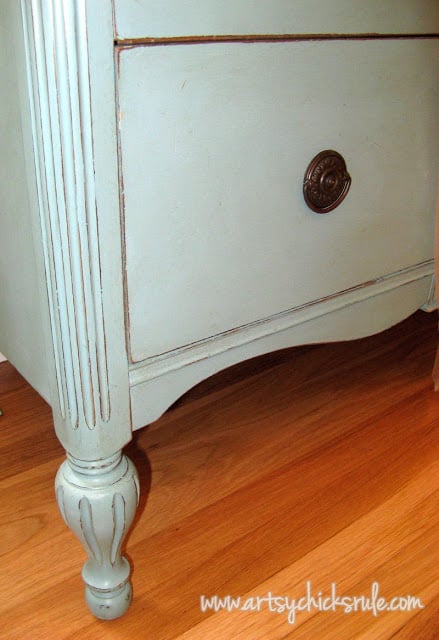
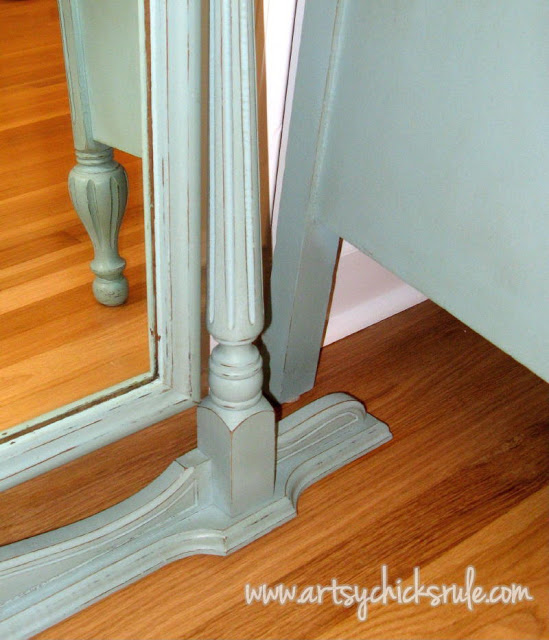
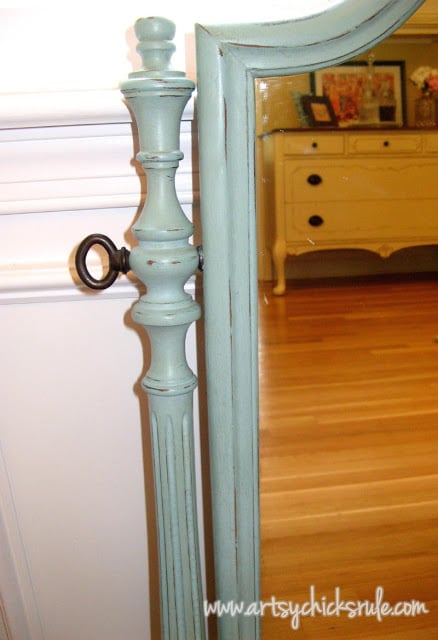
I just love all the details, those edges.
I liked the mirror but my husband thought it looked a little too “dresser-ish” for the dining room.
He suggested the chalkboard. I love it!
I used Chalk Paint to create the chalkboard. I did that a lot back then, it actually works great.
All finished chalkboard and all.
Look at the gorgeous shine on that waxed top.
See what I mean? A wax finish is really beautiful even if it is not the most practical thing sometimes.
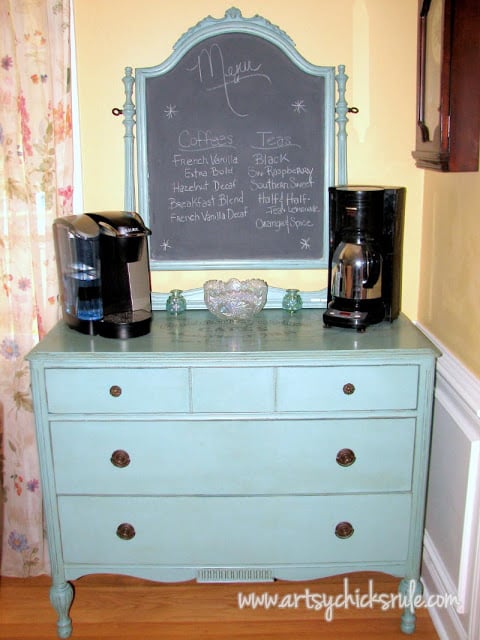
A little later I created this chalk art for it.
A dresser in my dining room- turned coffee server station. Why not?!
PIN it to save it!
I have always loved using furniture in new and interesting ways, and not always for its intended purpose.
Do you have repurposed furniture in your home too? I’d love to hear about it!
Have a wonderful weekend! Is it feeling like fall where you are at yet??
xo


")
")

")
")

Beautiful. You did a great job. The mirror really makes it! Visiting from HomeTalk.
Wow what a beautiful transformation! I love the color you chose this looks like such an expensive piece of furniture you’d find in a high end catalog!
Thank you Dria! I love this color too. :)
Love it! The colors are perfect
Thank you, Kimberly! :) xoxo
Nancy, this is such a creative idea for a buffet! I love that the old mirror becomes a built in chalkboard!!! Darling… just like your blog!
Thanks Yvonne! Yep, the chalkboard was a great choice and is fun to write different things on when guests are here.
Thanks so much for visiting my blog! :)
Nancy
I love coffee stations – and what a great piece of furniture you’ve upgrades with ASCP. Love the colors and the graphics. Great way to have everything you need at hand and out of sight too.
Visiting from Debbiedoos
Joy
Hi Joy! I love ASCP..one of my favorite products. Yes, the drawers work perfectly for mugs and coffee supplies. It’s a great conversation piece!
Thanks so much for coming by!
Nancy
Beautiful redo! Here from the POP Party, Pinning this gorgeous project :)
xoxo, Tanya
twelveOeight
Thanks so much Tanya :) And thanks so much for the pin!
xo
Nancy
Love this idea, especially the chalkboard. Pretty color too!
Thanks Shauna :) One of my fav colors on this one!
Nancy
You did such a beautiful job! Perfect colors, too. I really want to use a dresser in my dining room; I’ve been on the lookout for the perfect one. Pinning this for inspiration once I find it :)
dropping by from Inspire Me Monday. Thanks for sharing your link!
Roxana @ http://fourelevenrox.blogspot.com/
Thanks Rox! I am so glad I could offer up some inspiration to ya! I love repurposing things and using them in an unexpected way.
Nancy
What a beautiful dresser and such a great chalkboard idea! Just lovely! Pinning this one!
Thanks for pin Jeanette! And thanks for the compliment! :)
Nancy
Wow! Your transformation blew me away! I am IN.LOVE! I’ll be featuring your project next Sunday. Thanks so much for linking up & sharing your talent. :) IT’S A PARTY @ Three Mango Seeds
Oh wow! Thanks so much!!! :) So excited!
Thanks so much for hosting
xo
Nancy
Wow, what a great idea, and it looks fabulous!! You did a great job. I love it!! Thank you so much for sharing at A Bouquet of Talent! I hope you are having a great week. :)
Thank you Kathy! And thanks so much for hosting. :)
Hope you are having a great week too! I have been having a very rainy one. ;)
Nancy
Hey Nancy:
I love the dressers in other spots than the bedroom. I just repainted an online thrift dresser from white, to a butter yellow, and now it is a sideboard in my kitchen. I used homemade chalkpaint, and for my first time using chalkpaint, it turned out fabulous!!! (If I do say so myself!) (1 cup water, 1 cup plaster of paris, 2 cups latex paint)
Thank you Nicole :) this is one of my favorites…and I love it so much more now that I’ve moved it around a bit! (this is the older post, I’ve since moved it) Congrats on your piece, I’m sure it’s fabulous! :)
Nancy, What a great make over! I love the chalkboard instead of the mirror, It looks great! I do funky furniture (you can check out my site by clicking my link) but it takes soooo darn long! I am leaning a little more towards doing more with chalk paint. It is so fun to work with. You did a great job lettering, even if you have the outline, it still takes a lot of patience! I will check back often! ~Carolyn
Thank so much Carolyn! :)
Nancy
Hi…I love the projects you take on….a simple question
…when you use your “projector” to project an image onto a project….how are you getting to the imagery on your project to do the tracing????. It seems you’d create a shadow and interfere with your tracing….where do you position the furniture or project so you can work in comfort…this confuses me…..thanks for helping me understand how you do that!
Hi Carolyn,
I create a transparency from the graphic. I usually get it done at OfficeMax. You sometimes do create a shadow but it’s usually easy to work around and get it done. :) The projector is on the floor. Sometimes I will have to stick something under it to tilt it to get it just right. And I am on the floor with it! ;) Tracing away! Here’s a few more posts that might help, this one, this one and this one. Hope this helps! :)
I love the way this looks. I have a buffet that I want to paint but havent had the courage yet. I do have a question though. – I have tried using stencils before but the paint always spreads out for like the lettering or shape? How do you get it to look so good?
Thank you! You can try a spray adhesive on the backs of the stencils (those that are made to be repositionable). That really helps keep it in place, and helps protect against bleeding through. I actually had painted this in, however. (without a stencil)
Nancy, you have vision and skills! Wowzers, I love seeing this transformation!! Beautiful!
Aw, thanks, Christina! Happy weekend to you! xoxo
Please share what you mean by graphite and ASCP.
I’m sorry, that just means Annie Sloan Chalk Paint…in the color Graphite. I don’t use that line of chalk paint much these days as there are other alternatives. :)
Thank you, Nancy. . .what alternatives do you recommend?
I love Dixie Belle, Rustoleum Chalked, and just began using Fusion Mineral paint which I also like. :)
Hey, Nancy, I have admired this piece every time you post something and this coffee bar is in the picture. I appreciate seeing what it used to look like and what is looks now, even several years later. I had not joined your blog the first time you featured this beautiful makeover. The transformation is amazing. I love the color not too bright but more of soft color. The mirror looks great as a blackboard. I have to say this is one of my favorite pics of a coffee bar, and I have seen a ton! Thanks as always for sharing. Have a great week.
Hi Sue! Thank you so much. That made my day! Have a great weekend! xoxo :)
Well, I sure am seeing this for the first time, Nancy and it is brilliant! You did a great job – love the color choices, size, hand painted (wow) embellishments – and I ADORE the drinks on top, mugs in 2nd and travels on bottom. So handy. Just brilliant. I sure wish I had a place for something like that in my world. Just so clever!!!!
Aw, thanks so much, Michele!! (I want to call you Michele with one l all the time now! lol … I say it to myself as I’m typing every time! ;) ) And yes, I do love my repurposed dressers! I have several I use like this in other ways. Definitely handy! xoxo
It’s so pretty and all and I do love all your work but I don’t think I could have changed this to a color. I love that old old look on those type of chests and I think I would have just reconditioned it. For me anything with the old wheels like that, I just don’t have the heart to change them. I think it’s because I grew up in that era and I was always fascinated with the wheels and the wood color. You did do a gorgeous job on this and it does fit perfectly as a coffee bar.
I understand, Shirley. I am that way about some pieces too, trust me! :) And thank you! xo
Outstanding! I love it so much better as a caulk board, and hanging on the wall. You nailed this project.
Thank you, Ivory! :)
I love the idea of a coffee server!
So fun!! I love having one and a dresser is perfect for it. :) xo
I really love the makeovers you (and your thrift store sidekick) share with us. The best part is how you so elegantly explain how you do it (and the tools you use) like we are best friends sharing a cup of coffee while you take us through it. Adding those pictures of Ryder is icing on the cake. Thank you!
Aw, thanks so much, Jaye!! That is exactly how I feel when I’m writing my posts! :) And don’t think I’m crazy, but I talk to y’all as I’m doing my projects too!! haha! In that, I’m already detailing, telling, and bringing you all along in the moment too! xoxo
I love this! I have been trying to talk my honey into doing this with his coffee maker and grinder as it takes up too much space in our wee kitchen.
Thanks, Rose! :) Yes, yes, yes, do it!! xoxo