Estate Sale Sideboard with Chalk Paint Graphics (2nd Time’s the Charm)
Estate sale sideboard with chalk paint was a definite win for $20! It went through 2 makeovers but 3rd times the charm!
(EDIT: This post was originally published in 2013, updated in 2021. Things have changed around our home since this post. You can see our home tour now, here)
…and now…
This estate sale sideboard with chalk paint got a brand new life…twice!
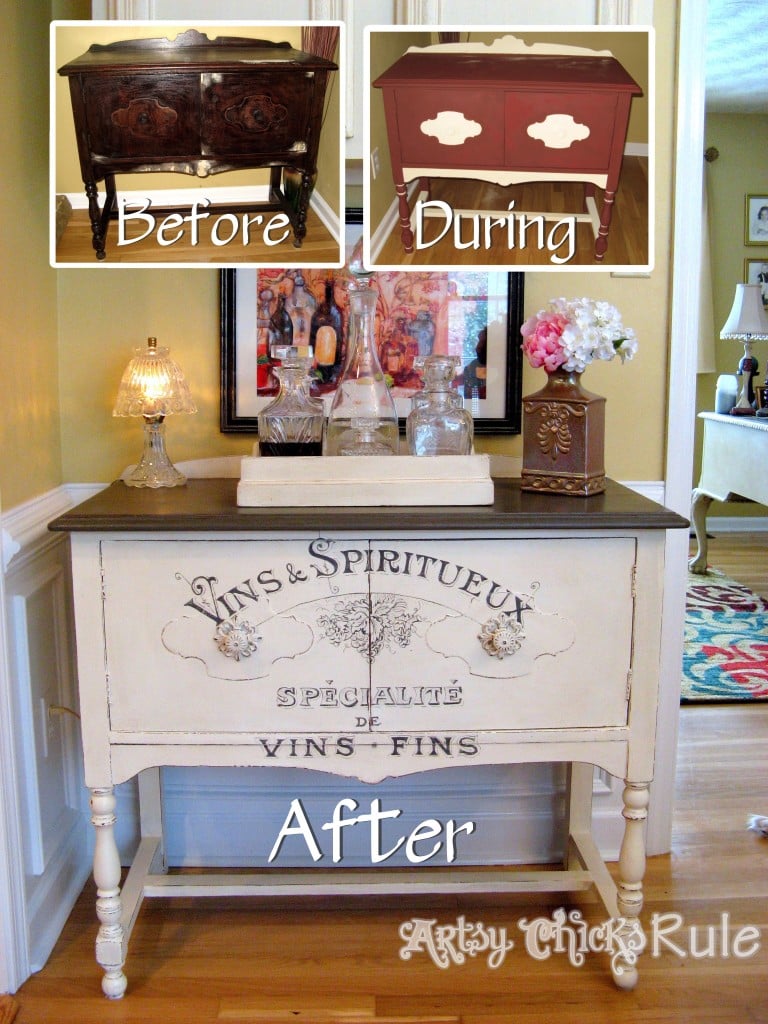
This poor little sideboard has gone through a couple of transformations.
One not so good…and one SO good.
Typically I will sit with a piece until it “talks” to me. I suppose this one spoke a foreign language the first go-’round.
Because clearly, I was misunderstanding what it was trying to tell me!
(Be sure to follow me on Instagram… I post most projects there long before I get to writing the posts about them. Plus a bit of randomness thrown in for a little fun & whimsy! )
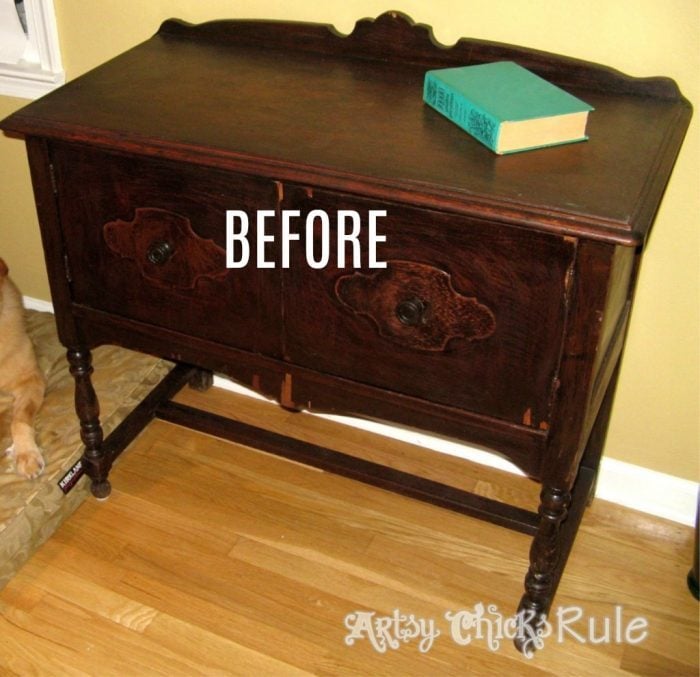
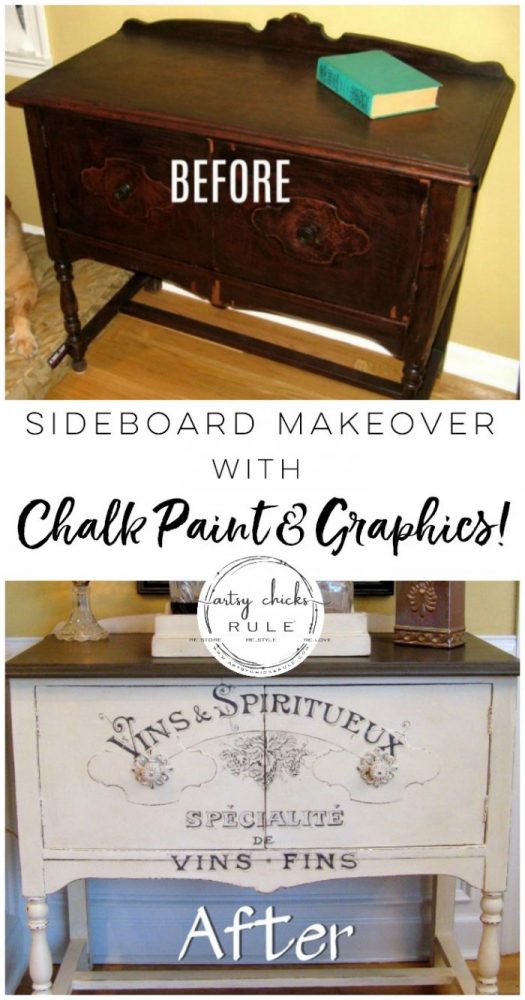
My husband and I were out one Saturday morning hitting garage sales as we often do. We came across an estate sale and I found this sideboard…
……for $20.
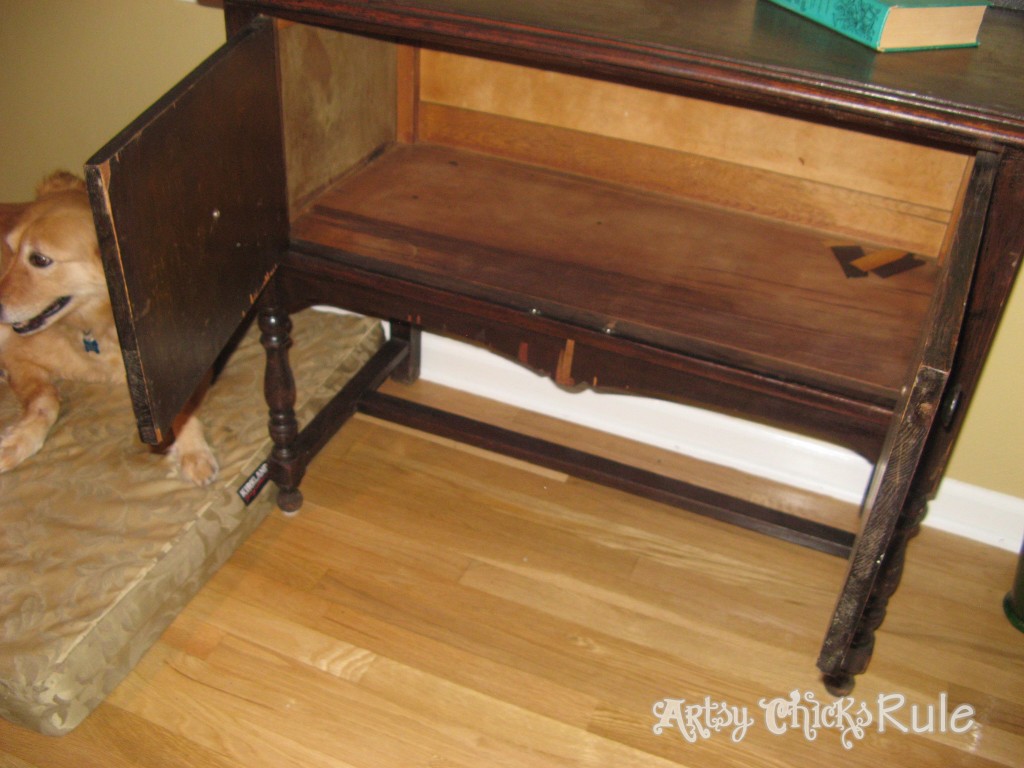
It was a little “rustic” to say the least. It needed something. And I really wanted to do something fun and funky with it!
Or so I thought.
So yes, it sat for a bit…but clearly not long enough.
Because this is what I came up with for the first go-’round… (this is Primer Red & Old White Chalk Paint )

“Fun & Funky” is one way to describe it. But I knew almost immediately I didn’t like it.
It was just ….too much. But I went ahead and finished it anyway.
I was unsure of what I wanted to do with it so it stayed this way for about 6 months.
Part of the problem was it was in the wrong room. Once I decided where it needed to go all was clear!
It needed to be a different color and some pretty graphics.
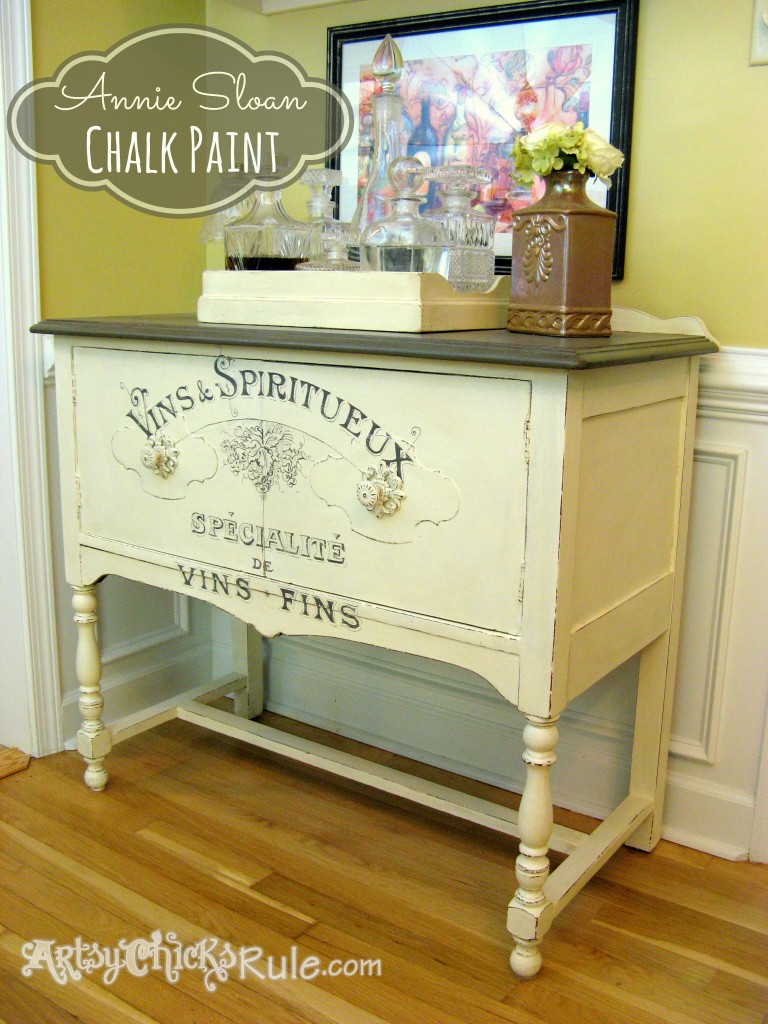
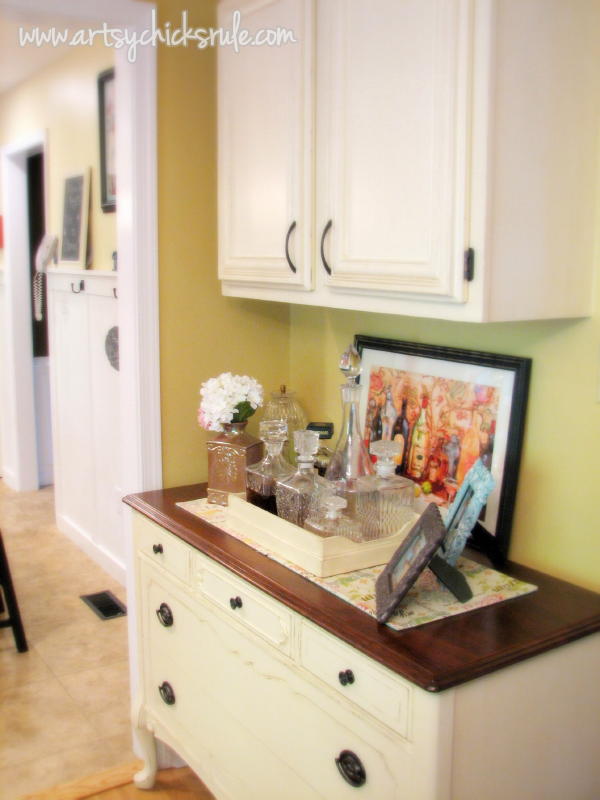
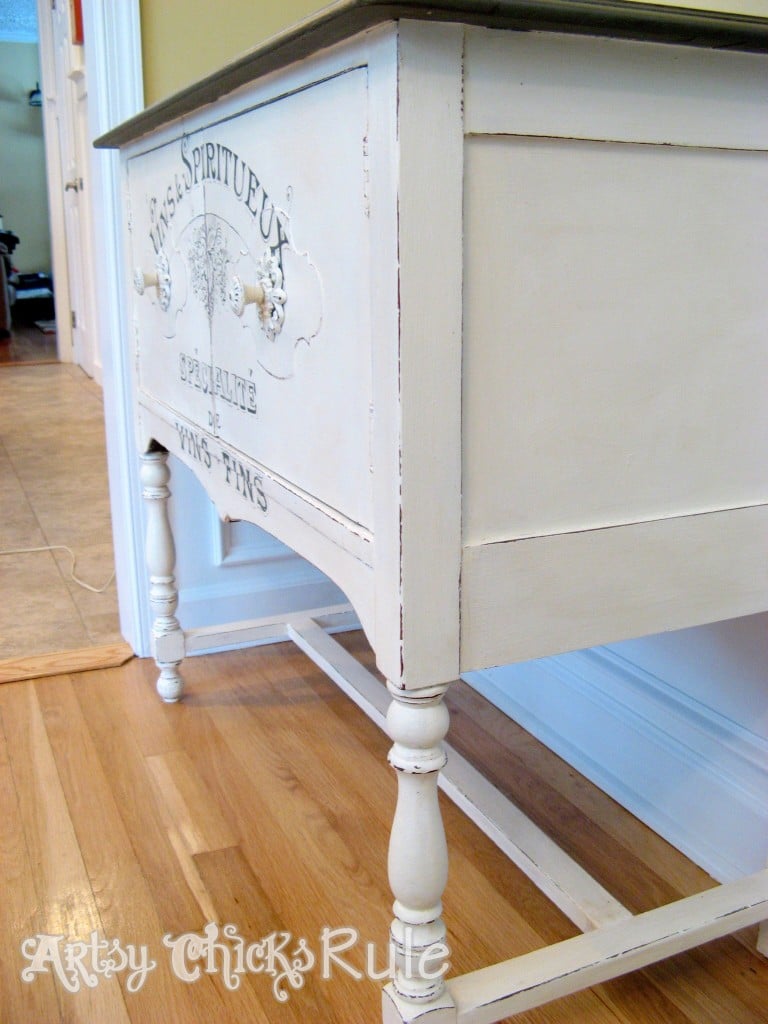
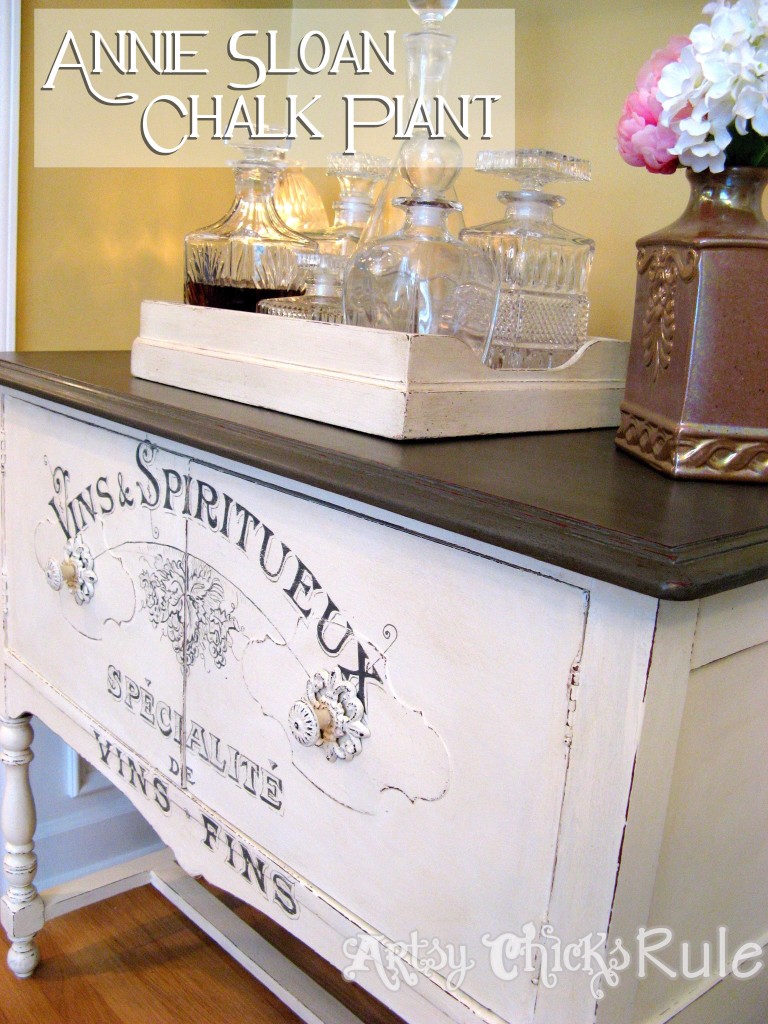
And so I turned it into this…
YES. I hear you agreeing with me! Right?? Yes.
Much better. So much better. It finally spoke to me in English!
Which is funny, I know, since there is now French writing on the front of it. Haha
Want to know about 26 other chalk-style paints?
I’ve got the low down for you right here! >>> 26 Types of Chalk Style Paint For Furniture
And just for fun, here’s what used to be in this spot…
This is a dresser I’ve had for 10 years (refinished twice by me…I painted over the “pretty, blue metallic” paint someone had chosen to paint it with an off-white. Last year I decided to strip all 3 paint layers down to the wood and start over — there were two different yellows under that metallic blue and my off-white topcoat, oh my!).
It was really a little too large for this space so this worked out well. It is now in my family room. And I love it there…funny how things work out.
*You can see more about it in this post here.
$20 Estate Sale Sideboard with Chalk Paint Makeover
Now let’s take a look at the process…
One of the great things about Annie Sloan Chalk Paint is you can paint right over the wax of a finished piece!
Love that.
I mean I really love that because my creative moods change with the wind!
I mixed up some Graphite & Coco Chalk Paint and came up with a really great color for the top. (if you didn’t already figure it out, I am a mixer)
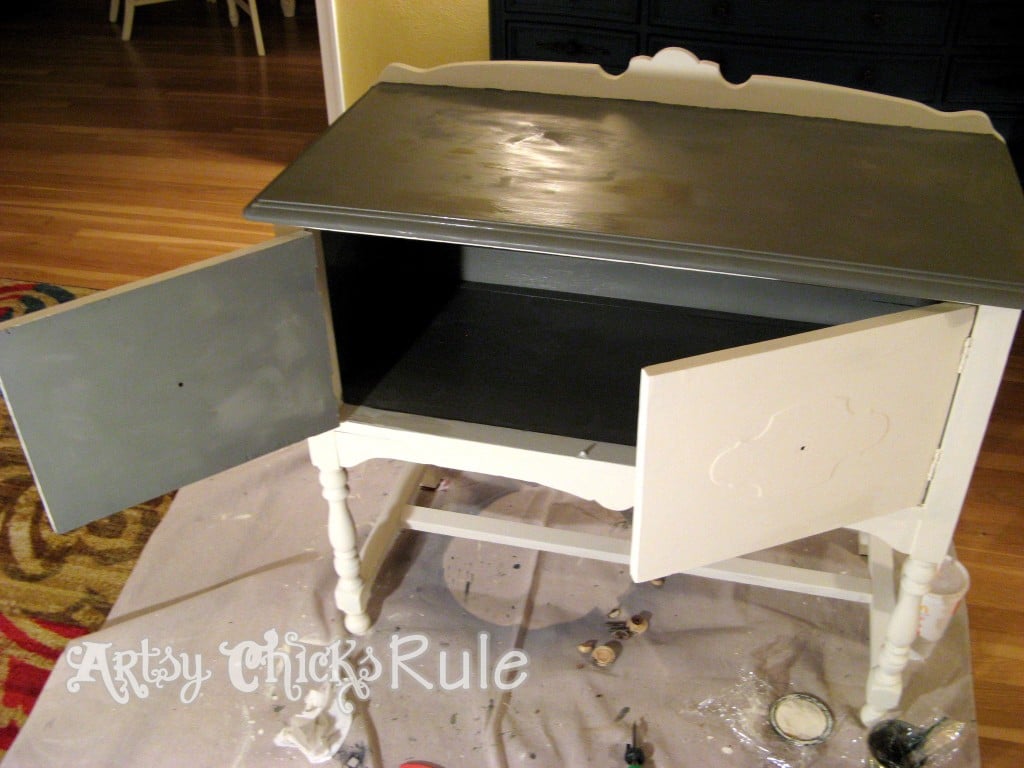
I also painted the inside this color.
I painted everything else “Old White”.
Much better with these new colors already, right?
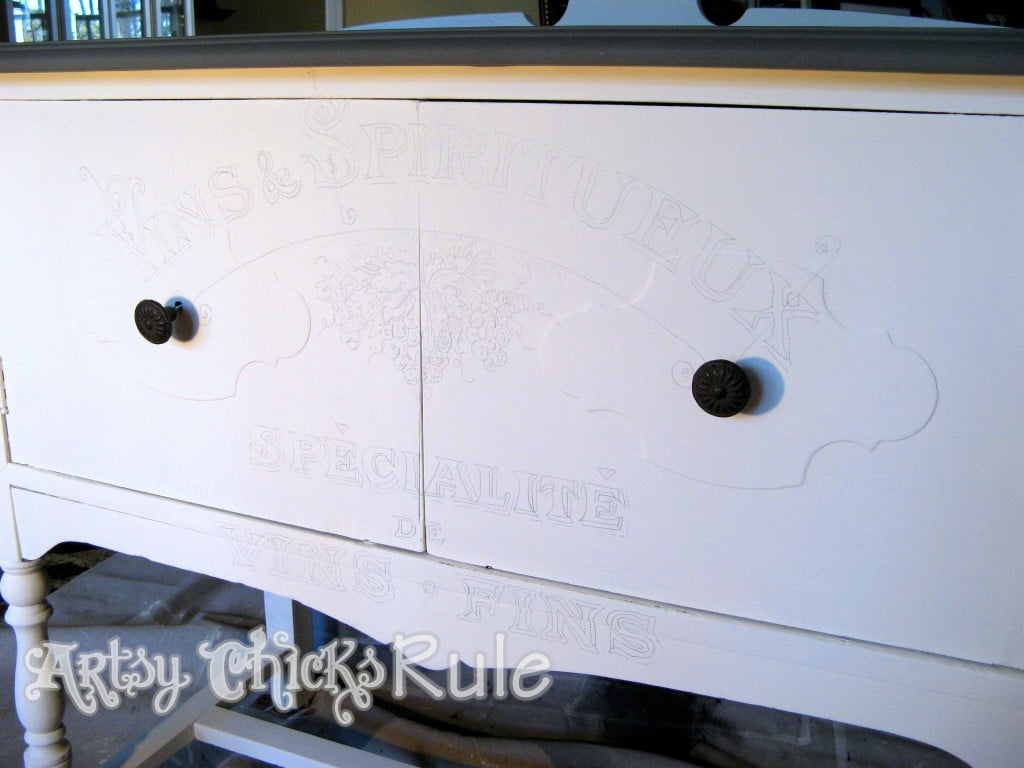
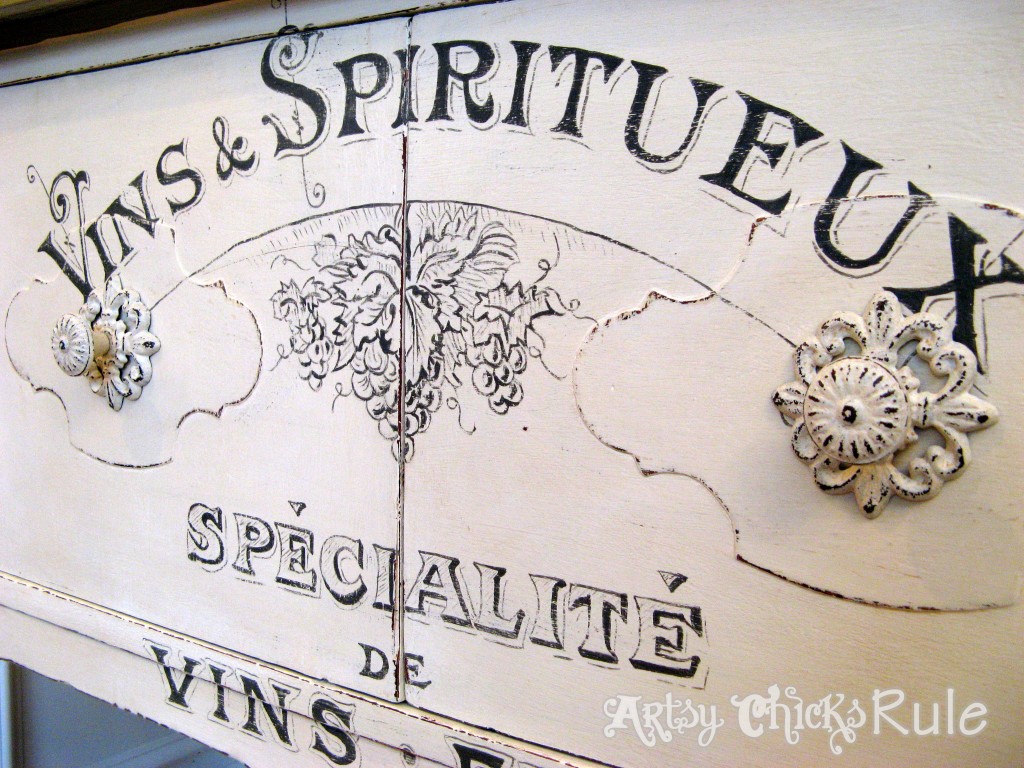
Then I pulled out my handy little projector and got to work.
I used this graphic from The Graphic’s Fairy.
She has a plethora of graphics that she so graciously offers for free!
Please go visit her site and take a look at them…there are so many!
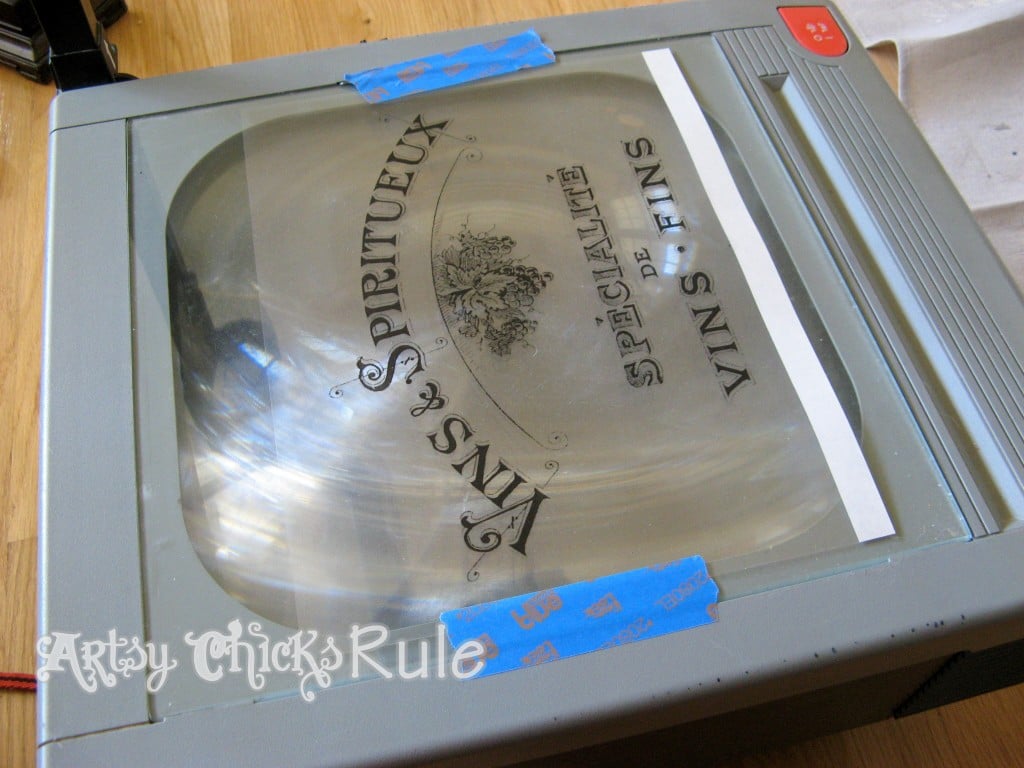
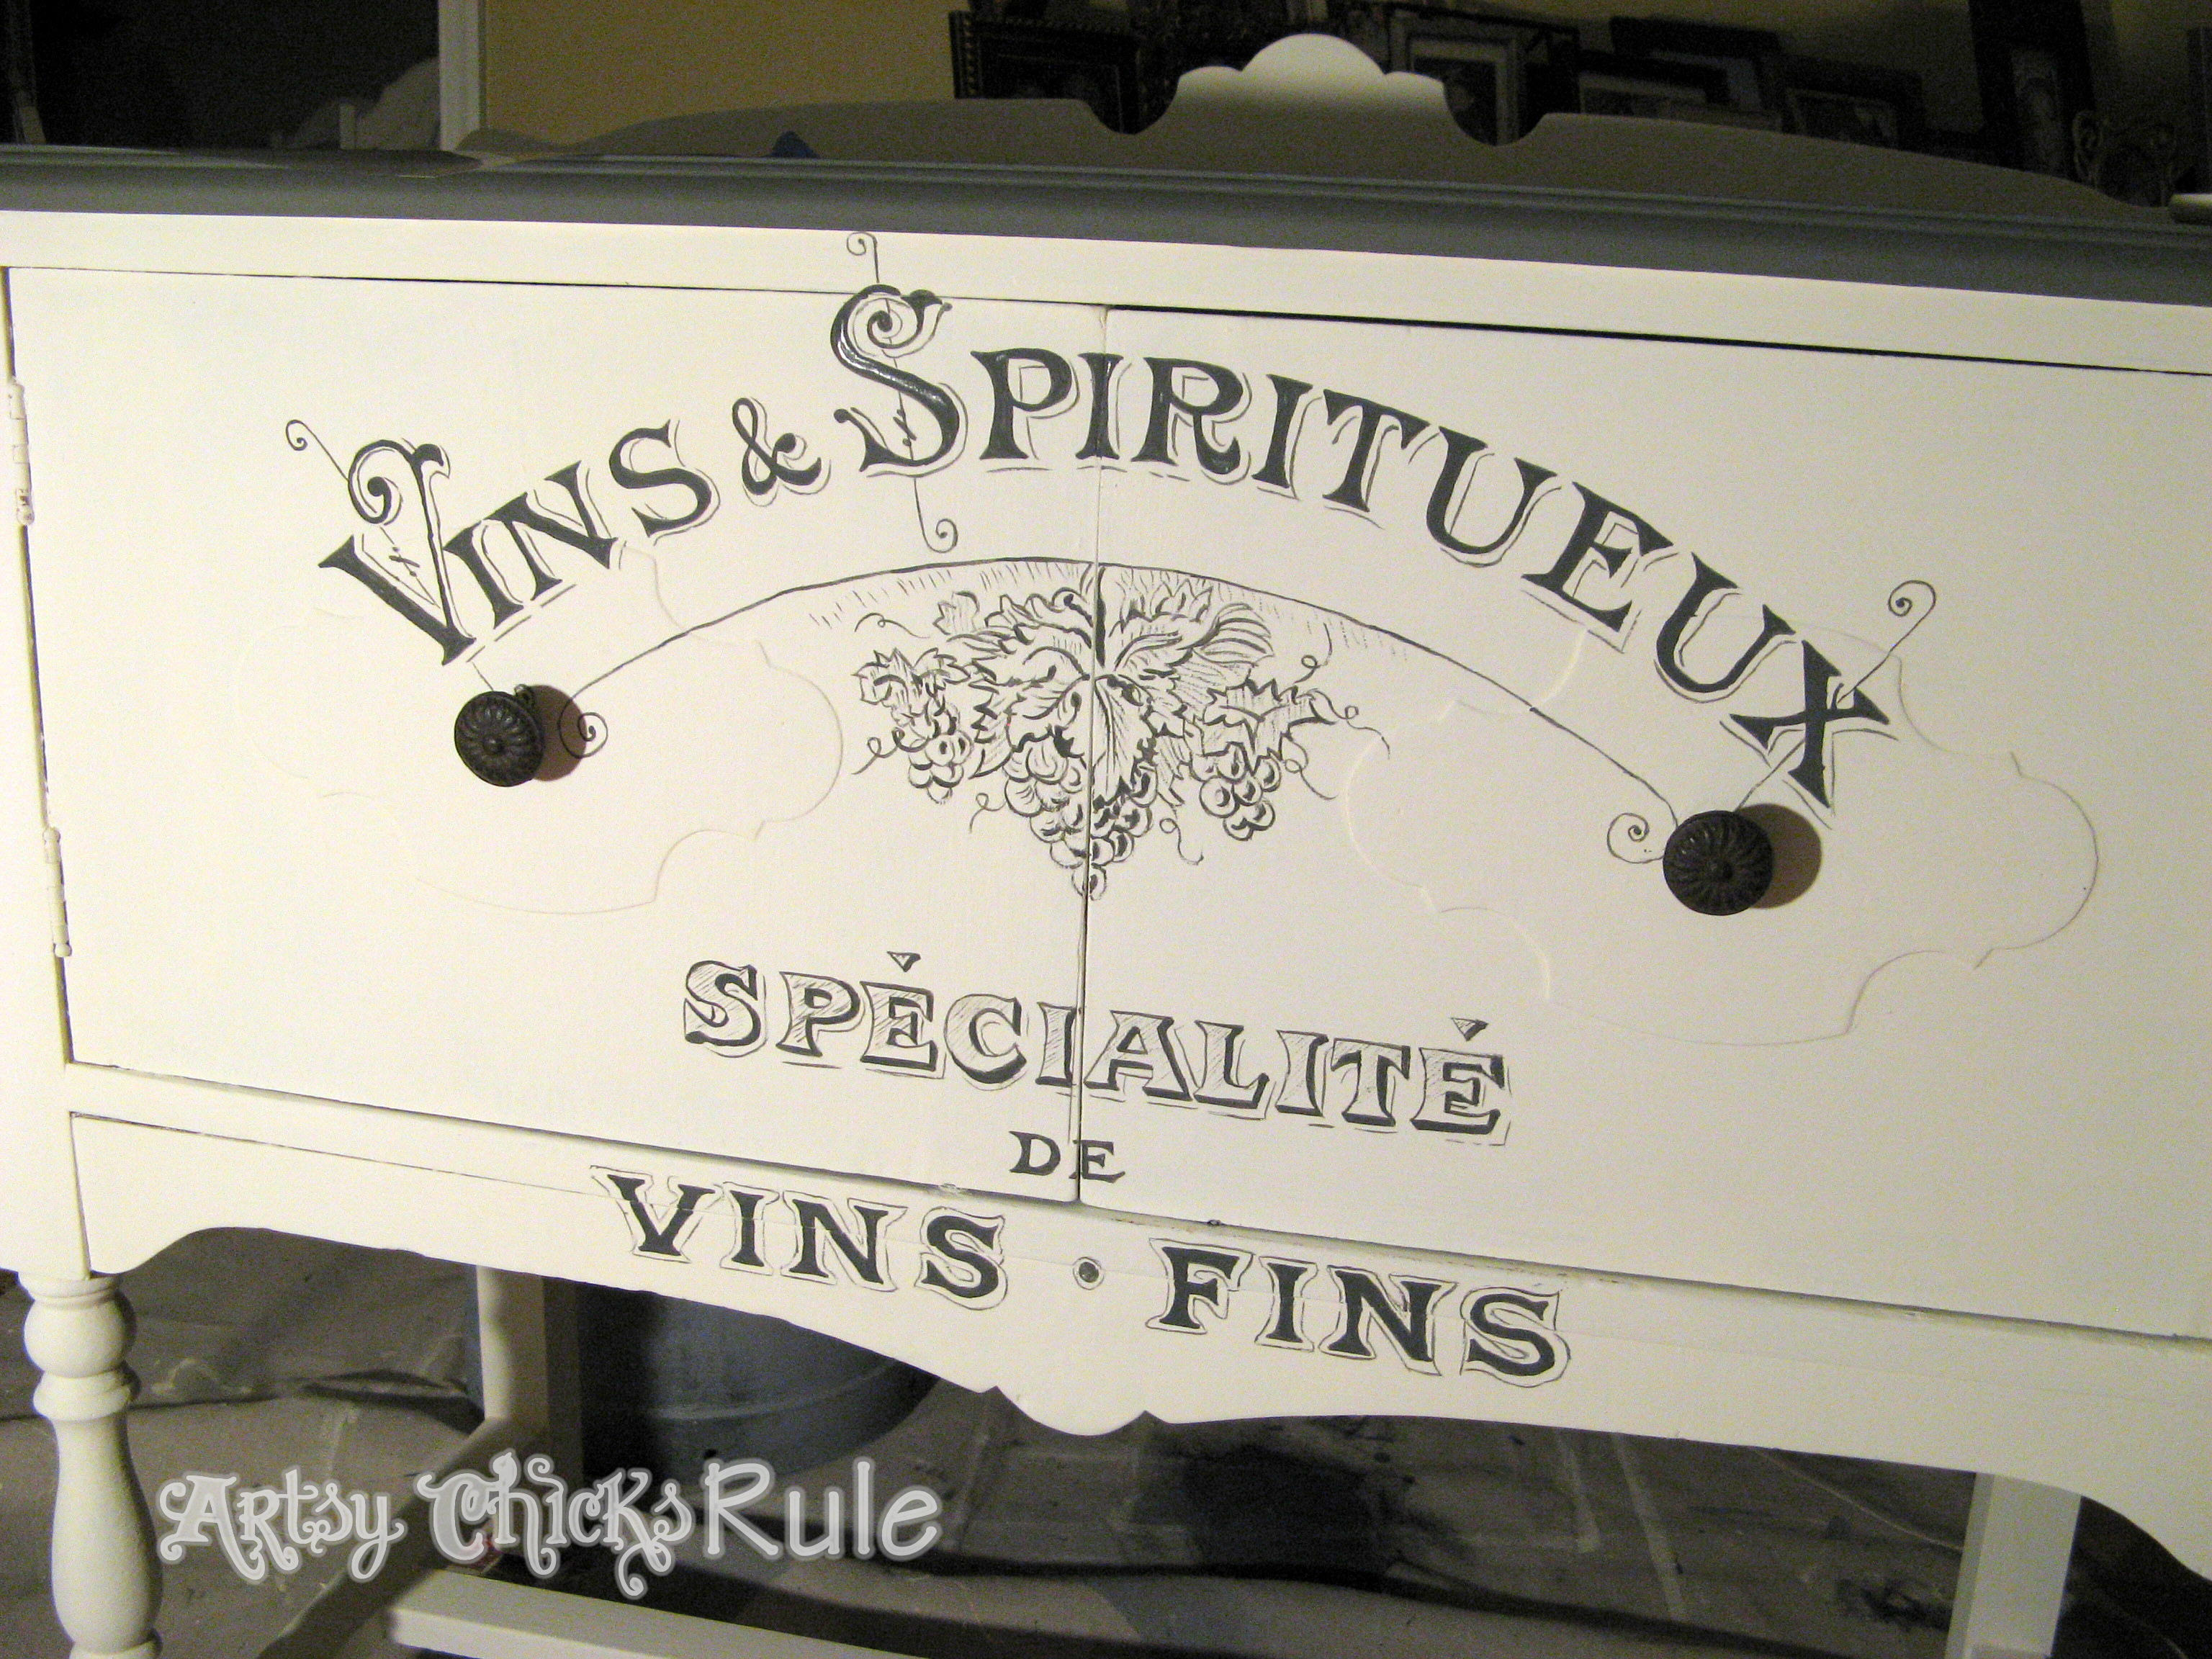
I was going to use this little sideboard cabinet as a “bar cabinet” so chose
this graphic…which means: “Wine & Liquor”
Perfect, right?
I moved the projector around until I got the graphic where I wanted it
positioned onto the cabinet.
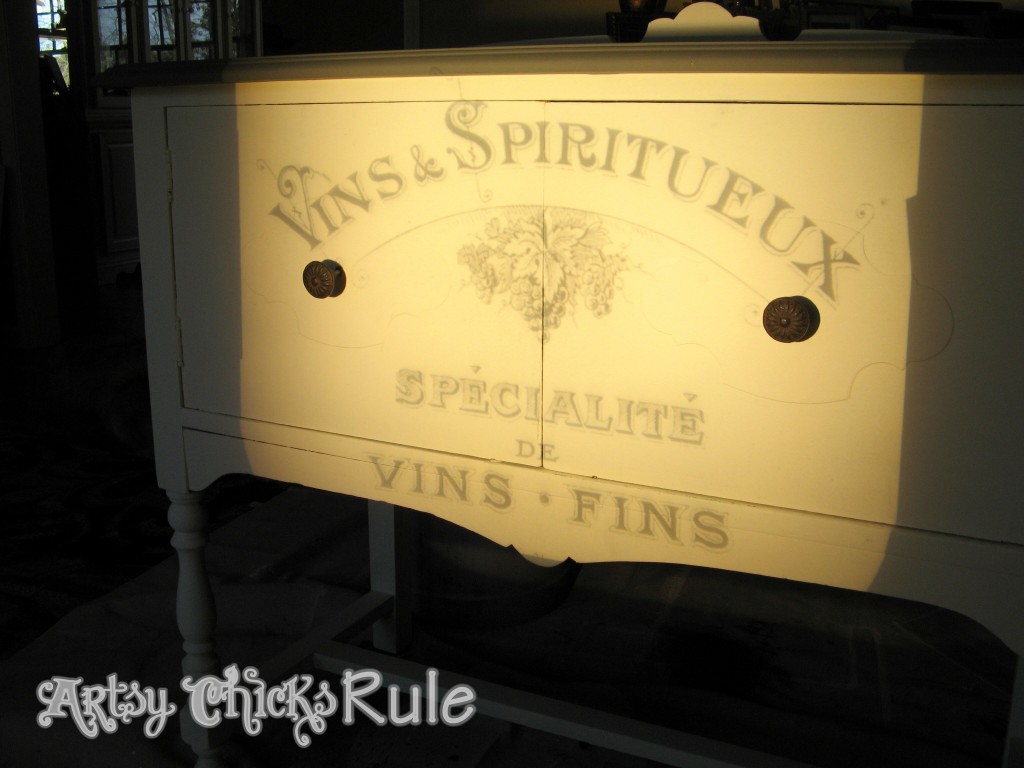
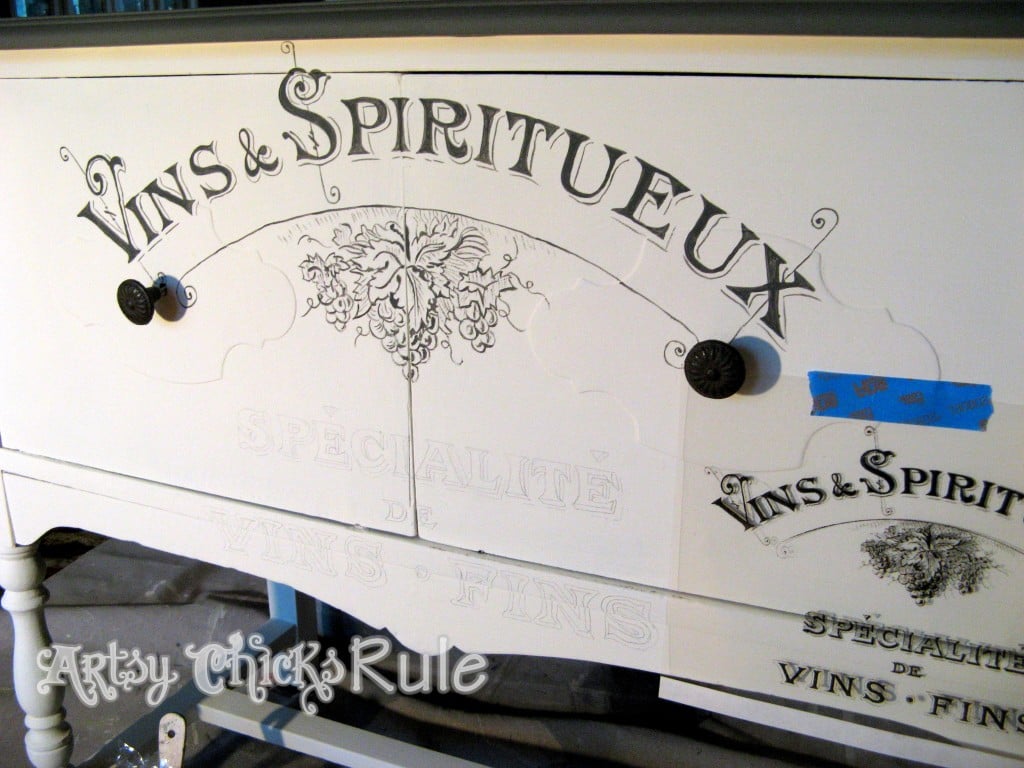
And then I started working…..
Next, it’s just as simple as “painting in the lines”…..the grapes and leaves in the middle were
a little bit of a booger.
I had to actually paint some of that part freehand as I thought they should look because it had gotten a bit muddled up.
Sort of therapeutic, quiet minded work. Many would think this is tedious.
And it is but I like it!
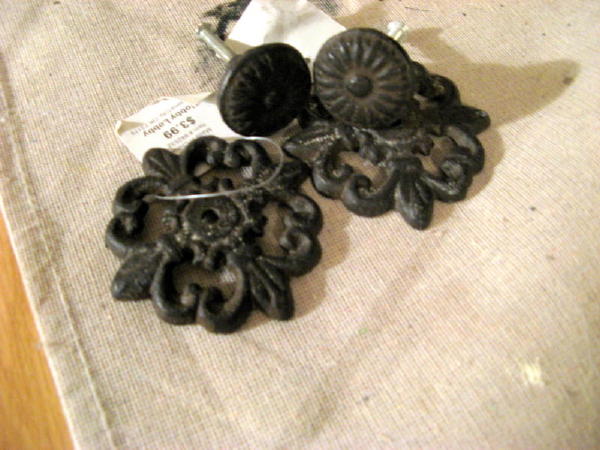
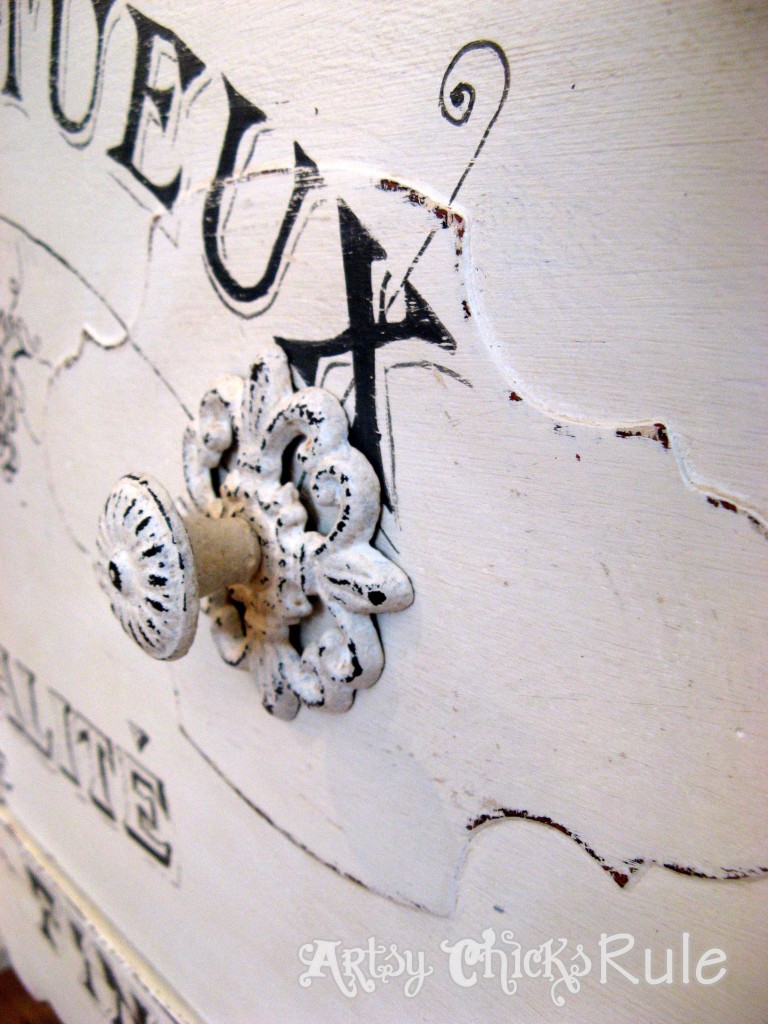
The knobs were only on so I could open and close the doors as I was working. (they are not staying that color)
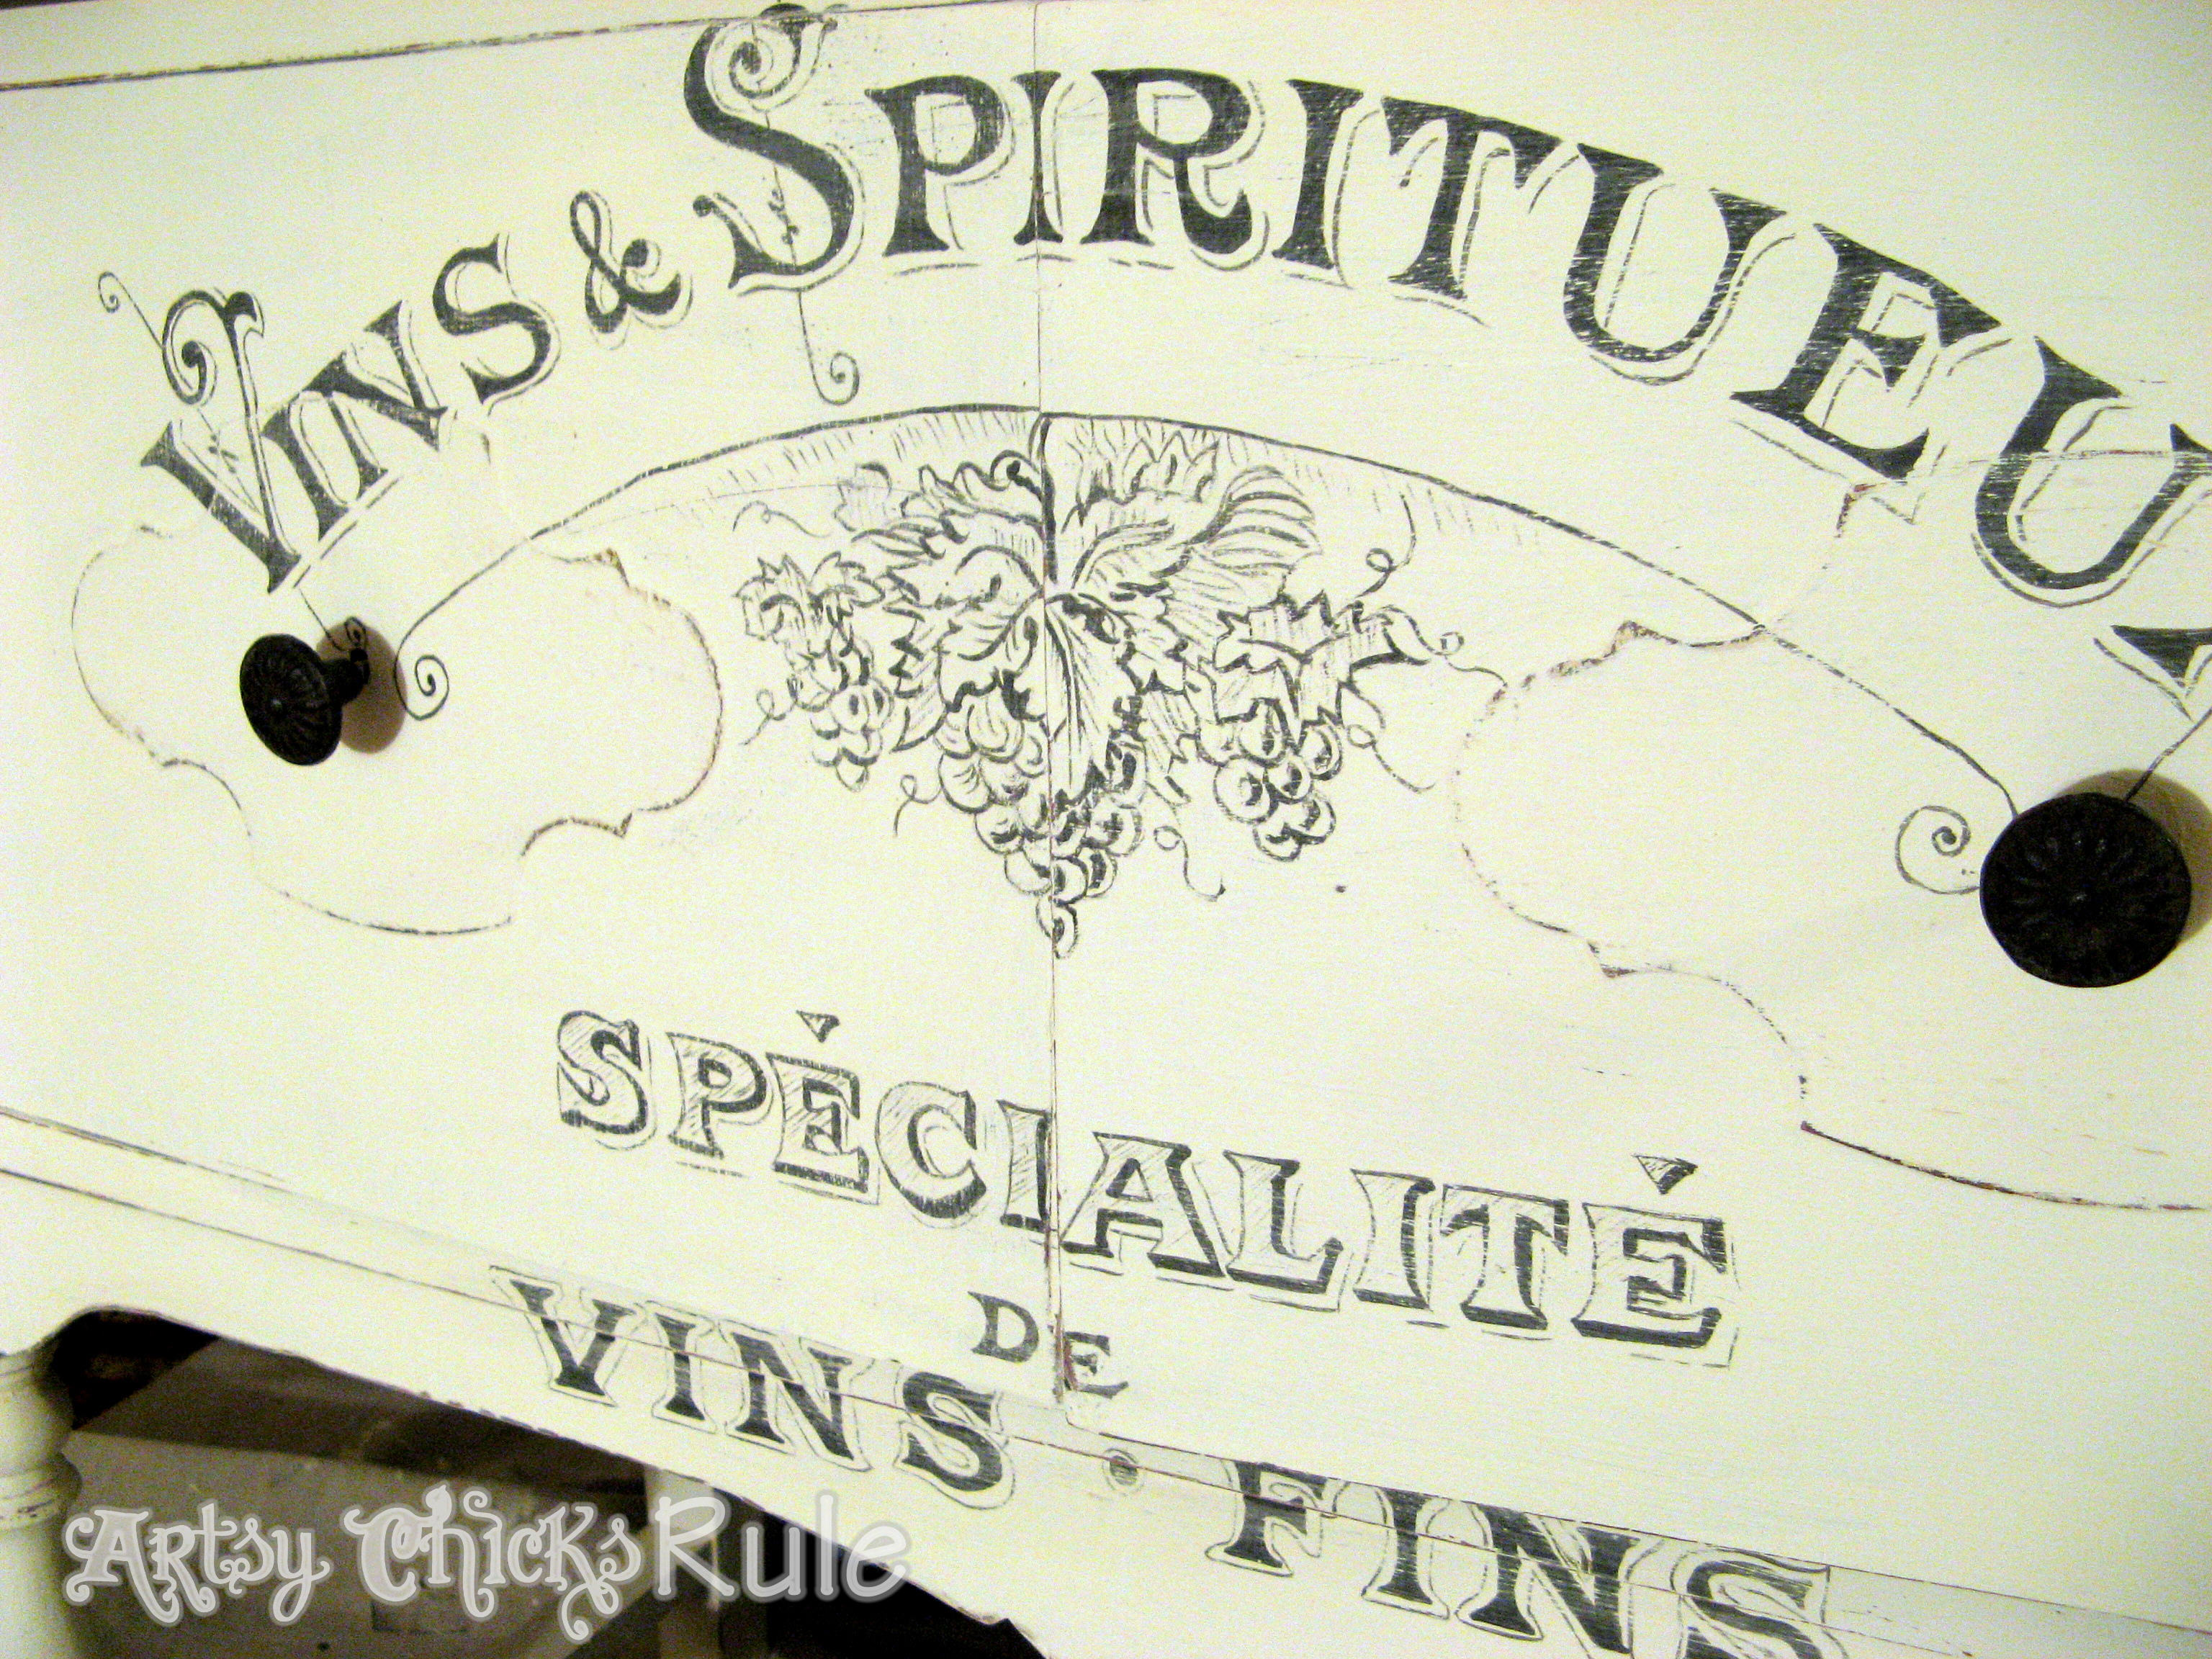
A touch of distressing with sandpaper…
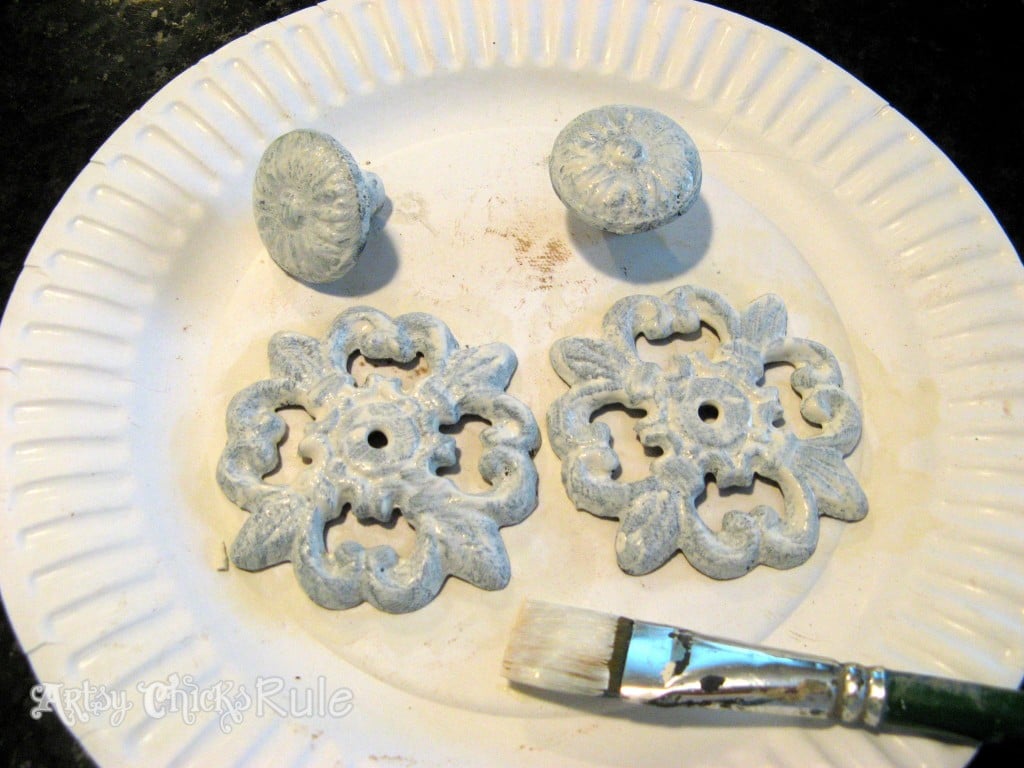
The hardware I chose was a perfect heavy rustic metal. But I chose to paint it to match the cabinet.
Painting…
Distressed and waxed….
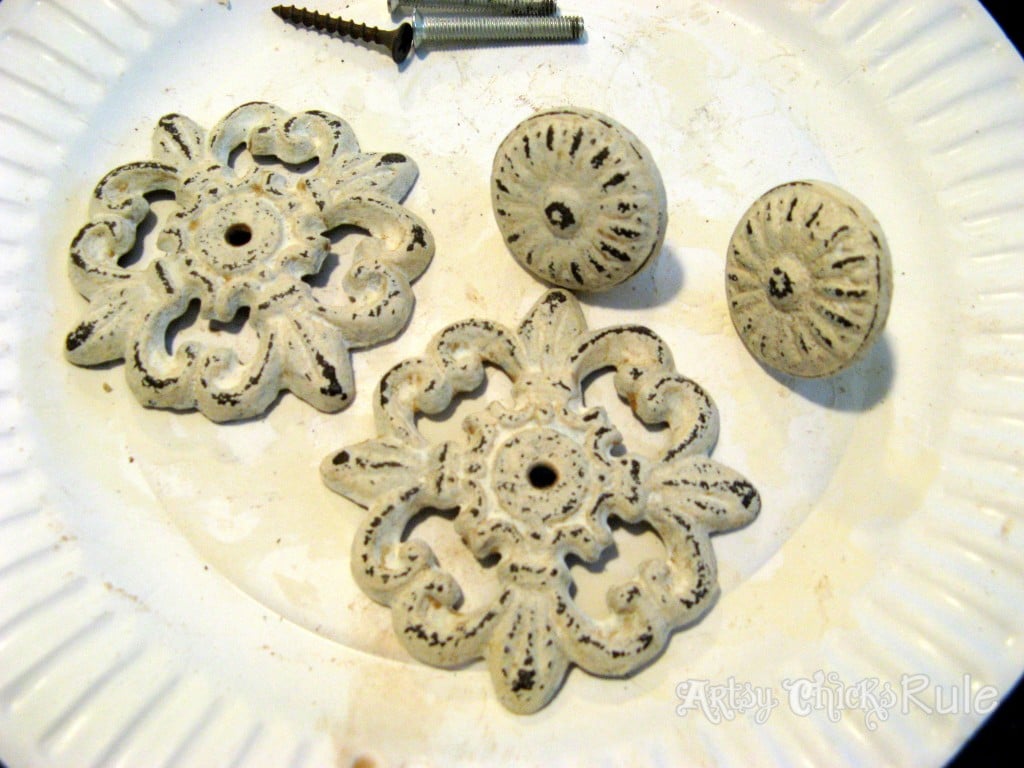
Aren’t they lovely like this?? I love painted hardware…on the right piece, of course.
I used a good amount of dark wax on the top. I wanted that varied look as you see here.
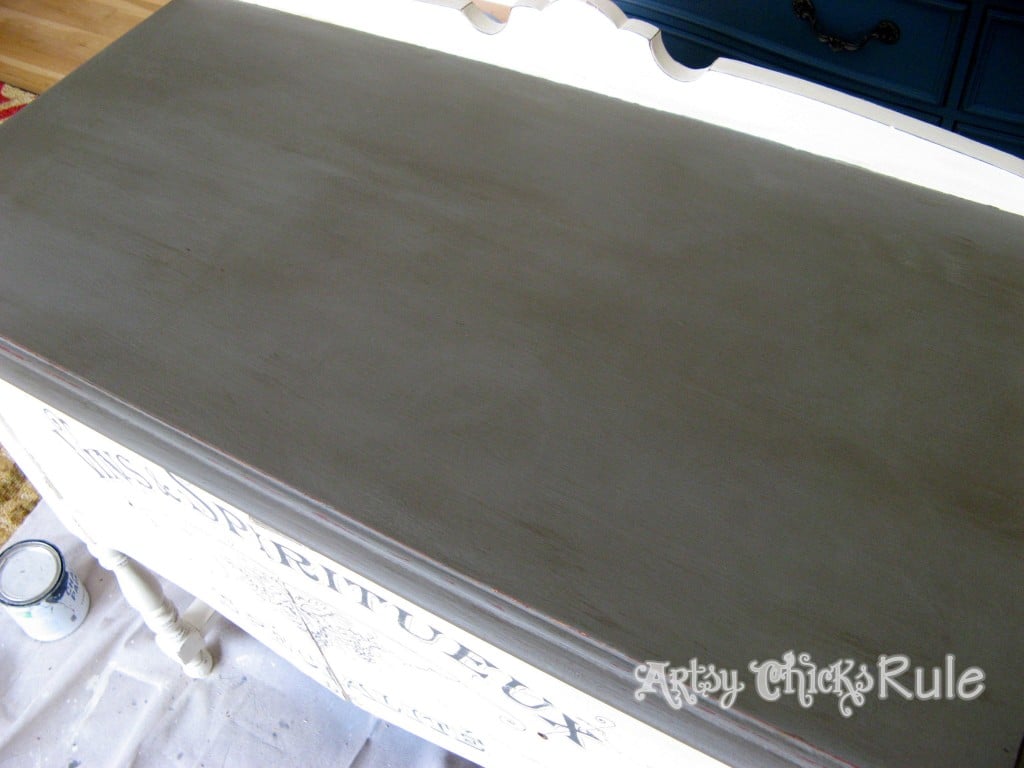
And mostly clear wax with only a touch of dark on the rest.
Close up of the knobs on…
Sigh, I’m loving it so much better now…
The legs…
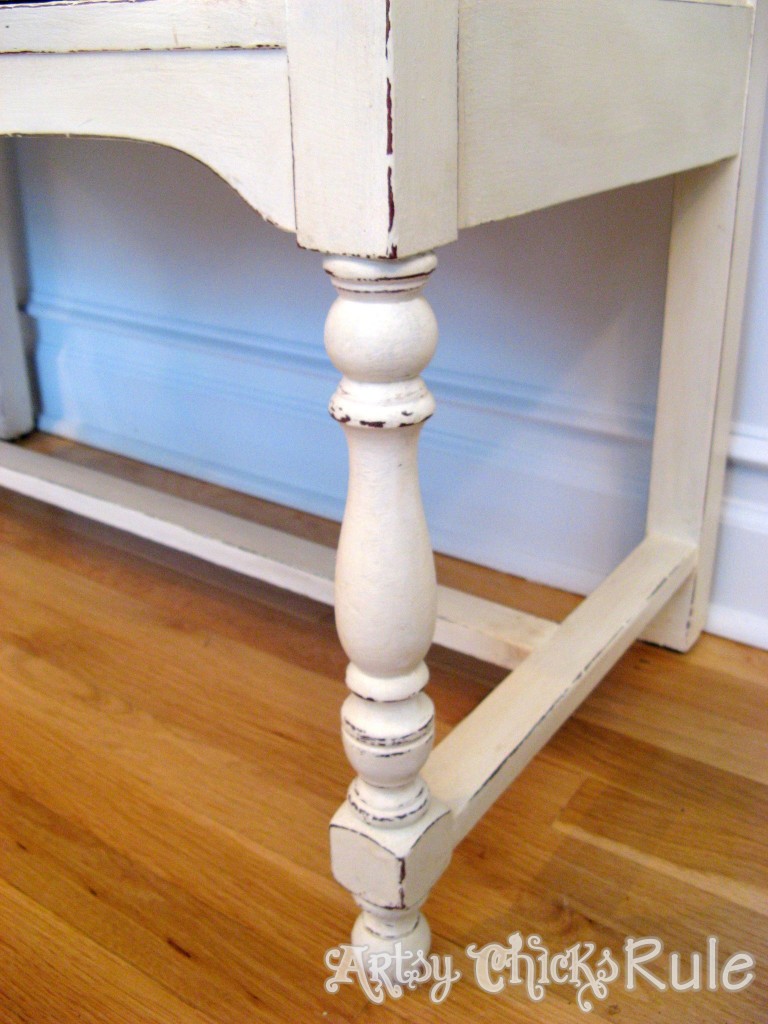
I really think this is the ONE.
….and it is finally finished being transformed.
And will stay this way forever…I think anyway!
You never really know with me but I do love this piece quite a lot.
I have to say this was a fun one to watch transform in front of me.
And it makes me smile every time I see it.
That’s how I know I got it right this time.
PIN it to save it!
Are you a (re) painter like me? Painting things several
times until you get it right?
You might also like makeover:

UPDATE!!! See it now, here!!
Want to see even more “before & after” furniture makeovers? Click here.
xo


")


")

fantastic! to scream .. nice job with the paint Sloan and above all I like the simplicity of the method of transfer .. I have to find a projector hips! ciaoo
I have to say this is the perfect piece for that spot and your artwork looks fantastic. I love sideboards and buffets. I am looking to find a piece now to mimic the idea you created for somewhere in our new house. I’ll find a spot. Congrats!
Thank you Debbi :) I still want a large sideboard but have not come across one..not that I have anywhere to put it at this point! ;) But like you, I’d find a spot!
That was really a sad little piece.. You have such a good eye for potential!
Thanks Cyndy! :) Yes, it was so sad when I found it!! xo
Nancy, that is fantastic! I love the final paint job so much better. Every single part of it! You are so creative and I love how you wait for a piece to speak to you before deciding. So funny how it spoke to you in a foreign language first! haha Another great project for me to pin! xoxo, Sharon
Oh yes, I’m a repainter like you. Have a waterfall chest that was first painted Coco, then Pure White because it looked so dull and now I’m still not happy with it, so it’s going to be painted with a Union Jack. Dont’ know what or where it’s going, but I’m excited about this project (finally).
Love how your sideboard/bar turned out, Nancy.
Well, I’m glad I’m not the only one! ;) The Union Jack is going to look great. And, yes, totally get that. I think that was my problem with the first paint job on this one. I wasn’t excited about it at all …but the second time I couldn’t wait to finish it.
Thanks so much for stopping by Heather!!
Nancy
Nancy, Lovely. Yes, I always wait for a piece to “speak to me” also. Quite often I say No Comprende (and I don’t speak Spanish, HA). Question. Did you use AS charcoal for your lettering or some acrylic or sharpie, or……? Thanks. Love the mix top.
Hey Erin, Thanks. Ha yes, that’s what I should’ve said to this one! ;)
I used the AS Graphite color for the graphics, watered down just a bit. You can use acrylic paint too for the same look.
Nancy
Stunning! I absolutely LOVE what you did with this piece Nancy. What a gorgeous piece to begin with, but the AFTER is amazing!
Krista
Wow. Great job. You are just so creative. When I find the perfect piece I’m gonna steal your idea. Thanks.
LOVE THIS! You are so incredibly talented! I cannot believe you painted all those little details! Amazing!! You are my furniture painting hero. It’s official. ;)
~Abby =)
I really think I need a big projector! I have a small one, it has worked for the small projects I’ve done. But I’m thinking big! Really like the way this turned out!
Shelly- minettesmaze
OH MY GOODNESS!! That is gorgeous….I’m not sure I would have the patients for the stencil work.
You did a great job. ~Sonya
I love this! You did a great job! Pinning this!
This turned out amazing!!! I can’t cant believe you scored it for only $20??? Absolutely stunning :)
XO,
Christy
Wow! I LOVE that. It is PERFECTION!! Where do you buy Annie Sloan chalk paint?
Hi Vickie,
Thanks so much! I have to order my chalk paint online because there is no one close by me that sells it. You can check the website asunfolded.com to see if there is a retailer close to where you live. Hopefully so, much cheaper that way!
Sorry, it’s anniesloanunfolded.com (not asunfolded.com)….check there for a retailer near you. :)
Now is that just perfectly perfect or what!!! Rock on friend! You did a stunning job on this piece. And having your furniture talk to you is the way to go!!! Ha!
Wow, what a labor of love for such a wonderful piece! Love the final result!
What a transformation! I would love this piece in my dining room. Such a clever idea with the projector! I need to try that sometime. Visiting from Miss Mustard seed’s link up.
It is a stunning transformation. I love everything about it. So great you took your time to figure out the best use because it now looks like a $1200 piece of furniture.
Nancy… it’s gorgeous!! Great tutorial, especially on the graphics. I’m pinning ~ Amy
Thank you and thank you for pinning Amy! :)
Wow ~ glad you were listening, it is beautiful!
My goodness this is beautiful! I have it on my Facebook page as a feature, too. I love the graphic, and The Graphics Fairy. Tell me, did you use a paint brush or a Sharpie to apply the paint? Your projects are so outstanding. Love your site!
Hi Jeanette :) Thanks so much! And thanks so much for the FB love :) I used a small artist’s brush to apply the paint. I have used a sharpie before but like the control I have with a brush better so I usually just stick with that. I don’t think I could have done the grapes with a sharpie. Thanks so much for the sweet words!
xo
Nancy
Oh, Nancy ~this is absolutely beautiful. LOVE it!!!! Pinning :)
What a perfect transformation- Love the graphics and the hardware you chose.
Have a great week.
Susan @ Rustic ReDiscovered
Wow! Absolutely beautiful! Hugs, Biljana
What a beautiful transformation! Absolutely gorgeous!
Leslie
Absolutely inspirational….could you estimate your proportions on the Graphite/CoCo mix? Half and half-ish? I’ve been hesitant to mix because I don’t want to waste that costly paint if I don’t care for the color=O I’m pinning in my Furniture Makeovers!!
Hi Allison, I didn’t write it down, sorry! I’m bad about that most of the time. But, I would say it was about half and half…leaning towards a little more Coco. I totally get it about mixing and messing it up. I’ve done that a couple times but luckily these colors mix so well I was able to salvage by mixing in some other colors. (not what I was going for on that particular project but something that is usable down the road on something else, kind of thing)
Thanks for the pin !! :)
Love that you’re hearing voices – they obviously know what they’re saying! Beautiful – and I need an overhead projector!!
Kelly
I love the wine bar….. I am relatively new to Chalk paint having had to track down a retailer …. and then started slowly with a couple of pieces. I am a long time do it yourselfer BUT I think that I need some advice. The wax just doesn’t come out as even as some of the samples that I have seen….. I am not patient which could be the problem… First I used too much and now I wonder if I don’t use enough…. I apply it with a brush and then buff with a soft cloth….suggestions?
Hi,
Thanks so much. Yes, the wax does take some time getting used to. There is a fine line between not enough and too much. I do think just continuing working with it you will get a feel for how much is needed. But, here’s what I do…. I used to use the AS wax brush to apply it to everything. Now I only use that brush to get into the nooks and crannies well (where details in the wood are). I use a soft cloth (old tshirt type material) for the smooth flat areas. I find that I have better control with the wax that way. I put some wax on the cloth and rub it into the paint well, being sure to get it in there good. I then have another clean cloth that I go back over and lightly wipe away any excess right after. That should take care of the “too much” problem. You don’t want it gummy, but you do want it absorbed into the paint. If you don’t use enough wax it won’t be able to get down into the paint well or evenly. I let it cure for a few hours or overnight and come back with another dry, clean cloth and buff.
Hope that helps!
Nancy
Hi Nancy! Great advice about applying the wax! Oh your sideboard, you said on the bottom part you used mostly clear wax and some dark wax. Didmyoummix the two together then apply, or just use the dark wax in the corners and details and then the clear wax everywhere else?
Thanks! Looks amazing!!!!
Hi Stacy,
On this piece I did actually mix just a little of the dark into the clear and then applied to the bottom part of the cabinet. Sometimes I will do a coat of clear and then go back with the dark. So, you can do it either way, it just depends on the look you are after. Hope that helps!! :) Nancy
Absolutely gorgeous ! Love it! Wonderful tutorial !
It’s beautiful now! great job. I’m pinning. Little Bit
It’s just beautiful! I love the graphics you added and the dark top. It is really perfect. Found you over at Tuts and Tips. Have a wonderful week and enjoy your gorgeous bar cabinet. Blessings!~Wanda
Like everyone’s comment before mine, I love it, so I’m pinning it for inspiration.
Bliss
Beautiful!!!! I love it!!! You nailed it the second time around!!
Yes, the second time is a charm. Just gorgeous.
Found you on Hometalk. this piece is gorgeous! I thought you had re-finished the top, so was really surprised to see that it was painted. Nicely done!
That is totally stunning! Fantastic job! :)
B-E-A-U-T-I-F-U-L!!!
I noticed the veneer on the first picture is chipped and missing some. What did you do? I didn’t see it in the remake. Did you fill it in with wood putty or remove all of it and how? I have a couple of old pieces and some veneer is missing and bubbly and coming up. I would love to redo them but don’t know what to do with that dang veneer. That stuff is going to be the death of me yet. HELP!!!
Thank you so much Linda! :) Yes, some of the veneer was chipped. I just went around and removed all loose pieces and filled them with putty and sanded it smooth. If any is left bubbling I’d remove that too and just fill in and sand. It’s an easy fix if you plan on painting the piece!
I have glued down loose veneer before but if it’s already chipped away by the time it gets to me I’ll usually glue what I can and fill the rest. If it’s a large area however, I’d probably just remove all the veneer and sand the wood smooth.
Hope that helps! :)
Nancy
Hi Nancy! I LOVE it! I have also downloaded some graphics and borrowed a overhead projector (that no one uses anymore) to transform my IKEA coffee table in the same manner! I hope it turns out as beautiful!
I love how your buffet turned out! So pretty, I had to laugh when I saw it because I am knee deep into one of my own… I actually just got up off my knees from painting to stretch and take a bit of a break! I will be very pleased if mine turns out half as lovely as your has. Beautiful!
Thanks Cynthia :) I take those breaks sometimes too…but then I get sidetracked terribly. Especially if it involves this computer. ;) Can’t wait to see yours finished!
Nancy
Nancy, this is outstanding! I loved the first transformation you did, but this one is perfect! Congrats!
wow, great job, Nancy!I love the distressing!
Nancy! what a great score! I love the way you finished off your sideboard. It’s beautiful! great tute!
gail
That’s absolutely STUNNING! Can’t believe the transformation. Love it!
Oh my!!! This looks fabulous. I love it.♥ You did an awesome job.
Just beautiful Nancy! Wonderful small piece that can go just about anywhere!
Oh my word, this piece is totally beyond amazing. I love it and wow, you definitely have a special talent. Gorgeous piece. I would love for you to link up to my Inspire Me party that is ongoing, this is definitely inspiring.
http://www.astrollthrulife.net/2013/04/161th-inspire-me-tue-frenchyfarmhouse.html
Hugs, Marty
Thanks so much! And thank you for the invite :)
Hi Nancy, absolutely beautiful job. Do you have anything written about the projector you used and how you actually use it? I get the gist of it, but I am curious about the translucent “page” that you have laying on it. I have to get one of these.
Karen
Hi Karen :)
Thank you!
I found my projector on Craigslist and it is a 3M 9075 model. The transparency I got from OfficeMax. I saved the graphic to my computer, then save it to a thumb drive and have OfficeMax make the transparency to be used on the projector. Makes the job easy! :)
nancy, looks absolutely amazing!! Great job from the color to the graphics choice. Featuring this in my weekly wow’s tomorrow.
Aww thanks Laura! :) And thank you SO much for featuring it!! :) So excited!
This buffet is so stunning and beautiful! I too have a projector and transfer my graphics in the same way. I was wondering what you use to transfer the graphic onto the furniture before you paint it? I use a pencil and then go in with a brush. Do you use a pencil to first transfer?
Thanks so much Jacqueline! :) I usually use a watercolor pencil…depending on the color I am planning to paint in. (white, brown, blue, black, etc)
Wow! What a gorgeous transformation! Thanks for sharing at Give Me the Goods! We hope you party with us again next week! Don’t forget to stop by tomorrow to check out this week’s features.
Beautiful job Nancy…even if you had to do it twice…the end result is fabulous! i’ve been wondering how to do Graphic Fairy transfers on furniture…looks like there is no easy way…good thing I have a projector and I’m going to give it a shot. Thank you for sharing your process, I really enjoyed reading it.
http://denisecerro.blogspot.com/2013/04/finding-time-for-learning-process-and.html
Thanks Denise :) Yes, I’m so glad I got it ‘right’ this time. ;)
There are several ways to transfer graphics to your projects. I’ve used most of them, but not all of them yet. The Graphic’s Fairy has a page on her site telling about the different ways to transfer. Not sure if you’ve seen that. Some are pretty easy! But I do use the projector method most of the time. I can get the best detail and better control of the image with that.
I am thrilled to have found your wonderful blog. Wow, I could spend many hours here. Thanks so much for your great posts. You have inspired me to try some new things on my AS painted pieces. I have never tried doing transfers and see you have to be what looks to be an old projector, found on CL. I am wondering how you transfer the graphics to the transparency film to use on that projector? I bought a small projector from the craft store years ago but it seems your projector would work better to project larger images on large furniture pieces. Do you wait till night to project or do you have a dark room in your home to do your projects?
Thanks so much for making time to address everyone’s questions here. That must be so time consuming but it is obvious that you inspire so many and we want to copy you.
Tonita @ http://www.ShabbyChicTinyRetreat.blogspot.com
Hi Tonita!
Thanks so much. I save the images to a thumb drive and take it to OfficeMax and have them make a transparency for me. I have also printed on clear label sheets but that does not work as well.
No, I do it during the day and night. The light projects very well, even in daylight.
Thanks for mentioning the response to comments! ;) Yes, it is very time consuming but I think an important part of running a blog. I so appreciate all of the comments I get here. And truly, interaction is what it’s all about…and sharing of knowledge…both ways! :)
Hope you have a great day and thanks for taking the time to comment!!
Nancy
LOVE this!! It turned out gorgeous! Congrats on being featured in 2 of my favorite places!! You did GOOD!! :)
Hey!! :) Thanks so much! Yes, that was such a fun surprise! :) Two of my favorite places too!!! ;)
very pretty! do you have a name or source for the projector?
Hi Norma,
Thank you :) The projector came from Craigslist. It is a 3M 9075 model. I think I paid around $40 for it.
Great job! Love the graphic and colors you have choosen…….such a transformation!
Stunning, gorjuss, wow !! I plan to do some furniture but sadly not with AS its too expensive so home made which should be fun. What a bargain with that unit and what a wonderful job you have done ! Lush !!
Thank you Jilly! I’m sure the homemade will work great for you too! Yes, I love when I come across these great bargains! I snatch em up for sure! ;)
I love the 2nd incarnation. What a fun little piece of furniture! I love all the details you added too. Going to stick around and check out your work, you have a great blog! If you are looking for a place to share your sideboard, I would love for you to come by this Thursday afternoon-Sunday to link it up at Redoux Interiors! Thanks for sharing, visiting for Graphics Fairy, so glad I came by!
Thanks so much Karen! And thank you for the invite. I’ll stop by on Thursday and link up!:)
Beautiful! Such an inspiration to me as I have a very similar piece except mine is a little taller with drawers under the double doors. But the doors, sides, legs, back piece, etc. are all so similar. I’ve painted mine gloss white and it holds stereo equipment, but now I’m inspired to really make it pretty.
BTW, I found out about a month ago that it’s a gentleman’s smoking cabinet (like for cigars). Mine have wooden drawers on runners inside the doors, which I’m using elsewhere since the stereo equipment needs the whole cavity.
Q: what wax do you use?
Hi Bronwyn,
Thanks!
I use Annie Sloan Clear and Dark Wax. They work great with the chalk paint and leave a really beautiful, lustrous finish. :)
Featuring your gorgeous sideboard at the PoPP Party this week!!! Thanks for linking up.
Thanks so much Maryann!!!! :) Thanks for hosting such a great party!
Wow, this is amazing! I love how this turned out!
I found you through Kim at Savvy Southern Style and I’m so glad I stopped by your blog, this piece (and your blog) are wonderful!
Just sent you an email to ask a few questions…
Again, just beautiful!
Terry
Oh my gosh, that is adorable! I wish I could do something like that. Projecting and painting that image is the intimidating part. I think I’d slop it everywhere. That’s beautiful, and thanks for sharing!
Hey Kim! Thanks :) You can do something like that too, I know it! ;)
Fantastic Table!
This is stunning – you did an awesome job! I hope you don’t mind if I use it for inspiration for a project I’m starting in a few weeks.
Thank you…and I don’t mind at all! :)
Thank you so much for sharing at my blog! I am featuring it at my party today!
Thanks so much Karen!! :)
Wow this came out amazing! I borrowed my sisters projector to do this same thing to my fathers dresser but I chickened out because I thought it would be way too hard! You have inspired me to ask my sister to borrow her projector again and really give this a shot! You did a beautiful job!
Thank you Dria! :) Yes, do borrow it! You can do it!!
LOVE this! I can’t wait to add some words to a furniture piece, this is amazing!
Thanks so much Katie :) This is one of my favorites! I told you I’m addicted to signs and graphics! ;)
Great work. It’s so unique, I just love it. What type of wood filler do you use to fill in where some of the wood chipped off in the first photo at the bottom of the base?
Cortne
Hi Cortne, Thanks so much! I just used regular Elmer’s Carpenter’s Wood Filler. Works well.
Love it and what a perfect use for that little cabinet! I just inherited a projector and wondered what to do with it, now I know. Graphics Fairy is the best. I to have been known to re-paint until the piece is right!
You hit the nail on the head so to speak with the final transformation!
Hi Peggy :) Thanks so much! I agree, I think I got it right this time. ;) Oh you will have fun with that projector!!
Great job! I love the way this turned out. Must have very tedious though since where ever your hand was, it would shadow out the projector’s lines! Really love the way this turned out, and I am not usually a white person as anyone would quickly see if they visit my blog. Great Job!!
Thanks! Yes, you sometimes have to guess along. ;) I did end up hand drawing some of the grapes area because it was hard to see with the projector. Thanks so much for stopping by!! :)
LOVE YOUR SIDE TABLE AND I WOULD LOVE TO FEATURE IT, IF THAT WOULD BE OK PLEASE LET ME KNOW,
LAUREN
Hi Lauren,
I’d be honored! Thanks so much! :)
Nancy
Hello…new follower here! Love this transformation, great job! I can’t tell you how many times my pieces speak a foreign language to me…haha!
I noticed you used wine corks to give some length to your knobs! Love it, and an awesome idea!!
Have a great day,
Char @ hisandherrestoration.blogspot.com
Hi Char! Thanks so much :) Yes, so funny, we do sometimes don’t we?? It’s nice when they speak correctly the first time but it doesn’t always happen! OH and I didn’t use corks on the knobs but I love the idea! :)
Hope you have a great weekend!!
Nancy
Well, I am just drooling all over my keyboard. This is gorgeous! Could you give me a little more info how you actually transferred it using the projector…pencil? ink? Are you an extremely artistic person? ;-)
Hi, thanks! :) I always use watercolor pencils to transfer. They seem to work best without leaving marks I don’t want after. Once it’s transferred with the help of the projector I hand paint it in. :)
Thanks! I won’t be happy until I tackle this!!!
You can do it! :) If you do, I’d love to see it!!
This is one of the most insanely cute things I’ve EVER seen on any DIY blog anywhere. Just had to say. It makes me dizzy. YOU HAVE THE TOUCH! LOVE IT!
Thank you Maryann!
That piece is so beautiful ! You did a great job!
Francine
Thank you so much, it’s one of my favorite pieces~ Nancy
I couldn’t love this more! I just stripped the top of my sideboard (I think it was built in the 30s, but needed major help) and have been trying to decide if I should paint it with Emperor’s Silk or Old Ochre/dark stain on top. You have catapulted me into the Graphic Fairy’s site! I’m going to do it!!! I’m not sure that it’ll turn out, but I’m doing it anyways! Your piece is just stunning! Thanks for your inspiration!
Thank you! That’s great Rachel! :) I’m sure it will be fantastic….I love The Graphic’s Fairy (Karen and all of her graphics :) )
Nancy
OK, I think I’m getting brave enough to give this a try! In reading over the post again, and looking at the pictures closely, I’m wondering why the Primer Red didn’t show through in the distressing. I like how you distressed very lightly along the edges (I’m not a heavy-distresser either!) but it seems like with such a bold color underneath, the red would have shown up on under the distressing…..how did you keep that from happening??
Hi Allison,
The red actually does show through somewhat….but it almost looks brown as if it is the wood of the cabinet. I’m ok with that! ;) Nancy
Perfect… I think you’ve given me the inspiration I need to pick up my paintbrush and go for it! Thanks, Nancy!
Hi Allison,
Wonderful! Love that…:) Nancy
Hi Nancy
Thank you sooooooooooooooooooo much for the literal step by step guide, it’s brilliant :-)
I’m not so fearful of doing something large myself now.
Your work is fabulous and I’m eagerly going through your posts, thank you :-)
Hi Helena,
You are welcome! So glad it is helpful. And no, don’t be afraid to try something…there is always a fix with paint! ;)
All the best,
Nancy
Thanks for the inspiration — I used this graphic on the front of an Old White corner cabinet, and it turned out great. I don’t have a website and can’t attach a photo here, but you can see it on my facebook page “Lavender Fields Studio.”
Hi Debbie,
I took at look at your piece. It’s lovely! :)
Nancy
Well, I finished my piece that had been inspired by you!!! Check it out! https://www.facebook.com/rachel.ruse.3/media_set?set=a.10201528805774568.1073741829.1609599420&type=3.
With your help I have decided I am not a bad painter, just a bad translator, occasionally! Repainting is my best friend :)
Love it! Yes, bad translator. We are all guilty of that a time or two (or three! ;) ) Paint is a wonderful thing!
This is soooo cute! I have been wanting an old projector to to projects like this. I love that style! It looks a lot like the flour canisters I recently put on my blog. You are talented!
Hi Ali,
Thanks so much! I found this projector on CL for about $45. They always have them in the listings around here!;)
Nancy
this is so fabulous! great photos! I am so glad we are new buddies in real life:) see you soon!
Thank you Rhiannon! :) Nice to have a blogging buddy so close!! Who knew, so crazy but so glad “we found each other out”! ;)
Nancy
Nancy, I love this so much! I featured it at tonight’s party! Your typography projects always blow me away :)
XO,
Christy
Thanks so much Christy! :) And right back at ya!! I LOVE everything you do!
xo
Nancy
Ok, I’m not following, lol. I am not understanding how you got the graphics onto the sideboard. Surely you didn’t paint them on???
Hi Lisa,
Oh yes, I did indeed paint them on. :) I created a transparency of the graphic, projected it onto the dresser. I then “traced” the lettering/graphic onto the piece from the projected image…and painted it in by hand. I’ve done quite a few pieces like this. I’ve done others using different transfer methods (still by hand though! ;) ) Those posts are also here on the blog.
Thanks for stopping by!! :)
Nancy
Great job! This is beautiful.
Hi Nancy,
Love your piece, especially the graphics. I am looking for a projector to do the same but not sure what I am looking for. Is there one on Amazon that does this?
Thanks,
Patti
Hi Patti,
Thank you! I am sure any projector will work. The one I use is an old basic one that I got off of Craigslist for around $40. :)
Nancy
Hi Nancy… love this make-over and the graphics you chose are perfect for this piece. Where did you get that nifty little projector? Thanks
Thanks Denise! This is one of my favorites! (and it sure didn’t start out that way!! lol) I found the projector on Craigslist for around $40.
Nancy
I’m going to keep my eyes peeled…. I want one of those! Thanks
I have tried sanding words I have painted before and it ended up smudging the back paint into the white background instead of just distressing it.
I used acrylic craft paint. How do it get it to look like yours in the future?
And can you give more info on the grey top (LOVE!)
Hi Carina,
Thanks! Two things…. the Chalk Paint would be less likely to do that, smudge, because it is more “dry and chalky” when dry. The acrylic craft paint is just typically more “rubbery” (can’t think of a better word to describe it right this second). The other thing, you could have too much paint on the lettering. Try doing it with the paint a bit watered down and do thinner coats, drying well in between.
And of course being sure the paint is fully dry before sanding. :)
The top is a mix of Coco and Graphite Chalk Paint. I don’t have exact measurements on each. I just mixed until I got what I liked. I did go directly over that with Dark Wax to give it a sort of “wood” look at the end.
Good luck!
Nancy
I love this piece of furniture and the graphics you put on it! What an amazing job you did. I’m definitely NOT an artist and wondered what kind of brush you used to paint after you penciled in your lines. I don’t have a steady hand and am afraid if I tried this it would be a crazy mess!
Hi Sue,
Thanks so much! :) I just used a very small artist’s brush. (sorry, I don’t know the exact one…I’ve had it awhile) It’s a thin, long bristled brush. I feel like I have more control over the lettering with that one. :) You could also try using a black permanent marker to color in the lines if you are not comfortable with a brush!!
Nancy
Really lovely piece of art, I admire your work you must be very patient person ☺
Thank you Kat :)
Nancy
Hi Nancy,
What an amazing, amazing transformation! And a great tutorial too. I have used AS Paint many times, and with great success, but I don’t know anything about the overhead projector. How did you get that image onto the transparent sheet that you have on top of the projector?
Thank you,
Claudia
PS. Love your blog!
Hi Claudia!
Thank you so much! :) I saved it from my computer to a thumb drive and took it up to Office Max. They will make transparencies for you pretty cheaply!
Nancy
Thank you! I will have to look into that :)
Sigh……
Dear Nancy, just got amazed by your lovely work!!! I am trying to transform my ikea dining room into a shabby chic style …. I,ve been looking for some ideas and then I just came into your web. Amazing I have to say, thanks for sharing and congratulations for your creativity … I also look for part time creative jobs :)
Take care and thanks again!!!
Best Regards from Barcelona.
Thank you Sonia!! Good luck with your dining set! I’m sure it will be fabulous! :)
xo
Nancy
I so didn’t realize this was an ‘old’ post. The piece has totally stayed relevant! LOVE the graphic, and love Graphics Fairy! You did such an amazing job painting on the graphic!
Thanks Julie! :) I kept and used and loved this one for a few years before I finally sold it. It was a fun piece!! xo
That came out fabulous! Such a unique piece now!
Hi Rose! :) Thank you!! I really enjoyed this one! xoxo
Beautiful transformation. It looks perfect.
I want to clarify that I understand correctly I can use Annie Sloan paint directly over a piece that has been waxed. Is that correct? A dream come true!
I look forward to your posts!
Thank you, Colette! Yes, you can. Regular paint, no you can’t, it won’t adhere, but Annie Sloan can go over previously waxed pieces. It’s probably best to do a little bit of sanding first though (nothing major, just a quick run over). Have fun!! :) xoxo
Thank You!
Looks fabulous!
Thank you, Nancy! :) xo
Still one of my favorites Nancy! You really nailed it! Love the graphics! It looks perfect where it is.
Be well and have some fun!!
Aw, thanks so much, Christina! We just got back from a week of fun…and a little bit of work. ;) xo
I enjoyed seeing this transformation. I think I saw this post a couple of years ago. I just realized my son has a similar piece he received from his grandmother! I have been trying to get the courage to repaint it – this would be a perfect look for his as well. So impressive and such a great idea. Thanks for reposting this makeover. Have a great week.
Oh that’s awesome, Sue! Yes, do it! :) xo