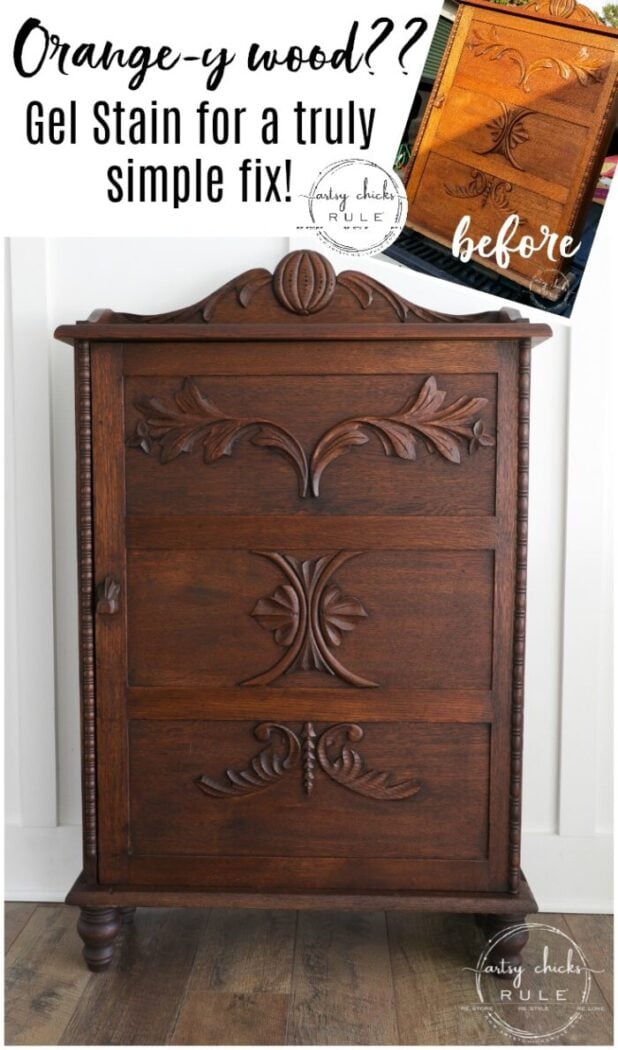
Gel Stain Cabinet Makeover (such a simple fix!)
This gel stain cabinet gets the makeover it deserves! Such beautiful woodwork, it’d be a shame to cover it up. You don’t have to with gel stain and it’s so quick and simple too!
Remember this one?? From last year? That I posted about in this post? >>> here.
Well, I completed it! It is done, made over and beeeuuutiful. :)
I am so happy to be working my way through these pieces. I brought several of them home with me this past weekend.
Not only that, but I went thrift shopping last week and got a bunch of smaller pieces to make over too. If you missed that post, you can see all my finds, here.
(and not to be confused, I did not bring home all that was pictured, only the ones at the very bottom of the post. I so wish I could’ve brought them all home but I promised myself, no more large furniture until I finish up these in my two storage units first.)
Anyway, it’s all about this lovely today.
Gel Stain Cabinet Makeover
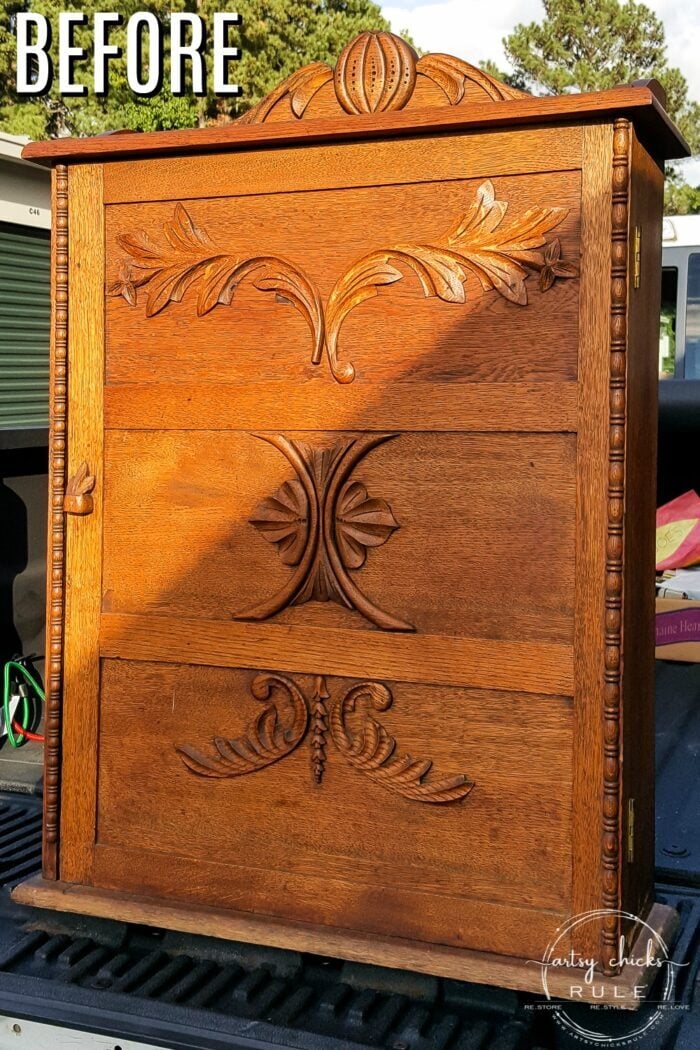
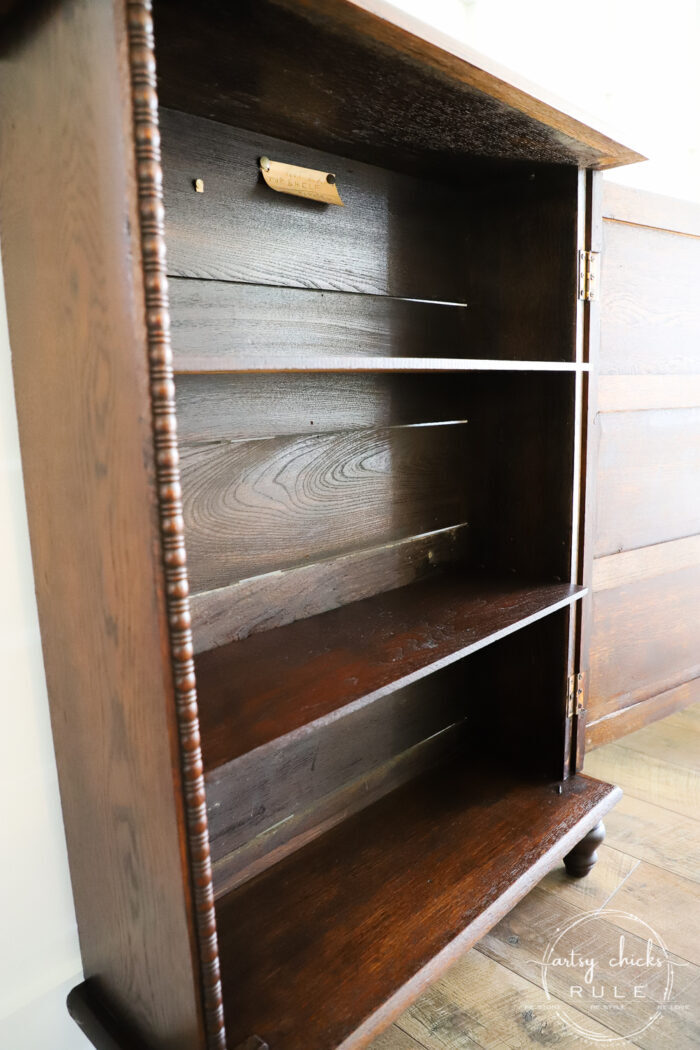
I don’t know what it is but I’m assuming it used to sit on top of something.
But I have nothing for it to sit on except those blocks. ;) Just kidding! I’m going to add legs and make it a little storage cabinet.
One of you mentioned that I should add legs and I thought that was just brilliant.
So first things first.
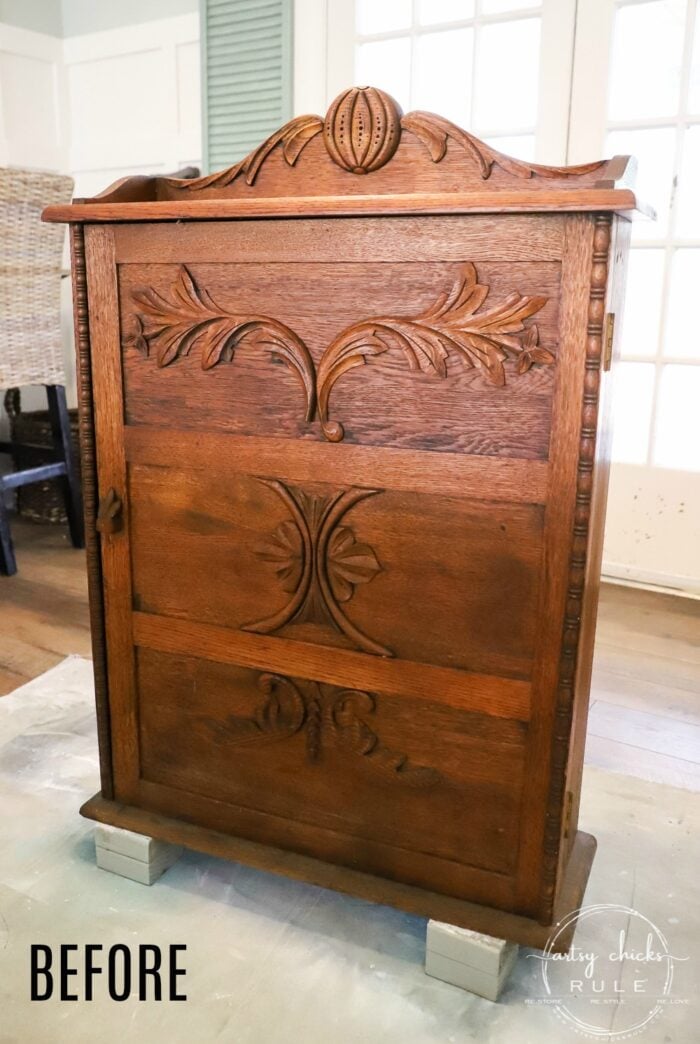
I wiped and cleaned the entire thing very well, inside and out.
Then I sat.
And sat as I tried to decide whether to paint or to stain.
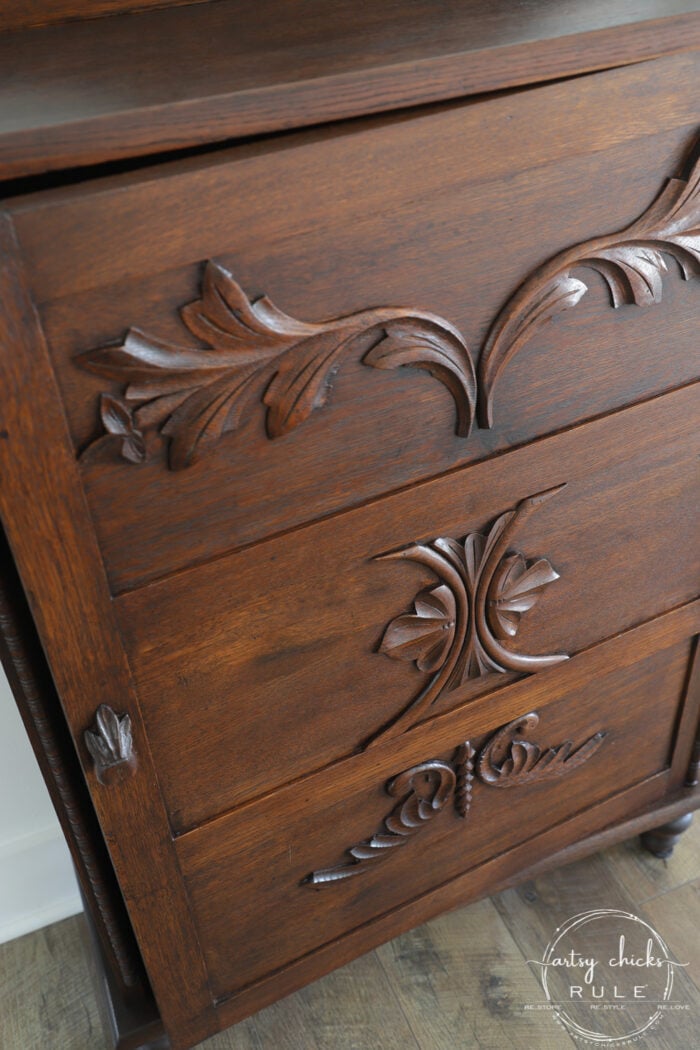
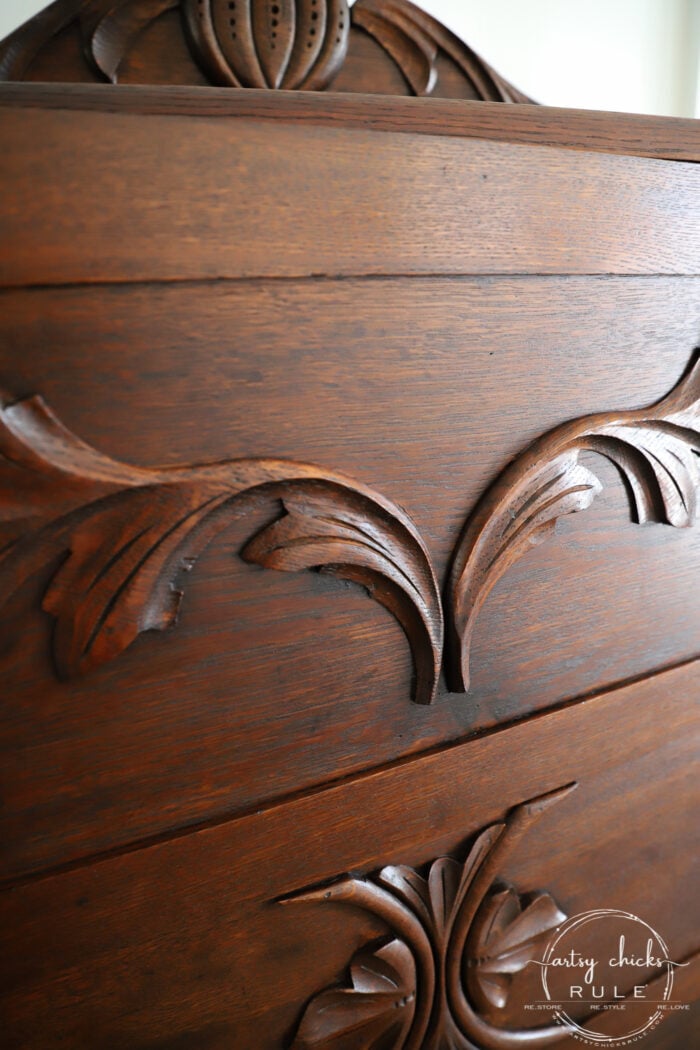
I had considered painting it because it would truly make those details stand out beautifully but that wood was so pretty. Orange, but pretty. And I knew I could counteract that orange so that didn’t deter me.
MATERIALS LIST
- Java Gel Stain
- Pre Stain Wood Conditioner
- Sandpaper
- Gel Top Coat
- Shelf Tabs
- Wood Legs
- Foam Applicator Brush (for the poly)
- Tshirt Rags
But here was the first dilemma…
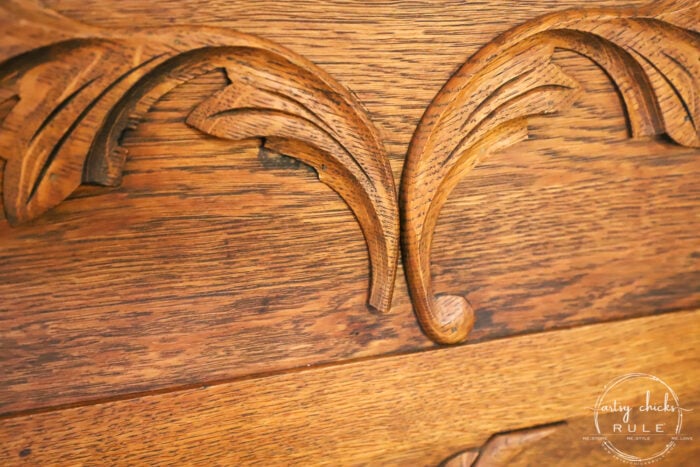
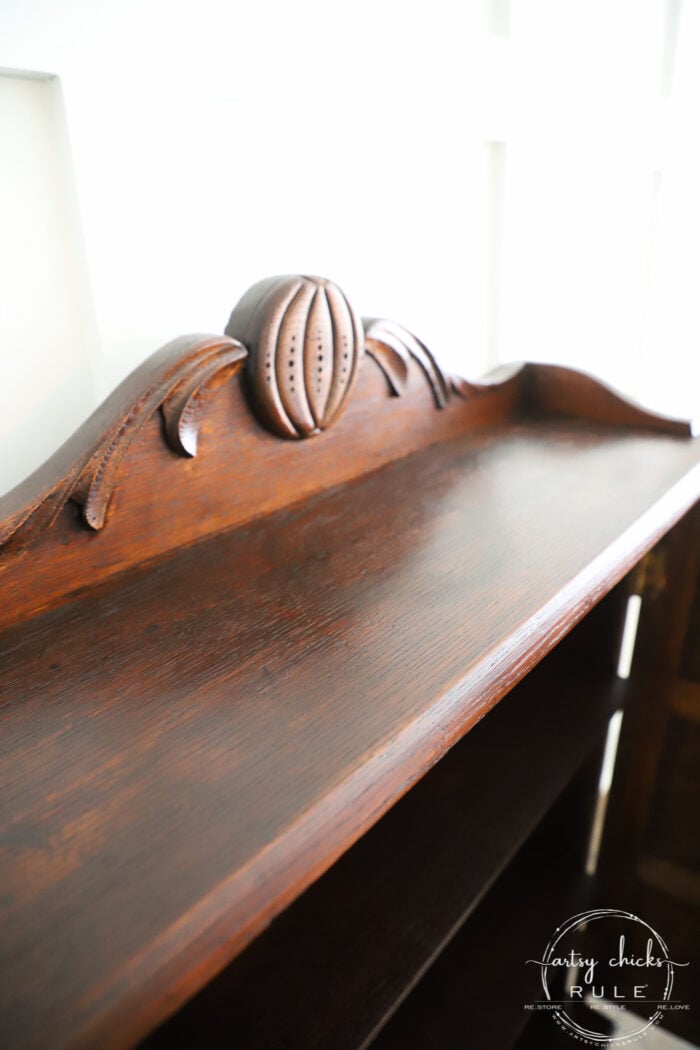
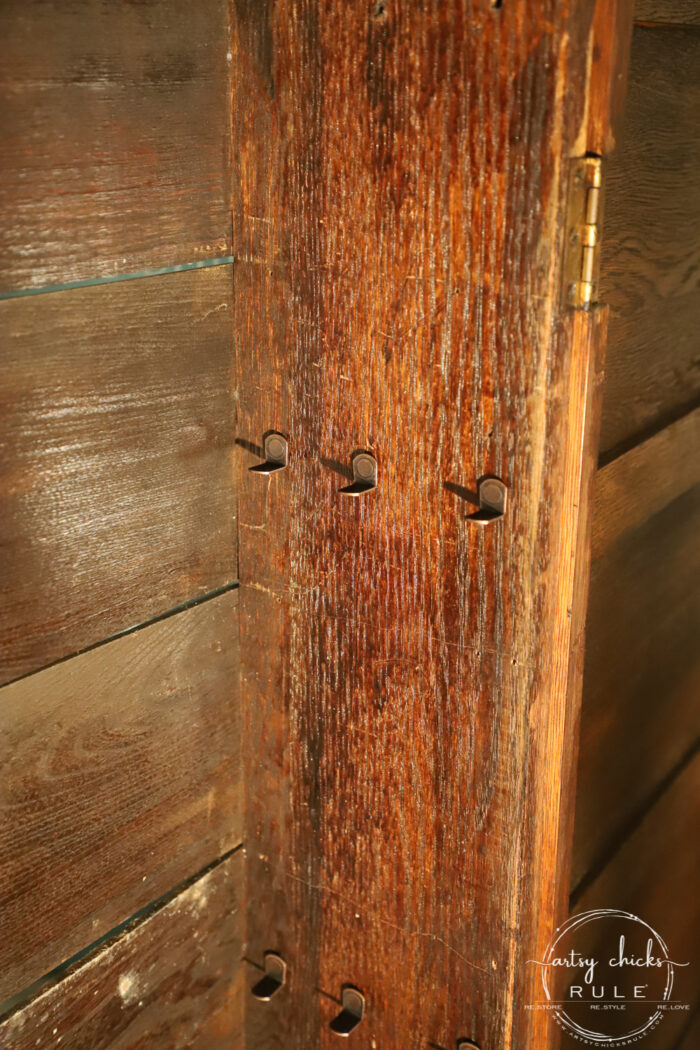
It was missing part of its beautiful trim.
No big deal if I’m painting it, I can just make one to match just like I did in this post >>> here.
And the second dilemma…
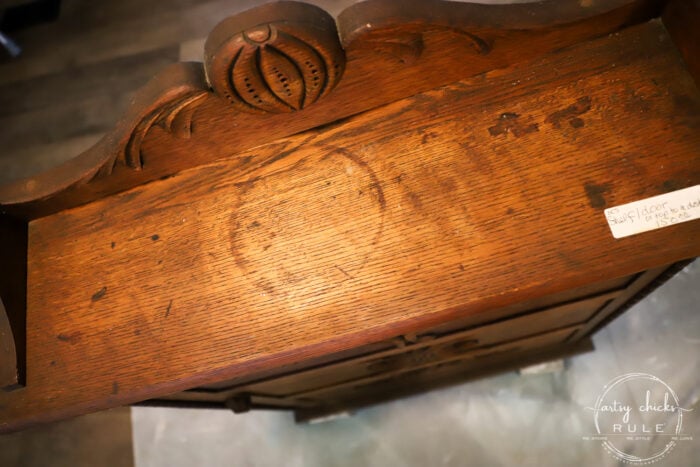
Looks maybe like a paint can had been sitting here for years, who knows? But it left a nice ring AND a lighter area in the wood.
Again, not a big deal if I paint it.
And one more dilemma was a big gouge on the bottom right side (you can see it on the bottom there). Not such a big deal with paint because I can simply fill it in, sand it smooth and paint. And well, I can somewhat do the same with stainable wood filler but I didn’t really want to mess with trying to match it, etc.
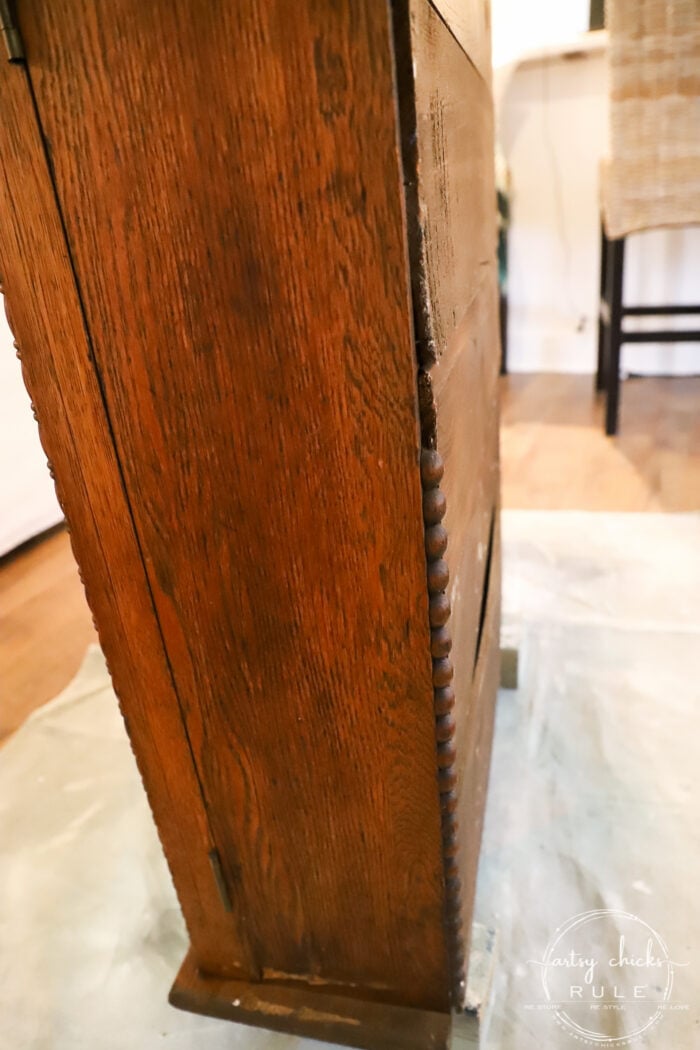
And it was missing most of the trim going down the sides. This was the only piece left. I hated to remove it but since there was none on the other side at all and this side had half missing, I decided it must go. :/ I suppose I could’ve added new but I kind of wanted to keep it as original as possible.
Want to see some of these projects in “live” time? Hop on over and follow along with me on INSTAGRAM. I’m always sharing in my stories as I’m doing projects, finding new furniture, fun finds….just all the day to day behind the scenes.
So, what to do?? Paint or stain it?
If I stained it, I would have to cut off part of the above applique to match the broken- off side, try to figure out some way to remove or even out the top of the cabinet where the can have set and do something with the gouge in the side.
Even still, stain won!
So we had to painstakingly cut off the piece. I think it physically hurt, haha, but it had to be done.
Now let me tell you how simple this makeover was. (really)
I took some fine-grit sandpaper (I didn’t want to rough it up, I only wanted to remove a bit of the surface) and lightly went over the whole thing by hand.
I think it maybe took me about 5 minutes, maybe 7. Quick quick!
Then I wiped all down again, really well.
By the way, I decided to let the “gouge roll”! ha! I’m calling it part of its history and character. :)
Next, I applied the gel stain with an old rag (like t-shirt material).
Want to know more about gel stain? How to apply it, etc? I wrote an entire post devoted to that and you can read it, here.
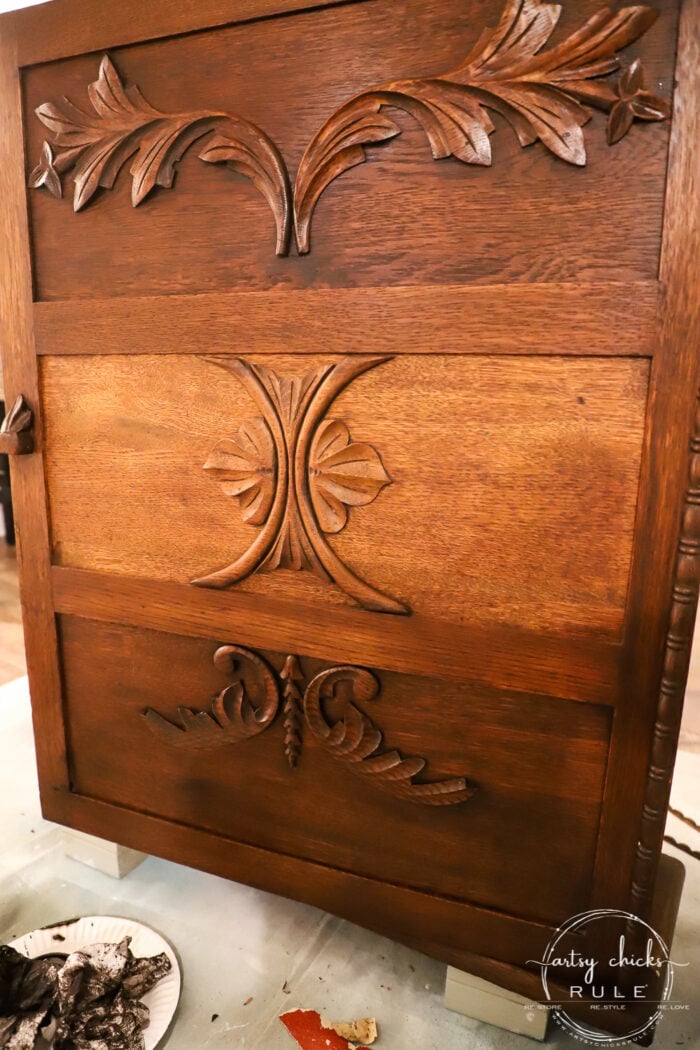
Do you see the piece where we cut it there? I think it turned out pretty well.
Anyway, I’m sharing this photo to show where I’ve applied the gel stain to the cabinet and where I have not (the middle section).
I keep a clean rag handy to “wipe-back” some of the stain after I apply.
Now what to do with the top besides sanding it completely down (which I did not want to do)?
I decided to try to lightly sand the ring only to lighten it. That way, I could go back over it and hopefully, it will not be as noticeable.
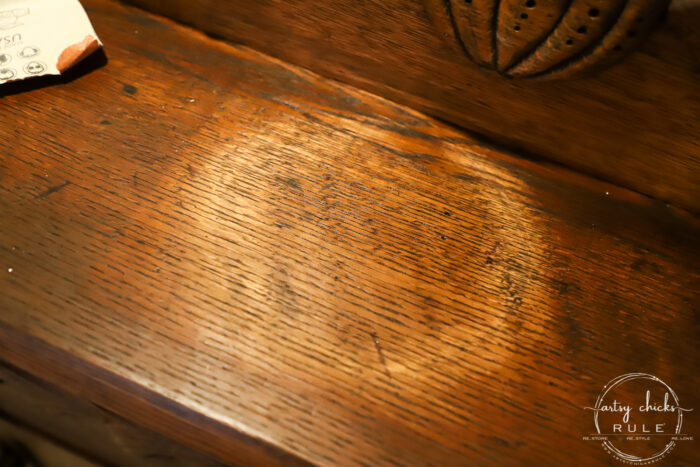
I think it worked pretty well. I did have to layer a bit more product in that particular area but I’m pretty happy with how it turned out.
(Want to see even more of my favorite furniture makeover supplies??? Take a look in my very own curated shop, here!)
You can just slightly see it. And I wasn’t going for perfection in this piece because it is old and I wanted to keep the character of it.
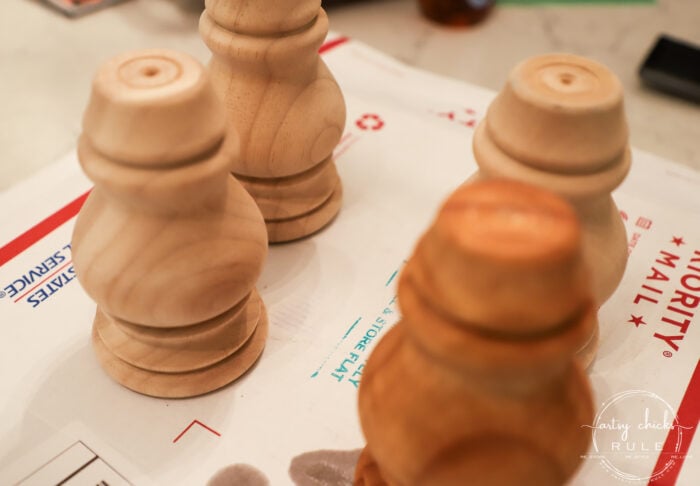
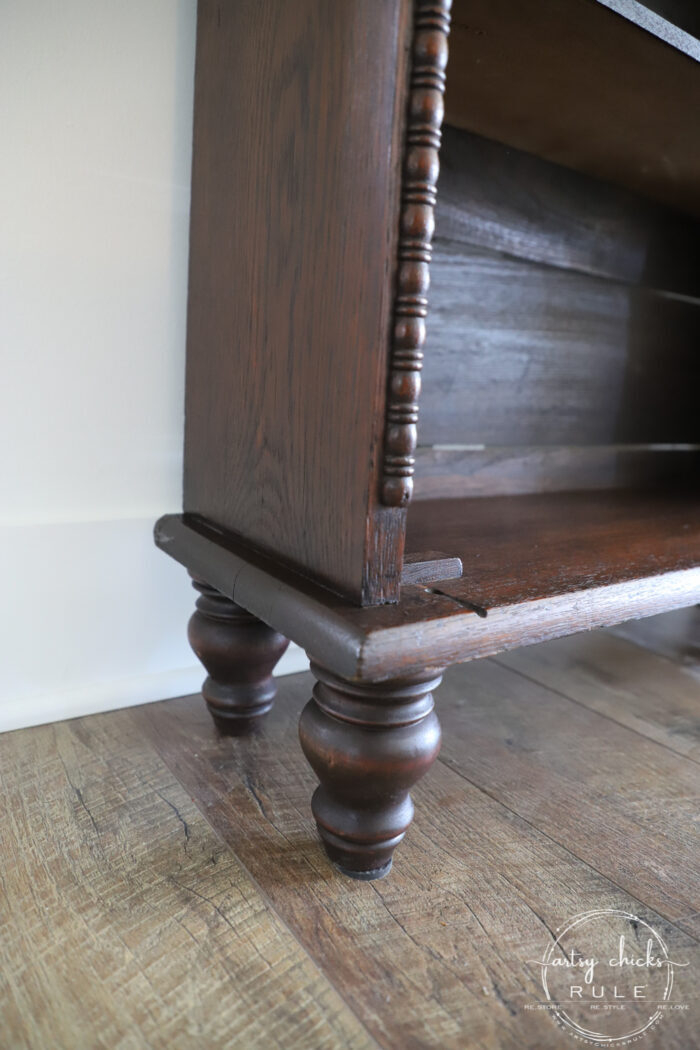
I ordered these pretty feet for the bottom. I used a pre-stain wood conditioner before I applied the stain since it was raw wood.
Then applied the same gel stain as the cabinet.
As I was concerned about, since these didn’t start out “orange-y” like the cabinet, they didn’t have the same tone as the cabinet. Bummer.
So I simply added a bit of red paint (very, very lightly, and rubbed in well) over top to change the tone a bit to match.
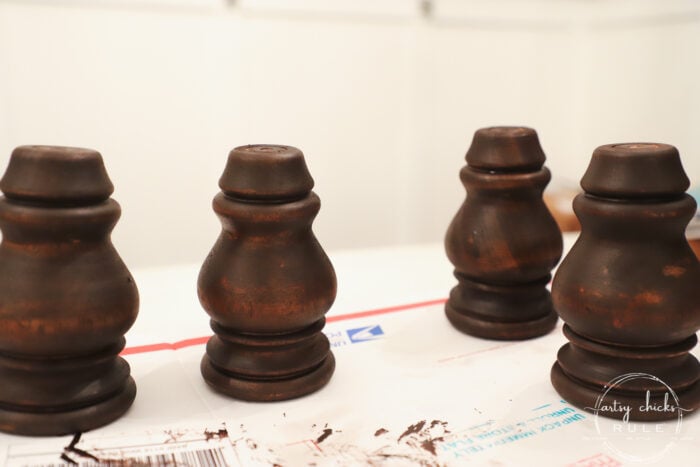
I think they came out pretty great. AND they sort of have that same “old-ish” look too with the wood peeking through here and there.
Pretty happy with them!
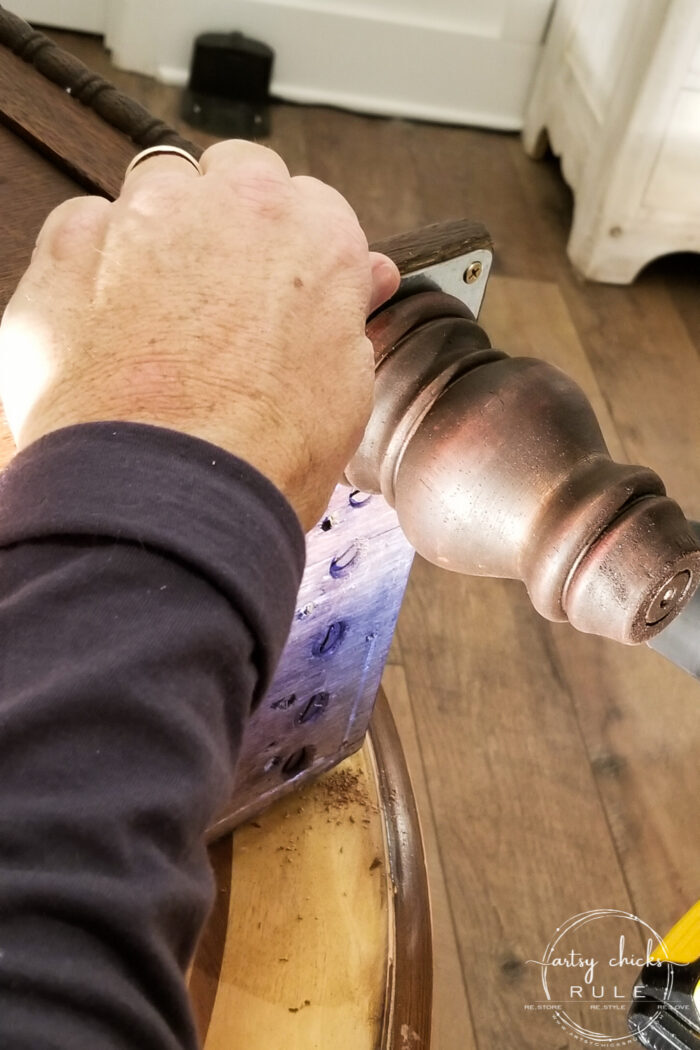
I love this set because it came with everything, even the protective pads to go under once done.
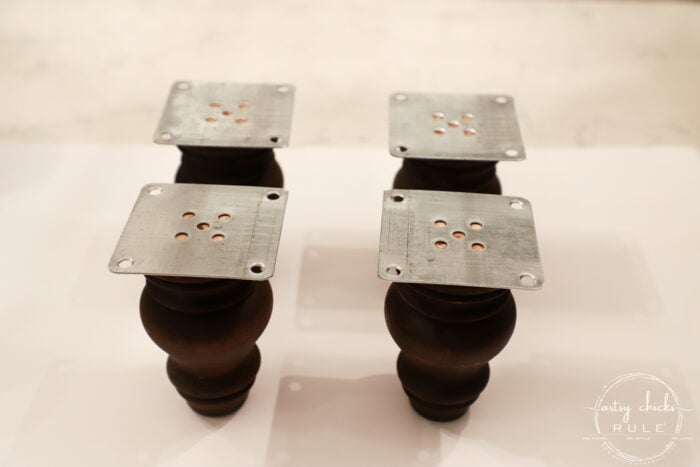
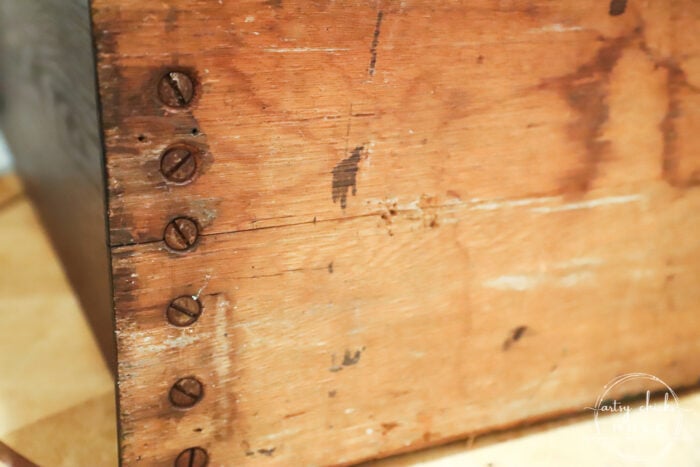
We simply (and by we, I mean my hubby…I can do these things but I was also cooking dinner last night as I was finishing this up so enlisted his help, lol) screwed the plates onto the legs and then screwed them to the bottom of the cabinet. (look at those old screws!)
And why yes we had it sitting atop yet another piece I’m also working on….in my living room. haha It’s too cold in our garage right now. The temps have been crazy here lately. (I’ll probably have this one on the blog next week…stay tuned and stay tuned to Instagram because I’ll surely share more of it in my stories as I finish it)
Finally, after letting it sit for a couple of days, I came back and used Gel Top Coat. It’s an oil-based poly. I decided to go that route this time but you can also use a water-based poly over the gel stain too. You just need to let it sit for about 72 hours or so before you do.
And done!
Such a simple makeover and refresh. Using gel stain is a win, for sure. It’s easy to use and makes that old wood rich and beautiful.

I’m so, so happy with how this old gel stain cabinet turned out. I think I managed to keep the charm and character it had.
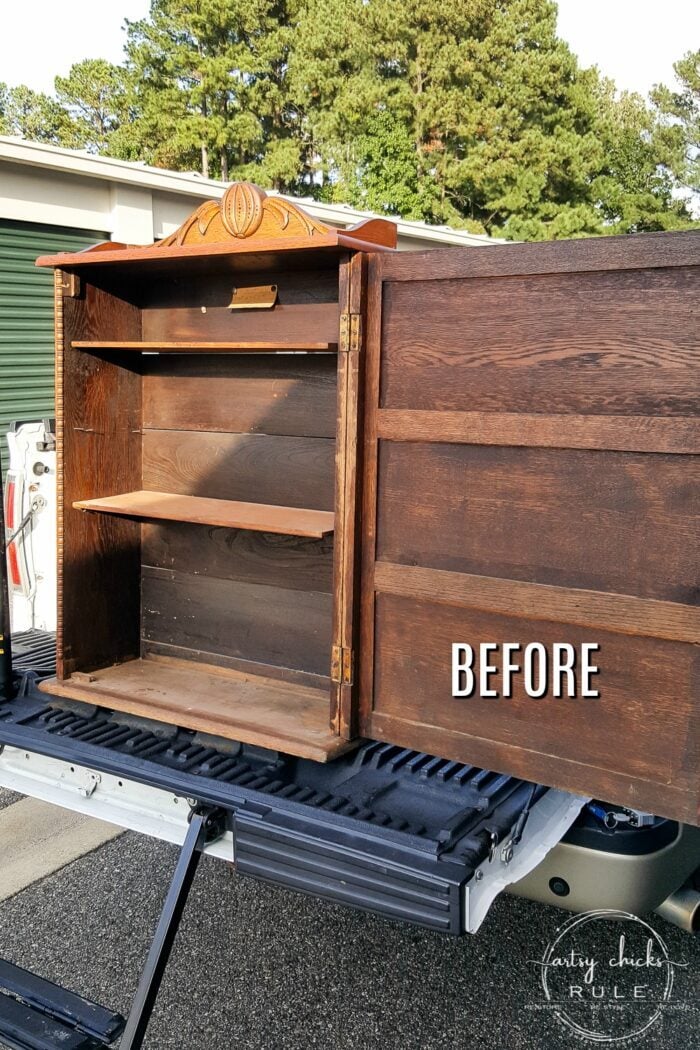
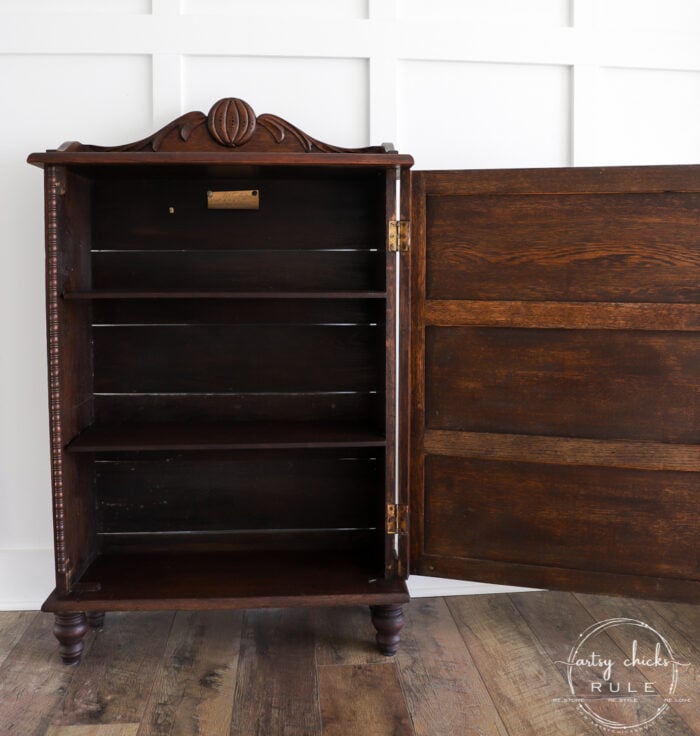
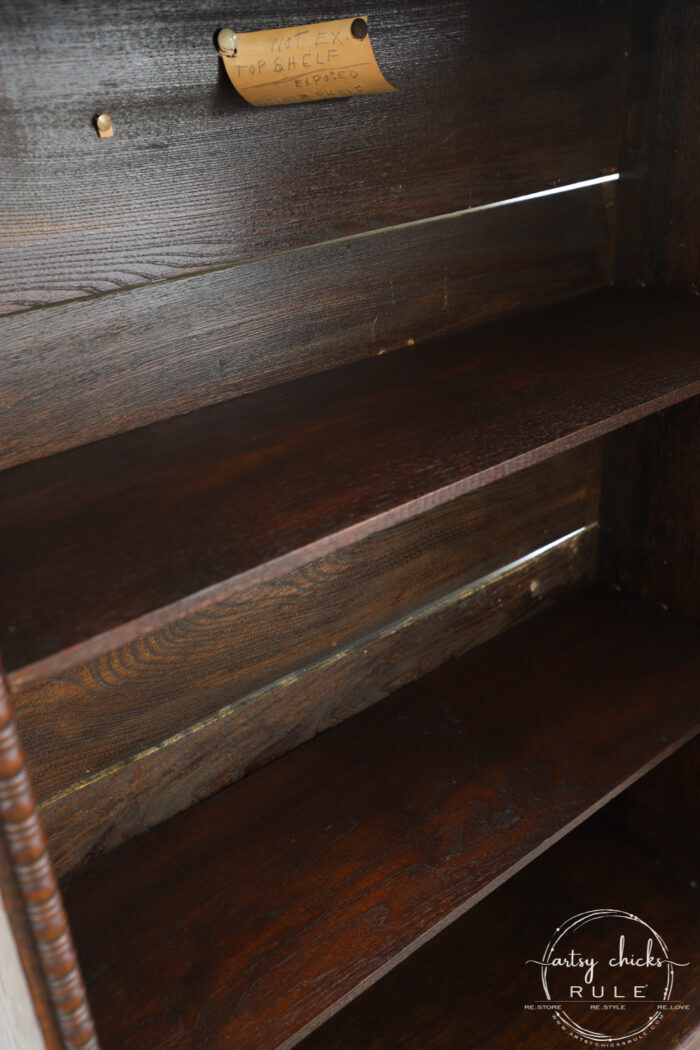
The only places I applied the gel stain to the inside of the cabinet was the shelves (which were originally up there with haphazard nails before–scroll back up to the inside “before” shot to see what I mean) and the bottom of the shelf. The rest of the inside, the back, sides, and inside of the door, I left alone. Except for poly.
I bought these to replace the nails.
And I meant to remove this old note…but forgot. So left it for now. Have not a clue what it means!

But I believe the inside color is what the outside originally looked like. It has faded over time and turned orange as this wood is known to do.
I am sad we had to cut it here, but I think being able to leave it stained made up for it.
It’s another one I’m going to hate having to say goodbye to!
So…do you have any old pieces like this? Old wood you don’t like anymore? It is really easy to change them up with gel stain. It doesn’t require you to sand it all the way down and that right there makes the job so much more enjoyable. This little gel stain cabinet looks night and day from when I first found it. And it truly did not take much effort or time to get it that way.
PIN it to save it!
Want to see even more gel stained makeovers?? Click here for more.
My next makeover got a little bit of “gel stain action” too…sorta! ;) Be sure to come back to see it!
UPDATE!! See it now, here!
I hope you all have a wonderful weekend!
xo


")
")


What a beautiful unique cabinet! It looks great!
Thank you, Kim! xo
Thank you for not painting it,that would’ve devalued it. So many beautiful antiques being ruined today as nobody appreciates just plain wood any longer.
I love both! But you are right, there is a time and place. :) xo
What a beautiful piece. Glad you didn’t paint it. Love the uniqueness of it.
It is so very unique, isn’t it?? I’ve never come across anything like it before! :) xo
You did a fabulous job on this old beauty! Someone is going to be very happy to use this in their home. If I were closer, it might be me! :)
Thanks, Paula! And haha, it would look great in your home! ;) xo
I love that! It so beautiful now. Some pieces don’t want paint! My husband brought home ice box about that size that has turned orangy. I think a light sanding and gel stain is perfect for it.
Thank you!! And yes, I agree! Oh this is the perfect solution to your old icebox. (I love those!) xo
Hi Nancy! I absolutely LOVE what you’ve done with this piece. And I agree – staining was the way to go. It’s just gorgeous. Wonder what it once was? A wardrobe? A pantry? It sure looks great in your home!
Thank you, Carolyn! It’s quite small really, and narrow, so I don’t have a clue what it could’ve been! :)
Another winner Nancy! Beautiful adaptation with the feet! It’s a gorgeous piece and you did a magnificent makeover. Love the stain color you chose. Truly a stand out piece now!
Thanks so much, Christina! I love the feet too!! They just make it, I think. :) xoxo
Nancy, this is a lovely piece since you brought the rich wood back to life! The feet are so perfect! I love the note too! It shows that someone really loved the piece. You are rocking and rolling already this year! Love your blog!
Thank you, Cecilia!! I’m trying!! ;) xoxo
I think the note inside referred to camera film….’Exposed’….Not Exposed”. You think??
Oh, hey, maybe that’s it!! That would make sense!
That’s what I was going to say. I believe we are correct!!
you have done a fabulous job on this beauty. I love , love the feet. you managed to match them up just perfect. thanks for sharing this one
Thank you, Jackie! I am SO glad I got them to match up!! I was a little worried there for a bit. ;) xo
So cute now, Nancy! I had my doubts about the stain, but it really did turn out well. The feet look great and definitely make it more functional. So fun to see someone’s old woodworking project – the whole time I was wondering what that note was and so glad you shared it, though I have no idea what it means!
I also am working in the living room, on top of another piece of furniture that is NOT looking better for all the paint drips on it 😂 Gotta keep working, even when the temperature doesn’t cooperate. Keep moving stuff out of the storage unit so you can buy more stuff!
Thanks, Marcie! Someone mentioned the note might mean something to do with camera film? Who knows!! All kinds of mysteries with these old pieces but that’s part of the fun. :) And here’s to staying warm!!! lol xoxo
Gorgeous! I need to do this to my poor water-stained, dog chewed dining table. Thanks for the inspiration – and the new-to-me idea of how to attach legs with metal plates.
Thanks, Anne! Yes, I was thrilled to find that set of legs and that it came with all of that too. :) xo
I love the way this cabinet turned out. A lot of older oak pieces turn an ugly orange color due to the way they were finished. My father was a carpenter and furniture maker and he only used clear polyurethane to seal his pieces and none of them ever turned to that ugly orange. The feet you added to the bottom of the cabinet made a big difference in the appearance also. With the gel stain it has such a rich color, very pretty!
OH that’s so crazy!! Yes, it seems a lot of it is orange-y like that. Thank you! :) xo
So beautiful. I have 2 old pieces and this is what I’m going to do.
Yay!! That is great, Barbara!! xo
This is truly gorgeous. Well done. I’m curious…how did you cut off the piece of wood appliqué? And without damaging wood underneath? What tool did you use? Thanks!
Thank you, Ellen! You know, I forgot to mention that!! Sorry about that. It was nothing fancy. We had considered using one of my husband’s special cutters but in the end, all we used was a chisel and a sharp knife. (heavy duty knife not kitchen) The wood was SO brittle that it didn’t take much to take off what was needed. But we also had to be really careful. Then I just simply gave it a little sanding to smooth it out. :)
chisels are such great tools! thanks for the tip! i had assumed some sort of short saw.
This looks amazing now!! I especially love how you were able to make the detailed trim on the top match and how well you were able to get the feet to match! Simply gorgeous!! And I was painting indoors this past week too ha ha and I never do that..too dang cold! XOXO
Thanks, Christy! I love the feet!! But I love adding feet to just about everything! lol So cold … I cannot take these temps! xoxo
Beautiful! Great job updating while retaining it’s character.
Thank you, Rebecca!! xo
It’s beautiful! What a difference the strain made, and I agree, paint would’ve ruined it! I have a question… how did you cut the front trim where it was missing a piece? Please teach this old dog a new trick!
Thank you, Helen! Yes, I am SO glad I went with stain on this one. I just LOVE it! And yes, I totally forgot to mention that in the post, I will have to update it! But it was pretty simple actually. We had considered using one of my husband’s special cutters but in the end, all we used was a chisel and a sharp knife. (heavy duty knife not kitchen) The wood was SO brittle that it didn’t take much to take off what was needed. But we also had to be really careful. Then I just simply gave it a little sanding to smooth it out. :) xo
Thank you for the help!😍
This turned out gorgeous Nancy!! I really enjoyed reading this post!
Thanks, Ann!! :) xo
What a lovely cabinet. No paint is a welcome change!
Thank you!! I agree! :) xo
Really gorgeous! You really rescued this.
Thanks so much, Eileen!! :) xo
This is a beautiful makeover. So much character in this piece.
Thank you, Tara!! :) xo
What color was the gel stain? Love this piece!
It is Java Gel Stain (General Finishes). I’ve got it linked in the “materials list” box inside the post. :) And thank you! xo
It’s really pretty and has so much character! What color gel stain did you use?
Thank you, Cate!! It’s Java Gel Stain. I have it linked in the “materials list” box inside the post. :) xo
You did a great job restoring this old cabinet. Am so happy you did not paint it! Old oak furniture in my favorite!
I agree!! I am so, so glad I went with stain on this one!! I have a couple more pieces coming up that will only be getting stain too! :) xo
WOW, you did an amazing job on this. it’s perfect!!!!! love it!!!
adding the feet was a nice finishing touch. I didn’t know you could buy feet like that with a metal plate attached. I’m glad to know this.
Thank you!
Thanks so much, Tracey! Yes, this was a great set!! (I have it linked in the post) It came with the metal places, screws and even the protective pads for the bottoms of the feet. :) xo
Those legs complete this so nicely! You did such a wonderful job. I’d be sad to see it go too.
Thank you, Kimberly! :) xo
Absolutely stunning! The stain really brought it back to life. I do the same thing, sit in front of a piece to decide what to do lol! You made the right call!
Thank you, Christina!! Yes, it takes time sometimes. And sometimes more time than others!! ;) xo
This is a beautiful cabinet, love the gel color you used.
Thank you, Christina! :) xo
ABSOLUTELY PHENOMENAL! I LOVE IT! So glad you left it stained! I have a jewelry cabinet that I am going to do, now that I’ve seen how relatively easy it is to do. Thank you, thank you!
Thanks so much, Teresa! And yes, this is the way to go for sure! :) xo
Nancy, i love that you did NOT paint this piece and trimming the applique was the perfect solution – i don’t think anyone would have known without reading your tutorial! I have a piece similar to this one (oh, not as decorative or beautiful!), and i was told that is was originally a cabinet for a Murphy bed, which explains how low to the ground it is and the one wide door. Regardless, your red oak cabinet is now beautiful on legs with a bit darker stain! LOVE IT!
Oh good, so glad to hear that!! It’s hard to be objective about it when you are right there over top of it..cutting it off! ;) Thank you, Gwen! xo
A real masterpiece and marvelous improvement. Big congrats!!!
Thanks so much, Helene! :) xo
Stunningly stunningly beautiful. This made my day. Thank you for keeping the wood and turning this modern furniture lover girl into an “antiques” lover! You’re the best!
Aw, I am so happy to hear that, Lynn! :) Thank you!! xoxo
LOVE LOVE LOVE this piece. Are you selling this? I think you are not so far from me. I’m in the Raleigh area.
Hi Uta! I am trying to find a way to keep it (maybe use it at the condo) but yes, I will most likely sell it if not. I live in Hampton Roads, Virginia which is only about 3 hours from Raleigh. :) xo
I love what you did with the gel stains…It is so nice to see you preserving the beauty of this piece….It is simply gorgeous. Long line of carpenters my family and we all love wood!
I love, love paint! But I too, also love the beauty of wood stained pieces. So happy you love it! I’m thrilled with how it turned out and so very glad I did not paint this one. :) xo
You hit this one out of the park!!! It is absolutely impeccable. Nothing more to say ’cause it couldn’t get any better! Great job! You bet I pinned this one!
Thank you so very much, Linda!! (and thank you for sharing on Pinterest too!) This is probably at the top of any I’ve done too! I just love how it turned out and so glad I did not paint it. :) xo
Would hate to have to let this one go! It’s beautiful. Great job!
I know!! I’m trying hard to keep it! (maybe use it in the condo??) You may be seeing here on the blog again! We’ll see! ;) xoxo
Wow!!! Great re-do. I am so happy you didn’t paint it. LOVE the feet…perfect!!! Also, so amazed you were able to fix the broken trim with no noticeable problems. AWESOME fix!!!! Looks like it could have been that way.
You guys have some great resale shops out there!!!! Thanks for sharing!!! XX00
Thanks so much, Addie!! You and me both!! Happy to hear the broken trim looks good too!! I’m thrilled with how this one turned out. And yes, sometimes..it can be hit or miss. It was definitely win-win last week though! xoxo
Really gorgeous.
Thank you, Lizzy. :) Have a great weekend! xo
This turned out beautifully. BRAVO! I have a question: can you use gel stain–or anything short of stripping the wood and bleaching it–to lighten wood. We’re looking at a new house, an old house, actually. The cabinets are are solid wood and of incredible quality. But they’re dark and make the kitchen dark. I don’t want to paint them. Do the white wash or lime finish stains actually work? Lighten the cabinets without hiding the wood. I’d appreciate your advice. From a devoted fan!
Unfortunately, no, Sandy. It just doesn’t really work that way. And yes, a whitewash would be lovely but again, you’d need to remove that dark stain first, especially if you want to lighten and see the wood. Just really no other way. Sorry!! BUT the end result will be worth it, especially in an old home like that. :) xo
Oh, Nancy! When I saw the before picture of the cabinet, I said to myself, “she’s NOT going to paint that! It’s too beautiful!” My heart actually hurt thinking that you would paint it! I get so upset when I see people painting antiques. But when I read your blog, I was so happy! You did such a beautiful job with it. I love what you did to the detailing. You had no choice but to cut part of it off, but it looks like it was originally like that! Great job! I love reading your blogs! Teresa from Hampton, VA
Haha!! No, no paint on this beauty…although, as you know, I did consider it! And thank you!! Oh, you are from Hampton? I actually found this piece at one of the markets in Smithfield (on main street) a couple of years ago. Those markets are so much fun to visit. Always lots of old pieces like this. (among other old, vintage things) xo
Gorgeous! You made the right choice. And thank you for sharing the gel stain info too.
Thank you, Jerri! :) xo
I love the way this came out. I have an antique oak armoire that I’ve been leaning toward painting though my husband was aghast at the thought. I didn’t like the orange tone. This is the perfect solution. Thank you for sharing.
Why are husbands always so against painting wood (mine too)?? It seems like it across the board! lol But so glad this will be the better solution for you both! :) xo
Love this piece! So very glad you didn’t paint it. You did a fabulous job.
I think it’s a dry pantry because I’ve seen cabinets like that before. And it does sit on top of something else, like on a sideboard.
Thank you, Mea! :) Oh yes, it could be that. I figured it probably sat on some sort of cabinet or bookcase, etc. :) xo
I really like the character of the piece and how you improved it, tho might have enjoyed a deep blue pop of color inside.
That might have been fun too, Rose!! Sometimes I get all sentimental about these old pieces though. And once I’m down that path, I want to keep it as original as possible! ;) xoxo
Nancy, this is a beauty. Love that you stained it VS painting it. Do you have an actual store where you sell the ones you don’t keep?
Thank you, Dianne! I don’t have a store but I do drop off at a consignment store of a friend of mine to sell most things I do here. xo
What a beautiful piece. I love how much you were able to keep the integrity of the cabinet. It would look darling with a bunch of quilts stacked in it.😍
Thank you, Susan! Yes, that would be darling, I agree! xo
What an incredible job you did!! I’m so glad you didn’t paint it and cover the beautiful wood grain.
Thank you, Ellen! :) xo
Omgosh!!! I love this! I’m on the no paint bandwagon- I cringe when I see some of these antiques painted! This is amazing! You inspire me!! Thanks!
Thanks so much, Kris! Yes, me too on some pieces. I do love paint, for sure, but I really love wood too! xo
Wow what a beautiful piece of furniture! I love how you stained the piece and got rid of the orange coloring.
I have to say I look forward to your post and how you change things for the better!
Thank you so much, Joanne!! I have yet to be able to part with it but I don’t know where to use it! ;) And thank you, that makes me so happy to hear! :) xoxo
Major cabinet envy here-this piece is gorgeous-even more so now that it’s lost its’ spray on tan look!
That gorgeous cabinet used to hold old film rolls. That sign means, the top shelf has unexposed film and the middle shelf has film that has been exposed. Lovely! It was inside someone’s darkroom at some point, very cool little piece.
Oh wow, really?! That makes sense though! I love to learn history of some of these old pieces I find. Thanks so much for sharing! xo
This looks beautiful! I’d like to try a gel stain on my dining room table top. It is veneer, cherry, I think and has several chips. If I use a wood filler on them would the gel stain work? Thanks!
Thank you, Trish! Yes, it would somewhat but I’m not sure how well it will match. I would probably try to pick up a cherry wood-colored stain pen and touch up with it after you fill them with wood filler. That way when you add the gel stain over top it will be more uniform.
Beautifully done!! I’m going to use gel stain on an antique highboy that belonged to my Grandmother.
Thank you for posting.
Thanks, Liz! Sounds great, good luck with yours! xo