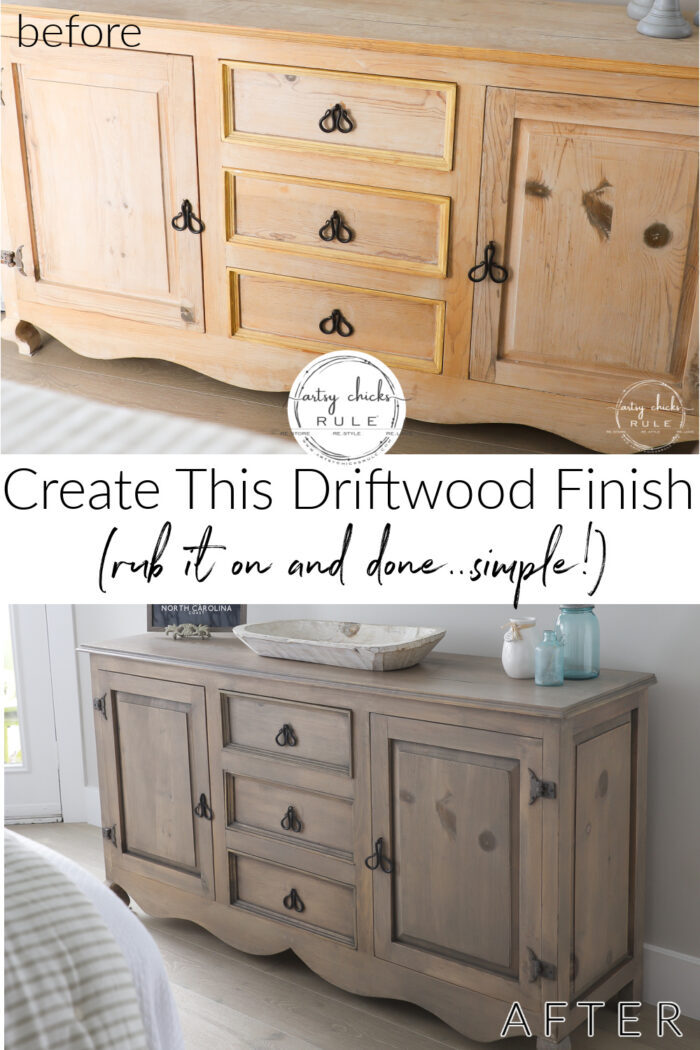
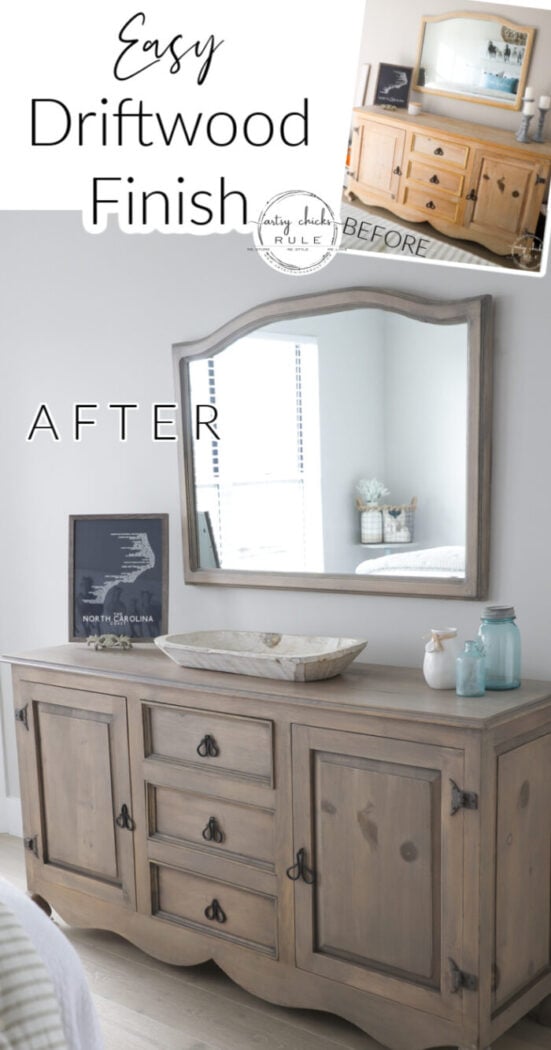
Create this driftwood stain dresser look simply (and quickly!) with ONE product…one and done!
Hello friends!
I am so excited to be sharing a brand new (to me) product with you today.
Remember when I recently decided to give Fusion Mineral Paint a try? Well, I also picked up their “natural” Stain and Finishing Oil and their “driftwood” Stain and Finishing Oil.
Without really knowing much about either.
Apparently, the finishing oil can be used on top of the paint to seal it OR it can be used on unpainted wood.
To note though, the “natural” which is clear is said it’s best used on the darker colors because it can darken or yellow.
Well, I brought all my things to the beach condo this past weekend to work on the console table.
This one…
I found it at Home Goods and loved it. BUT I always knew I would paint or refinish it in some way.
Anyway, if you follow along with me on Instagram, you probably already saw what color I painted it in my stories this past weekend.
If you don’t follow and missed it, you’re going to have to wait till I post it next week to see!! ;)
Because I ended up using one of the Stain and Finishing Oils on this piece after I painted it. (and I love it!)
(by the way, you can read all about that gorgeous flooring we had installed, here)
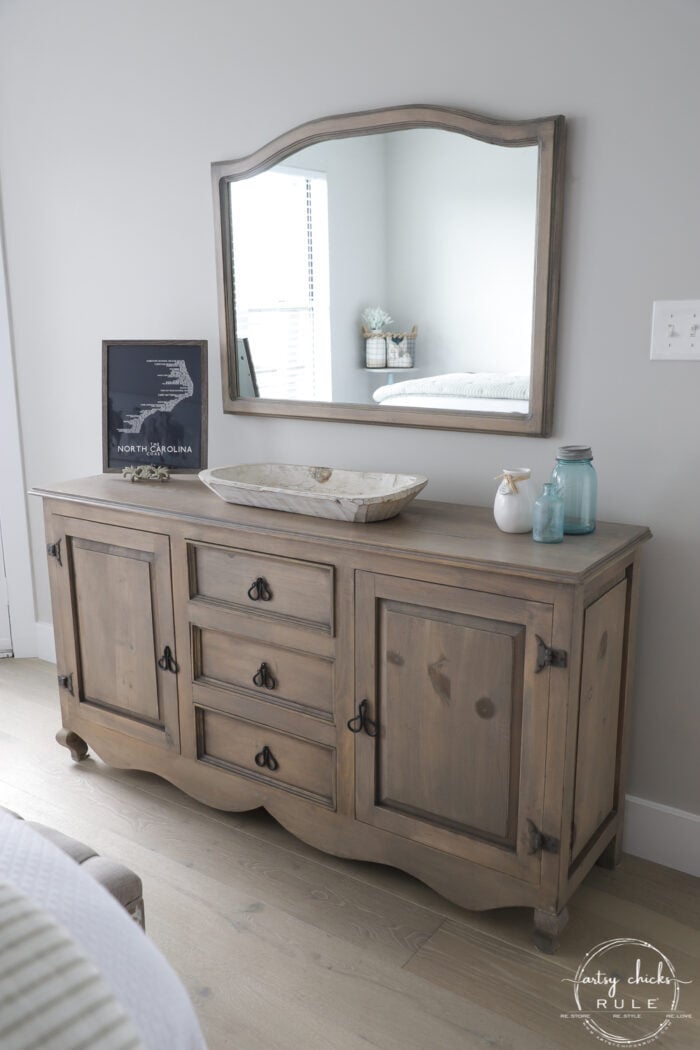
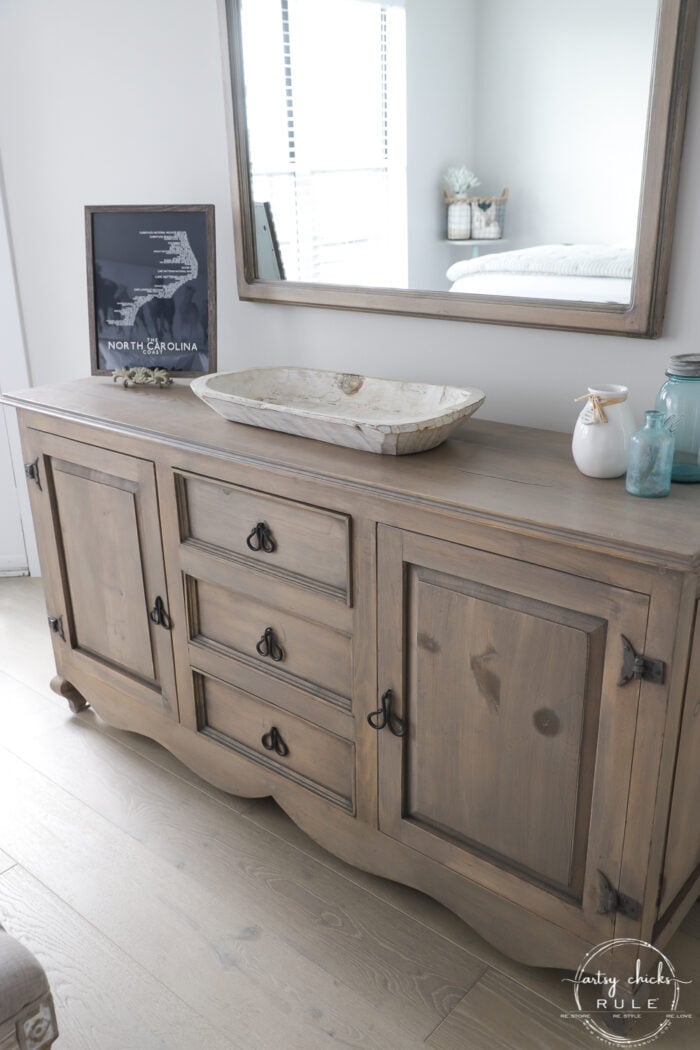
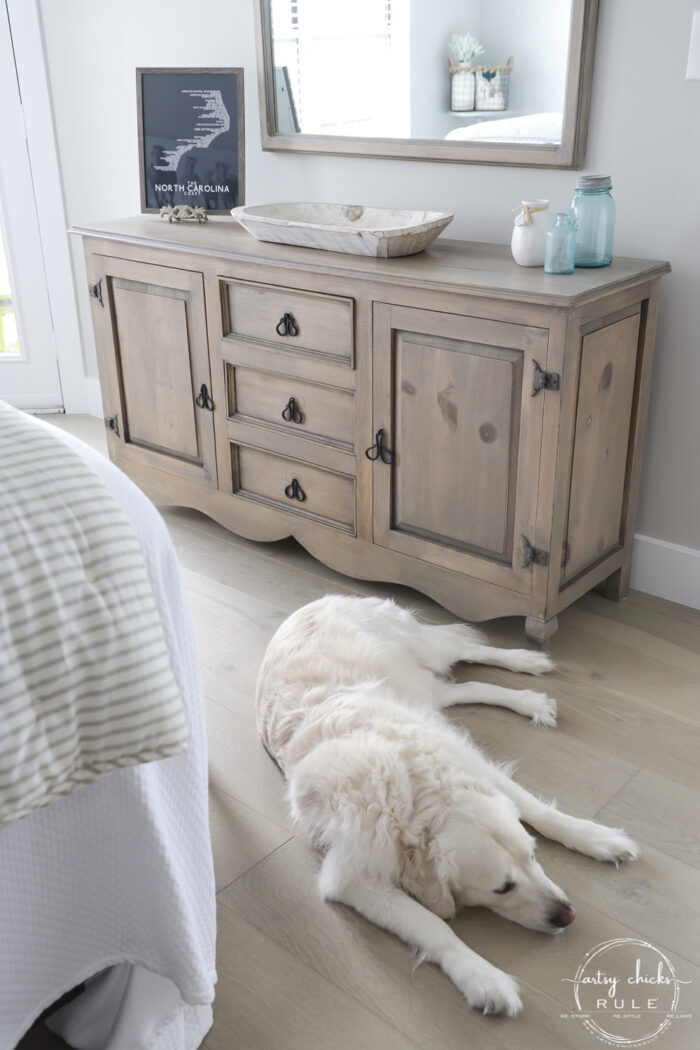
Driftwood Stain Dresser
So that got my wheels turning, don’t ya know! lol
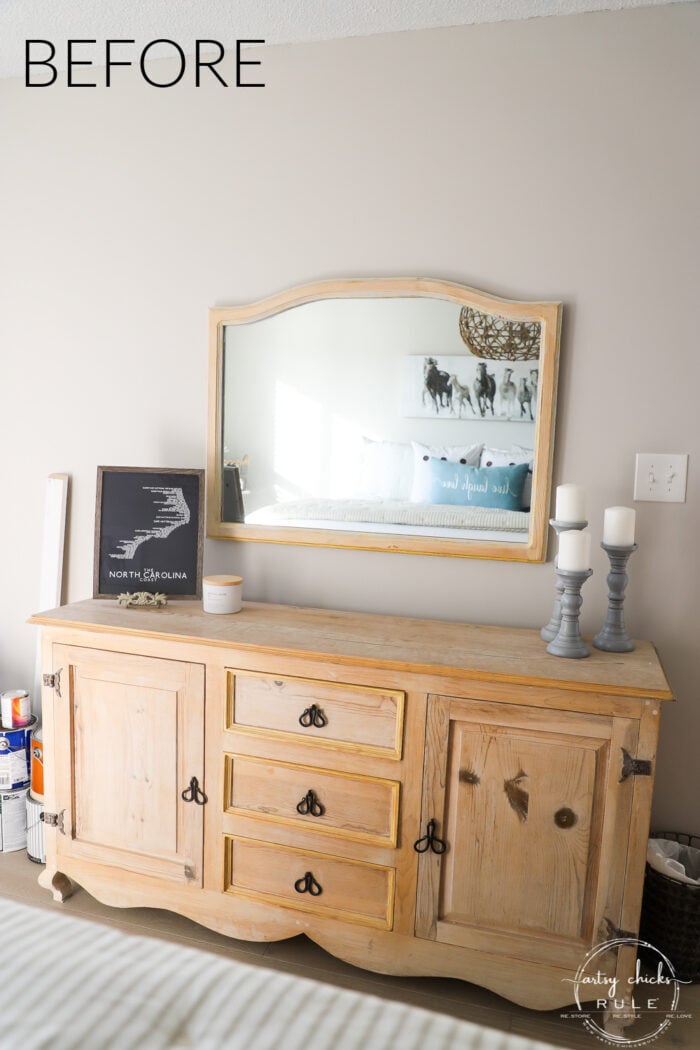
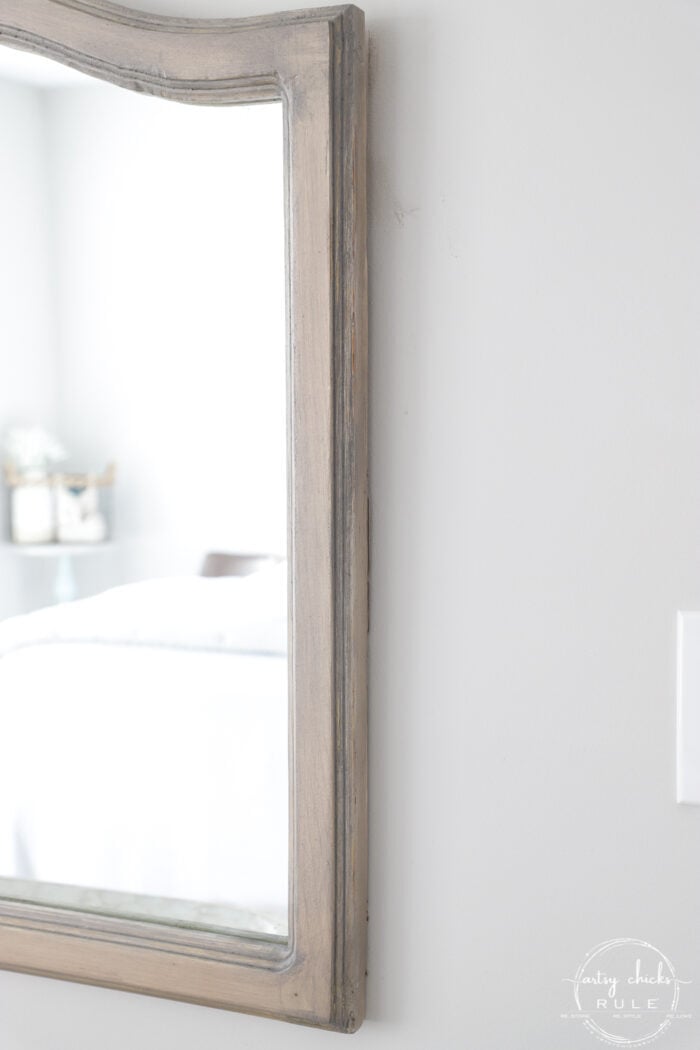
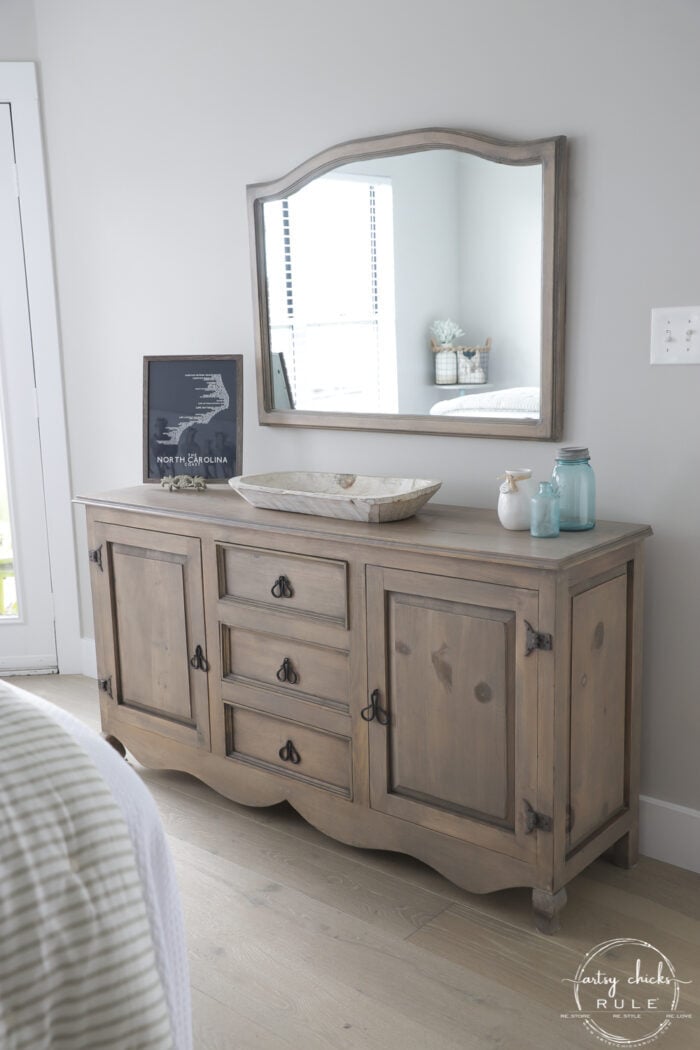
And I decided to try it out on the unsealed (but oddly whitewashed, maybe??) dresser and mirror in the bedroom
It’s the matching set to the “console table”/desk I shared last week. Missed it? You can see it, here.
Same hardware and all!! haha
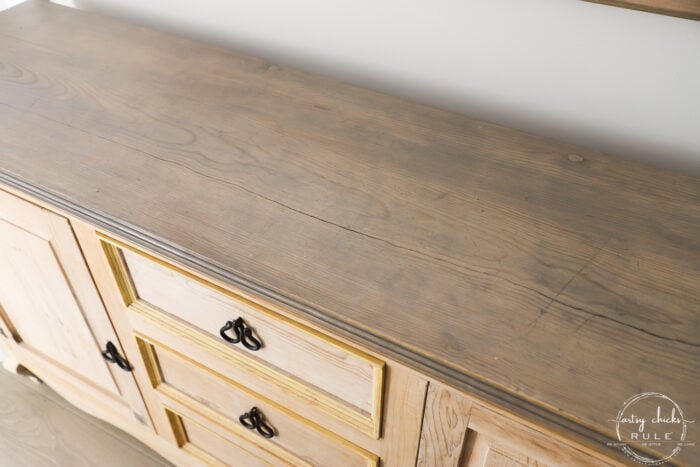
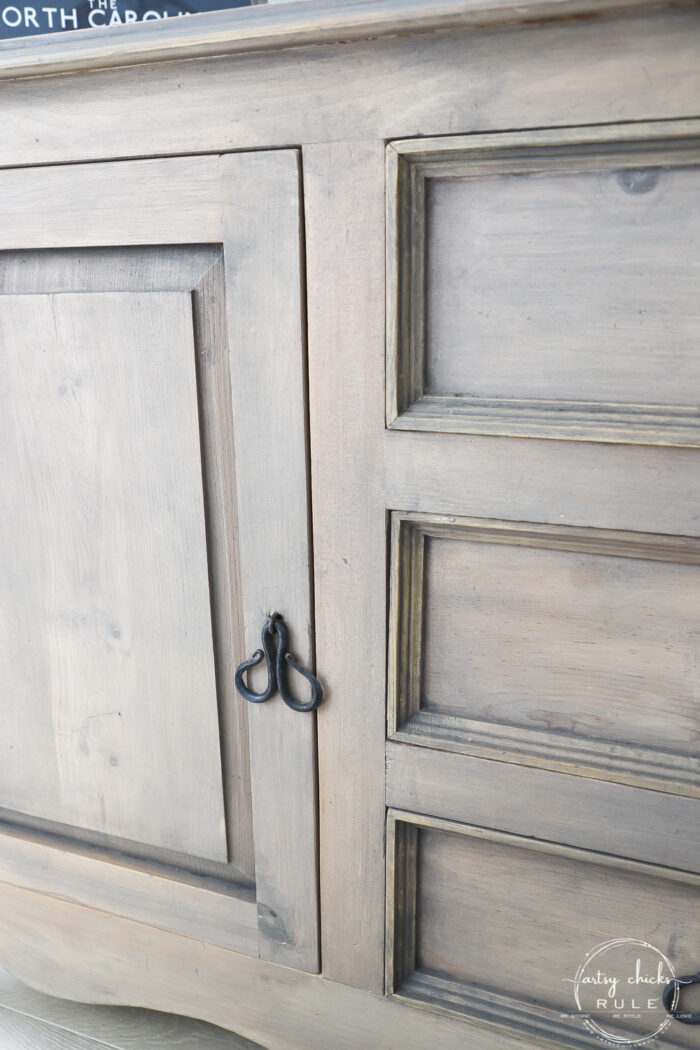
And that same weird yellow trim. Do you see it there around the drawers and top? (and mirror too)
I wasn’t sure at all how this driftwood stain would work on this plainish and yellow trim painted wood.
But I was ready to find out!
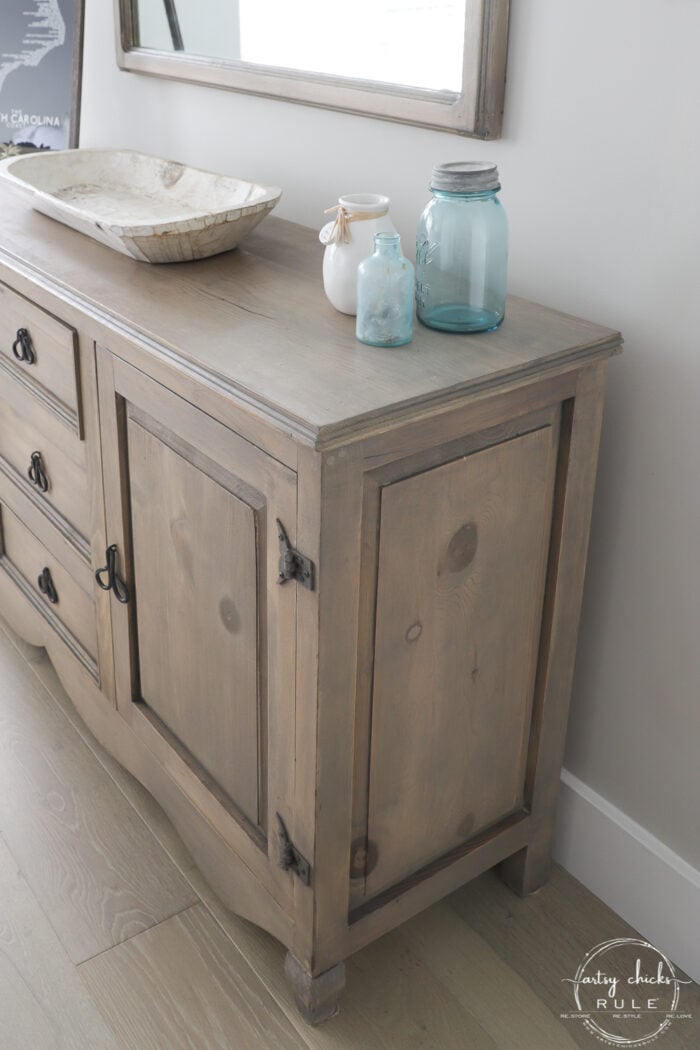
By the way, this one had water stains too that you can see on the left side where I haven’t applied the stain yet. (see them?)
I wasn’t sure if they would disappear or what but I wanted to try going right over it anyway.
And it worked!
Not only that, but it did a very decent job of hiding that funky yellow too. Wow!
You can find this Driftwood Stain (and several other colors) in my online shop, here.
I was so excited to see how well it was working. And I was loving the color of the driftwood stain color.
Exactly the look I love and exactly the perfect look for this condo at the beach.
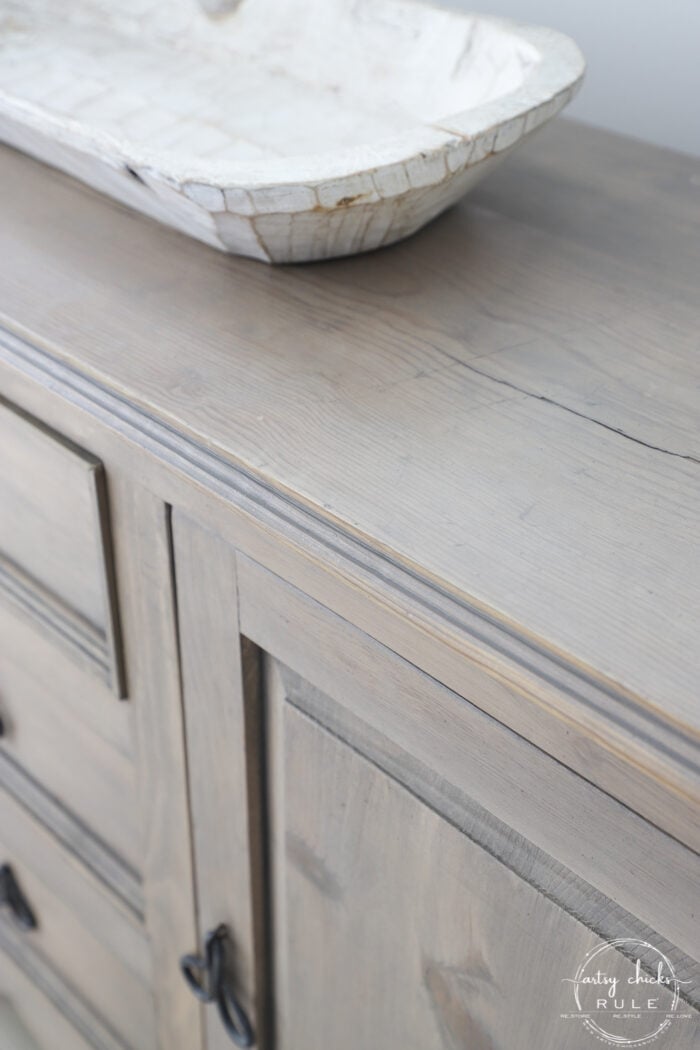
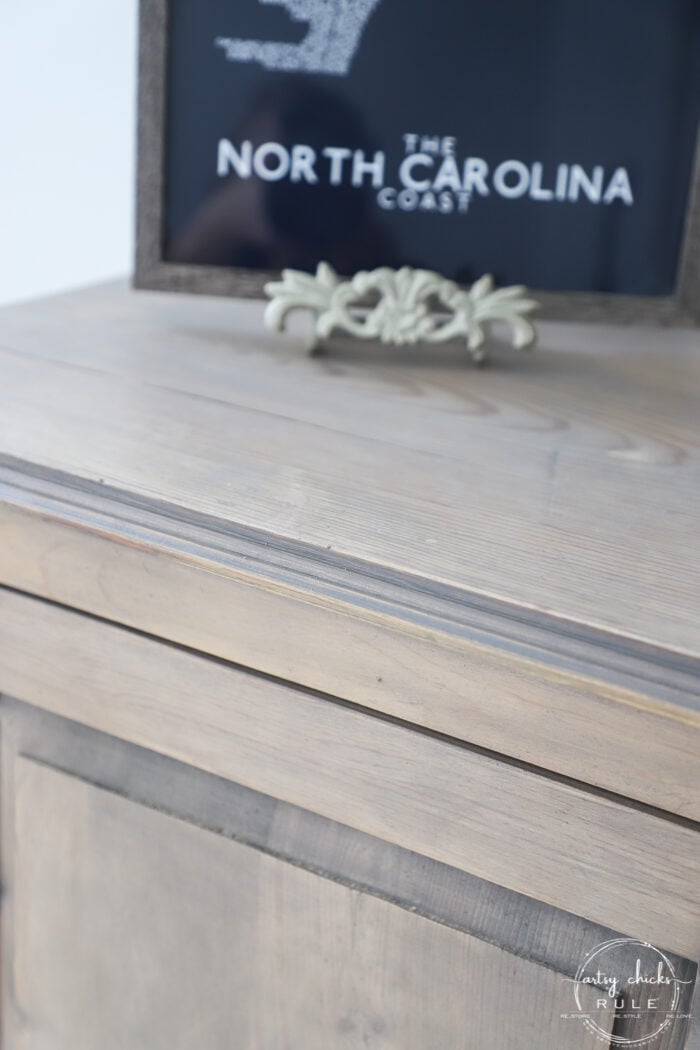
I mean, just look at that finish…
I am in LOVE.
And where is that yellow again?? Ha! Gone…hidden…bye!
What the what? It looks amazing!
And it looks like I spent hours creating this finish.
And I am here to tell you I absolutely did not.
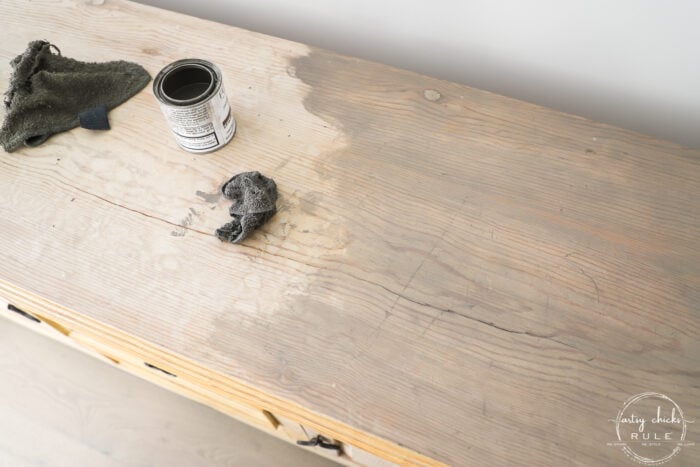
I literally poured the oil onto an old rag (t-shirt, etc, I used an old washcloth because that’s all I had…I’d recommend an old t-shirt instead) and rubbed it on and into the wood.
The application was a dream, really.
I rubbed it on and then wiped it back over to remove the excess.
EDITED to add: I want to clarify that no, I did not sand or do any prep other than wiping it down all over first. BUT this dresser really didn’t have a finish coat on it. (no sealer, hence the water stains these pieces had/have) SO, if you have something similar, you will be able to use this without sanding and it will soak in nicely. With that being said, it does impart some color on even those areas that are sealed/finished. (such as it did on my painted piece that I will share next week) And as you can see on the finished/sealed yellow grooves on this dresser.
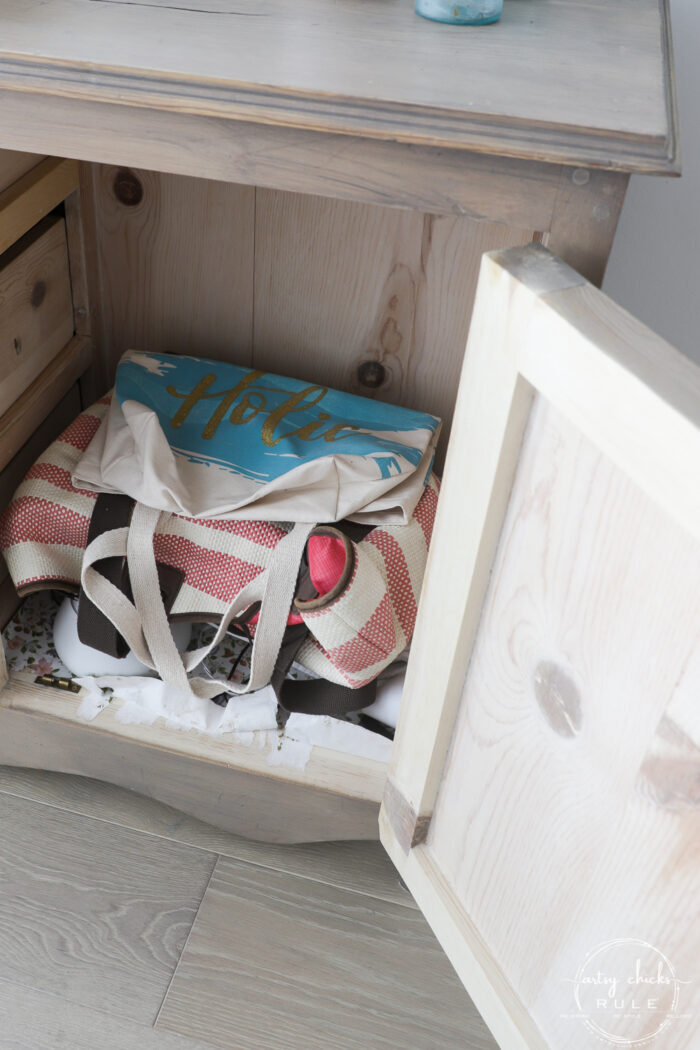
I did the entire outside and around the drawers and just the inside edges of the doors.
I’m not messing with the inside areas except to remove/replace that old paper lining on the bottom.
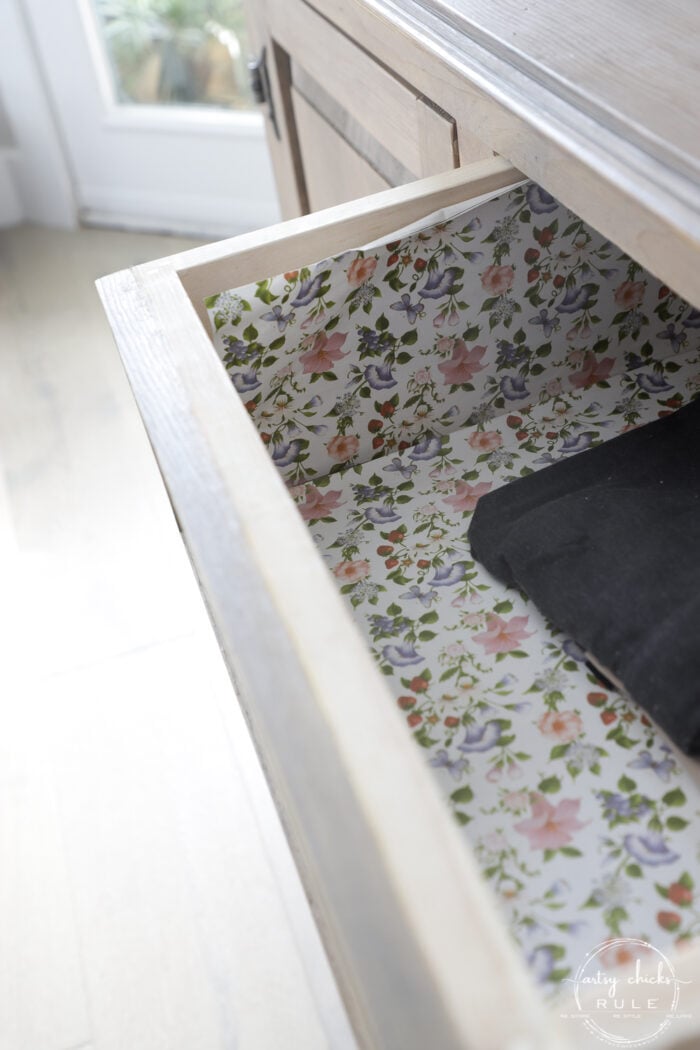
And inside the drawers…
Can you tell I am thrilled with how it turned out???
I don’t even mind those metal pulls on this one. I feel like they sort of go perfectly with this rustic-looking dresser now.
You can’t even see the yellow on the mirror anymore either. (it was on both sides, in the grooved areas)
I love it.
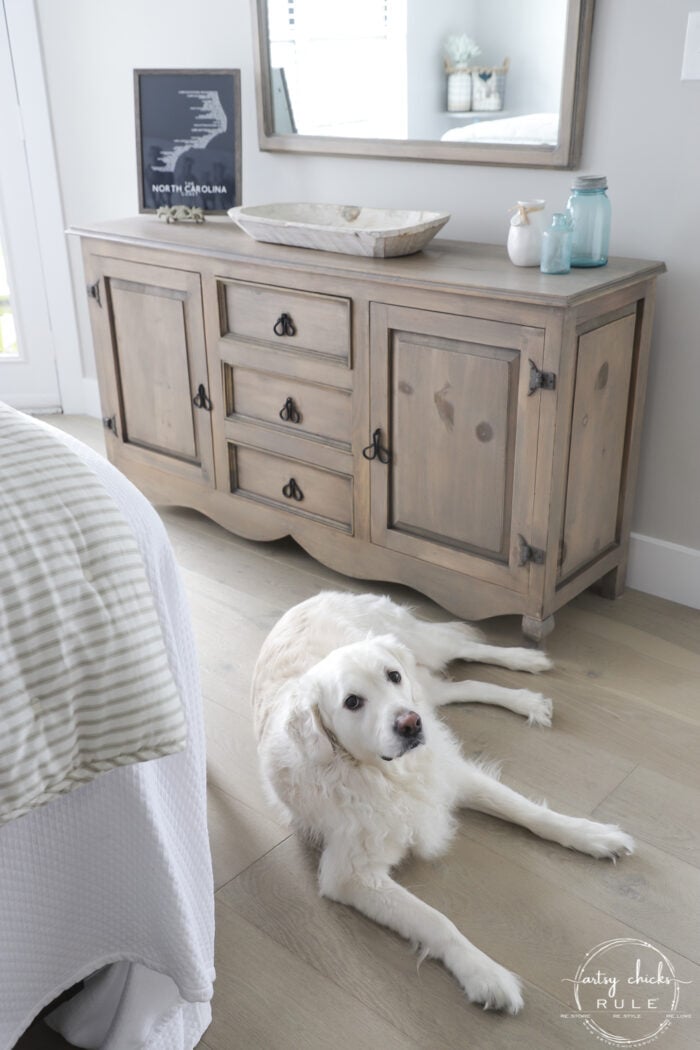
Do you want to know why Ryder is always in my photos?
Because he literally follows me from room to room.
So as I came into this room, he followed and before I could finish setting up my tripod, he had plopped down right here. hahaha
I said, “Ryder…watcha doing buddy”? lol
Cutie…felt bad making him move but I did want to get a few without him too.
Anyway, this oil that I used was one that I included in my latest giveaway even though I had not even used it yet.
And I can now attest to how awesome it is! I’ve now used it on two pieces, in two different ways and I love it on both. (wait till you see that one!)
By the way, since this is a “finishing” oil, I can leave it just like this and be DONE.
I haven’t decided if I want to add another topcoat or not just yet but I’ll keep y’all updated if I do!
Want to try the Driftwood Stain and Finishing oil on a project too? You can find it, here.
PIN it to save it!
This mirror got a fresh new look, simply! I’m sharing it next…
WOW! What a huge difference the driftwood makes. The dresser looks so different now. Perfect for your beach condo!! You make finishing the dresser look so easy. I will have to give this color a try! Thanks for sharing. BTW, I enjoy seeing Ryder in your pics.😊
Thanks, Sue! Yes, I think so too!! So happy with it! Hope you try it, I really love it! :) (and aw, thanks, he’s a sweetheart and the best companion) xo
The color is exactly like driftwood; I love it! So, you didn’t prep it with a little sanding? If there is a glaze on a piece would it be necessary to sand a little? This would be a great way to update cabinets it looks so much easier than painting. Ryder has such a beautiful coat and I can see his cute personality in your pictures.
Isn’t it fun?! I am loving it and can’t wait to use it again. No, for this one, no prep/sanding because it was basically “unfinished” wood. It soaked right in. Yes, I think for your best look, I would sand if there were a finish. BUT this does lay nicely on top of a finish too. So you could test it out and see what you think first. Thank you, Cecilia! He is my little cutie. xoxo
Love this project! I have a childhood bedroom suit that has that orange/yellow look to it and am looking for an easy redo. Did you sand your pieces first before you applied the driftwood stain? Thanks!
I didn’t (I edited the post about this) because mine was pretty much “unfinished” wood. It didn’t have a sealer/topcoat so the stain was able to sink in. That made the project truly simple. But, if you have a finished piece with a seal coat/poly, you can either go over top of that or sand to remove it. I am thinking you will get a similar look either way but keep in mind I have not yet used it over natural wood that has poly yet. (you can use this over paint, etc., as I did on the other piece I’m sharing next week) I would test it out on an inconspicuous area first to see what you think. :)
Wowzers! This is a redonkulously beautiful makeover! LOVE the finish! Saved the link to the product as well. Ah-MAZ-ing!!!
Aww, give gorgeous Ryder some lovins for me! Love that sweet face!! :)
That WAS easy, Nancy! Love when a simple solution looks good, too 😉 And bonus for getting the look you wanted instead of having to find new furniture to fit your design.
No, I didn’t (I edited the post about this) because mine was pretty much “unfinished” wood. It didn’t have a sealer/topcoat so the stain was able to sink in. But, if you have a finished piece with a seal coat/poly, you can either go over the top of that or sand to remove it. I am thinking you will get a similar look either way but keep in mind I have not yet used it over natural wood that has poly yet. (you can use this over paint, etc., as I did on the other piece I’m sharing next week) So if you have a piece with a poly coat on it, try it out on an inconspicuous place first to see if you would like it that way, or if you’d want to remove the finish instead. :)
What a beauty….both the dresser and Ryder. AAAhhh, we love that face. This product seems to be so easy to use, especially for us beginners. Hope you’re having beautiful weather to work. It inspires us when the sun is shinning and we’ve got projects to do. The piece is perfect for the condo. Get busy on making over the rest of the condo we’re looking forward to seeing it all completed with your all your beautiful projects in it.
Awe, thanks, Kathy! :) Yes, it was so easy to use. I really love it. We had amazing weather to work in…windows and doors OPEN! Yippee! Not sure that’s gonna be a repeat this weekend though. (calling for highs in the 40s instead of 60s..boo) I am so ready to be at the full-on “decorating” stage, I cannot even tell you!! lol xo
Don’t you love when a project takes minimal effort to make a huge improvement?! I always think things will be easy and then it’s a whole lotta “#@$%&*!”
Looks great, glad you found the right product to enhance it’s beauty.
This turned out so beautiful!
I am trying to get the nerve to redo my bedroom furniture. It is all mahogany.
I want to do it white or light. What do you suggest I use? Chalk paint?
Thank you for your inspiration.
Thank you, Bess! Yes, you can do it! It’s only paint, right? For mahogany, I would probably suggest applying a sealer so it won’t bleed through your pretty paint. Something like Shellac or with Shellac in it like Zinsser primers. Chalk paint or Fusion would be a good choice. Maybe get a sample of both and see which one you like working with better. :) Good luck and yes, do it! xo
Wow what a change! I have used the fashion driftwood on top of a set of end tables and I have to say it olds up very well without any kind of top coat. It’s been two years and they still look great! I actually used your technique on them to make it look like wood grain since they had a black smooth top to them.
Enjoy your new found product the color is amazing and perfect for your home!
Oh my! What a fantastic transformation. I’m not on IG and am looking forward to your post next week. After I see that, I’m placing my order and giving this a try! Did you do all the work inside the condo? No fumes? Not too runny? You are so talented!
Thanks, Deanna! I can not wait to share that one. It turned out so amazing and I’m telling you, it’s all due to that Driftwood topcoat! :) Stay tuned! Oh! And yes, it does have an odor but I found that it doesn’t last long at all, only while you are applying and then it seems to completely dissipate. I don’t like anything with a strong odor and this did not bother me at all. We even slept in the bedroom with the dresser the same night, no issues. (it is runny, yes, but that is a good thing with this particular type of product). xo
WOWSER!!!! Big diff. I like the handles, it gives it a casual beauty feel. OH!!!! so much better!!!
You the bomb!!!! ….nobody says that anymore!!!! I am bringing it back!!! hahahah……xoxo
Wow!!!!!! What a difference – I LOVE it! You’re right, the handles look like they were made for the driftwood color. Beautiful makeover for the beach condo for sure!!!!
Thanks so much, Wendy! It’s so funny how I don’t mind them at all on this one but didn’t really like them on the console I made over! I’m happy though because I do not want to try to remove them! lol xo
The driftwood stain is MAGIC!!!
Personally, I’m quite all right with Ryder being in EVERY photo. He’s a cutie! And besides, he’s totally a neutral color!! 💕💕🐾🐾😉
Isn’t it?? I think so too!! I REALLY thought so as I was using it the other day!lol Aw, thanks, that’s good because he finds his way into quite a few of them!! (and haha, he sure is) xo
Thank you, Tess! Oh, the transfer, I have a direct link to it in the post (it’s in the gray box, all the links are there to make it easy for you all to find the products :) ) Happy Spring to you too! xo
I love the way the driftwood stain transformed your dresser and mirror! It looks awesome! I’m going to try it on my bedroom set. But being mine is a newer darker stain on maple, I’m assuming it would need to be sanded heavily or stripped first then use the lighter stain. But I bet you are so thrilled with how everything is coming together and not having to buy brand new furniture and re-purpose what you have is a win win! Thanks for sharing your makeover with us and the product info. I’m definitely giving it a try!
Oh yay, I’m so happy to hear you are going to try it, Michele! You could try the stain out on an inconspicuous spot (if you can find one) to see how you like it over your finish. Otherwise, yes, you might have to sand if you want a different look. And yes, you’ve got that right! SO much better when you can makeover when you have instead of buy new!! Good luck with yours and have fun! xo
I love this project & want to try it! I will start with an old drawer set I have. I really want to try on my kitchen cabinets! They are orange-yellow oak. I considered bleaching but it would be too light – don’t want to paint cuz I love a wood effect – but this would be great;
If I used for the kitchen – would I need to seal or add anything on top?
Love your posts, your new shop & Ryder in the pics! Thanks
I LOVE it! I want to do my kitchen cabinets and this is exactly the color I’ve been searching Pinterest for. Right now my cabinets are Java gel stain over 80’s-90’s orange oak. Do you think this would be a good option?
Thanks, Jennifer! If your cabinets are stained dark, unfortunately you’d have to sand to remove that as this won’t cover that well. If you don’t want to do that, your best bet would be to clean them well, lightly sand (not sanding to remove the stain just roughing it up a bit), then painting white, cream, beige, etc. Then once that dried completely, go over it with the stain to give it that look. You can mimic the look of stained wood that way without stripping all the way down. Check out this post here because that is exactly what I did…paint then stain.Hope that helps you! :)
Want to be inspired, learn new skills, discover all the tricks to furniture makeovers, creating new out of the old and more? You'll also receive my FREE ebook "Creating Fabulous Finishes" PLUS access to my private Printables Resource Library, too!
Sign up to get the Weekly Newsletter! Our emails include an unsubscribe link and you may opt-out at any time. Your information will *never* be shared or sold to a 3rd party.


")
")


")


WOW! What a huge difference the driftwood makes. The dresser looks so different now. Perfect for your beach condo!! You make finishing the dresser look so easy. I will have to give this color a try! Thanks for sharing. BTW, I enjoy seeing Ryder in your pics.😊
Thanks, Sue! Yes, I think so too!! So happy with it! Hope you try it, I really love it! :) (and aw, thanks, he’s a sweetheart and the best companion) xo
Wow, that looks fantastic. I just ordered some to try on a few things that have that yellowish pine. I can’t wait to try it!
Great!! I think you will love it too! And thank you, Suzanne! xo
Hey Nancy, what type of wood was this?? It looks amazing!!
Hi Nikki! I think it is probably pine. And thank you!
The color is exactly like driftwood; I love it! So, you didn’t prep it with a little sanding? If there is a glaze on a piece would it be necessary to sand a little? This would be a great way to update cabinets it looks so much easier than painting. Ryder has such a beautiful coat and I can see his cute personality in your pictures.
Isn’t it fun?! I am loving it and can’t wait to use it again. No, for this one, no prep/sanding because it was basically “unfinished” wood. It soaked right in. Yes, I think for your best look, I would sand if there were a finish. BUT this does lay nicely on top of a finish too. So you could test it out and see what you think first. Thank you, Cecilia! He is my little cutie. xoxo
It looks so great! I love seeing Ryder too – a great finishing touch! I can’t wait to try this.
Thank you, Denise! :) xo
Love this project! I have a childhood bedroom suit that has that orange/yellow look to it and am looking for an easy redo. Did you sand your pieces first before you applied the driftwood stain? Thanks!
I didn’t (I edited the post about this) because mine was pretty much “unfinished” wood. It didn’t have a sealer/topcoat so the stain was able to sink in. That made the project truly simple. But, if you have a finished piece with a seal coat/poly, you can either go over top of that or sand to remove it. I am thinking you will get a similar look either way but keep in mind I have not yet used it over natural wood that has poly yet. (you can use this over paint, etc., as I did on the other piece I’m sharing next week) I would test it out on an inconspicuous area first to see what you think. :)
Wowzers! This is a redonkulously beautiful makeover! LOVE the finish! Saved the link to the product as well. Ah-MAZ-ing!!!
Aww, give gorgeous Ryder some lovins for me! Love that sweet face!! :)
Thanks so much, Christina! :D I am so happy with it!! And yes, you know I will!! He sure does get lots of love from all of y’all! xoxo
That WAS easy, Nancy! Love when a simple solution looks good, too 😉 And bonus for getting the look you wanted instead of having to find new furniture to fit your design.
It really was, Marcie! One of the quickest I’ve done. Gotta love that! lol And yes, 100% absolutely right about that!! xoxo
No, sanding ?? You just rub in the stain ??
No, I didn’t (I edited the post about this) because mine was pretty much “unfinished” wood. It didn’t have a sealer/topcoat so the stain was able to sink in. But, if you have a finished piece with a seal coat/poly, you can either go over the top of that or sand to remove it. I am thinking you will get a similar look either way but keep in mind I have not yet used it over natural wood that has poly yet. (you can use this over paint, etc., as I did on the other piece I’m sharing next week) So if you have a piece with a poly coat on it, try it out on an inconspicuous place first to see if you would like it that way, or if you’d want to remove the finish instead. :)
What a beauty….both the dresser and Ryder. AAAhhh, we love that face. This product seems to be so easy to use, especially for us beginners. Hope you’re having beautiful weather to work. It inspires us when the sun is shinning and we’ve got projects to do. The piece is perfect for the condo. Get busy on making over the rest of the condo we’re looking forward to seeing it all completed with your all your beautiful projects in it.
Awe, thanks, Kathy! :) Yes, it was so easy to use. I really love it. We had amazing weather to work in…windows and doors OPEN! Yippee! Not sure that’s gonna be a repeat this weekend though. (calling for highs in the 40s instead of 60s..boo) I am so ready to be at the full-on “decorating” stage, I cannot even tell you!! lol xo
Don’t you love when a project takes minimal effort to make a huge improvement?! I always think things will be easy and then it’s a whole lotta “#@$%&*!”
Looks great, glad you found the right product to enhance it’s beauty.
Yes, 100%, I do! And haha, you and me both! So it’s even sweeter when they do turn out that way. :) xo
This turned out so beautiful!
I am trying to get the nerve to redo my bedroom furniture. It is all mahogany.
I want to do it white or light. What do you suggest I use? Chalk paint?
Thank you for your inspiration.
Thank you, Bess! Yes, you can do it! It’s only paint, right? For mahogany, I would probably suggest applying a sealer so it won’t bleed through your pretty paint. Something like Shellac or with Shellac in it like Zinsser primers. Chalk paint or Fusion would be a good choice. Maybe get a sample of both and see which one you like working with better. :) Good luck and yes, do it! xo
Thank you for letting me know about using shellac first. Great help! I will let you know when I accomplish this huge task!!
You are very welcome, Bess! Yes, do! :) xo
Wow what a change! I have used the fashion driftwood on top of a set of end tables and I have to say it olds up very well without any kind of top coat. It’s been two years and they still look great! I actually used your technique on them to make it look like wood grain since they had a black smooth top to them.
Enjoy your new found product the color is amazing and perfect for your home!
That’s great to hear, Vicki! Thank you!! And also, that is awesome, I love that we can make things look like wood with paint, don’t you? :) xoxo
Oh my! What a fantastic transformation. I’m not on IG and am looking forward to your post next week. After I see that, I’m placing my order and giving this a try! Did you do all the work inside the condo? No fumes? Not too runny? You are so talented!
Thanks, Deanna! I can not wait to share that one. It turned out so amazing and I’m telling you, it’s all due to that Driftwood topcoat! :) Stay tuned! Oh! And yes, it does have an odor but I found that it doesn’t last long at all, only while you are applying and then it seems to completely dissipate. I don’t like anything with a strong odor and this did not bother me at all. We even slept in the bedroom with the dresser the same night, no issues. (it is runny, yes, but that is a good thing with this particular type of product). xo
The new look is great. It would go into any decor!
Thank you, Rose! It’s so much fun to find a new product like this! :) xo
I love it. Such a gorgeous finish. Pinned!
Thank you, Lizzy!! I’m so thrilled with it and can’t wait to use it more. Oh and thanks for the pin too!! :) xo
WOWSER!!!! Big diff. I like the handles, it gives it a casual beauty feel. OH!!!! so much better!!!
You the bomb!!!! ….nobody says that anymore!!!! I am bringing it back!!! hahahah……xoxo
Yes, don’t they work on this one?? I’m totally okay with them on here! And haha, thank you for bringing that back for me!! lol xoxo
Wow!!!!!! What a difference – I LOVE it! You’re right, the handles look like they were made for the driftwood color. Beautiful makeover for the beach condo for sure!!!!
Wendy :)
Thanks so much, Wendy! It’s so funny how I don’t mind them at all on this one but didn’t really like them on the console I made over! I’m happy though because I do not want to try to remove them! lol xo
OMG- that is exactly the look I have been looking for. What a great job and a wonderful project. Thank you.
Oh perfect!! You will love it! Thanks, Renee!! xo
Oh my gosh – it looks amazing. WOW!
I love it was easy too, for a change, huh???? Love it – and really like those unique pulls, glad you kept.
Ryder is a rock star cutie.
Thanks, Michele! :) Oh my gosh, you know it!! Easy is so nice! lol And thank you…he’s the star of the show! xo
The driftwood stain is MAGIC!!!
Personally, I’m quite all right with Ryder being in EVERY photo. He’s a cutie! And besides, he’s totally a neutral color!! 💕💕🐾🐾😉
Isn’t it?? I think so too!! I REALLY thought so as I was using it the other day!lol Aw, thanks, that’s good because he finds his way into quite a few of them!! (and haha, he sure is) xo
Awesome! Love this project.
Thanks so much, Kathleen!! :) xo
It looks like a Restoration Hardware piece now! And I think the hardware is perfect for it!
Aw, thanks so much, Julie! xoxo
Absolutely love the new stain on the dresser and mirror! Where did you get the transfer for the tray? I love trays! Happy Spring!🐣
Thank you, Tess! Oh, the transfer, I have a direct link to it in the post (it’s in the gray box, all the links are there to make it easy for you all to find the products :) ) Happy Spring to you too! xo
I love the way the driftwood stain transformed your dresser and mirror! It looks awesome! I’m going to try it on my bedroom set. But being mine is a newer darker stain on maple, I’m assuming it would need to be sanded heavily or stripped first then use the lighter stain. But I bet you are so thrilled with how everything is coming together and not having to buy brand new furniture and re-purpose what you have is a win win! Thanks for sharing your makeover with us and the product info. I’m definitely giving it a try!
Oh yay, I’m so happy to hear you are going to try it, Michele! You could try the stain out on an inconspicuous spot (if you can find one) to see how you like it over your finish. Otherwise, yes, you might have to sand if you want a different look. And yes, you’ve got that right! SO much better when you can makeover when you have instead of buy new!! Good luck with yours and have fun! xo
Hello! Beautiful work! Do you mind sharing the name of the product that you used? The link isn’t working because it says unavailable on amazon?
Oh yes, it’s Driftwood Stain and Finishing Oil by Fusion. And thank you!
Hi! You can ignore my question. I was looking for the driftwood in paint, not stain.
I love this project & want to try it! I will start with an old drawer set I have. I really want to try on my kitchen cabinets! They are orange-yellow oak. I considered bleaching but it would be too light – don’t want to paint cuz I love a wood effect – but this would be great;
If I used for the kitchen – would I need to seal or add anything on top?
Love your posts, your new shop & Ryder in the pics! Thanks
Hi Marty! No, you don’t but you can for extra protection xo
Your dresser came out so good! Love the driftwood color :)
Thank you, Katie! xo
I LOVE it! I want to do my kitchen cabinets and this is exactly the color I’ve been searching Pinterest for. Right now my cabinets are Java gel stain over 80’s-90’s orange oak. Do you think this would be a good option?
Thanks, Jennifer! If your cabinets are stained dark, unfortunately you’d have to sand to remove that as this won’t cover that well. If you don’t want to do that, your best bet would be to clean them well, lightly sand (not sanding to remove the stain just roughing it up a bit), then painting white, cream, beige, etc. Then once that dried completely, go over it with the stain to give it that look. You can mimic the look of stained wood that way without stripping all the way down. Check out this post here because that is exactly what I did…paint then stain.Hope that helps you! :)