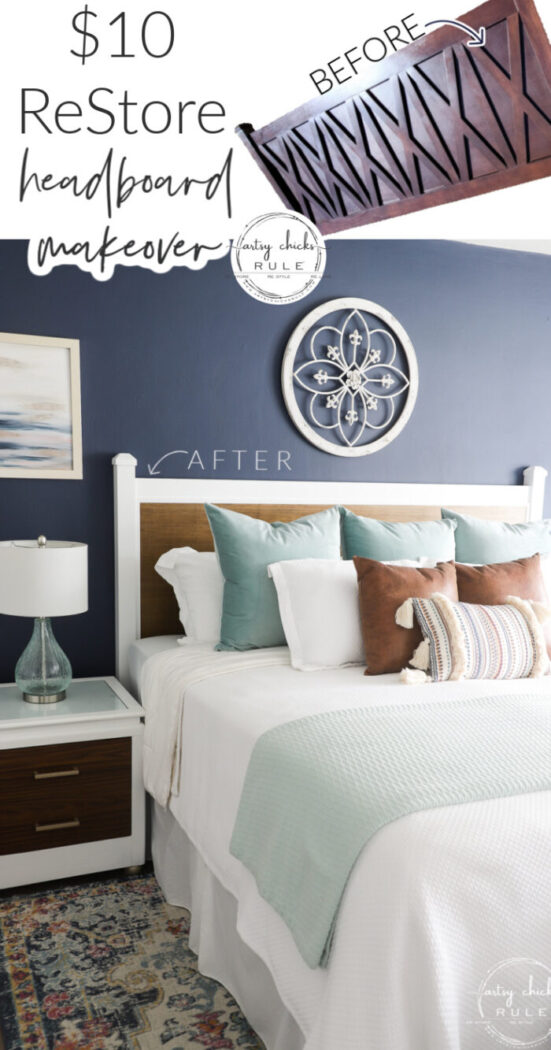
$10 ReStore Headboard Makeover
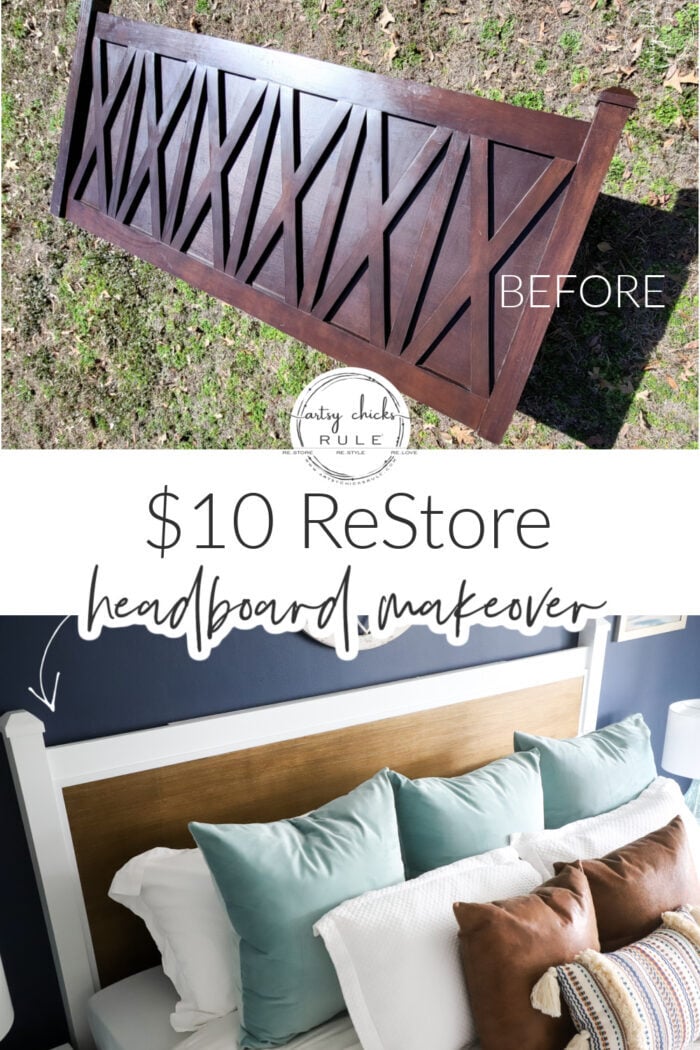
Plywood and paint…totally transform this $10 ReStore find! This headboard makeover was simple to do too!

Hello beautiful friends!
Did you love the DIY wall treatments I shared on Tuesday?? SO many amazing ones! I am hankering for a pretty wall treatment now.
And I might just do one at the beach. We’ll see. ;)
But guess what? Did you catch my sneak peek over on my Instagram stories yesterday?
I finished the headboard makeover!! Woohoo! Finally.
We are almost finished with the master bedroom redo. The only thing left (for the most part) is putting new doors (decorative) over the drawers on the IKEA PAX that we built for the mister.
We haven’t ordered them yet because…well, I’ll tell you soon. I know, that’s not nice, haha, but that’s all I’m gonna tell you for now. ;)
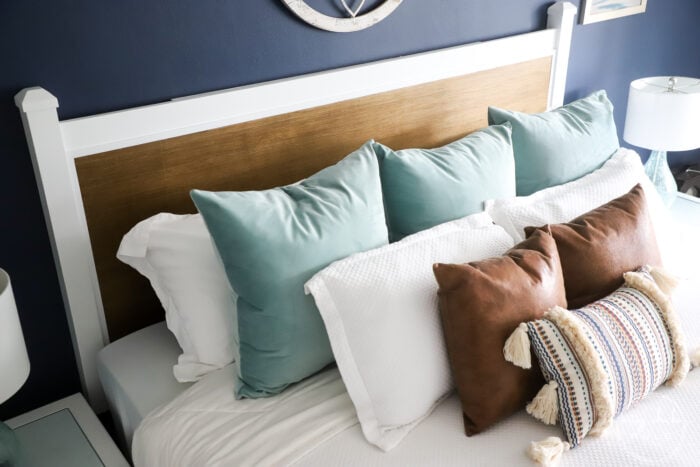
But I am gonna share this pretty headboard that I got for TEN dollars at the ReStore a while back. I mean for real…ten bucks, solid wood. What?!
I bought two, one for here and one for the beach. And since it is lovely solid wood, I am going to remove the dark finish on the second one and do something completely different than what I did on this one. Stay tuned, I’m working on that one next.
Oh! And I have 3 winners for my March giveaway and will be emailing them today so keep an eye for an email from me! It could be YOU! :)
$10 ReStore Headboard Makeover
Here’s how it started…

Eh.
But ten dollars for a heavy, solid wood headboard, well, absolutely!
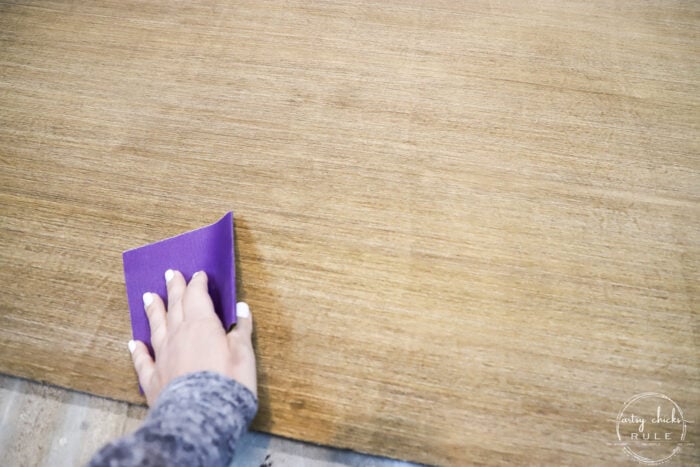
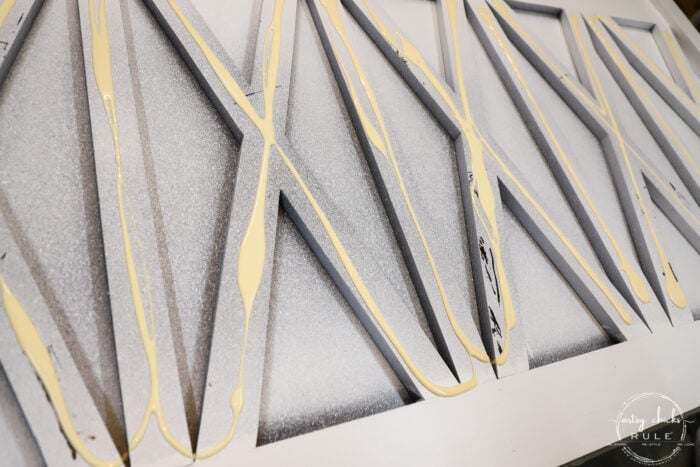
I cleaned it up and lightly sanded it by hand to remove the shine and get it ready for paint. (I didn’t sand or try to paint the x’s because I’m covering that part)
And since I was already painting trim (for the beach, we decided to spray and take it back to the beach from here….instead of painting crown on a ladder) I went ahead and painted this headboard with the same paint. (which is Sherwin Williams, Urethane Trim Enamel)
I sprayed them all with my HomeRight paint sprayer. (linked below)
Once it was done and dry, we brought it into the garage for me to finish the makeover.
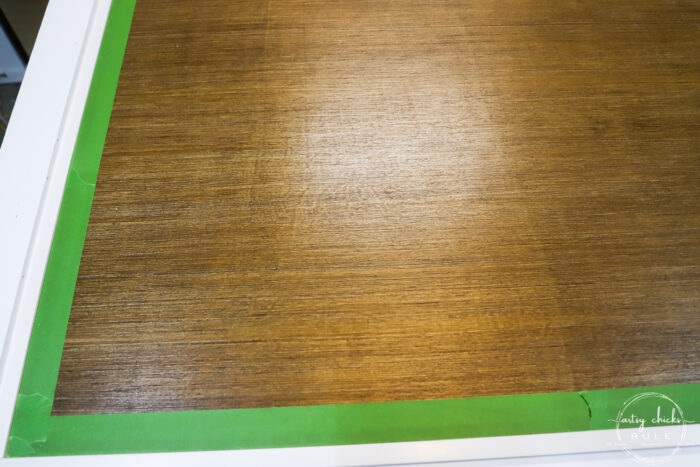
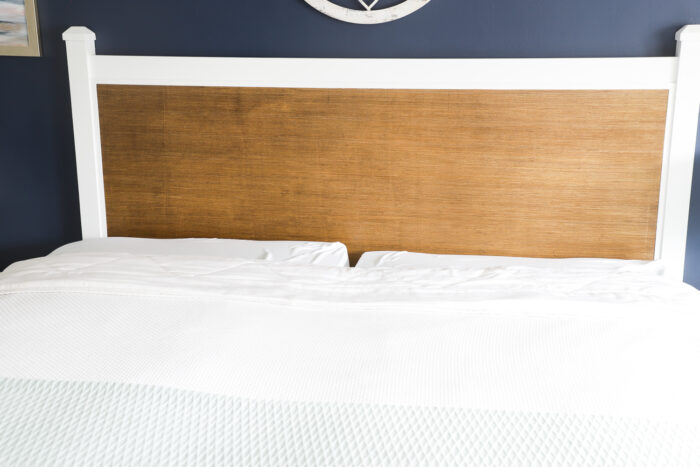
I found this thin plywood and loved it! I love the way the wood looked, sort of lined.
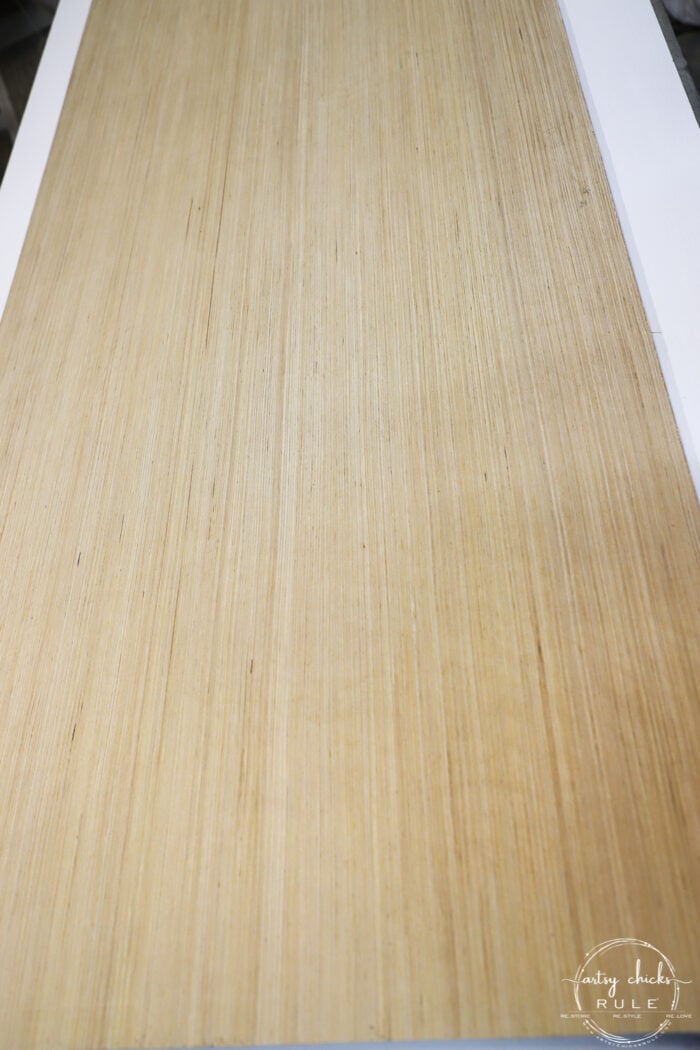
And I should say here, that my $10 headboard did end up costing more because I bought a $25 board (still have pieces leftover for other projects though) and a few pieces of trim. I’m still coming in around $45 so that’s pretty cheap!
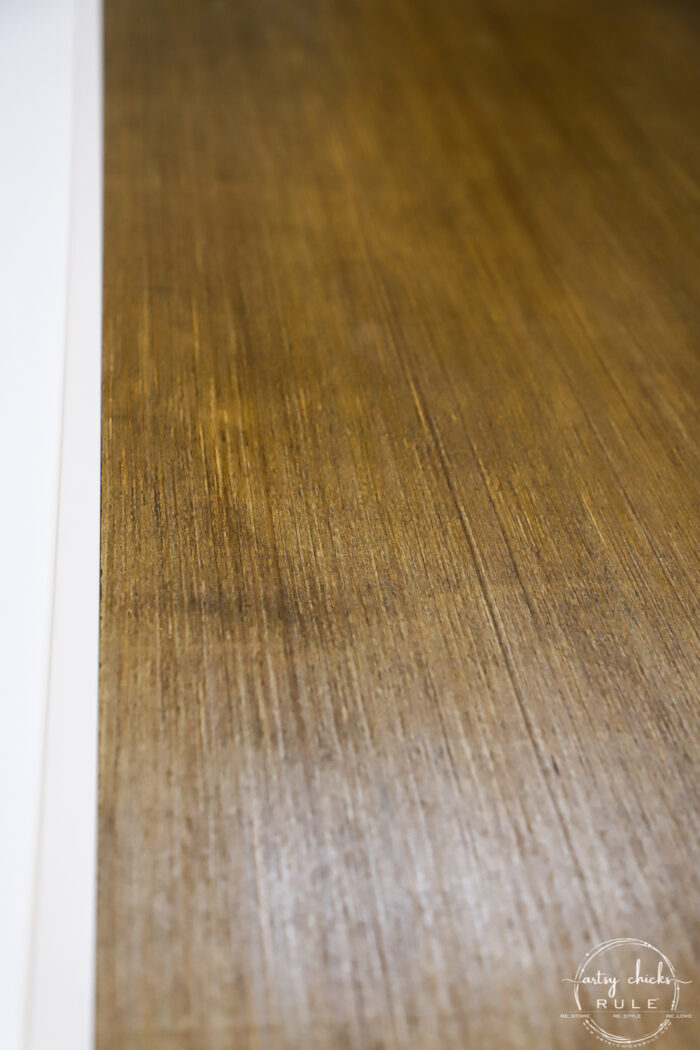
I lightly sanded it (it was already smooth but wanted to go over it) and then applied this pre-stain.
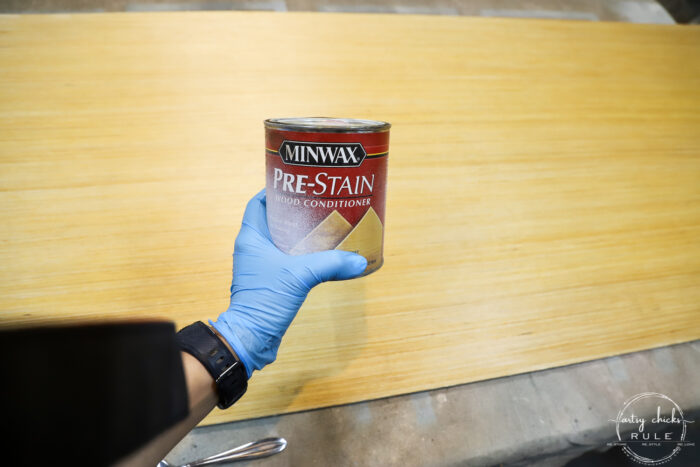
I ended up mixing 2 colors together to get the shade I wanted (all linked below). AND I also ended up using Polyshades.
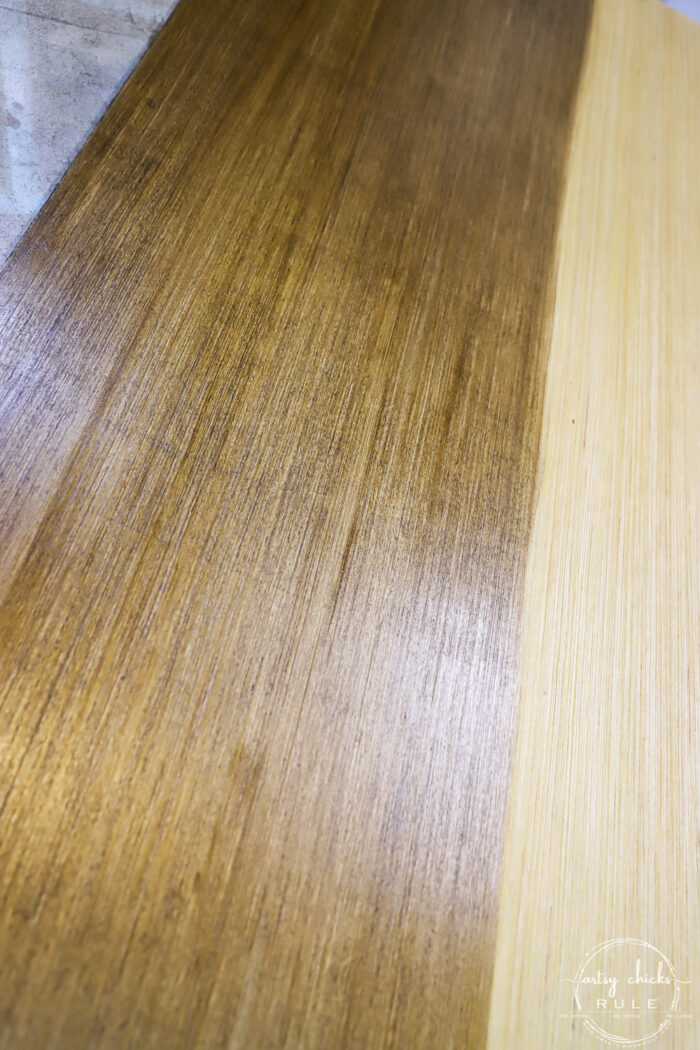
I hadn’t planned to but the regular stain I was planning to use was too dark.
But the Polyshades ended up doing the job well.
MATERIALS SOURCE LIST
- Plywood
- White Trim Strips
- Minwax Pre-Stain Wood Conditioner
- Sherwin Williams Urethane Trim Enamel
- Paint Sprayer
- Wood Glue
- Minwax Quick Dry Poly
- Espresso Polyshades
- Antique Walnut Polyshades
So, not ideal but it worked out just fine. Hey, I have to use what I have on hand right? I’ve already got a garage full of products.
I mixed these two (the espresso and antique walnut) about half and half. (I didn’t measure because I wasn’t sure I was going to even love it…then I did)
And it was the perfect shade.
Now, remember, Polyshades is stain and poly in one. So technically there is no need for poly topcoat.
However, I didn’t apply this like I normally would apply Polyshades, I used a chip brush and didn’t apply a lot.
Once it was dry, I lightly sanded it with 220 grit sandpaper to remove the raised grain and put one coat of the Minwax fast-drying poly. (in Satin)
I actually need to do one more coat but I went ahead and put it together and up on the wall so I could share it today.

I will just put the final coat of poly on while it’s up. No biggie!
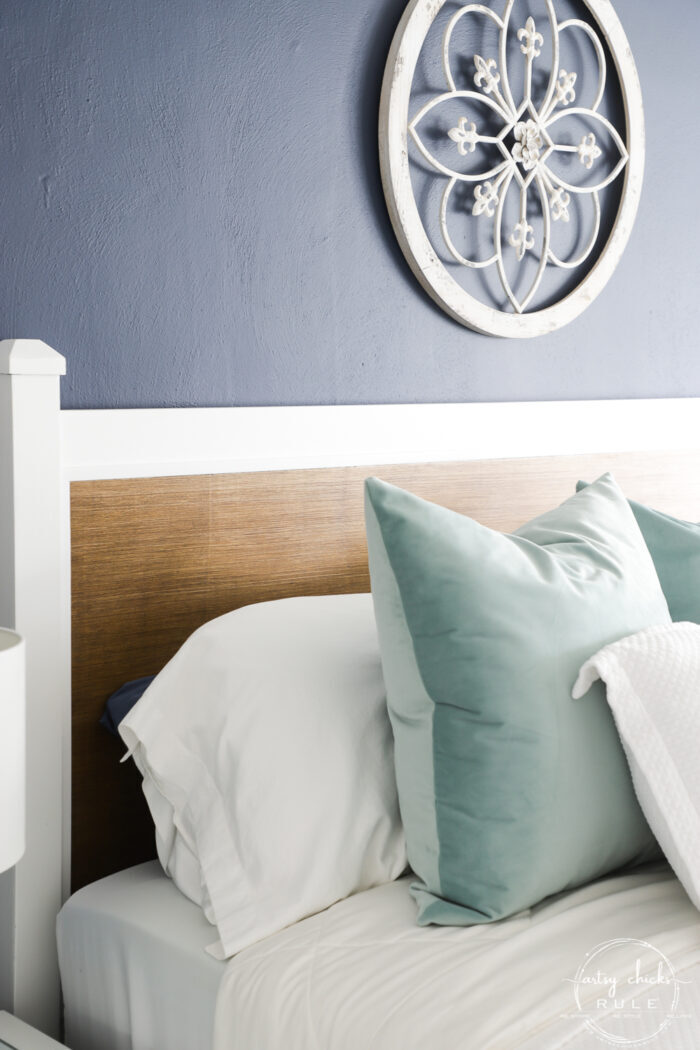
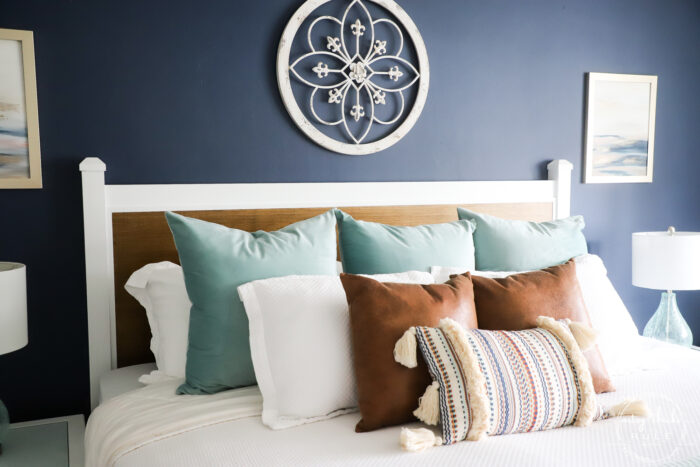
I love how the stain/color turned out. And isn’t it amazing how it really comes to life with the poly?
Once it was dry, I glued it to the headboard with the wood glue.
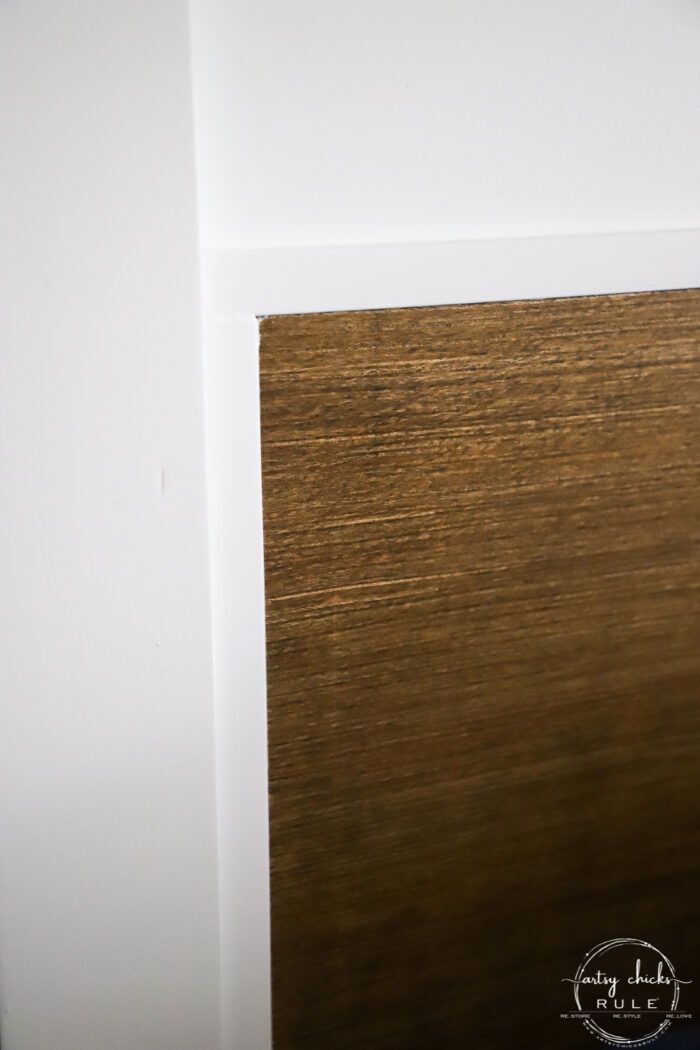
I let it sit overnight (clamped and weighted) and then glued the small wood trim pieces the next day…
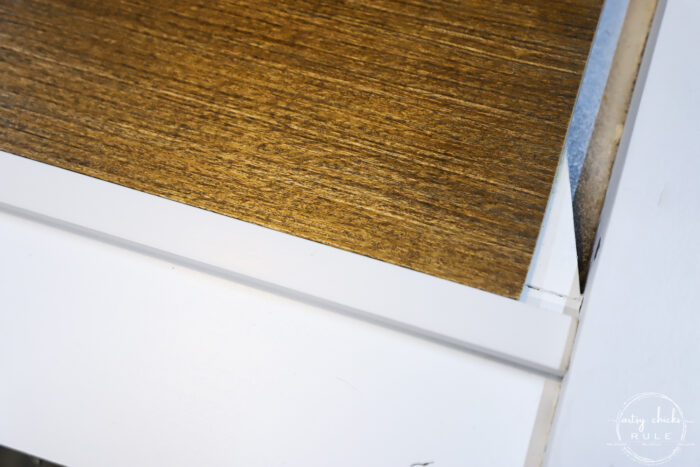
They just go all the way around to create a finished edge.
Once that was dry, I taped up my wood panel and gave everything one more coat of white paint. (the small trim pieces are white but weren’t painted and didn’t match)
And that’s it! Done! (well, except for the second coat of poly I still need to give it)
I’m so happy with how it turned out.
OH! And here is how we hung it.
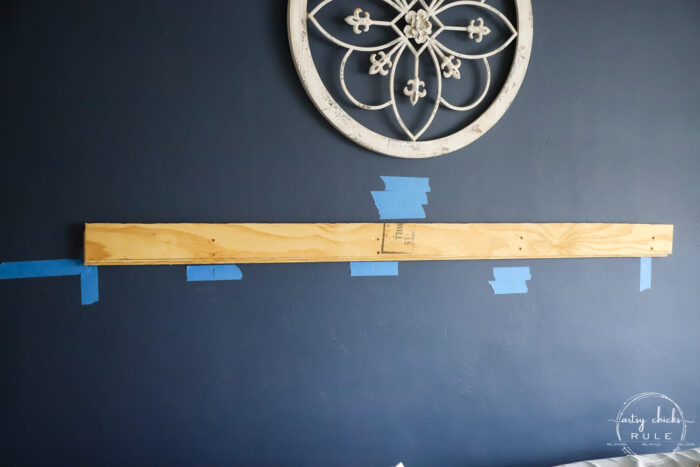
It already had a French cleat type of thing on the back of the headboard so we put one up on the wall in our room.
The tape was just there to mark where the studs are and center, etc.
Easiest way to hang a headboard…or something heavy like this.
Up close of that wood grain.
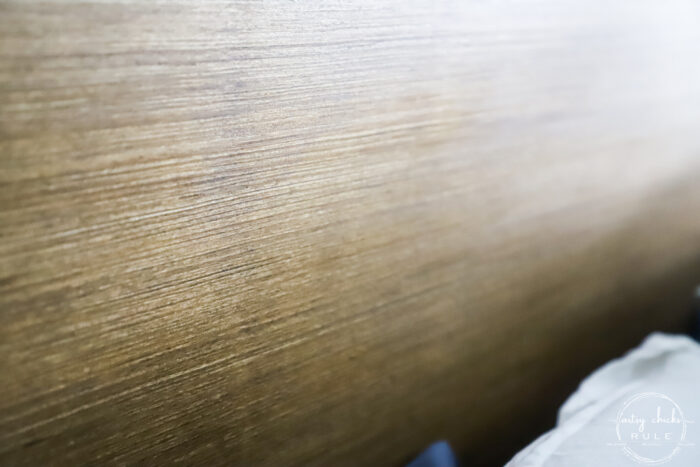
So cool, it almost has a grasscloth look.
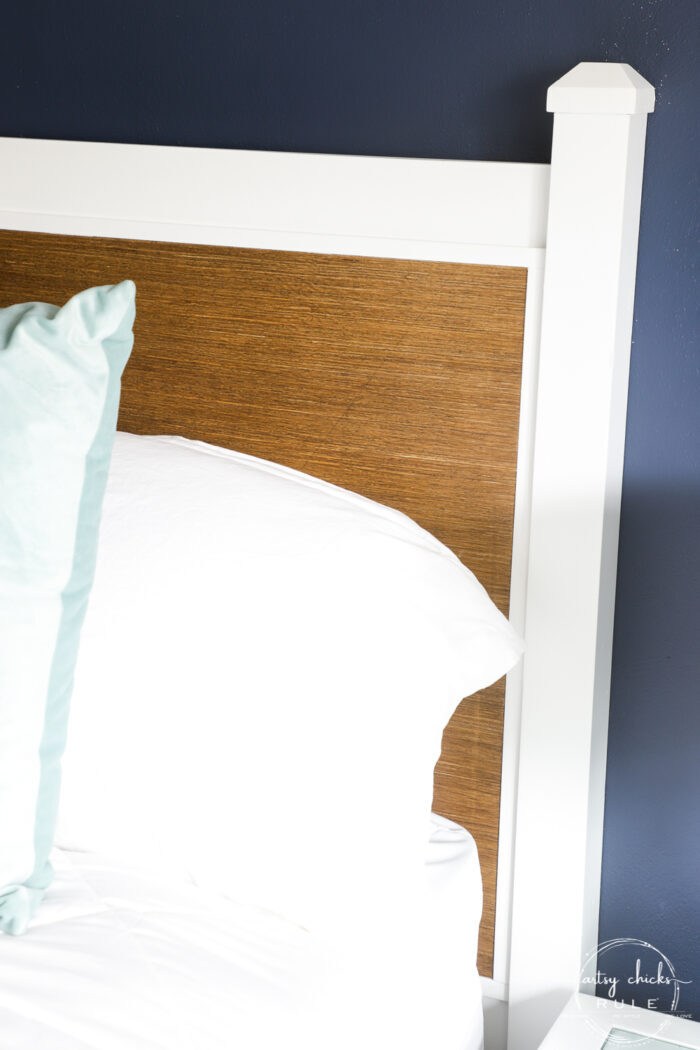
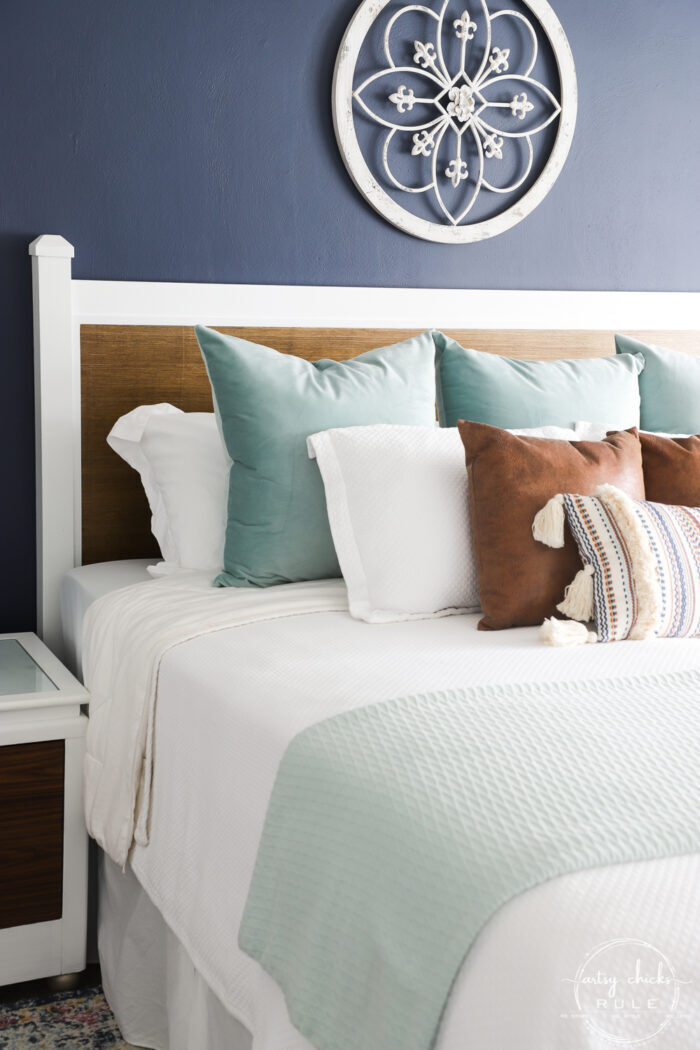
And one without the pillows in the way.
Not bad for a $10 ReStore find, huh?
Oh, and I am moving the two abstract paintings I made down a little to hang two small decorative things I found over top.
I’ll share that when I reveal the room makeover.
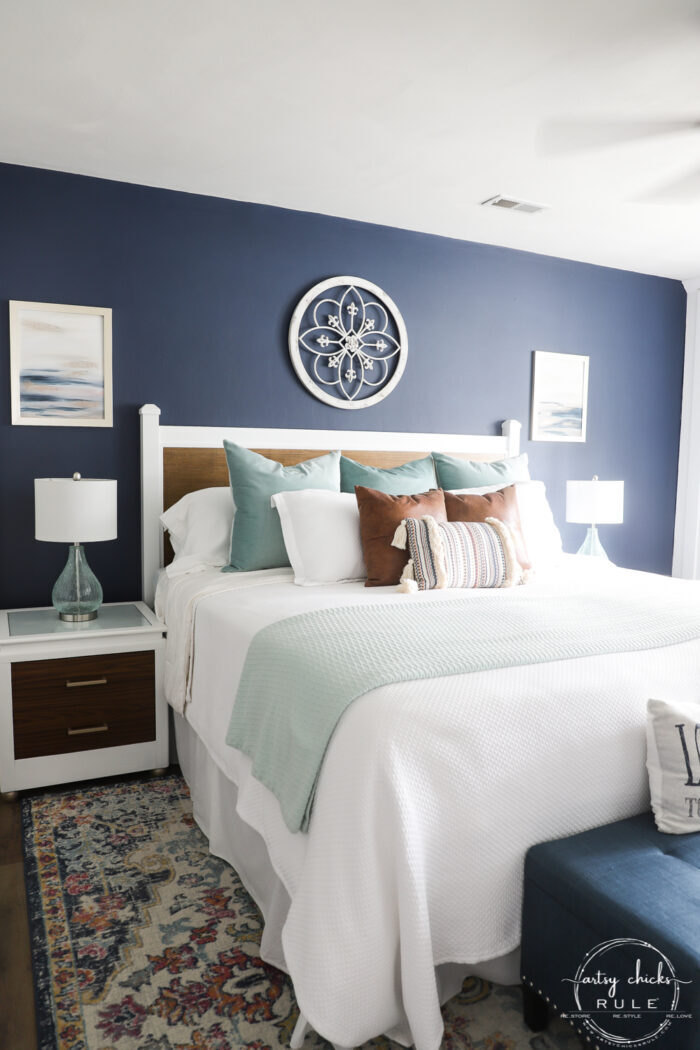
So happy to mark this one off the list!
PIN it to save it!
I haven’t hit up our ReStore lately, might have to make a run this weekend to see what I can find. If I do, I’ll share it on my Instagram stories.
Maybe we can find some new goodies to play with!
And it’s getting to be yard sale time too…fun, fun.
I did a little bleaching of the wood on this next one coming up…
UPDATE!! See it now, here!
Have a wonderful weekend, friends!
xoxo


")
")

")
")


Nancy, this is a brilliant makeover!! It DOES have a grass cloth look to it!! A deal turned into a diamond. Way to go! Have a great rest of this week and weekend.
Yes, it sure did, Christina! :) Thank you! xoxo
Nancy, You sure have an eye for decor. The way you refurbish the pieces you find are all amazing. This piece was a diamond in the ruff, and you sure made a Diamond. This would be lovely in anyone’s home. The insert looks like grass, and the color would just about go with any color scheme out there.Thank you for showing your work.
Hi Donnita!
Thank you so much! So kind of you to say. :) And I had never thought of it looking like grass but I can totally see that! Love that perspective. xo
This turned out beautiful! Quite the vision!
Thank you, Susan! xo
Amazing! I thought it was grass cloth! I am not familiar with hanging heavy things like you did; great to know! Did you just screw the board in the wall studs and hang the headboard on it or attach it some way? The beach house is looking fabulous!
Isn’t it funny how much it looks like that? And yes, that is the best way to do it! So glad it had that type of hanging on the back already. And yes, my husband found the studs in the wall and screwed in there. Once that is secure you simply hand this on it. The two sides are angled so they “fit” into each other. Thanks so much, Cecilia, getting there! xoxo
Very cool! LOVE the “grasscloth” look! Light & fresh overall. :)
Thanks so much, Ann! It is fun! So happy it’s all almost done! xo
Nancy, good choice buying an upgraded piece of plywood, no knots and looks great!
we are trying to hang the back of a church pew with a French cleat, but because of the curve we are not finding it easy! but we’ll persist and get our headboard up sooner OR later!
I still like your side tables and now they look even more connected to the room!
Thanks, Gwen! Oh no! That’s a bummer, I hope you can get it worked out! xo
Wow – you did a great job on that headboard. What a great find – It really fits nicely with the side tables – you obviously had that in your head already. Looks very nice all put together! I wish our thrift stores and Restores had the same kind of stuff as yours do. You wouldn’t believe the stuff ours has and not in a good way.
Enjoy your weekend!
Thank you, Vicki! Yes, I wanted it to match without (hopefully) being too matchy-matchy, if that makes sense. Oh that’s a shame! Ours has definitely grown. It was in a much smaller space years ago and now it’s in a huge space. So maybe there is hope for yours! xoxo
Clever you! I love, love what you did with the headboard. The wood panel and the stain give the headboard an entirely different look. I love the two colors together. The white makes the headboard pop against your dark blue wall, and the wood shade you used is a perfect counter to the stark white! Stunning! Thanks for sharing. You have given me lots of inspiration for redoing some of my “ancient” older headboards that are short and have open fretwork! Have a wonderful weekend.
Aw, thanks Sue! I’m really happy with how it turned out. :) I’m so happy you are inspired!! Have a wonderful week! xoxo
So surprised at what you did. I didn’t expect this covering at all. Love it. I was thinking you were going to highlight those cool X’s and do a 2 tone on it, but you killed it by covering it.
Great job.
Yes, I knew the moment I saw them that I would cover it in some way. (don’t hate it though, just not the style I was going for) Thank you, Kris! Can’t wait to get started on the second one now. :) xoxo
You have 2 of them? wow. I think it could be cool to somehow leave the center X and highlight it…..just thought.
Kris
Yep! I bought 2 since I also needed one for the beach house. I’ve considered doing that but I think I have something else in mind for this one! :)
Oh my goodness, the transformation is stunning! You hit it out of the park. I wasn’t sure I was going to like the 2 tone of white and wood; but I love it!
Aw, thank you so much, Melva! :) xoxo
I love your combination of being creative and frugal. It turned out fantastic!
Thank you, Teri! :) xo
WOW!!!! Boy does that tie your redone room in perfectly.
I find it fascinating how you transform pieces. Well done, Nancy.
Yes, I was hoping for matching, but not matchy-matchy, lol. Hopefully, I achieved that! ;) Thank you, Michele! xo
I definitely would have walked past that one, Nancy. But really, you would have paid more than $10 for the wood pieces to make the frame. The top reminds me of a picket fence and the contrast with the plywood is excellent. Nice job!
Yes, not too exciting before. And you are so right there. They are solid wood and I’m taking it down to the natural wood for the second one. (I think…always subject to change haha) Thanks, Marcie! xo
Wow you have such great ideas I would never think of. This is beautiful and perfect for your bed and room.
Aw, thanks so much, Debra! :) xo
Your bed headboard looks fabulous. Yes, it does have that grass cloth look. However, I loved the XXXXXX on the headboard too. Thanks for sharing your beautiful fine. They would have also been gorgeous hanging sliding doors.
Thanks so much, Ivory! Yes! I didn’t really dislike the x’s, they just weren’t what I was going for in here. :) And oh my gosh, yes, that is brilliant! They sure would’ve been! xoxo
The entire room has such a fine « put-together » look; the rug, the bed, the pillows, the side tables, the walls. It’s just great!
Thank you so much! :) xo
Great job! It really turned out nice!
Thank you, Vicki! xo
😍Looks great – the plywood really does look like fabric.
I never pass a cheap good solid wood headboard, especially if it has a decorative edge. They can be covered with padding and fabric, or I paint with chalkboard paint for a novel chalkboard or they make a great base for signage. Just wish we in the UK had all the fantastic products you use in the states.
Oh yes, fabric would’ve been a fun change up too! Signs are fun out of headboards too…lots of great ideas, Cally! And what a bummer you guys don’t have access to all that we do, that’s a shame! Sorry to hear that. xo
Would have liked it better just painted. It had a nice, interesting pattern as is.
Yes, it did have a unique look that was not bad at all. I really didn’t hate it…it just wasn’t the look I was personally going for. :)