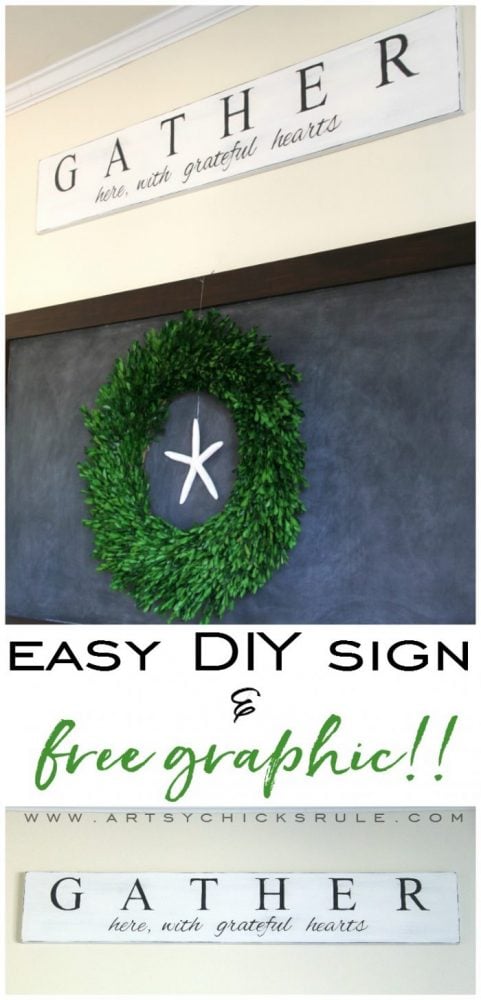
How great to have a sign to welcome and ask friends and family to gather in your home. See how to create this simple to make, DIY farmhouse gather sign for your own home below.
Hello Friends! Happy Valentine’s Day! :)
It’s also “Trash to Treasure Transformation” Tuesday and my friends and I are sharing our new treasures with you today.
I had a sweet little dresser I found at the Restore that I had planned to share today but I didn’t finish in time.
I will share it soon though!
So I switched gears real quick and created a brand new DIY Farmhouse Gather Sign out of an old scrap of leftover wood we had in the garage….
….on Sunday afternoon! ;)
Yep, so if you think these signs are hard to do, or think they are something you can’t do, you can. If you have a printer and some paint, you can do it. Or, even if you don’t have a printer, you can have it printed at Office Max or somewhere similar….and then come home and do it.
Let me show you. :)
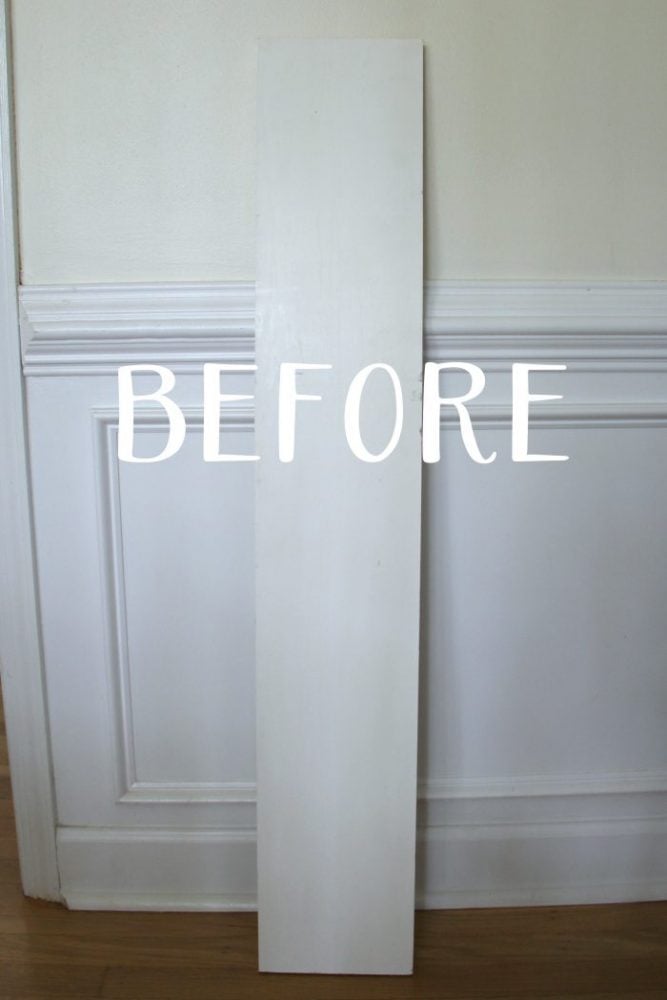
I found that old, white pre-primed board in the garage from some leftover project.
It was essentially “trash” but we never throw anything out! ;)
That is sometimes a good thing and sometimes a bad thing. haha
But in this case, it was a good thing. ;)
AND it was the PERFECT size! Yay, I absolutely love when that happens. I love easy.
That’s why I love making signs…because they really are easy.
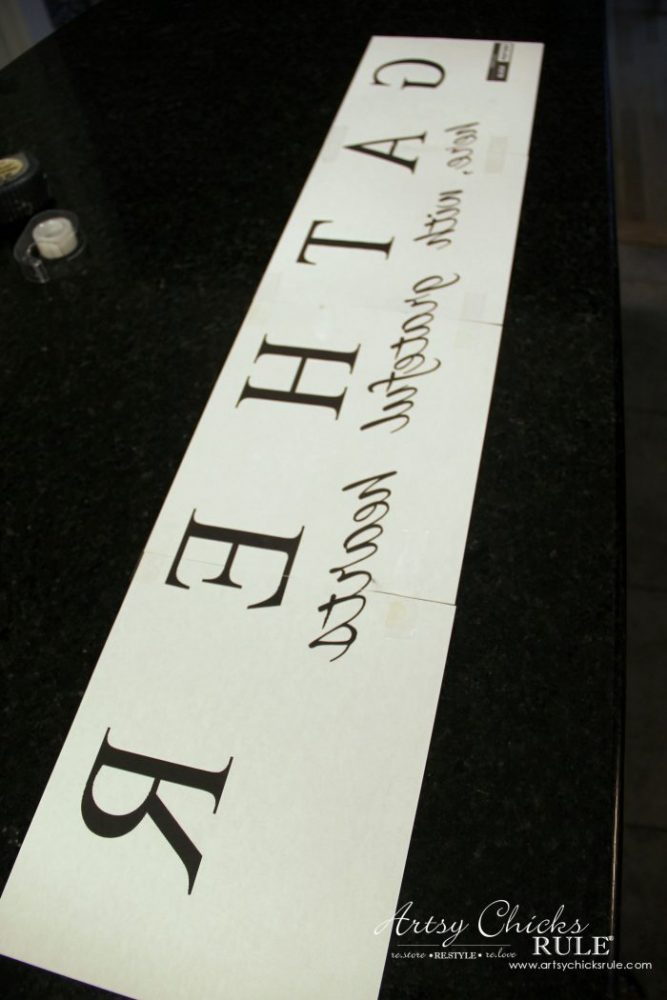
I measured it and then created the graphic to fit.
Which was this…..
I had originally thought I’d just do the word “GATHER” in large, spaced letters.
But decided to add a little bit more, however, I still kept the word “GATHER” as the main focus.
You can download it here…
The watermark will not appear on the downloadable file.
I’ll be sure to include an affiliate link or two below for the products I used in this project. See my disclosure here.
You might remember I had another farmhouse gather sign in my kitchen. You can see that one here (it had a little different saying”) >>> “Gather Sign”
I used blockposters . com to print it out to the size I needed. (be sure to use the “reverse” file for this) Then I taped them together…..
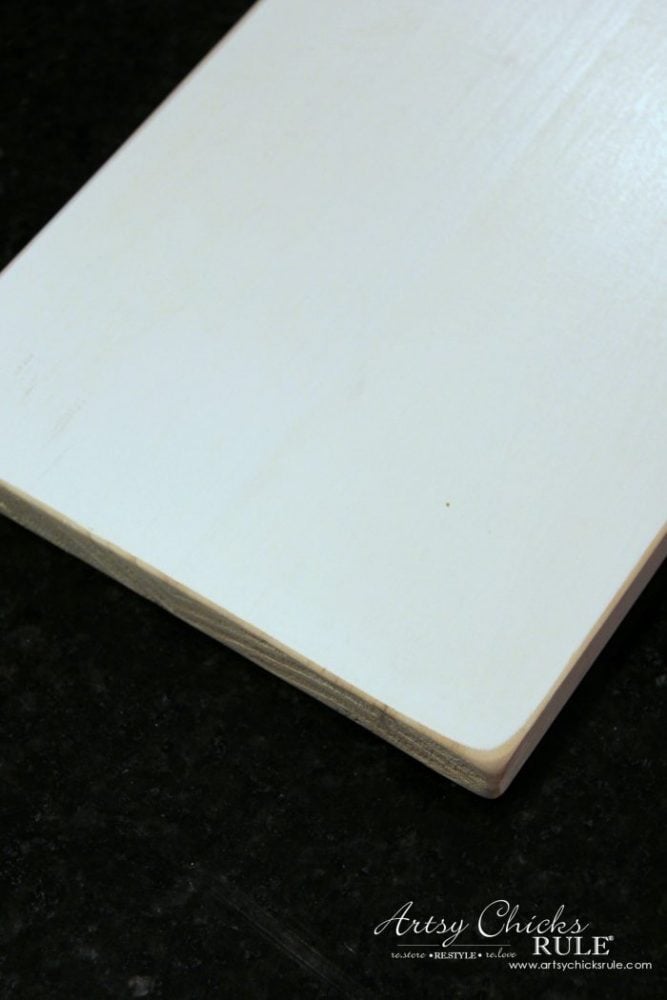
The edges were rough cut so I lightly sanded to round and soften the edges of the board.
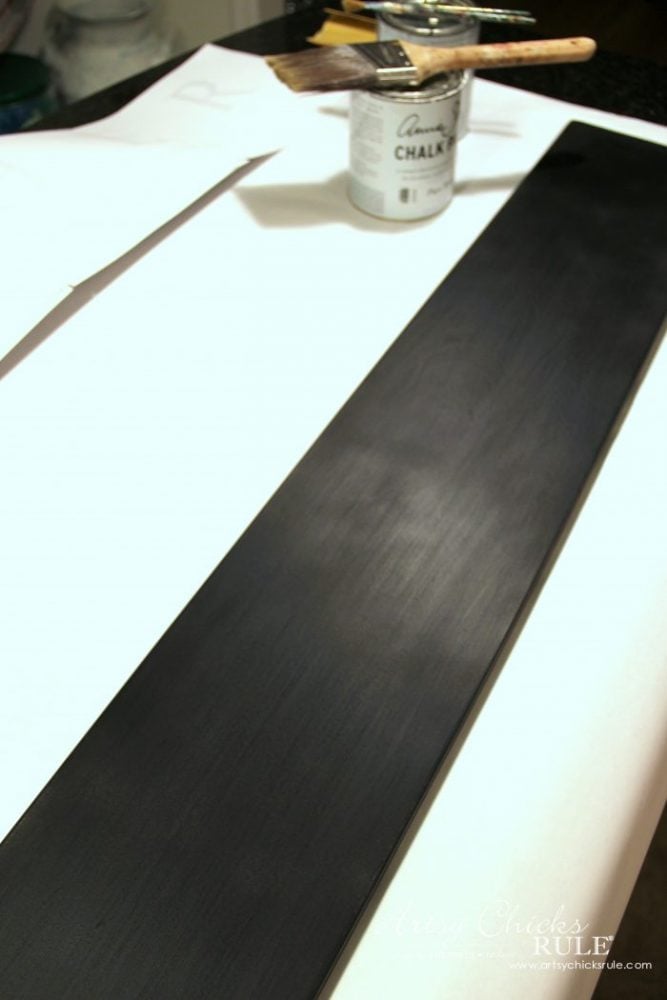
After that I took it outside and gave it a quick spray of flat, black spray paint.
By the way, I just love this white paper that I use to protect my counters when painting, etc.
It comes on a roll and I will just fold up and reuse what I’ve cut several times making the roll last forever!
It’s handy and thought I’d share. :) You can find it here >>> “White Art Paper Roll”
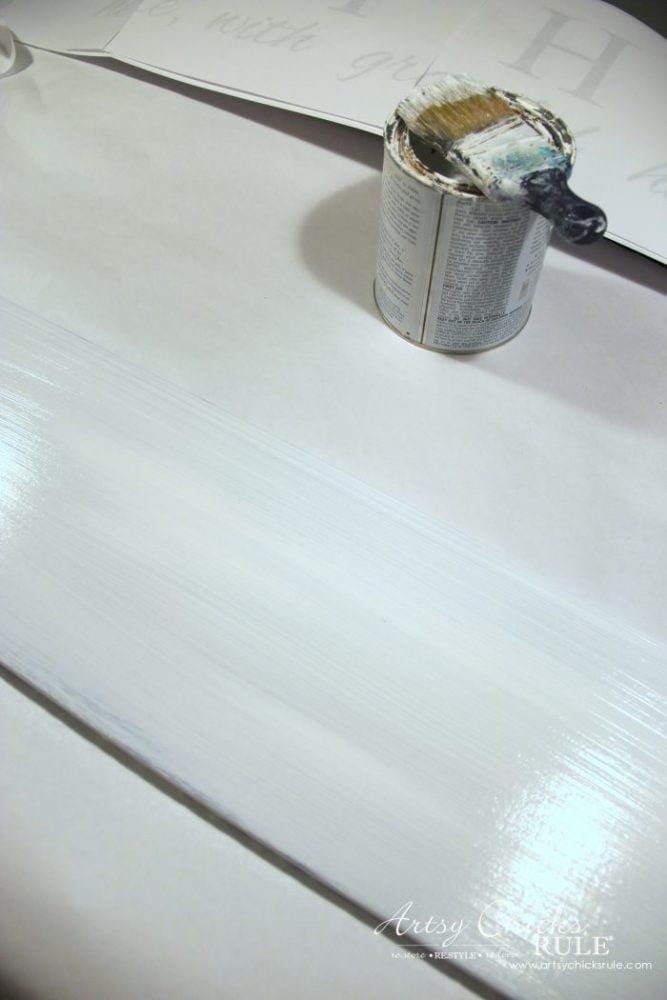
Paint over the black with Pure White Chalk Paint…..
….two coats.
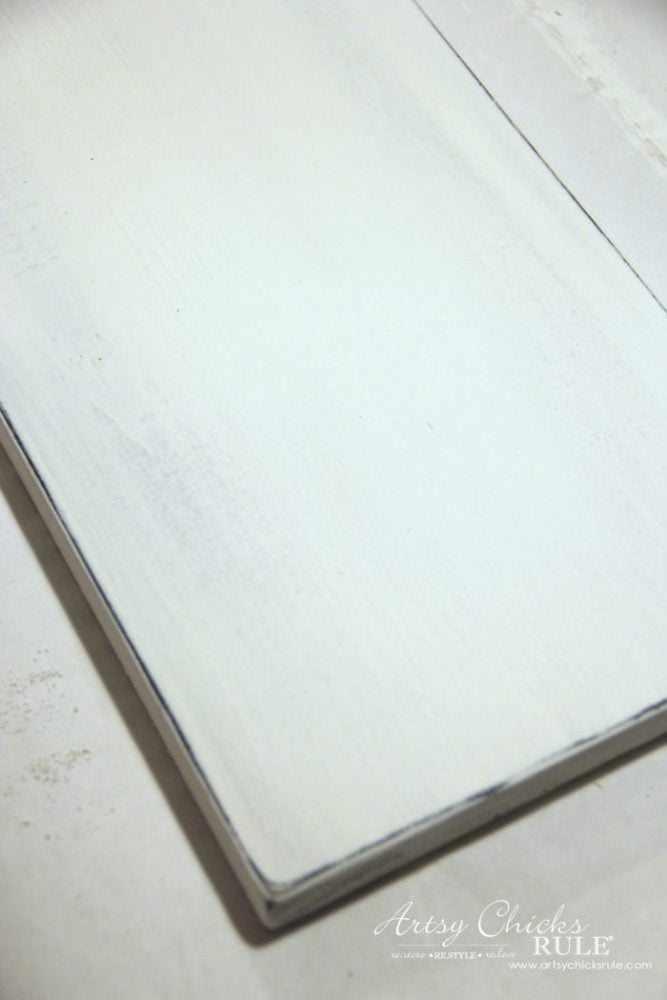
Once it was dry, I went ahead and gave it a bit of distressing to reveal some of the black underneath.
Be sure to use very fine sandpaper and go lightly so you don’t go right through the black paint.
I’m not sure if you can tell, but I also sanded some of the flat area where the lettering will be going.
I didn’t want to bring the black all the way through there, but I did want it to look a bit worn with it showing through just slightly.
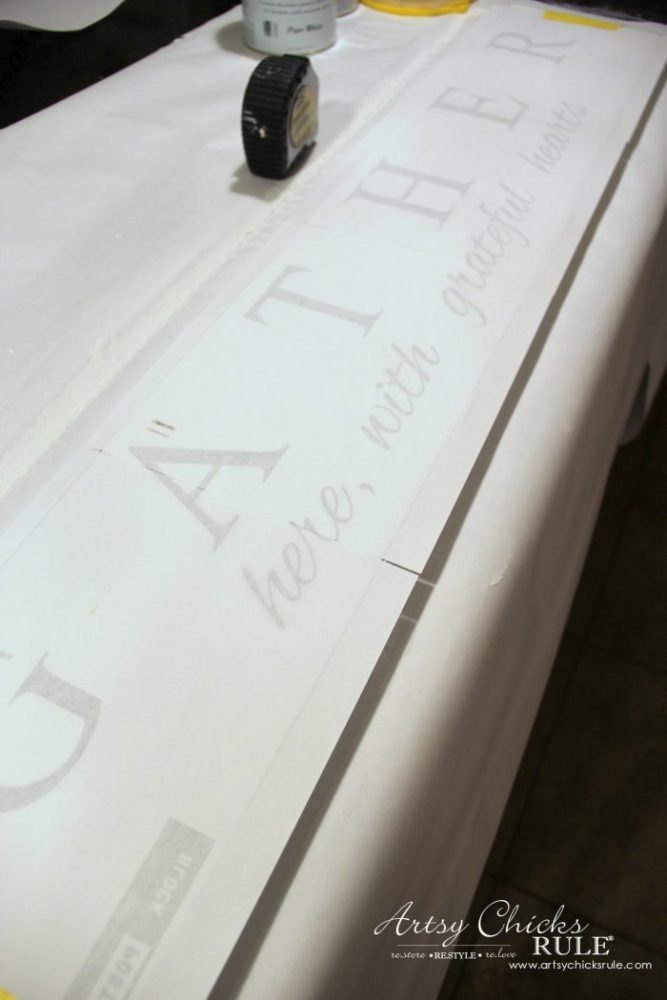
Next, lay and align the graphic that was printed earlier and taped together onto the board.
Be sure to measure both sides, bottom and top, to make sure it is aligned properly.
Then measure again.
There’s nothing worse than transferring all of something like this to only find that it’s crooked once the paper is removed. Ask me how I know. ;)
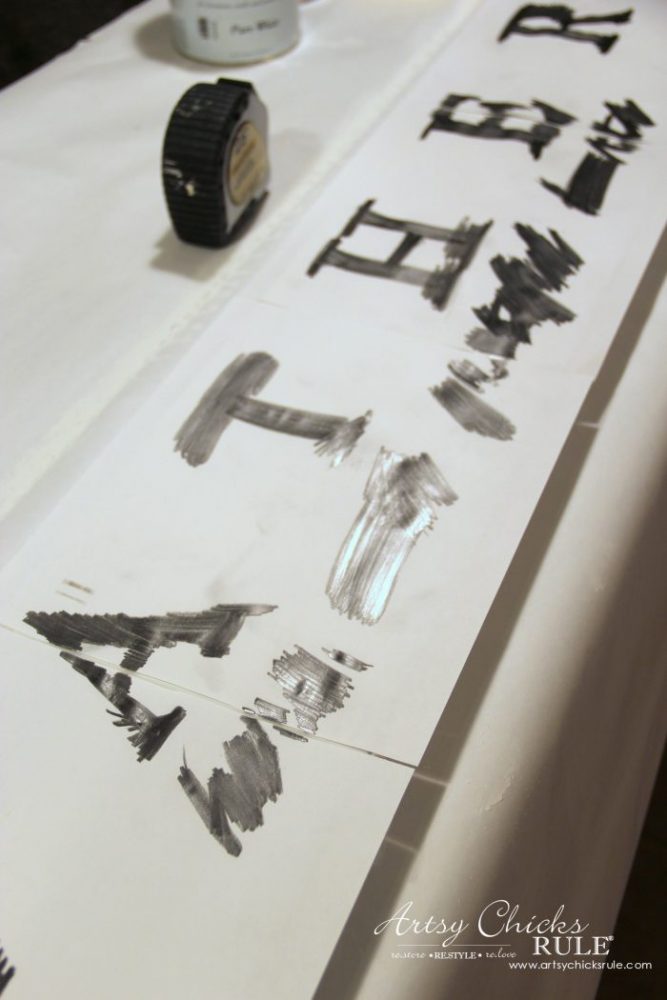
Then do this.
Color like a 3 year old. ;)
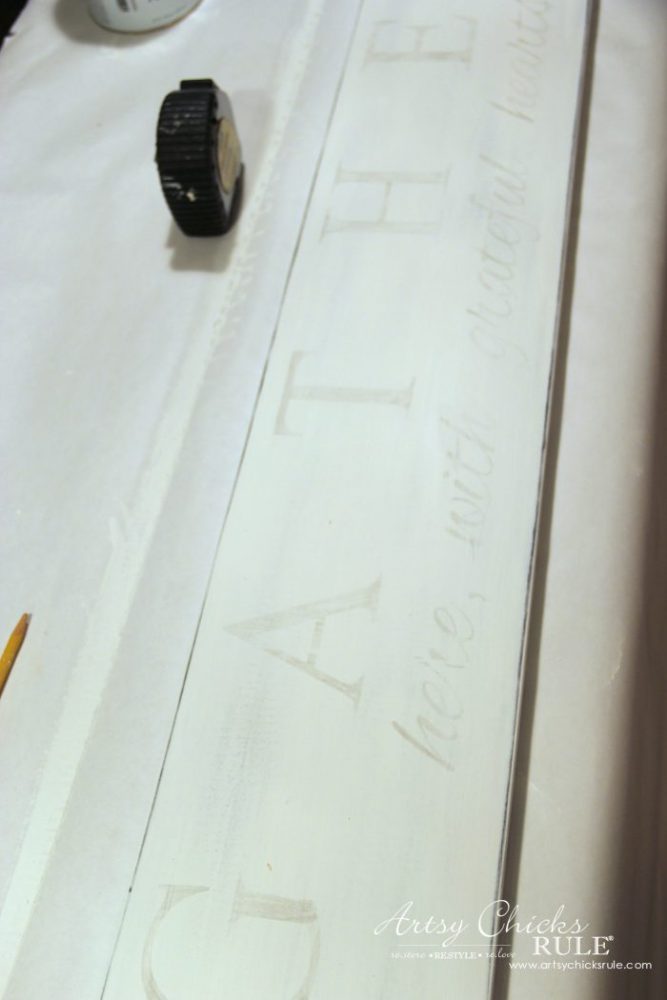
Using a pencil, color over each letter with firm pressure to transfer the ink from the printed paper onto the board.
This is what you will find when you lift up the paper.
Isn’t that neat?
It’s pale but it’s enough to see where to paint.
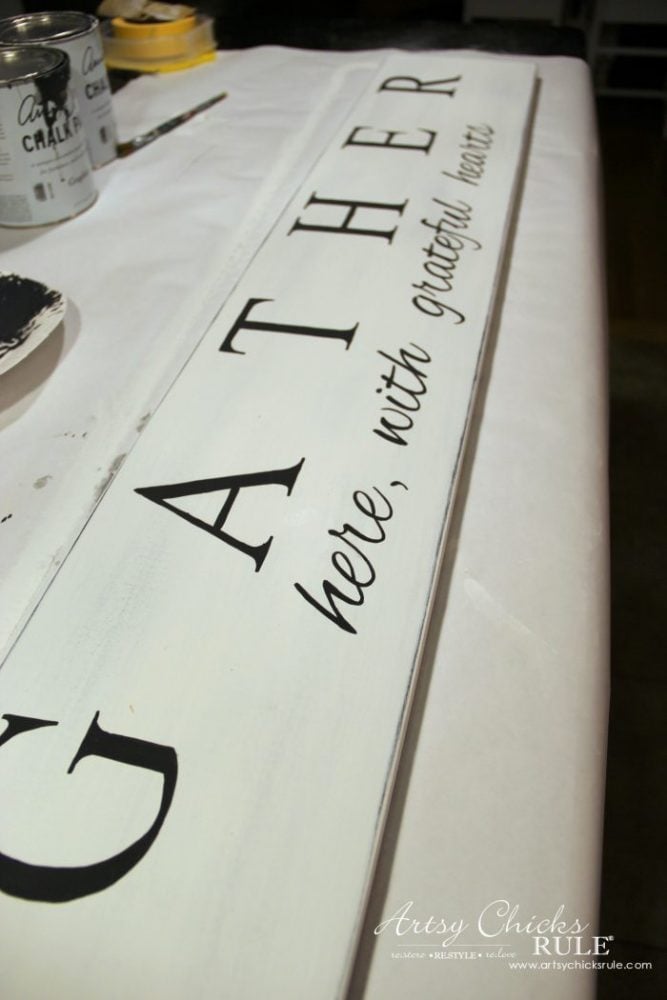
Using a fine artist’s brush, like this one >>> script liner, hand paint in the lettering on your farmhouse gather sign.
It’s not as hard as it seems.
Just practice a bit on a piece of paper first.
Thinning the paint just a touch also helps painting in those skinny areas.
Gloppy, thick paint is not your friend here.
This particular sign took about an hour to hand paint in.
It’s very relaxing to me because I am focused and still.
I actually enjoy doing this. :)
And in the end, you have your very own hand painted piece.
This is the best way to do it if you don’t have equipment, like a Silhouette machine.
There are “easier” and quicker ways to do this if you do have a Silhouette or similar.
Here are several projects I’ve done with varying techniques and my Silhouette.
“Nautical Sign” (I created a “stencil” and painted in the lettering)
“Laundry Sign” (THIS … this is a simple way to “paint” lettering)
“Thrifty Wall Art” (and then simply using the Silhouette to create the letters)
But as I am showing you, you don’t need that to create beautiful signs! :)
Want even more ways to transfer?? Check out my “How To Transfer Graphics” post! (sharing all the techniques I use)
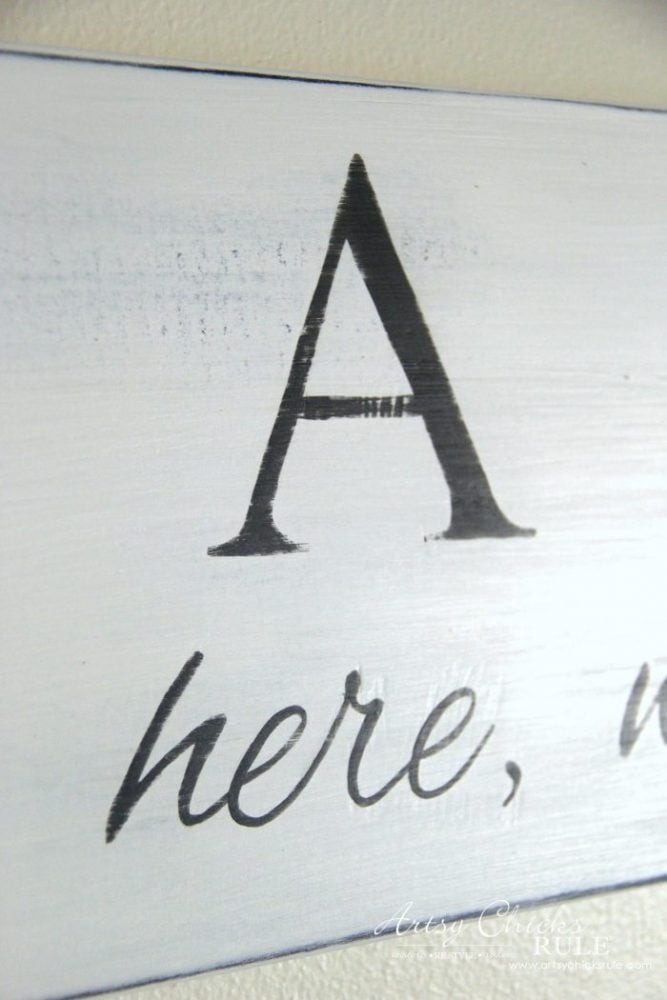
Okay, so after it’s all painted in, I wanted to soften the lettering and edges a bit.
Once dry, I lightly sanded to soften.
You can see, you don’t have to be os-so-perfect with the lettering if you are going to sand to soften them.
Doing this really hides some of the imperfections (like bumpy edges, etc) so it’s a win-win.
Plus, I like the way it looks.
Wipe away the dust from sanding and apply a coat of sealer.
You can wax or use poly. I used >>> this poly. (my fave!!)
Attach a hanger on the back and you are ready to go.
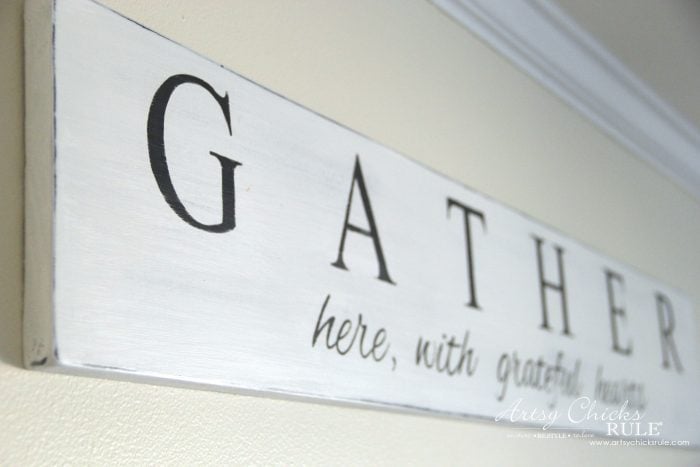
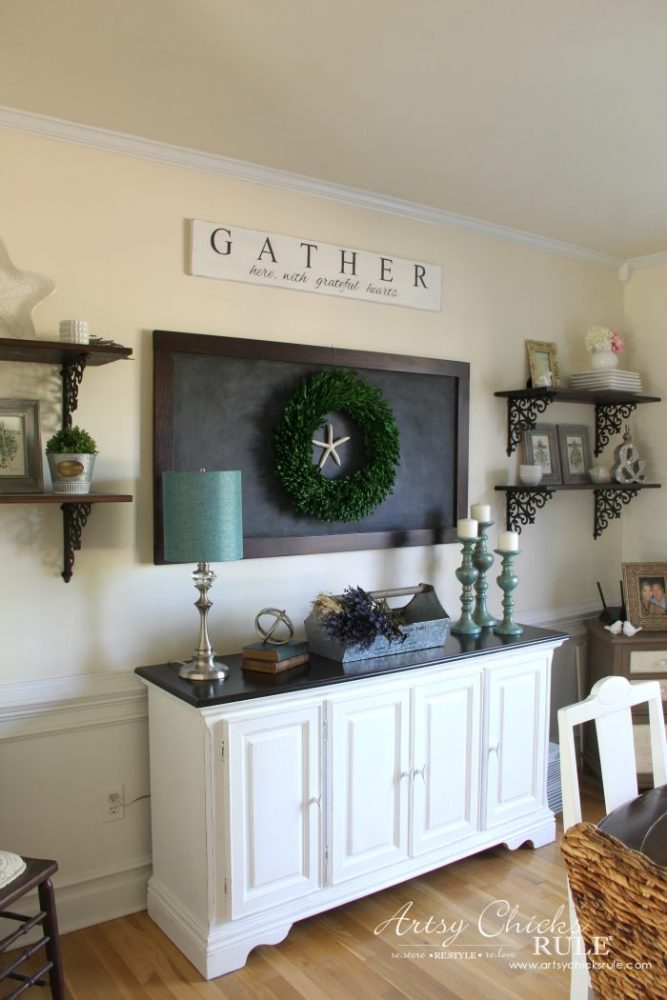
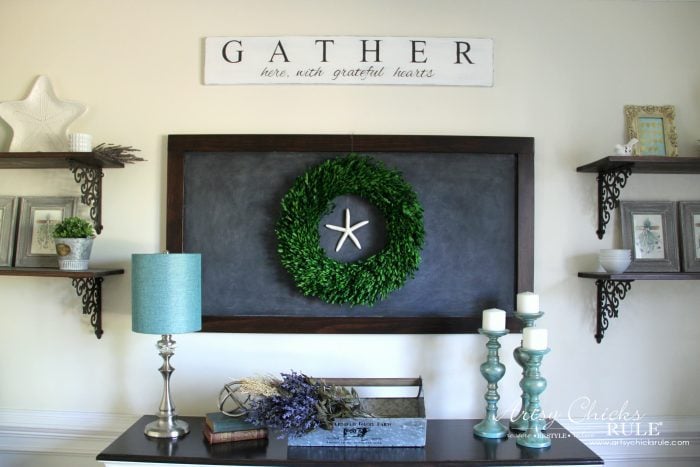
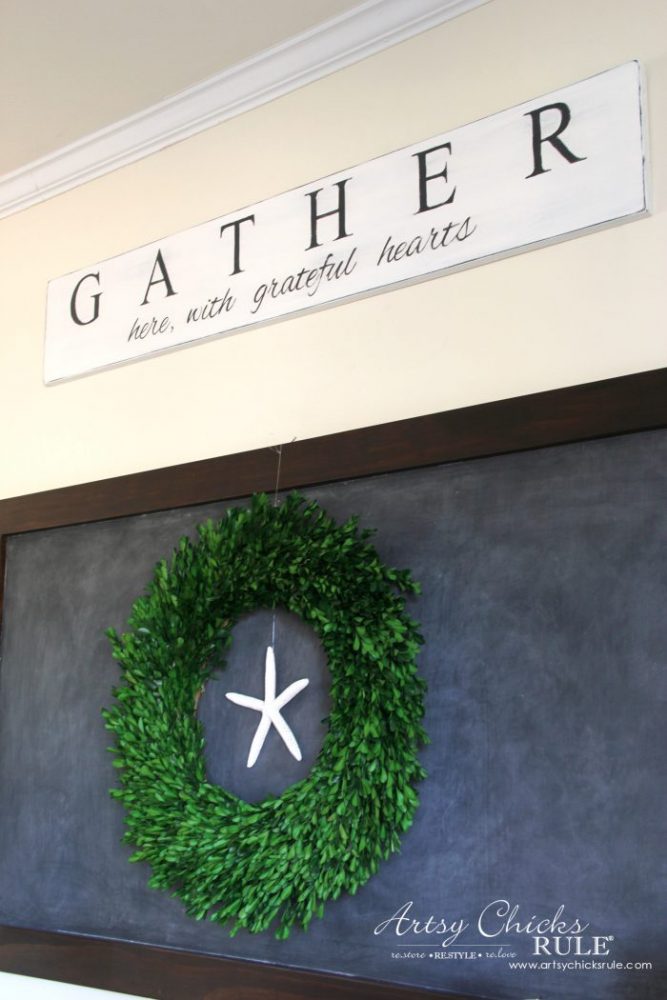
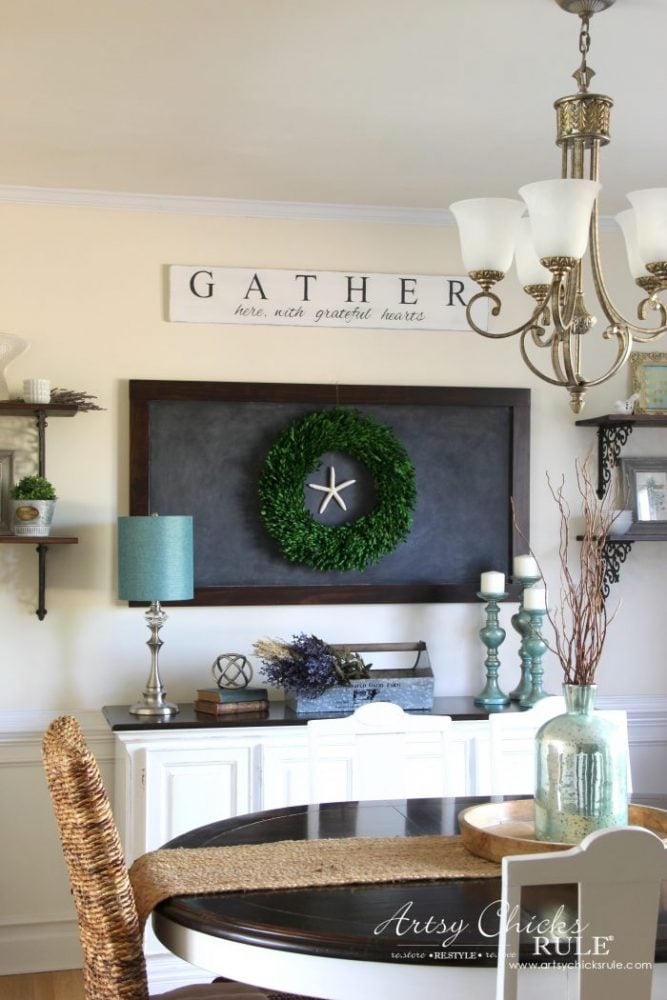
And this is where it is hanging in my home….
….you might remember the other sign I had hanging here >>> “Grateful, Thankful, Blessed Sign“.
I LOVE the sign I had here (linked above) but the finish didn’t really look right with the other wood finishes I had in here.
So, I moved it to the kitchen and it’s now where my old gather sign was.
I haven’t even had my new farmhouse gather sign hung 24 hours but just love it. :)
The lighting was weird in here today. My walls are not “yellow” like they appear at the top of the photos.
The color is actually closer to what you see behind the lamp, below the chalkboard.
And I’m so glad I added the other wording at the bottom. So sweet. :)
And a little peek at the new globes I added to my chandelier.
I was thinking about replacing the entire chandelier but since we are going to list our house soon, decided to just change the globes.
You can see the old ones here >>> “New Lighting“. They just didn’t match the room.
I’ve considered painting the metal, and still may, in a pale aqua with a bit of patina.
What do you think?
UPDATE: This light fixture got a brand new look! VERDIGRIS!! (faux, and I didn’t even have to remove it from the ceiling) See the video tutorial, here >>> “How To Create Faux Verdigris”
Want to make a DIY Farmhouse Gather Sign too? Now that you see how simple it really was, you can!
Love this farmhouse gather sign? PIN it to save it!
Now let’s see what kind of treasures my friends created this month….
You might also like this project.
I turned this Christmas sign into two signs for my bedroom. :)
(and shows yet another way to transfer images onto wood!) See them here >>> “DIY Weathered Love Signs”
If you’d rather not make your own, here’s a few others I found for you. :)
Hi …. I need some help … I used your link to get the free graphic sign for the gather here with grateful hearts but it won’t let me enlarge it to print it …. it will only let me print a couple letters & never the G A …. can you tell me what I am doing wrong or what the trick it to get it to print? Thanks
Hi Tiffany,
Where are you trying to enlarge it? I’m not sure what’s wrong.
Have you tried printing it the size you need in blockposters (dot) com? That’s were I do all my large printed items.
If you haven’t, give that a go and see how it works for you. :)
Nancy,
It is easy for time to get away these days with hectic schedules. Your Gather sign turned out beautiful and you grabbed some peace in your day.
Happy Creating,
Karen Marie
As for the lighting? I wouldn’t paint it with anything that wasn’t a neutral since you are selling. You could add some distressing/dry brushing etc. Just my thought – I sure wouldn’t want an aqua chandelier to stop a sale because someone else couldn’t get past it. Not every buyer is a DIY-er and would want aqua lighting.
Oh yes, Linda, you are so right! Maybe I should just leave it be? I do have some blue patina gilding paste, maybe I’ll try to just add a tiny bit of that. Or maybe even a bit of white dry brush. :)
But no, probably won’t paint it aqua with that in mind. Thank you!! xo
I love a good sign and this one is perfect in your dining space!! I haven’t created a sign that way in a long time, but I do miss the peaceful quiet of painting in the letters. :) XOXO
Thanks and I know!! I hadn’t either. ;) When I got started, I was like, oh, this is gonna take awhile. haha But then I got going and it was SO relaxing! I had forgotten how much so! xo
I’ve never done this before, but think I’ll give it a try! What kind of paint did you use for the lettering? Also, what is the approximate size of the board you used? Thanks so much.
Yay! So happy you are going to give it a go! I used Chalk Paint but you can use any craft paint. I’ve used both at different times. :) I think the board is around 3 feet or so. xo
Great tutorial, Nancy, and your sign is awesome! Did you use an inkjet printer? Did you transfer the graphic immediately after printing while the ink was still wet?
Hi Frances!
Thanks and yep, you do. The inkjet type ink lets you “transfer” the ink over to the project. I don’t think a laser printer will work for this. And yep, plain ole copy paper! :)
Love this!! When I tried to edit it on Picmonkey, it would not accept the file. Do I need to change it to jpeg? Same with loading the image to paint to try to reverse it. Any idea what I might be doing wrong?
Hi Lynette and thank you! I’ve not tried it with a PDF, but you would probably have to change out the file type. If you do a search on Google, you should be able to find a free file converter. I’ve used a few at times in the past! :)
Want to be inspired, learn new skills, discover all the tricks to furniture makeovers, creating new out of the old and more? You'll also receive my FREE ebook "Creating Fabulous Finishes" PLUS access to my private Printables Resource Library, too!
Sign up to get the Weekly Newsletter! Our emails include an unsubscribe link and you may opt-out at any time. Your information will *never* be shared or sold to a 3rd party.


")

")


")


")

This is a great sign! Thanks for the how-to!
Thanks Randi! :) xo
Hi …. I need some help … I used your link to get the free graphic sign for the gather here with grateful hearts but it won’t let me enlarge it to print it …. it will only let me print a couple letters & never the G A …. can you tell me what I am doing wrong or what the trick it to get it to print? Thanks
Hi Tiffany,
Where are you trying to enlarge it? I’m not sure what’s wrong.
Have you tried printing it the size you need in blockposters (dot) com? That’s were I do all my large printed items.
If you haven’t, give that a go and see how it works for you. :)
Love the saying on this sign Nancy <3 :) Happy Valentines Day!
Hey Annie! Happy Valentine’s Day to you too! And thank you, I’m so happy with it! I think I could make signs all day….maybe. ;) xo
Nancy,
It is easy for time to get away these days with hectic schedules. Your Gather sign turned out beautiful and you grabbed some peace in your day.
Happy Creating,
Karen Marie
Thanks Karen :) xo
The sign looks gorgeous in its new home above your chalkboard, Nancy!
Thanks Jen! xo
Thank you for the graphic! It will be perfect for my dining room. Not sure yet how I’ll make it so I downloaded the regular and reverse versions.
You are so welcome Nancy! :)
I’m so glad you are going to make something with it! xo
As for the lighting? I wouldn’t paint it with anything that wasn’t a neutral since you are selling. You could add some distressing/dry brushing etc. Just my thought – I sure wouldn’t want an aqua chandelier to stop a sale because someone else couldn’t get past it. Not every buyer is a DIY-er and would want aqua lighting.
LOVE the signs, thanks for the tips and how-to’s.
Oh yes, Linda, you are so right! Maybe I should just leave it be? I do have some blue patina gilding paste, maybe I’ll try to just add a tiny bit of that. Or maybe even a bit of white dry brush. :)
But no, probably won’t paint it aqua with that in mind. Thank you!! xo
I love a good sign and this one is perfect in your dining space!! I haven’t created a sign that way in a long time, but I do miss the peaceful quiet of painting in the letters. :) XOXO
Thanks and I know!! I hadn’t either. ;) When I got started, I was like, oh, this is gonna take awhile. haha But then I got going and it was SO relaxing! I had forgotten how much so! xo
I’ve never done this before, but think I’ll give it a try! What kind of paint did you use for the lettering? Also, what is the approximate size of the board you used? Thanks so much.
Yay! So happy you are going to give it a go! I used Chalk Paint but you can use any craft paint. I’ve used both at different times. :) I think the board is around 3 feet or so. xo
Thanks, Nancy.
It turned out great!
Thanks Jes! :) xo
Great tutorial, Nancy, and your sign is awesome! Did you use an inkjet printer? Did you transfer the graphic immediately after printing while the ink was still wet?
Thanks Marie! :) Yep, I sure did! And nope, you can do it anytime, even after the ink is dry. :) xo
Love the sign, quick question. Do you have to use an inkjet printer and do you use just plain copier paper? Thanks!
Hi Frances!
Thanks and yep, you do. The inkjet type ink lets you “transfer” the ink over to the project. I don’t think a laser printer will work for this. And yep, plain ole copy paper! :)
Love this!! When I tried to edit it on Picmonkey, it would not accept the file. Do I need to change it to jpeg? Same with loading the image to paint to try to reverse it. Any idea what I might be doing wrong?
Hi Lynette and thank you! I’ve not tried it with a PDF, but you would probably have to change out the file type. If you do a search on Google, you should be able to find a free file converter. I’ve used a few at times in the past! :)