Thrifty Wall Art (for gifts, home decor and more!)
Hi Friends!!
I’m popping in today to share this super cute (and super inexpensive <– my favorite kind!) thrifty wall art.
I created it recently for my niece who just had her second child, a girl. :)
We are all so excited and can you just imagine all the bows she has already? (her first child was a boy…and we have lots of boys in this family!)
I wanted to make something personal, so decided to do something using her name.
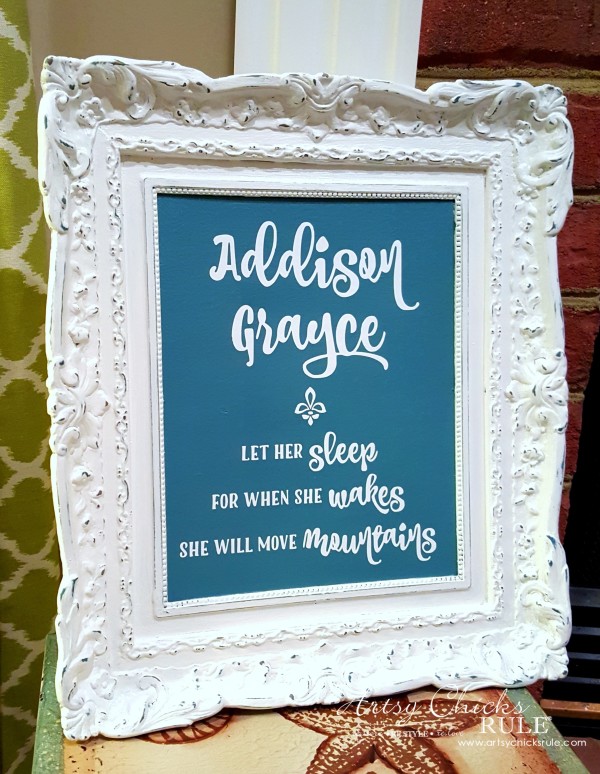
So I came up with this…..
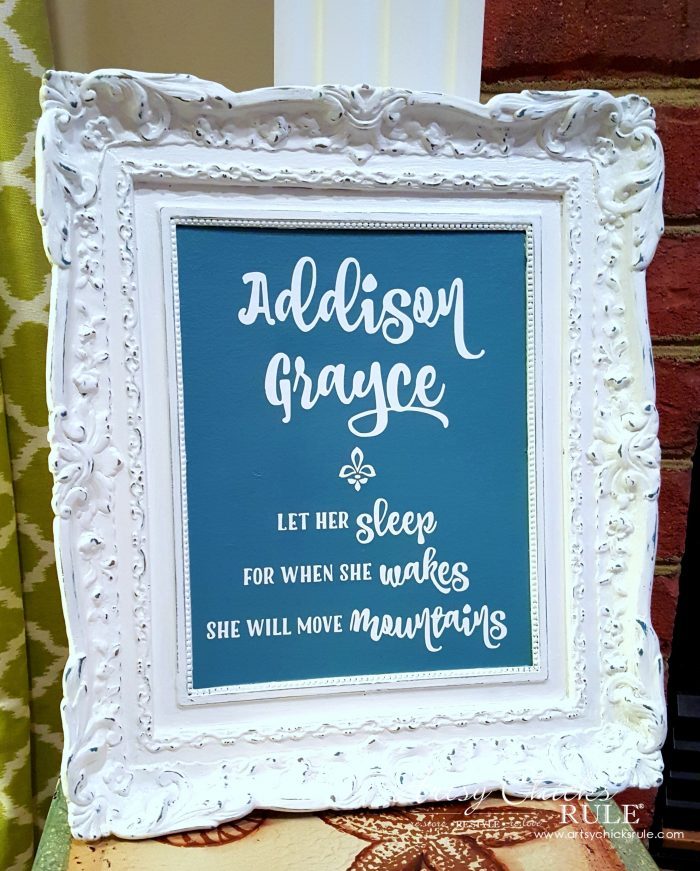
I just love her name!
She was named after my Mom who passed away several years ago.
Her middle name was “Gray” (which I have always loved!) and my niece loved the name “Grace”.
So she gave her the name “Grayce” spelled with a “y” in honor of my mother, her grandmother.
It’s so easy (and economical) to recreate or repurpose things out of old things found at the thrift store.
Especially so if they are still in really good shape.
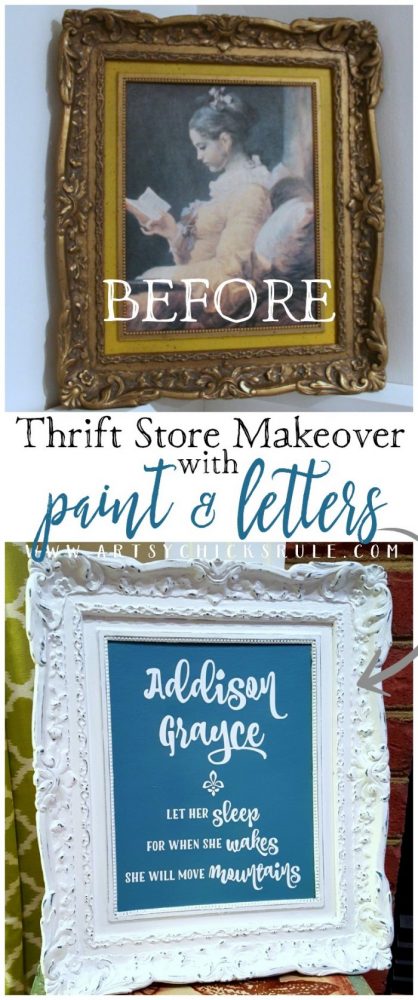
Like this old print….
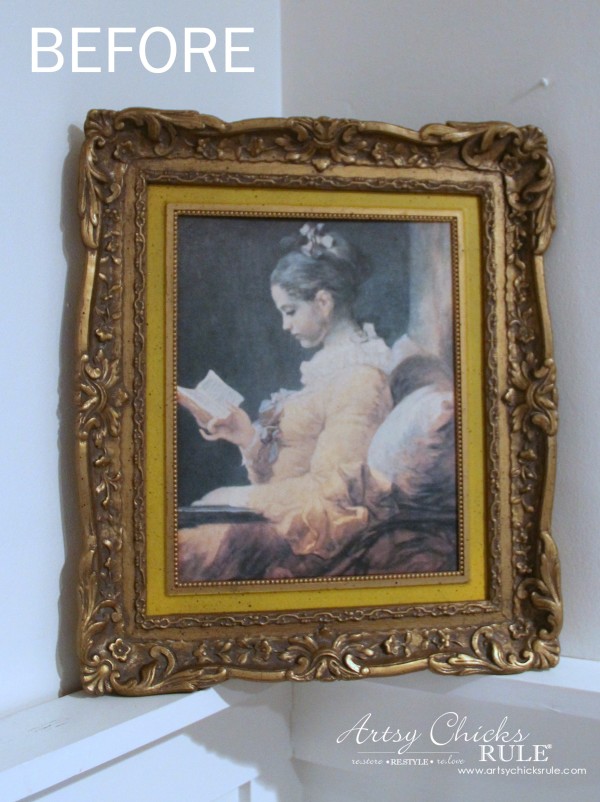
It’s an old “Home Interiors” piece (remember them? are they still around?), so not something of value.
But just look at that ornate frame! LOVE it.
I considered keeping it gold but decided to just go with a clean white and one of the colors my niece is using in the nursery.
First, I created the graphic for the wall art in my computer.
Then I transferred the saved jpg to my Silhouette.
Want to see how easy it is to use your own designs inside of Silhouette? Click here >>> How To Import Your Own Designs Into Silhouette Cameo.
Or you can also use any of these transfer methods to do it if you don’t have a Silhouette machine.
As far as designing elsewhere, I feel I have a bit more freedom to design in Picmonkey rather than in the Silhouette program.
AND I had no idea, until recently, that I could even do this!
Wow, it’s opened up a ton of design possibilities for me and my sweet little Silhouette! Yay!
M A T E R I A L S L I S T:
Silhouette Cameo (nice bundle!)
Paint (of your choice)
White Vinyl
Transfer Paper
Clear Coat Spray
This is what I designed.
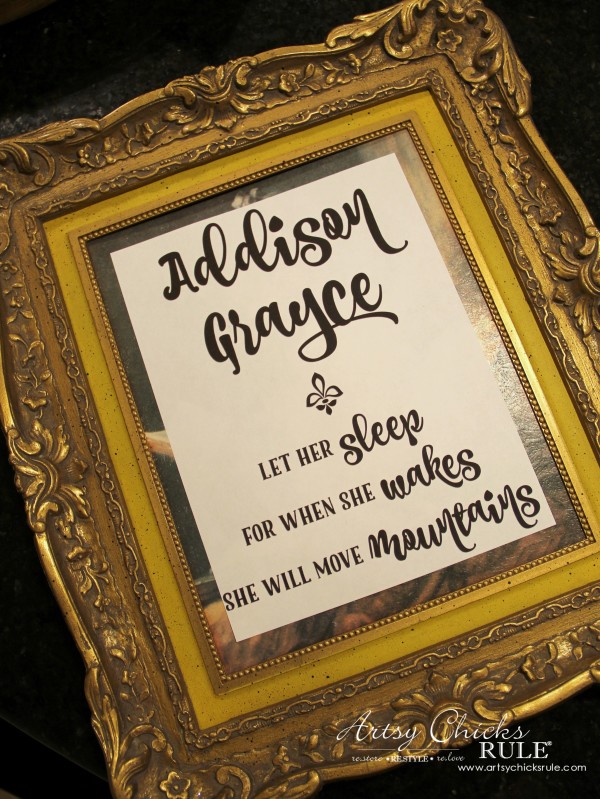
I printed it out because I originally thought I’d paint it by hand.
When I realized I could use my own design in the Silhouette…it became a no-brainer!
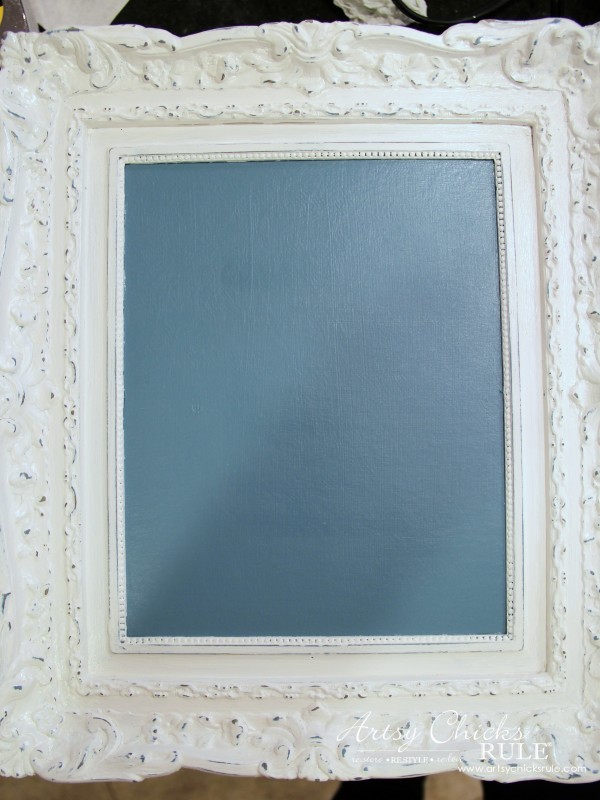
I painted the frame, and print, all blue.
I used some blue I had mixed up into a turquoise shade. (Chalk Paint)
Then I painted Pure White over that. (also Chalk Paint)
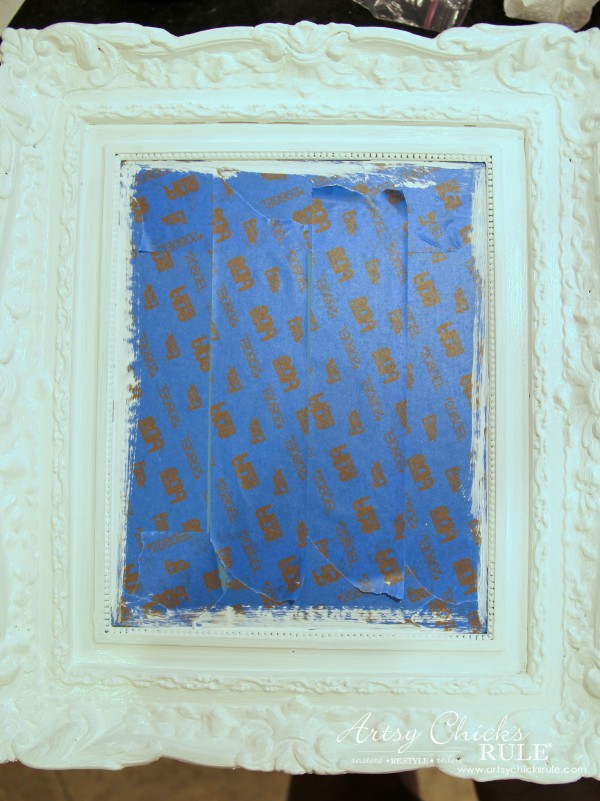
I taped off the print area because I wanted it to stay blue.
The reason I painted the frame blue underneath is because I wanted the blue to show through when I lightly distressed.
As you can see, above and below. (more visible in person)
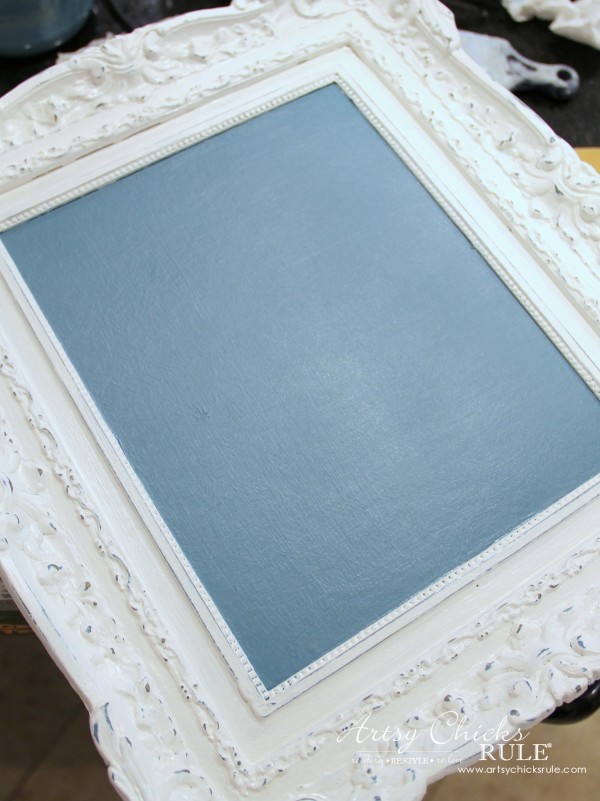
I sealed the whole thing with a poly spray.
Then I let that dry well before applying the vinyl lettering I cut in the Silhouette.
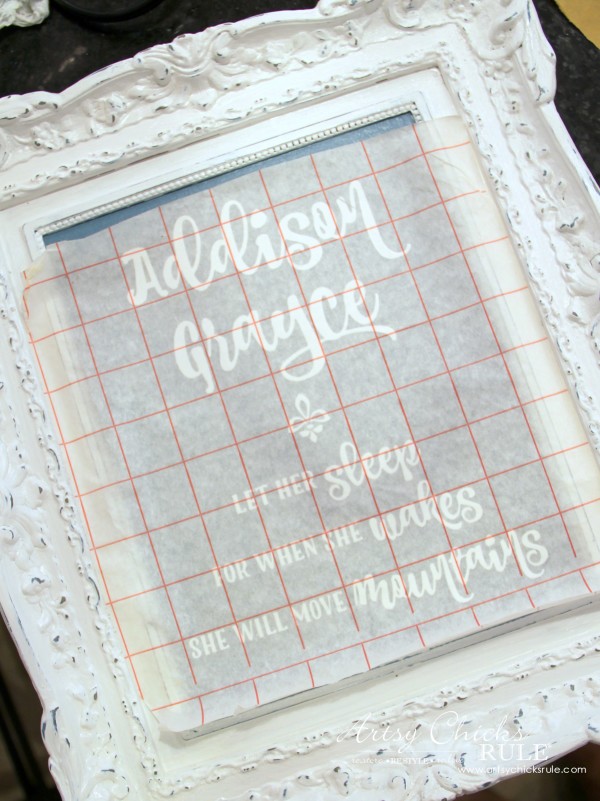
Lay it out and measure to make sure it is aligned correctly.
Then rub over the vinyl letters to adhere them to the framed print.
Then slowly remove the paper backing.
Can that get any easier???
The rest are a few quick shots (with my mobile phone) …at the baby shower!
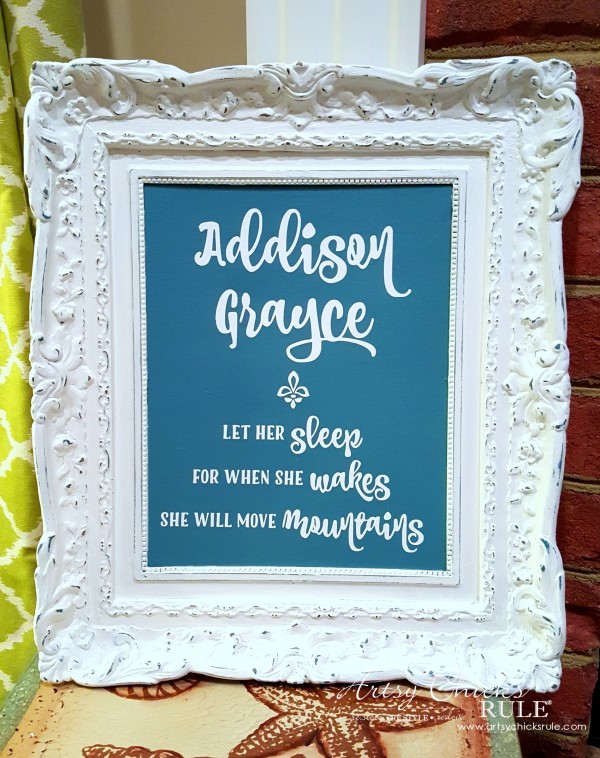
The saying is perfect…for my niece and my great niece too!
Let her sleep, for when she wakes, she will move mountains. Yes.
PIN this simple thrift wall art for later!!
So easy, very inexpensive AND makes a fabulous, personalized gift!
Again I say, don’t look past those old things at the thrift store/garage sale, etc.
This was a framed print I bought months ago.
I didn’t really know what I’d do with it at the time but I loved that frame.
When I decided to make some pretty wall art for the new baby I knew it would be perfect!
I hope I’ve inspired you to make and create some thrifty wall art too!
If you don’t have a Silhouette, Amazon has a great bundle –> here.
If you don’t have a Silhouette and aren’t interested in getting one, you can still make this pretty art.
See these posts below for other ways to transfer the graphic lettering:
“Believe” Sign (transferring using your printer)
“Laundry” Sign (transferring with graphite paper)
Happy thrifting AND creating!
See you back here next week with this! Come see how I used these letters. (it’s not how you think!)
UPDATE!! See it now, here!
xo

")


")

")

How sweet is that? Super nice!!
That frame !!
Sure your niece would adore that gift
Kisses
Victoria
Aw thanks Victoria! :)
xoxo
Nancy
That is so cute Nancy, what a great gift idea! I may do that for my new granddaughter, and put her name in it! I am a new grandma she is 2 weeks old! Always get good ideas from you :))
Thank you Sandra!:)
Oh yes, do!! And congrats to you!! How exciting!!
xo
Nancy
What a thoughtful gift. I know that your niece loved it. I finally got brave and opened the Silhouette that I bought on Thanksgiving day. I’m eager to make some things with it and love this idea. My friend at school is having a boy in April and since I already know the name, I could make something similar for his nursery. I also didn’t know that I could use Picmonkey to make designs. I can’t wait to try that!
Thanks Paula!
Yes, open that thing up and use it! I am not one to talk though. ;)
BUT being able to create things in Picmonkey and then transfer there….that has opened up a whole new world of possibilities to me!
I think I may be using my Silhouette a whole lot more now! ;)
xo
Nancy
Hi Nancy, what font was used for the name?
Hi Kelly,
It’s called Coffeebreak and is in the Picmonkey program that I linked in the post. :)
Nancy
Personally i hate all these “paint everything over and distress them” projects. And I rarely comment on blogs, but I have to say this is a beautiful and thoughtful gift. I wish I had had an aunt like you!
Aw, well thank you! That really means a lot! :)
Thank you for taking the time to read and comment Jan!!
xo
Nancy
Soooo pretty! I love it!
I have a couple of old frames in the basement. Thanks for the inspiration. :)
Thanks Lizzy!
OH yes, lots of things you can do with them!
Some of the old ones have really pretty and ornate frames too!
xo
Nancy
Very sweet…love that frame! I need to take advantage of my silhouette way more than I do! XO
Thanks Christy! :)
I always snatch up the oldies with the great frames! I figure I will do something with them at some point.
I’m loving the new little trick I found out about the Silhouette! Thinking I’ll be using it a lot more now! :)
xo
Nancy
What kind of poly spray? What brand? Some turn white yellow. Love your result.
Hi Andrea,
I have updated the post for the products I used! Sorry about that! :) It was Krylon Clear Coat.
Oh and thank you! :)
Nancy
Oh my goodness Nancy, I just LOVE this! My niece is due with her first baby in March and you’ve inspired a DIY gift for her once baby is born. Thank you so much for the inspiration. I bet your niece was thrilled when she opened your gift!
Thanks Marie! :)
OH yay!! Congrats! Yes, she did like it!
xo
Nancy