Aubusson Blue Dresser Makeover (Best of Archives)
Hello friends! :)
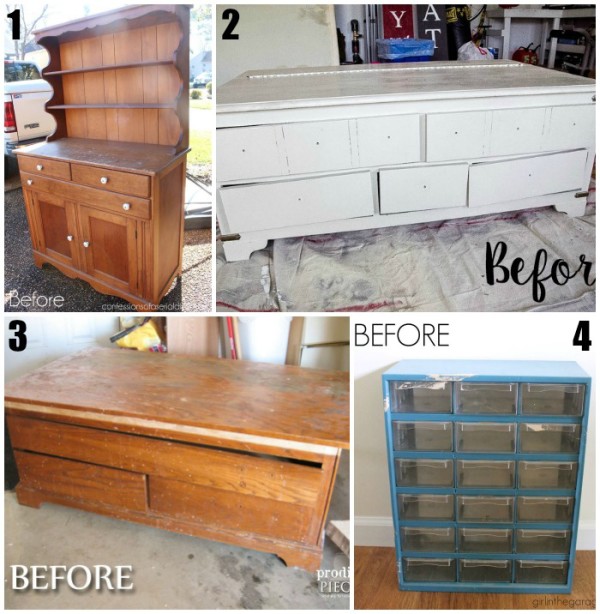
My “Trash to Treasure” friends and I decided to bring you a “Best of the Archives” for the month of February.

So, instead of sharing a new trash to treasure next Tuesday, we are going to bring you 4 every Tuesday this month.
They will be “new” (or new to you) treasures that we are pulling deep from the dusty ole archives.
We hope you will enjoy seeing some of these projects you may have never seen before!
……………………………………………………………………………………………………
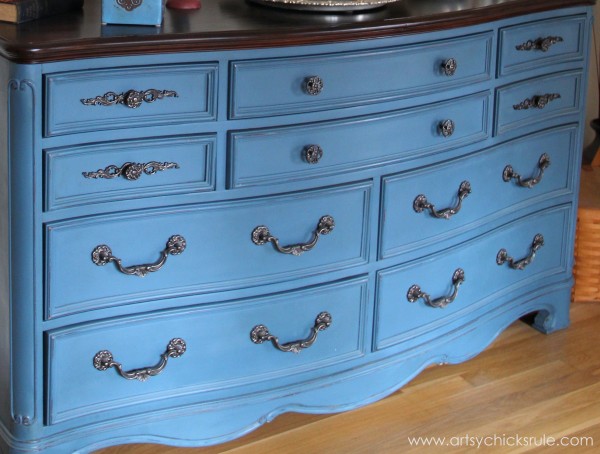
One of my very favorite (to this very day!) projects (and one of my very first on the blog here) is my AUBUSSON BLUE DRESSER.

I just adore it.
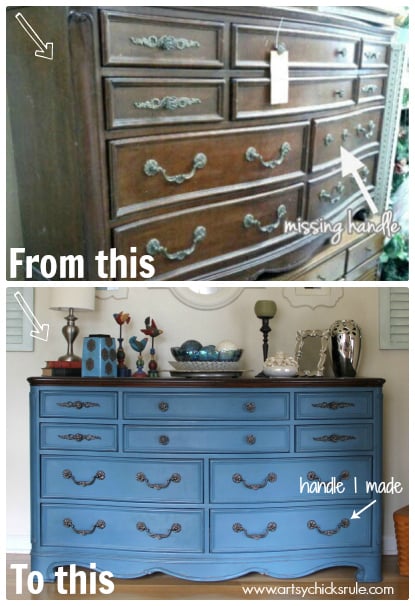
It was definitely in need when I found it at the thrift store….for $35!
What a bargain….except it was missing a handle as you can see below.
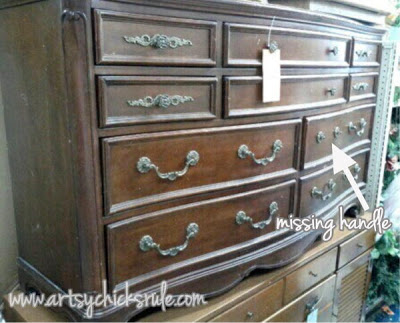
It was a little beat up too. (or a lot actually)
But I had a vision for it.
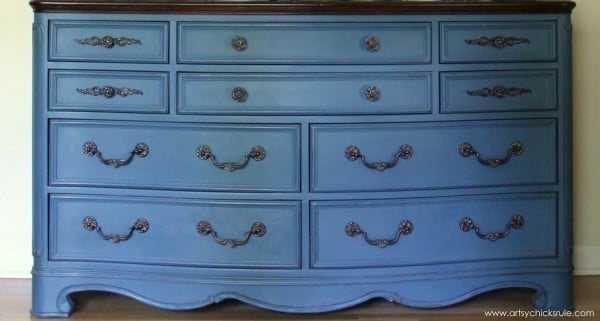
I wanted to keep the top natural in a nice deep, rich shade like walnut and paint the rest.
I also knew exactly where I was going to put it.
It actually still sits in the same spot almost 4 years later!
As far as that missing handle dilemma, you can read how I actually made a handle to match >>> here.
I’m including a few affiliate links below for your convenience. See my full disclosure here.
Materials List:
Chalk Paint® – Aubusson Blue
Clear Wax
Dark Wax
Wax Brush
Paint Brush (for Chalk Paint)
Oil Rubbed Bronzed Spray
Gold Paint
Citristrip
Minwax Dark Walnut Stain
Minwax Polyurethane
Purdy Brush (for stain and finish)
How to:
- I used Chalk Paint® by Annie Sloan in the color “Aubusson Blue”.
I LOVE (love, love, love) this color. - I very lightly distressed this one by sanding the edges before I waxed.
I know Annie Sloan recommends doing it after waxing but I personally like doing it before. - Next, I mixed a bit of her dark wax in with some clear wax. (just a tiny bit)
I applied the was to the entire piece (except the top) and hand buffed to create that gorgeous sheen. - For the top, I used Citristrip (my favorite!) to remove most of the finish.
(Gloves, safety glasses and dust mask are a must! Safety first. Always.) - Then I sanded it completely down to the wood and applied a dark walnut stain.
- For the handles, I gave them a quick spray with Oil Rubbed Bronze Spray paint and a touch of gold paint to highlight.
I sure wish I had taken photos of the process but I was mostly sharing “before/after” shots at that time.
This is how it ended up…. (I made one of those handles..can you tell which one it is? ;) )
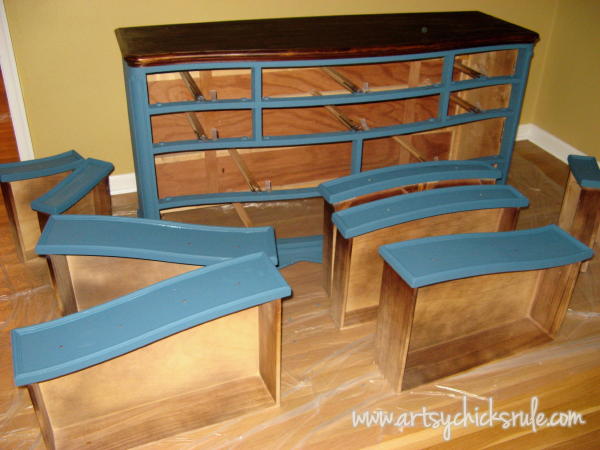
And here it is in the middle of the painting process.
Isn’t that color amazing???
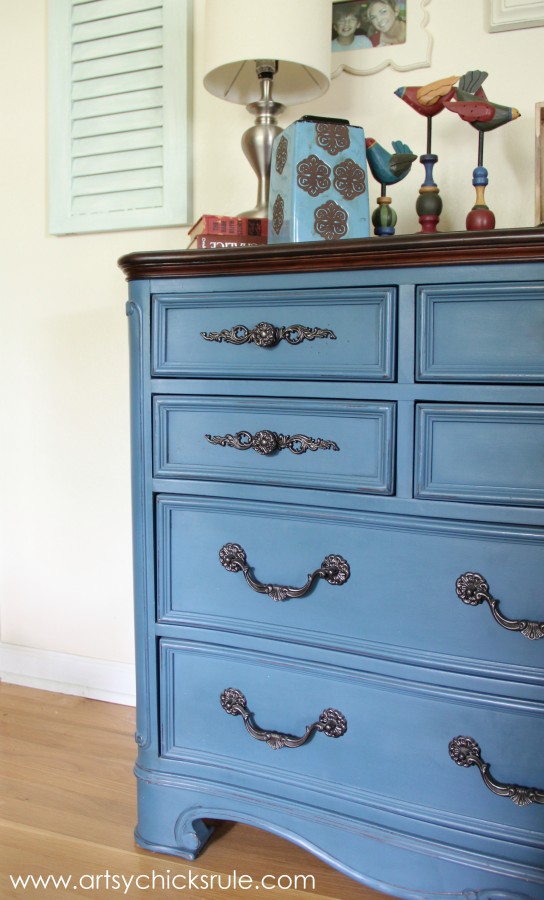
Look at that gorgeous wood top. That stain is just beautiful!
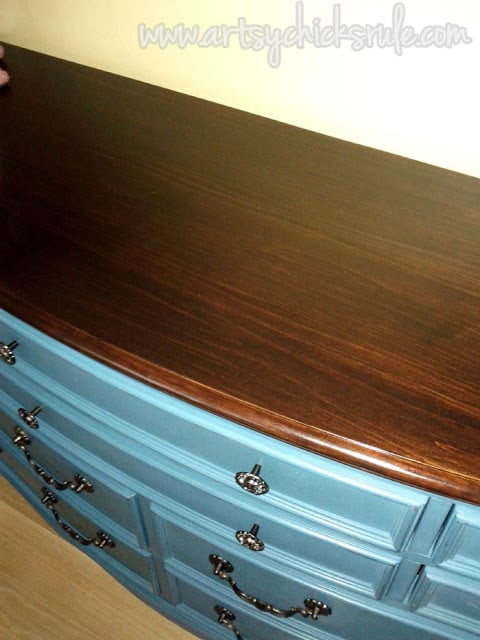
I love color…and I LOVE paint but I do love wood peaking through here and there.
I try to keep a bit in some of my re-do’s.
And the final “before/after” shot.
What a difference a little paint makes!
Definitely a treasure now. :)
Be sure to see what my friends are sharing this week below!

Follow along! –> Instagram ~ Facebook ~ Pinterest ~ Bloglovin
")


Thats a beauty Nancy, great job! love the color one of these days I will try Annie S. paint!! Weather wise we are having a really mild winter here, which I dont mind. It’s not like your temp. but we have hardly had the snow we usually get! :))
Hi Sandra!
Thanks so much! OH yes, you need to! :)
I sooo love a mild winter! We are too, although we have had a bit of snow already!(we don’t get a lot)
Last year was brutal so I’m happy it’s been mild!!!
xo
Nancy
This is still one of my favorites too!! Just gorgeous!!
Thanks Christy!! :)
xo
Nancy
This piece was my inspiration to “just do it!” I had my sideboard, paint, everything. I just could not get started. It was my very first chalk paint project. Thanks Nancy for giving me courage! BTW, your drawer pull was magic!
Aw, yea Carol!!!
So happy to hear that! I bet it’s beauty. :)
Have you painted more since? It’s addicting!
xo
Nancy
We are spending 4 months in Puerto Vallarta, MX. I have a great Stanley buffet that patiently awaits my return. Thinking Burgandy…
Oh how nice Carol! :) Have a wonderful time!!
This dresser is gorgeous in Aubusson! Love it! <3
Thanks Jen! :)
xo
Nancy
What a gorgeous transformation and I love the idea that you made your own replacement pull. Fantastic, Nancy!!
Thanks Larissa!!! :)
Nancy
Love thee transformation! Did you apply a primer or stain blocker before applying the chalk paint? If so, did you spray it on or brush it on? I painted an end table using an off white chalk paint and then applied a clear wax made for chalk paint. When the wax dried I noticed that it caused the paint to yellow. I had to repaint the entire piece. I’d like to apply a top coat but not sure what to seal it with that’s non yellowing. Any advice would be helpful.
Hi Linda,
No, I didn’t need to since I was using a darker color. With a lighter color I may have had to. I usually spray it, when I do.
Are you sure the wax yellowed or could it possibly be a bit of bleed through from the wood underneath?
I haven’t had any issues with Annie Sloan Clear Wax yellowing any of my whites. Now, poly will yellow somewhat. Some more than others.
My only advice would be to maybe seal with Shellac before using a light paint color, then trying the AS Clear wax instead next go round.
Hope that helps! :)
Nancy
that has to be the most incredible job I have seen to date. Yeah, that color is so awesome, I can’t think of a prettier shade of blue! I am blown away with this fabulous project, you da man!!
Wow, thank you so much for the sweet compliment! Oh yes, I do love this color so much. :)
My favorite!
xo
Nancy
I’d love to know your best way to do the wax. I’ve waxed a couple pieces before with a brush and with a cloth but neither seemed to work well. I can’t wait to try this!
Hi Christin,
I use a wax brush or a cloth (like old tshirt material) depending on what I’m waxing. Mostly, I just use the cloth. :)
Nancy