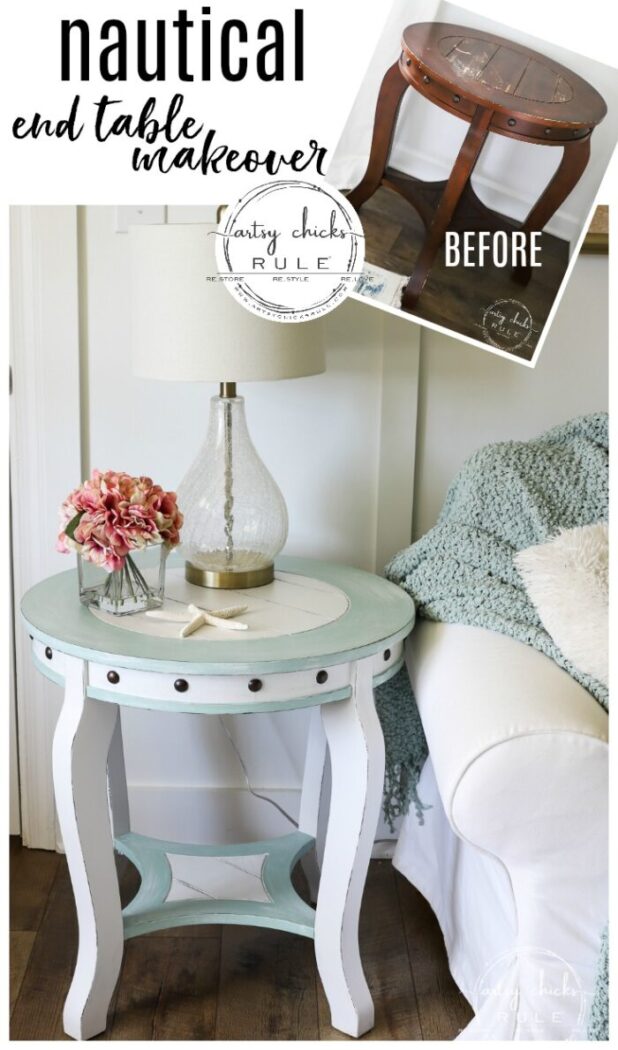
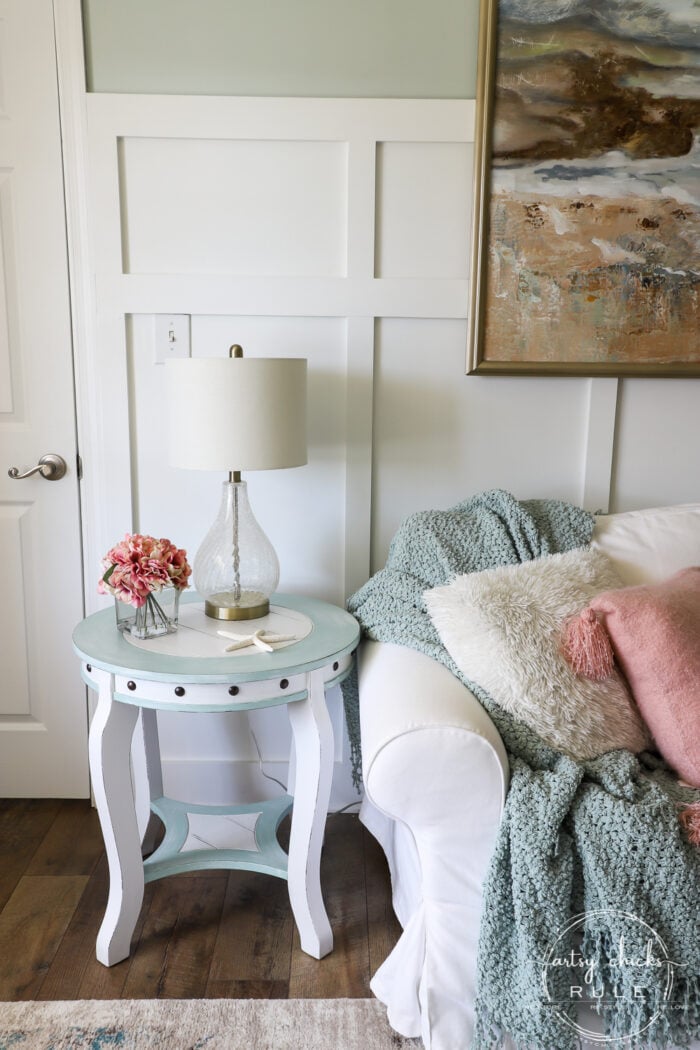
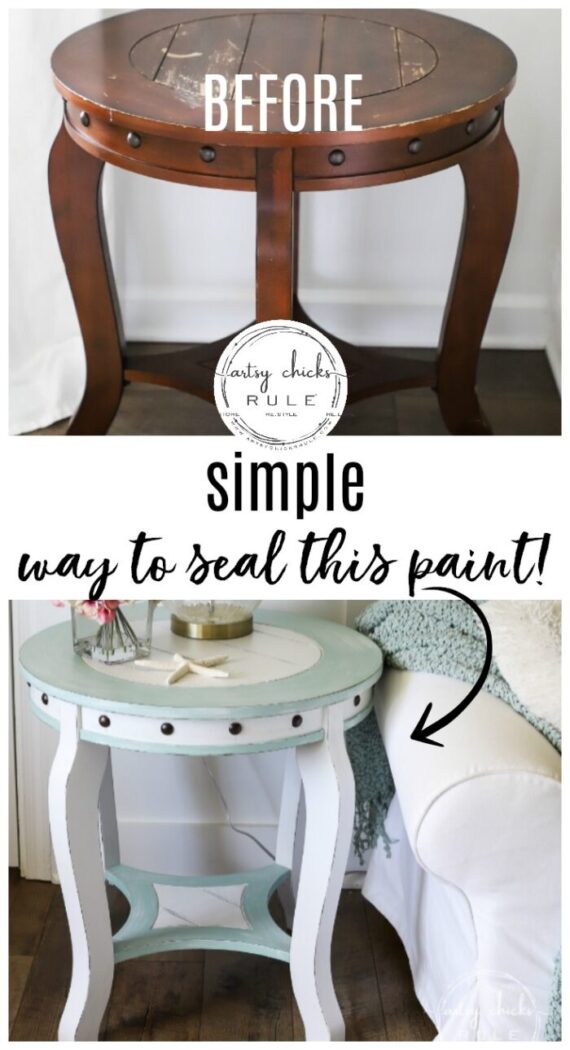
Nautical End Table Makeover
Simply add paint and an amazing way to seal it up, and your result is this adorably sweet nautical end table, perfect for any coastal-style home!
Hey friends! I’m sharing a brand new piece of furniture that I just picked up last week.
Today is all about this sweet little nautical end table.
If you follow along with me over on Instagram, you might have seen me post about it when I found it last week at the thrift store.
And then again on Sunday, when I was working on it. I actually asked your opinion on what color I should paint it…beige or aqua.
And overwhelmingly, AQUA was the winner! Which is what was calling to me too.
Want to see some of these projects in “live” time? Hop on over and follow along with me on INSTAGRAM. I’m always sharing in my stories as I’m doing projects, finding new furniture, fun finds….just all the day to day behind the scenes.
Either would have worked for the look I was going for, which was “nautical”.
I mean just look at it.
It’s trying so hard to be nautical in style, I just helped it along a little.
Beige or aqua would have worked as well…. “sand or water” are both perfect for that style.
I just thought the aqua stood out a little more and gave a bit more contrast with the white.
Nautical End Table Makeover
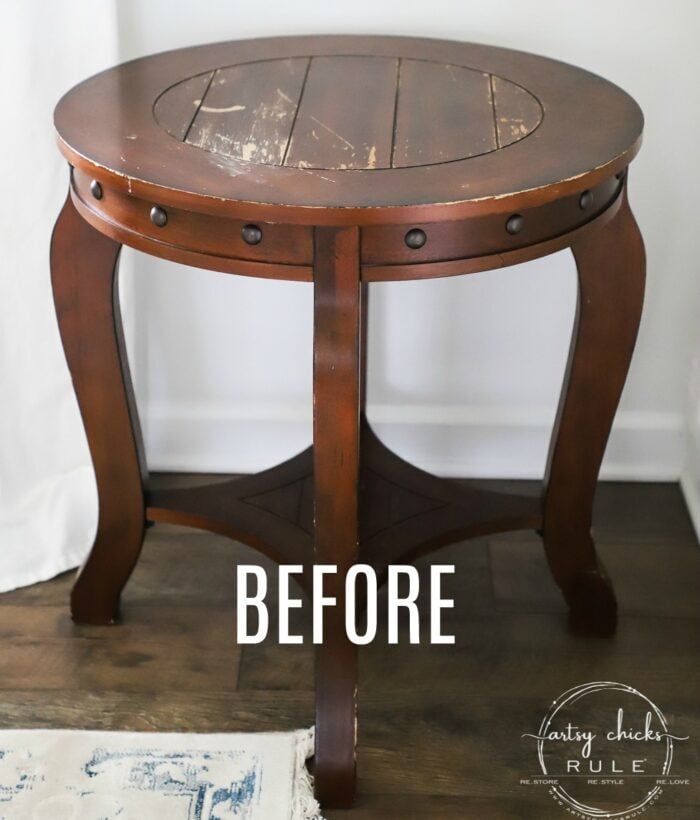
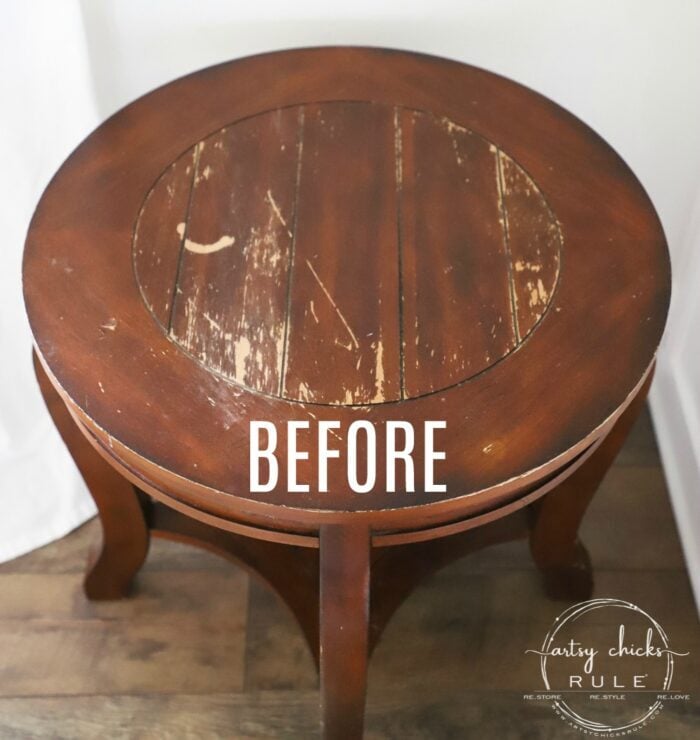
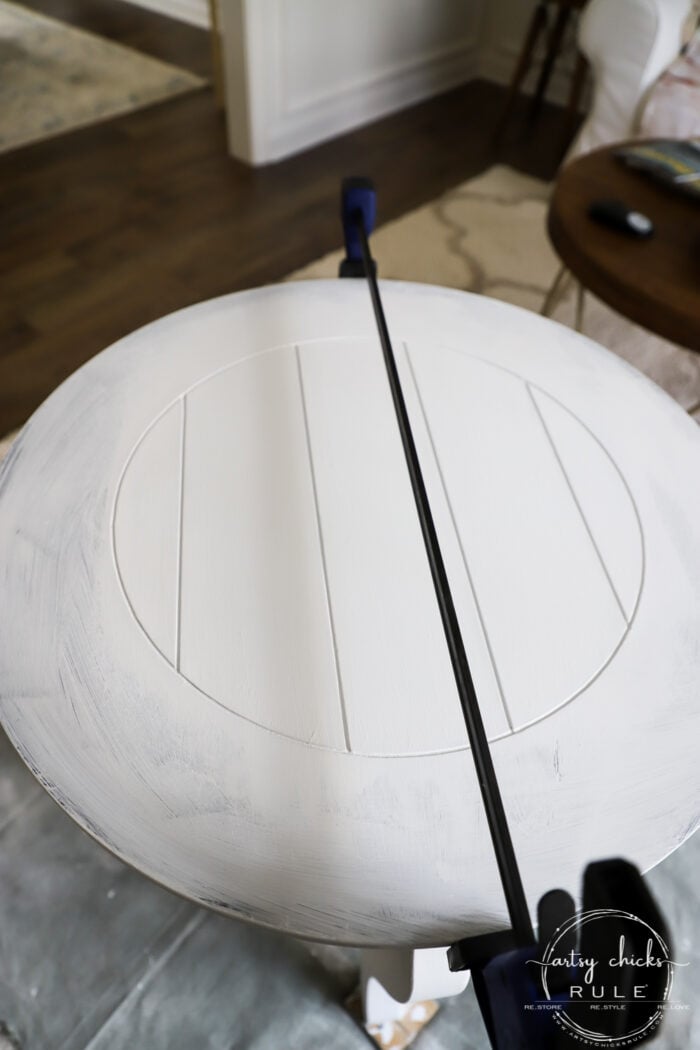
The top was in rough shape, so I lightly sanded that by hand to smooth things out before I painted.
Then I started by painting the whole thing white.
MATERIALS LIST
- White Paint
- Blue Paint
- Paint Brush
- Chip Brush
- Sandpaper
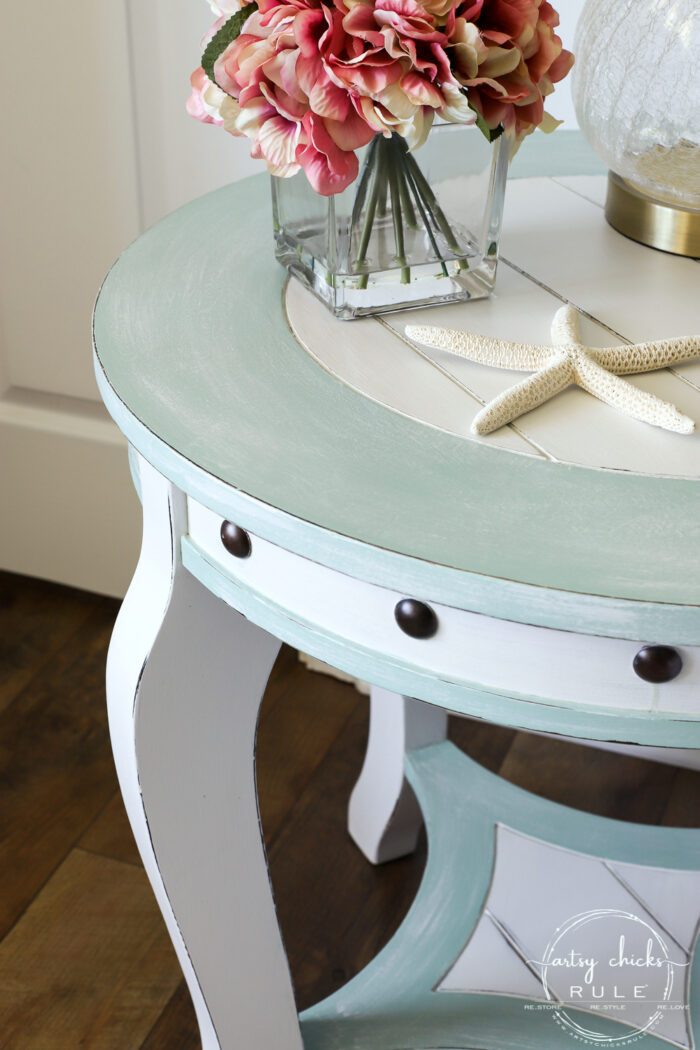
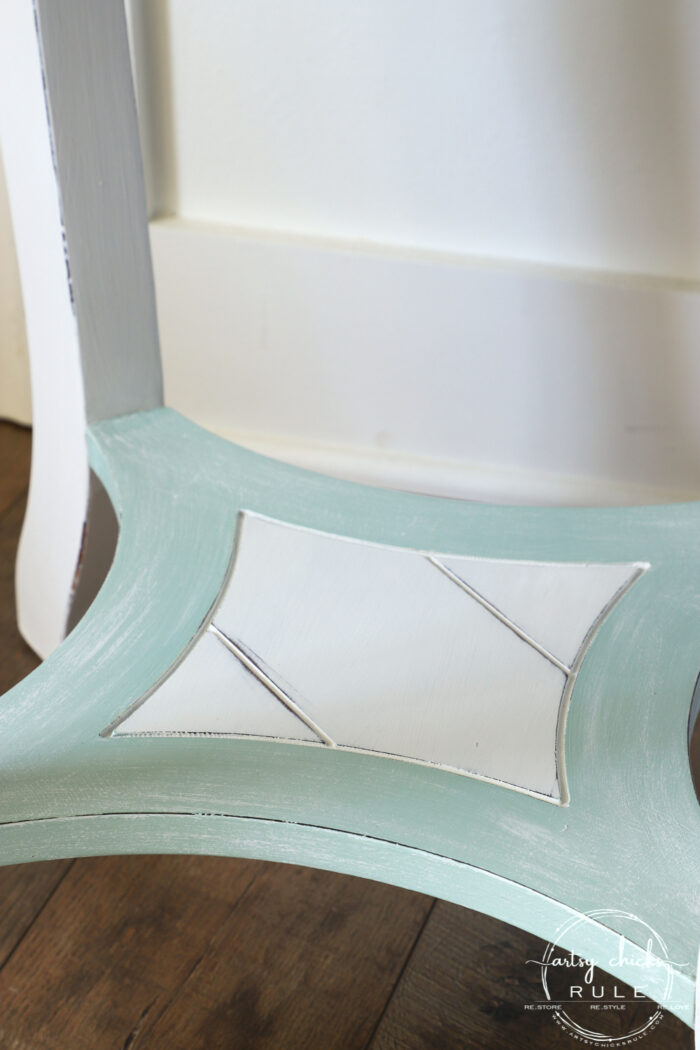
I decided to make the inset, striped areas, all white. I considered “striping” them, but in the end, kept it simple.
I did have a little edge on one side that was coming apart, so I added a bit of wood glue and a clamp to fix that up before I continued.
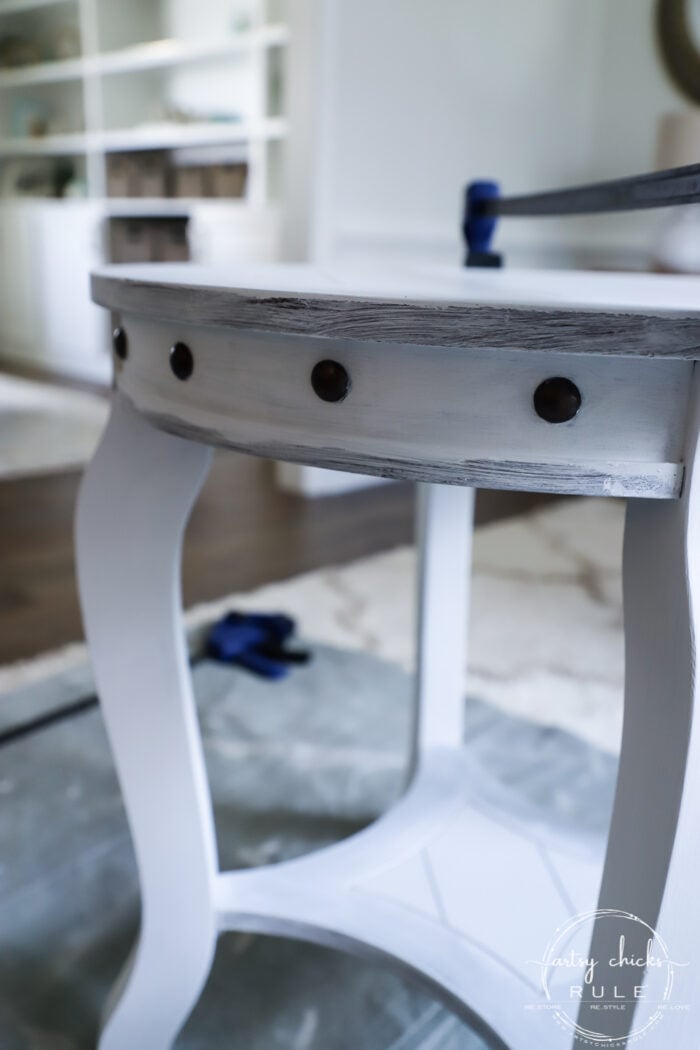
I was originally going to paint those metal tacks in a contrasting color, blue.
But I decided to keep them bronze because I thought (and so did my helpful hubby) it would look more nautical-ish if I did.
Are you new to chalk painting?? This post might be helpful to you >>> “How To Chalk Paint Furniture & More (tips & tricks I’ve learned!)“
That was a little tedious painting around them, but it was worth it.
If they had been screwed in instead, I’d have just removed them. But they were tacks. (I removed one)
And being tacks, I didn’t really want to chance breaking one of the points off the back and then not having a matching one.
So I painstakingly painted around them!
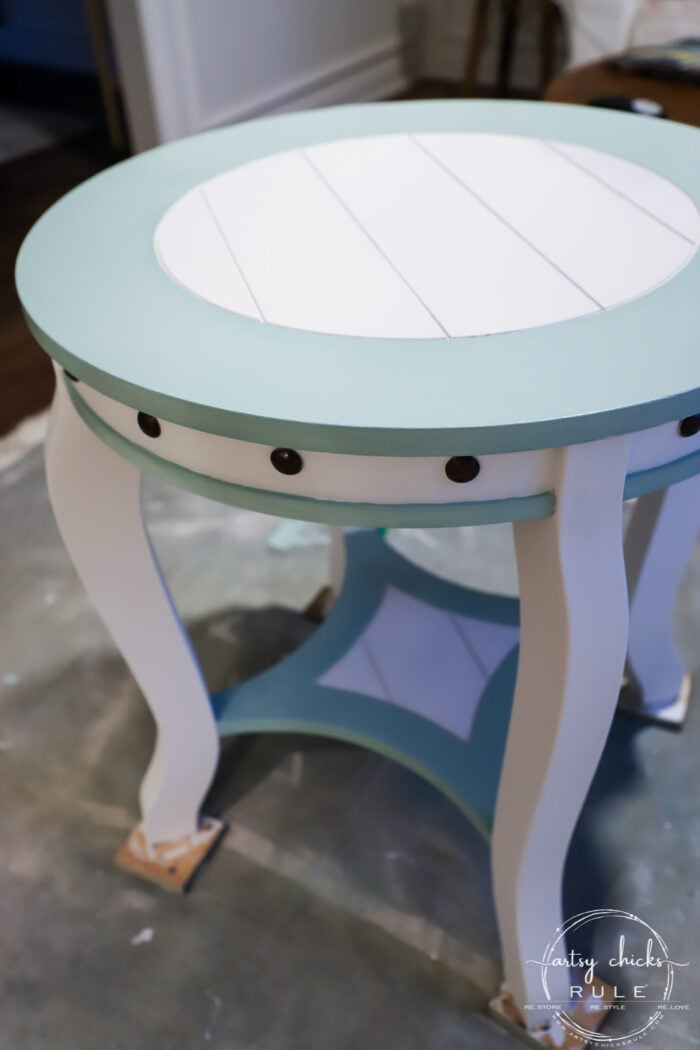
Then added that pretty blue paint. (similar paint linked above)
The blue is beautiful, but I thought it was a little too bright for the look I was going for, so I gave it a white wash…with a “dry brush”.
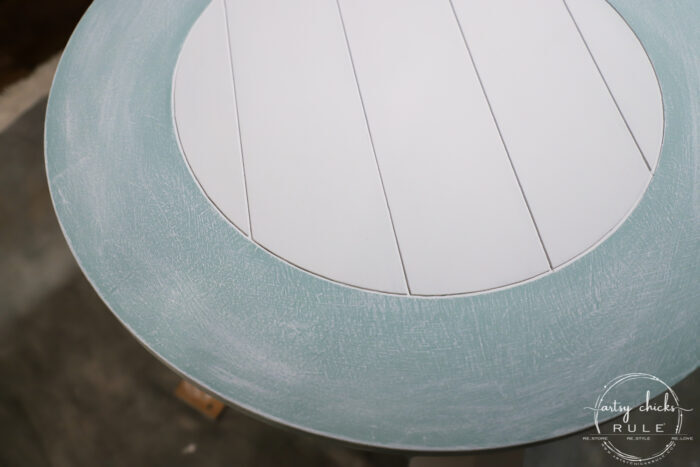
That softened it up nicely.
Once that was all dry, I then gave it a light sanding to distress it for a more relaxed look.
Want to know more about “dry brushing”?? Check out this post here >>> “How To Dry Brush – With Video Instructions”
I did two coats of Topcoat and done!
I’ll be interested to see if it yellows. That is unknown as of now.
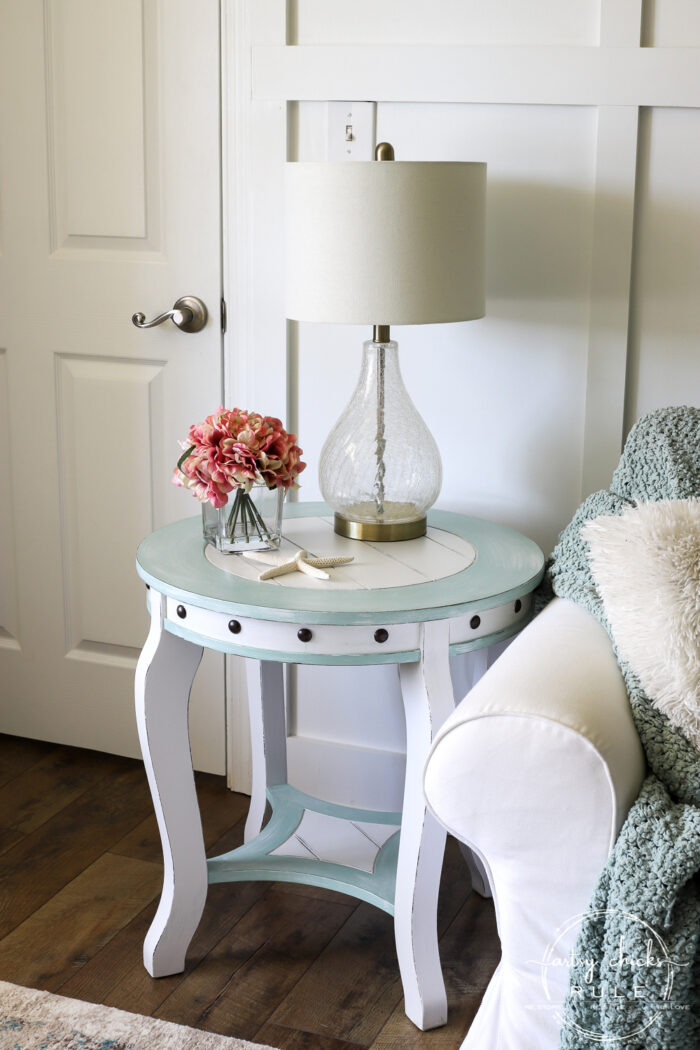
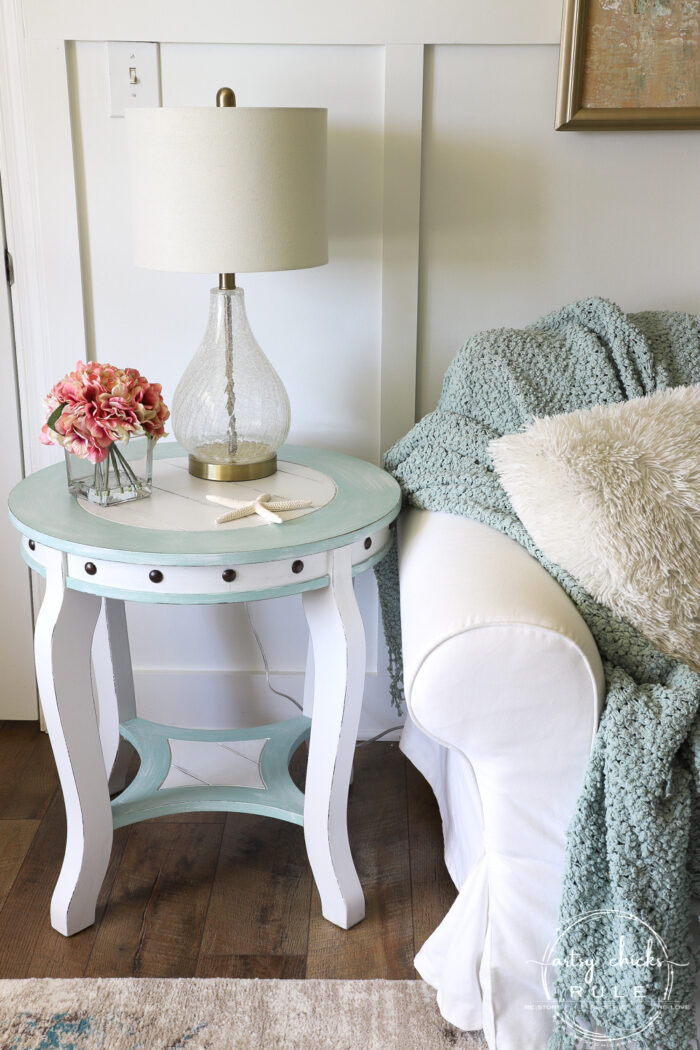
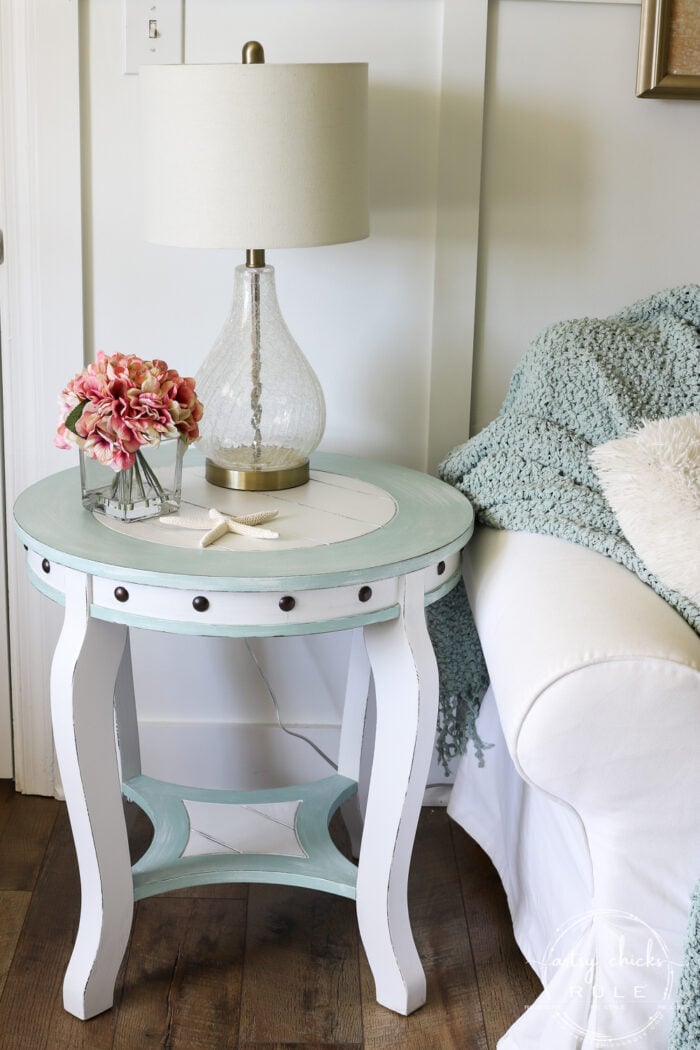
Looks right at home here!
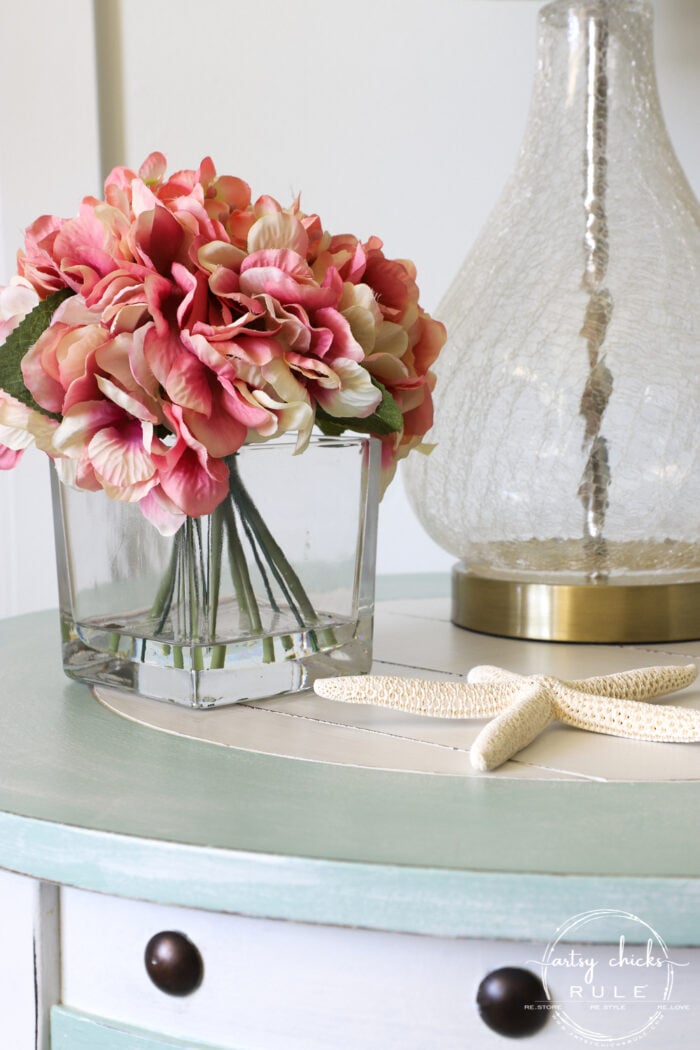
Close-ups.
There wasn’t really anything special about this table before, but it really shines now.
I think those bronze “rivets” just make it, don’t you?
This was a really simple (and quick! Minus painting around the bronze tacks, “rivets”) project.
Most would (and probably did) walk right past this cutie patootie of a table because it wasn’t really much to look at before…but it is now!
PIN it to save it!
I’ll see you back here on Thursday with another brand new spring project…that involves flowers, of course, and a mailbox!
UPDATE!! See it now here!!
xoxo


")

")
")

You “NAILED IT!” Nancy! I couldn’t resist the pun on all the nail head tacks. Your soft color palette and delicate distressing make this a winner. Wow, you do great work! :) I’m glad you didn’t pass this little table up but gave it a new life. Way to go!!!
Aw, hahaha, I love that!! Thank you, Christina! :) xoxo
What a cute transformation. I would have probably bought that table also. I love it! I have tried Gator Hide. It is easy to use on small pieces but when covering a big flat piece i find it hard to get smooth. I will keep trying though.
Thank you, Cheryl! Oh, that is good to know. This is only the first time I’ve used it. Will keep that in mind! xo
So cute!
Thank you! :)
Hi – I build tables from scratch starting with saw mill lumber after drying time (6-12 months. Guess what? I’m going to visit the Habitat for Humanity store today and see what’s there. We have a very large store here and I never thought about it. Only thing I have bought there were door hinges for my chicken coops and a few doors for work shops doors and work tables..Thank you for inspiring me to check it out.
Oh, that is awesome! I’m not sure about yours, but ours is always full of furniture! Good luck! :)
This is so cute! I’ve seen various bloggers post about “bleed through” when painting over dark stained woods, and using some kind of sealer first (shellac, maybe, I’m still confused about the purpose of shellac since it’s supposedly not as durable as poly). How do you know when you need to seal the stained wood? Or does the sanding take care of the problem? Thanks for any help! I am really interested in painting some thrifted wood pieces (possibly to sell) and want to do it right😊
Thanks, Vicki! Well, usually it’s those reddish stained pieces. This one was not one of those, thank goodness. But you can kind of tell when you see them! And when you have one of those reddish pieces, sanding almost always makes it worse. I would say if in doubt, save yourself a headache and Shellac it! ;) xo
This is my new favorite, such a sweet personality piece.
Aw, thanks, Debbie! :) xoxo
I love this so much!! The contrast of the nailheads really makes it! Too bad you only have one…it looks so good in your space!! XOXO
Thanks, Christy! :) I think so too, they really do! And I know, I still have it sitting there just like this actually! It will have to go soon though, lol! xoxo
I LOVE IT! The colors are so perfect! You should move here to Oregon! smiling
Thank you so much, Rose! :) Aw, haha, that’s a ways away from me! ;) xoxo
I definitely wouldn’t have given that table a second glance in the thrift shop. Now that you worked your magic on it, it’s fabulous, Nancy! And it does look great in your living room. I say life is too short for matching furniture. Use something different for the other side of the couch!
I definitely wouldn’t have given that table a second glance in the thrift shop. Now that you worked your magic on it, it’s fabulous, Nancy! And it does look great in your living room. I say life is too short for matching furniture. Put something different on the other side of the couch!
Thank you, Marcie! Ohhh, that is a thought! I might have to consider that!! xoxo
FaBuLoUs!!! Sea Glass by Dixie Belle is one of my favorite colors to use :) I love the the contrast of the tacks too. You Nailed It!
Thank you so much, Mary! :) I agree, that color is just beautiful! xoxo
I so enjoy your makeovers but this one is my absolute favorite. It is fun and versatile and just plain lovely to look at. Nice creativity and execution!
Thanks so much, I’m so glad to hear that! :) This one turned out better than I’d imagined! Love when that happens! xoxo
Why not prime red furniture rather then using shellac ? wouldn’t that stop a bleed through of the wood ?
Thanks
Lynn
PS love your work !!
Hi Lynn!
Yes, the shellac is the “primer” in this instance. (and if you click those links, there are a couple that look like more traditional “primer”…with the addition of shellac) But some of the regular primers out there (without the ingredient of shellac) I have found don’t work as well. You will still sometimes get bleed-thru with those. This is just something I’ve had the best luck with. There is nothing worse than doing all that work and having to go back and start over or redo!
And thank you!! I am so happy to hear that. :) xo
Thank you for your reply, and I love watching what you do.. I am just starting out and learning..
Hugs
Lynn
You are so welcome, Lynn! xo
Nancy – it looks great. I especially love that you didn’t paint the tacks.
Well done!
Thank you, Michele! Happy New Year! xo
I absolutely love the style and colors you chose for this project! I bought a couple of church pews last fall that I want to paint and use outside on a deck (uncovered). What would you suggest I use to protect them from the elements?
Your work is gorgeous!
Thank you, Jen! Fusion Mineral Paint works for outside projects. Just clean it well with a TSP type of cleaner and apply thin, light coats, drying well in between. You can find the paint and TSP cleaner in my shop, here. :)
Really cute table. I love the aqua color and the distressing. Great job and thanks for all the details. Enjoy your week.
Thank you, Sue! I hope you are having an amazing start to your New Year! xo
This is perfect. I was picturing a lamp I have perched on it.
Thanks, Rose! Oh fun!! xoxo
Very sweet, Nancy. I love the colors, especially the way you toned down the blue. Somebody will snap it up pretty quick, I predict.
Thanks so much, Naomi!! I have actually held on to this one because I love it! Sadly, I have nowhere to use it so may have to sell it after all. xo
I love love love this little table and it looks perfect in that space. You should keep it lol and just use something else on the other side. Is matched tables a thing anymore anyway? I’m not sure. The finish you gave this is perfect. Wanted to comment regarding comments on the Gator Hide. What many do on a large piece (like myself) is first put a coat of their Satin Clear Coat on and that goes on very easily and smoothly with the applicator pad or brush. Then once very dry use the Gator Hide over that and it will go over the large piece much easier and smoother. It’s also helpful on very dark pieces to add just a few drops of the color paint you used to the Gator Hide. Just thought worth mentioning.
Thank you, Debra!! I’m trying hard to find a place for it!! I love it and didn’t want to let it go. And thanks so much for the tips on the Gator Hide! :) xoxo
this looks soooooo pretty!!!!! reminds me of sunny florida seashores! wow you totally transformed the table and it looks beautifyl!
Wow! You have such vision, Nancy. I didn’t see the nautical as you did – but now I see it! Perfect.
Aw, thanks so much Dalila! xoxo