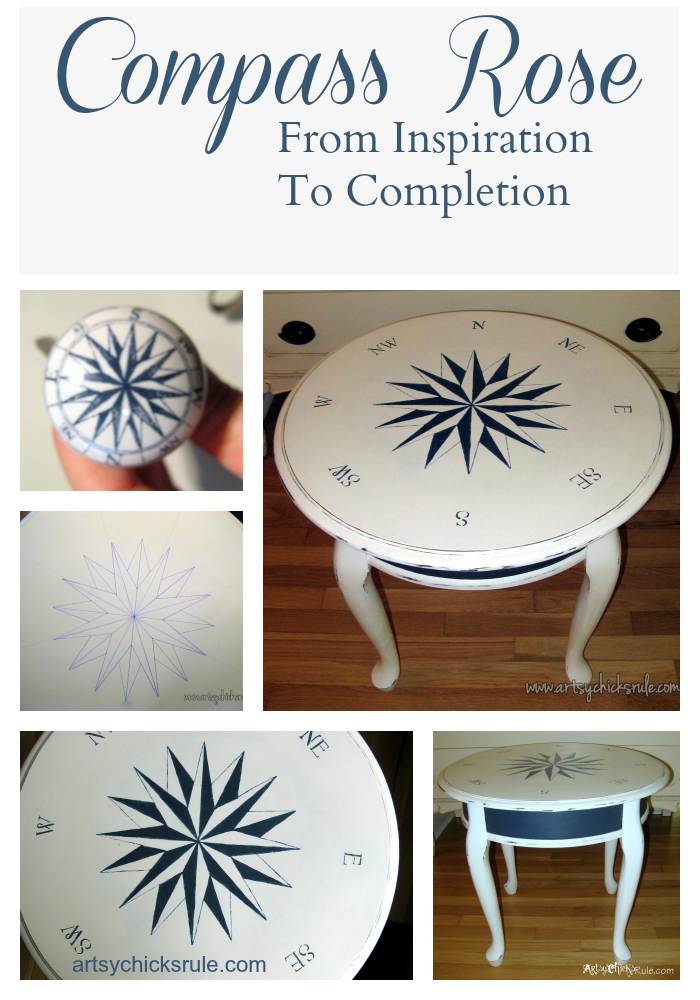
Hand Painted Compass Rose Tables (Annie Sloan Chalk Paint)
Create hand painted compass rose tables with ease! It’s really not that hard to do as I’ll show you in today’s post.
This post is a long time coming.
I actually had it written (many) months ago and you would have seen what I did to this poor little table long ago but…….it disappeared.
Poof! Gone one day, never to be seen again. Not sure what happened to it? But I was not a happy camper! lol
But I learned my lesson pretty quickly after that.
All posts get saved elsewhere once written. Something I suppose I should have been doing all along. Soooo…..
….guess it was time for a rewrite…finally.
And well, because I also picked up an adorable table at the thrift store a while back for $8….that I’m going to paint a compass rose on, for me! (Which, in turn, got me inspired to tackle this post once more.)
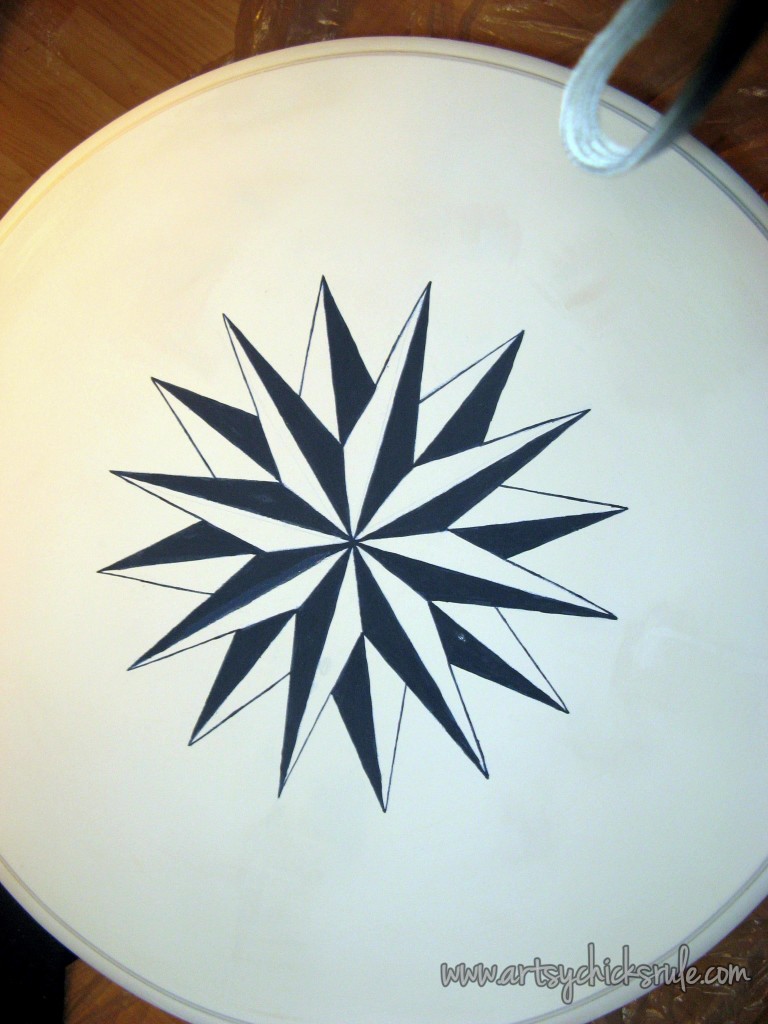
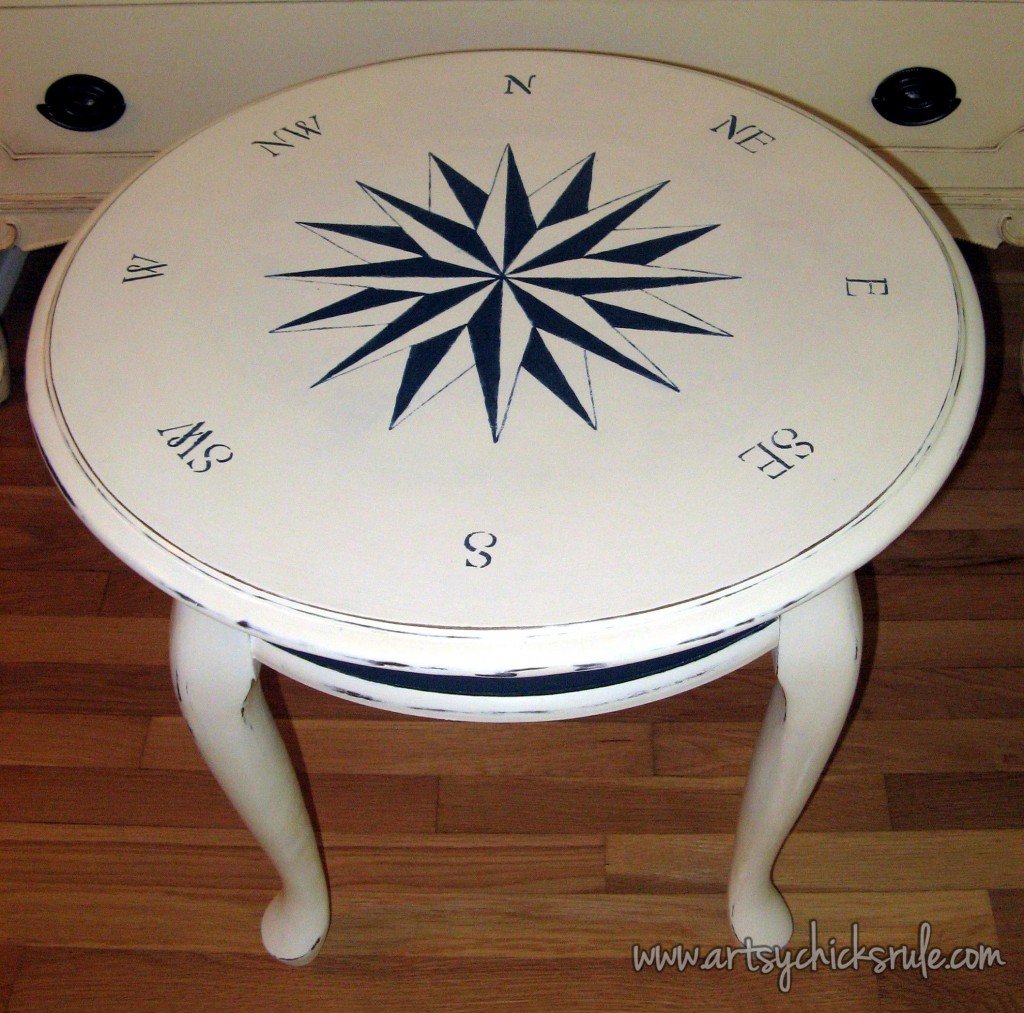
The 2 compass rose tables you see here were not for my own home. The first one above I painted early last year and it went to and was sold at the shop.
The one below was a gift for my sister’s birthday….over a year ago.
I love compass roses and anything nautical really. I should, I live right by the coast, right?
Update: I’ve since painted many things with a compass rose, see them here:
- End Table Makeover
- $20 Restore Dresser Makeover
- Nautical Wall Map (and stencil)
- Round, Gold & White Table Makeover
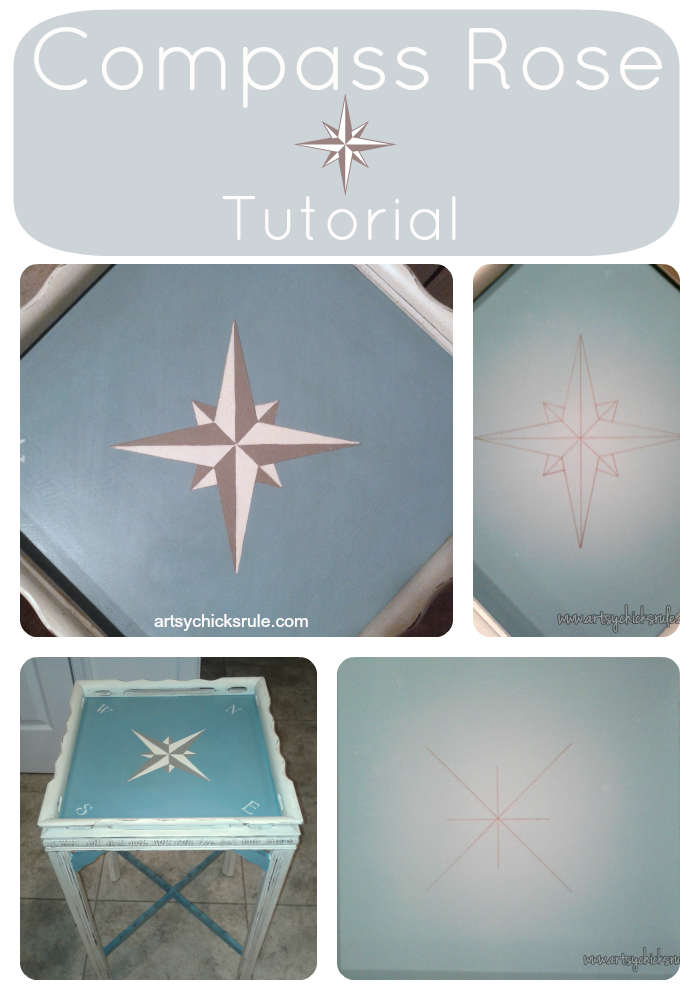
I’m thinking more like the first one I posted but with the colors from the second one.
My inspiration for the first of the compass rose tables came from this little knob here….
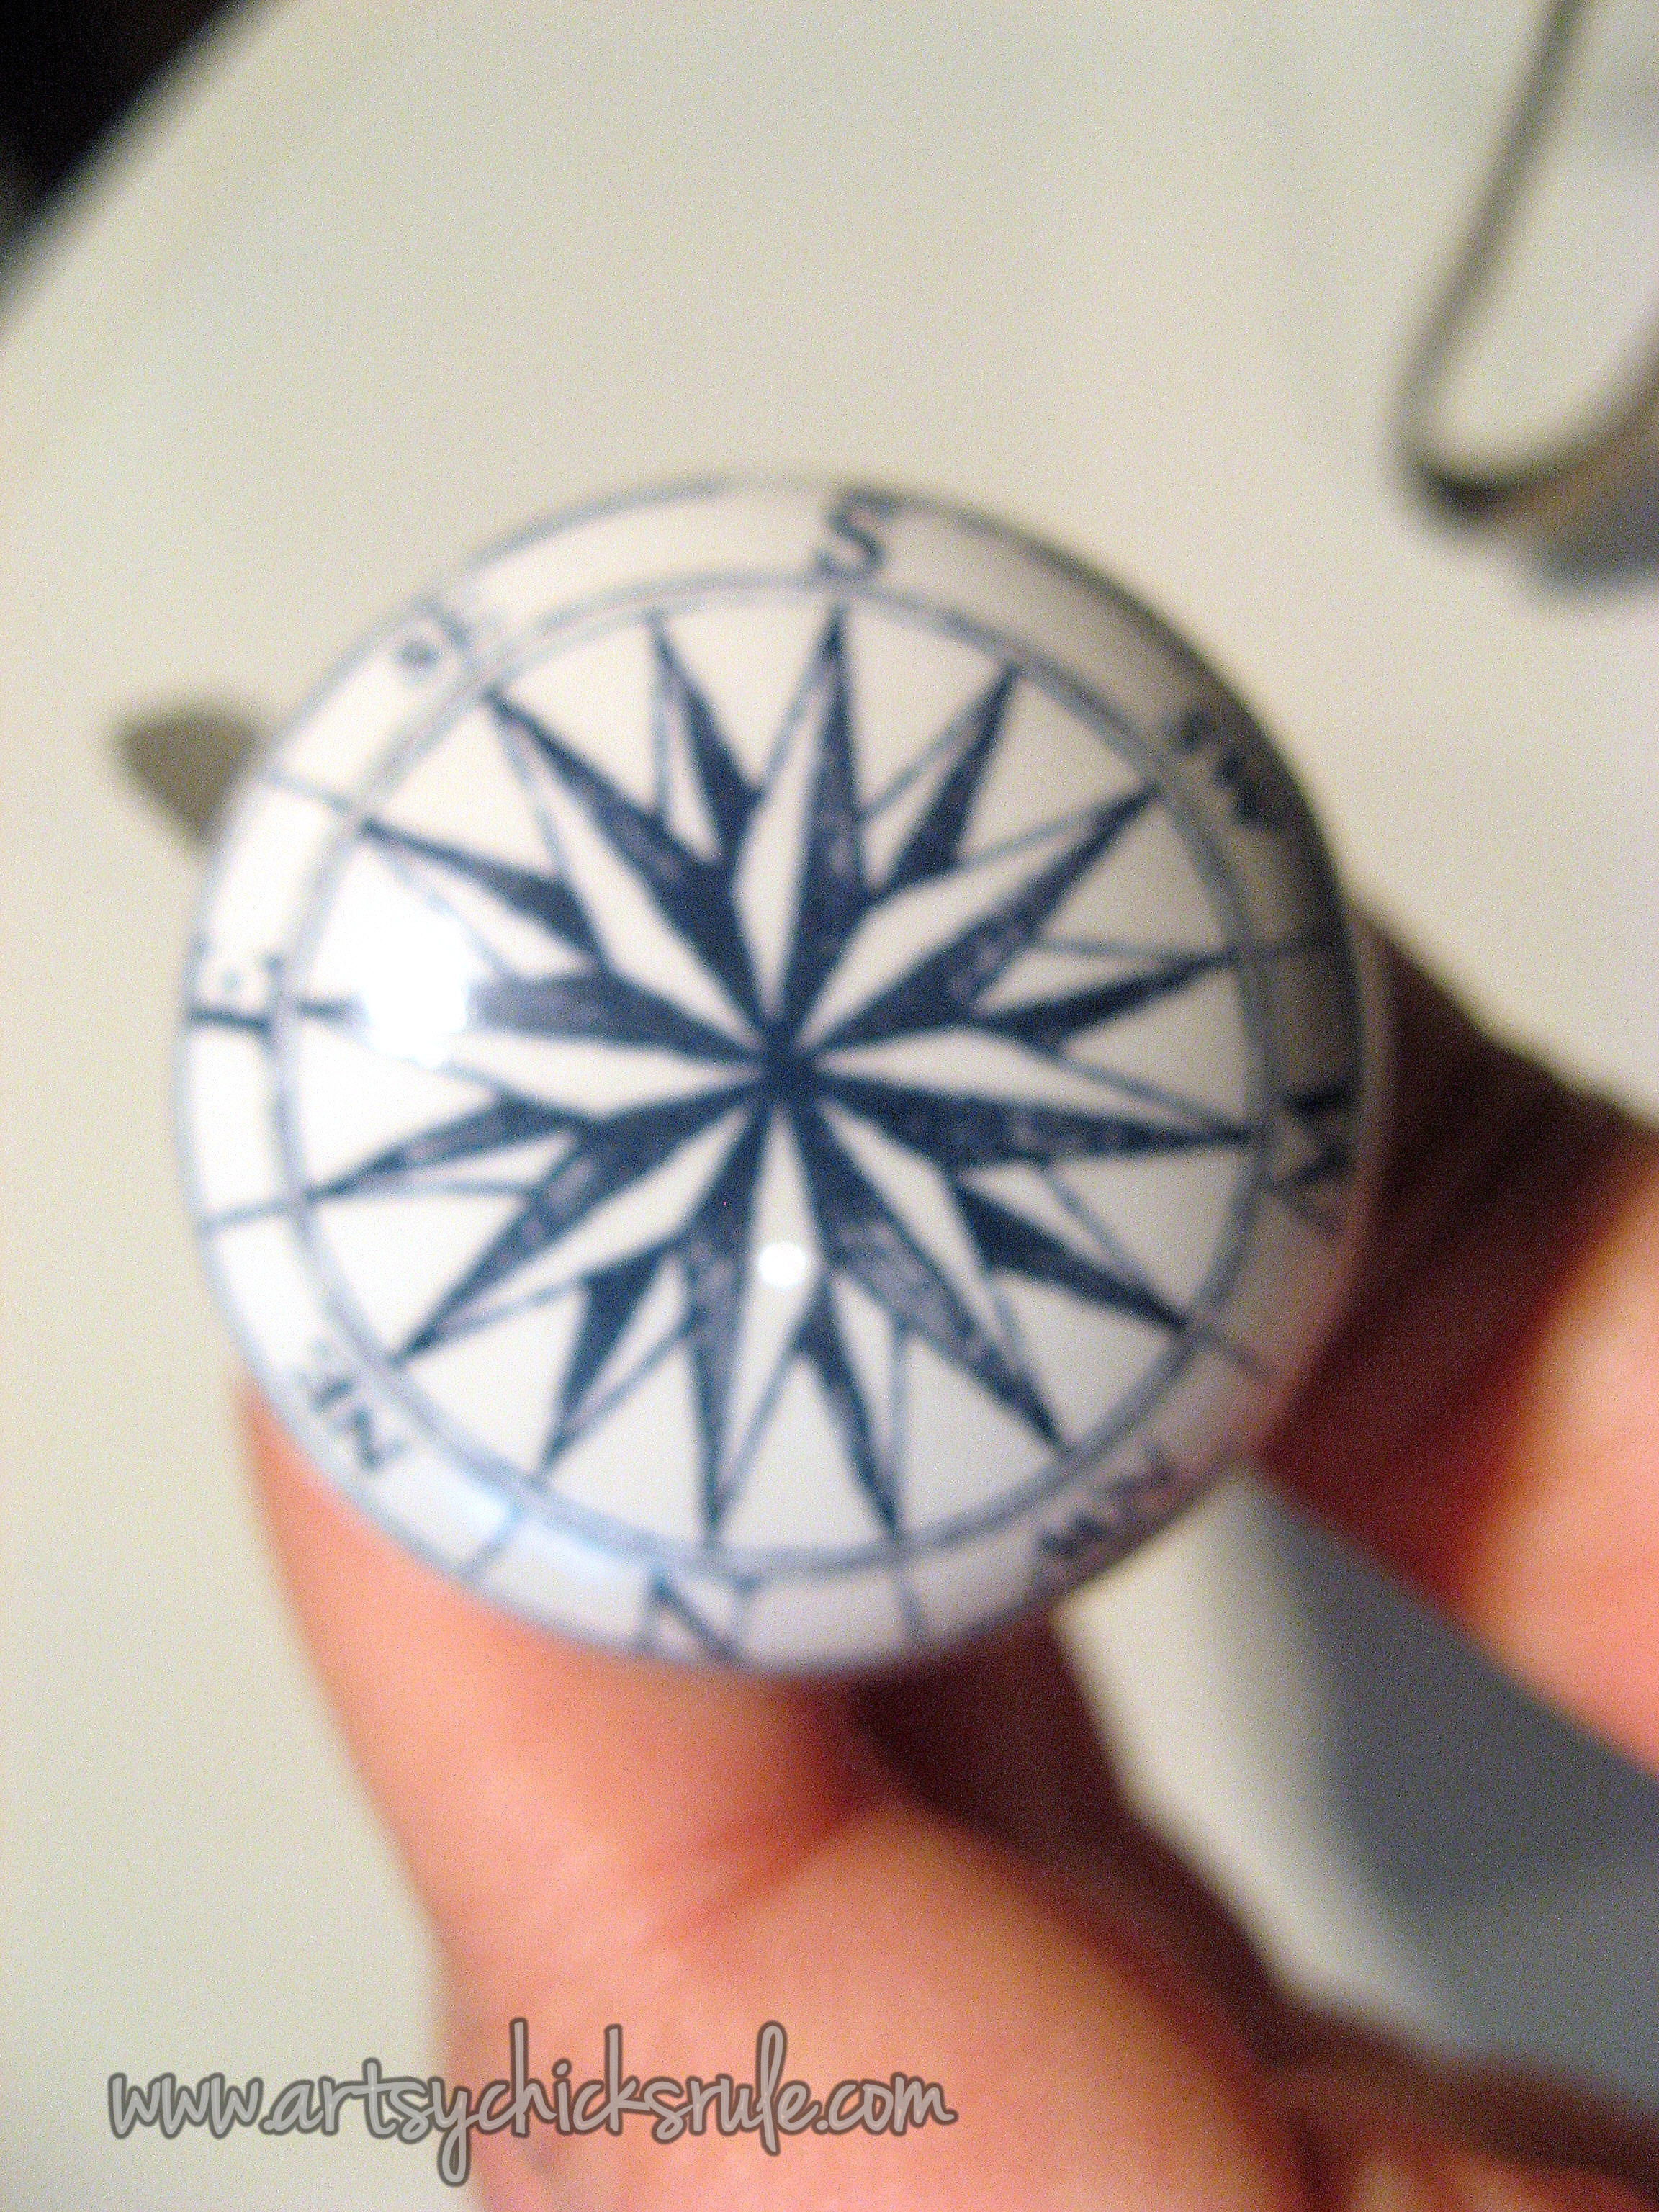
Blurry, sorry, old photo. But you get the idea.
I had originally planned to add this knob to the little round table but in the end didn’t. (It didn’t really have a drawer…just a pull to a “fake” drawer shown in the picture below- what’s the point of that? So I left it off.)
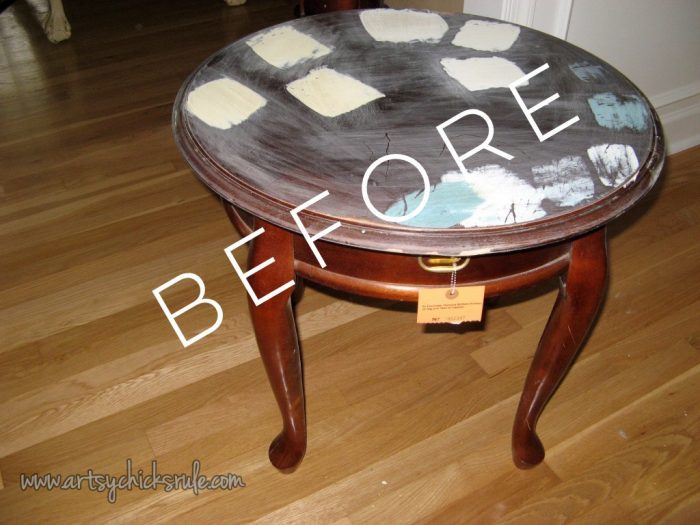
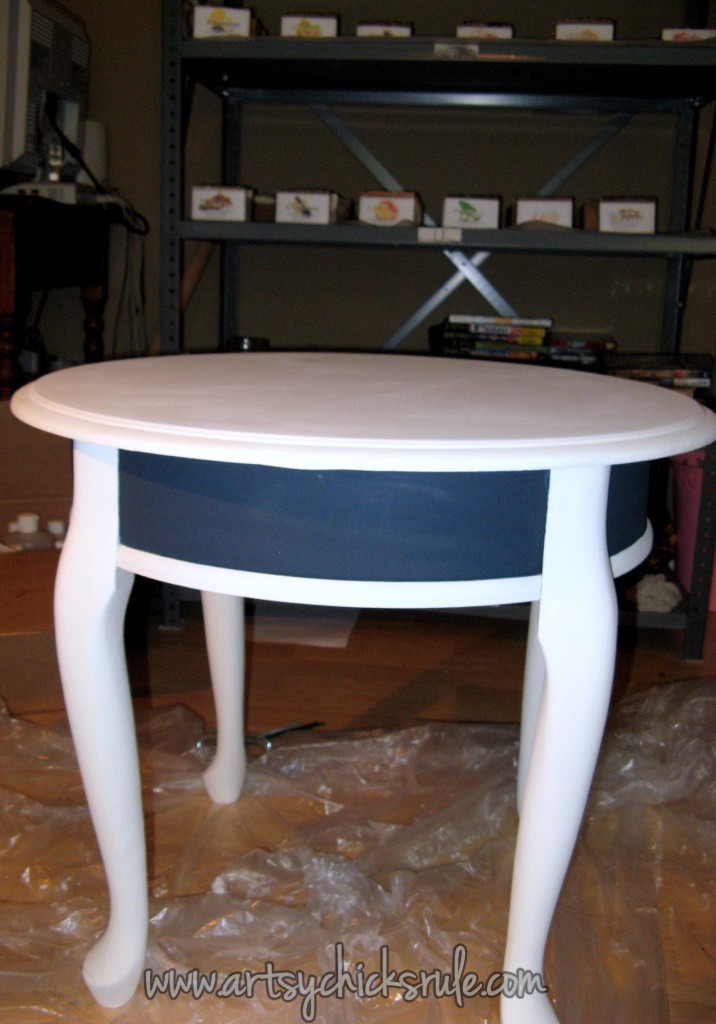
This was the table before the pretty paint job….I know….what the?
Well, it was a whole $6 from the thrift store and it had THE MOST PERFECT super slick top to test out adhesion properties of some paints I was trying at the time.
Want to know about 26 other chalk style paints?
I’ve got the low down for you right here! >>> 26 Types of Chalk Style Paint For Furniture
Poor, sad little thing stayed that way for quite awhile.
I sanded it well to smooth it out and then painted it with Pure White Chalk Paint and a blend of Napoleonic Blue/Graphite (also Annie Sloan Chalk Paint) to get the Navy color.
Those are my hand made soaps in the background. I’ve been making soap for about 15 years now.
I used to own my own company selling natural soaps and soy wax candles (among other natural products)…but that feels like it was a lifetime ago now.
Wait…it was!! haha Well, many years anyway. ;)
I am going to deviate a bit and do a natural soap post soon though. If you are interested, keep an eye out for it.
UPDATE: See the “how-to” natural soap making post now, here.
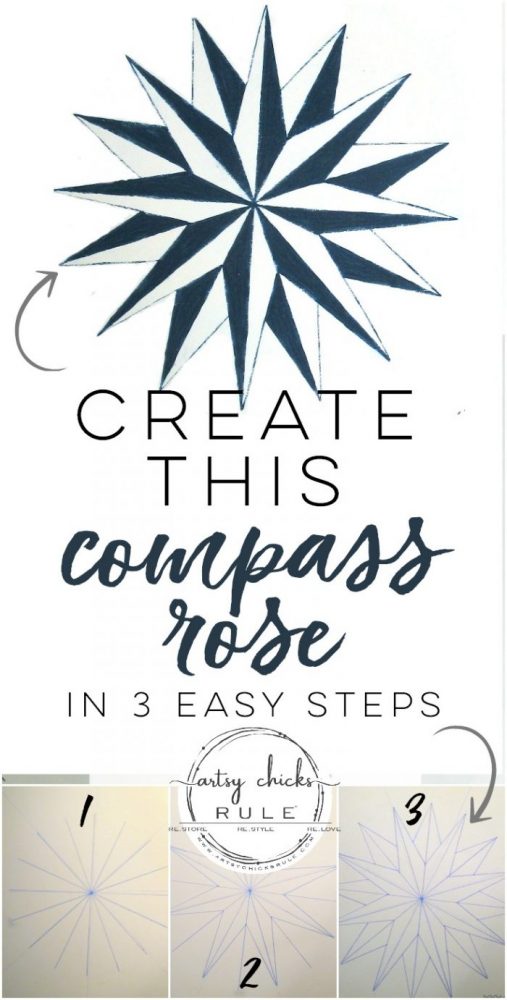
So back to the table…I drew the design on paper first to get the measurements how I wanted them for each line.
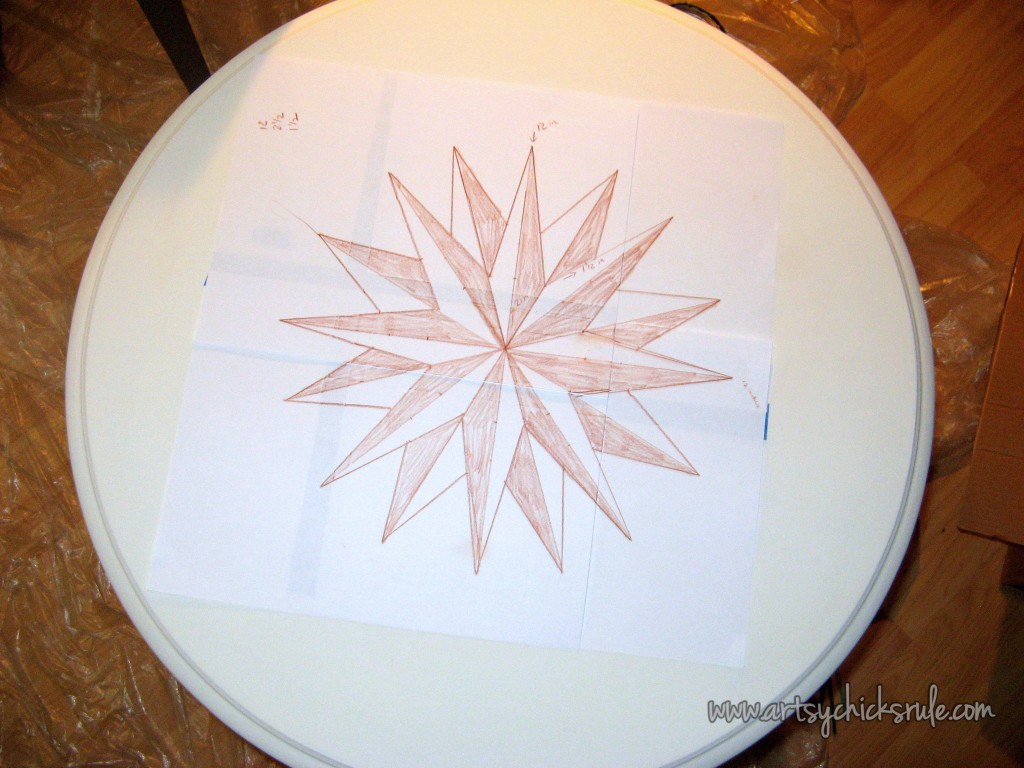
Then I found the center of the table and got started….(this is the same for both styles I have in this post)
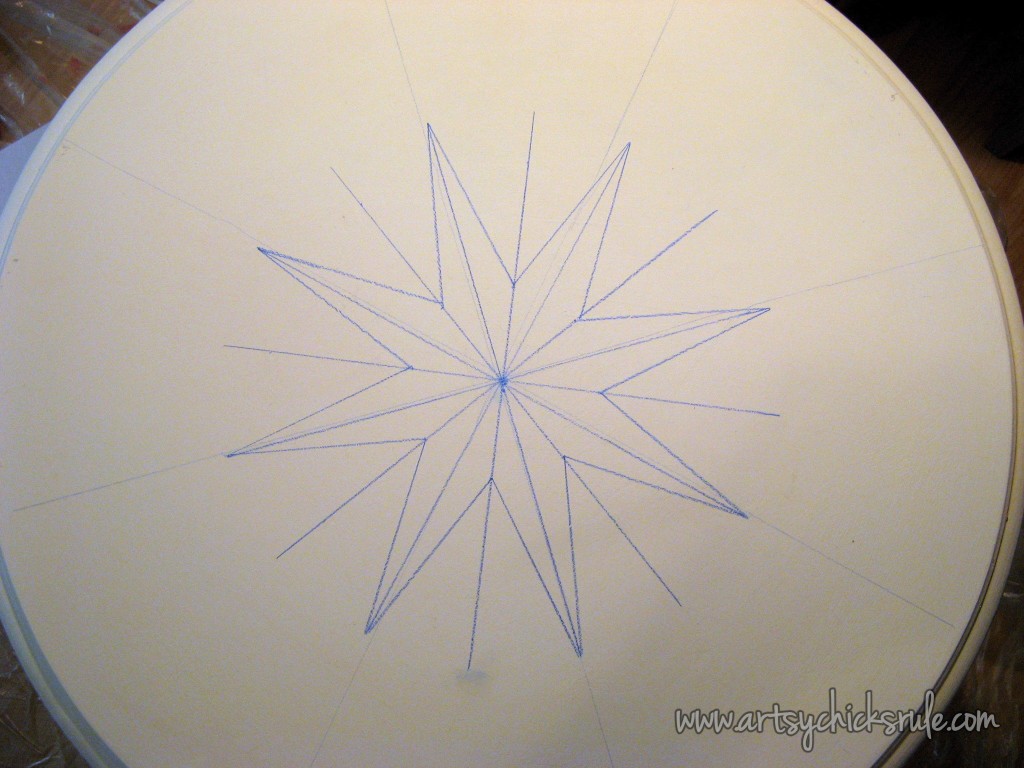
You can see the long lines I drew to find the center. And no, my other lines are not “perfect” but they don’t have to be….it’ll work out.
Doesn’t look like much yet…..

Adding to the design…..(it’s “off” a little but that’s okay..you’ll see)
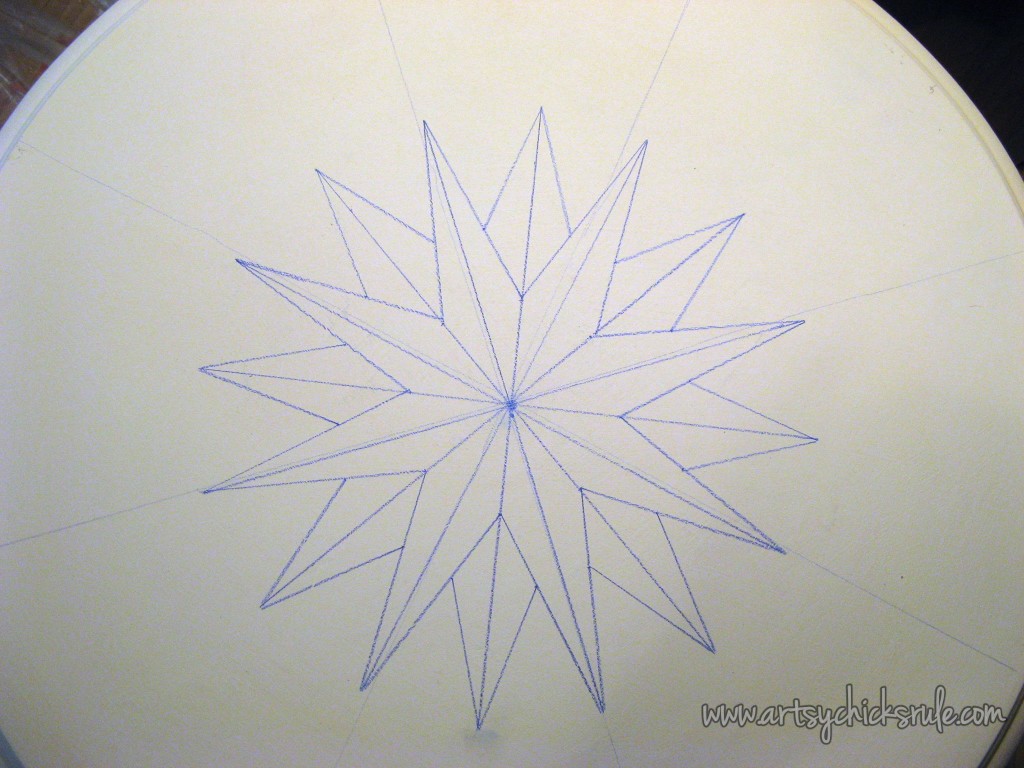
Finished design (I used a navy blue watercolor pencil to do this since I will be painting it in with the Chalk Paint I mixed up in the Navy Blue color)
Now it’s starting to look like something….
Areas of the compass rose painted in….a little tedious but like I’ve said in some of my other posts, I like this kind of mind numbing work.
It’s actually relaxing and cheap therapy! ;)
Added the lettering (using a stencil)….then distressed it all just a tiny bit…..
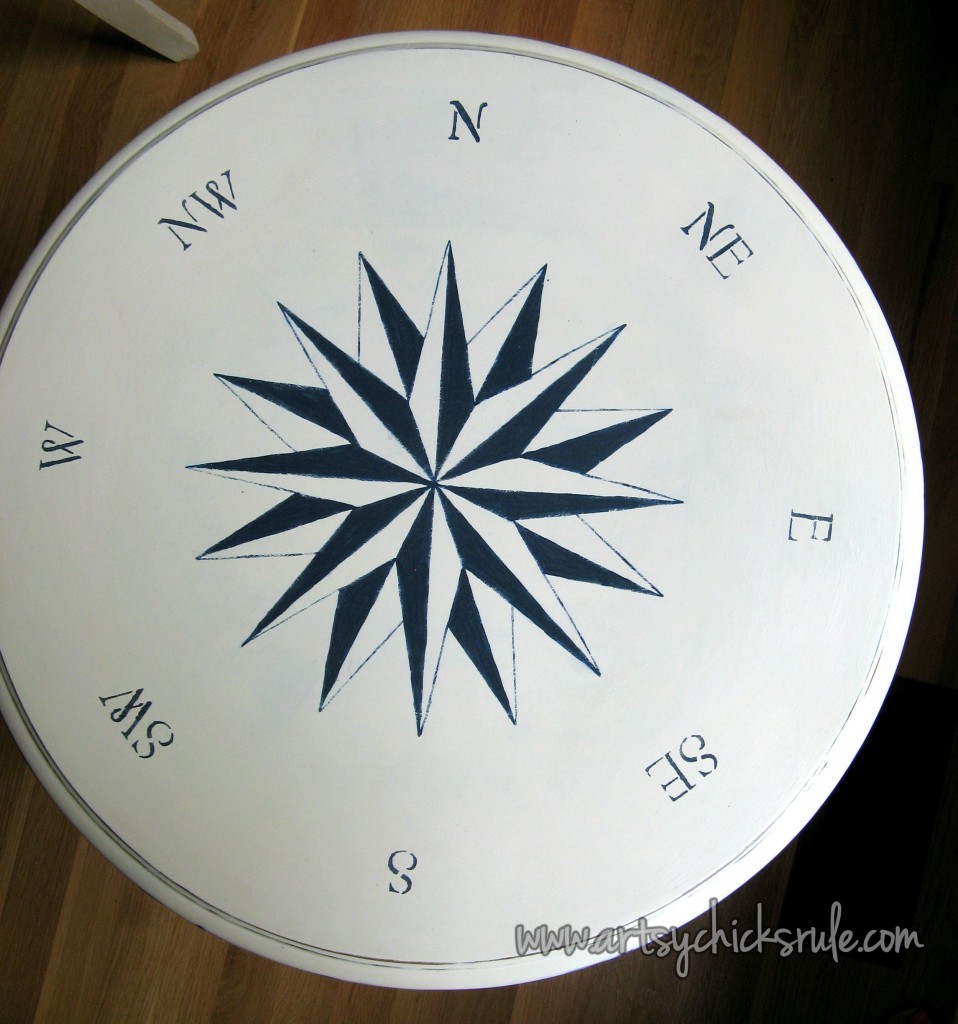
Finished up with a coat of Clear Wax…. a little buffing and it was complete.
These were both so much fun to do. I am really looking forward to starting on my new piece.
I love both styles I did but just adore the complexity (not really, it only looks complex as you saw) of this one.
Fun to do!
Be sure to PIN these compass rose tables to save for later! :)
Easy really.
Just measure, draw some lines and then paint “in the lines”, right? Anyone can do it!
Be sure to check in later to see how I updated our kitchen island…with paint! :)
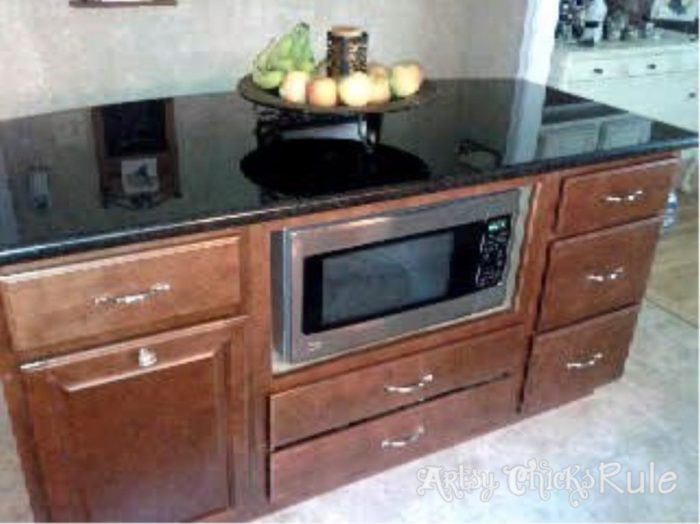
UPDATE!! See it now, here!!


")
")


")


Looks great Nancy!! I had a perfect round table I was going to use for a similar compass design but ended up selling it to my daughter for a project she was doing! Haven’t found another one yet but keeping my eyes peeled! I love this kind of “upscale”nautical look too!
Thanks Lorraine :) Yes, those little round end tables are “usually” easy to come by. But I had someone who wanted me to make one just like this one that I sold awhile back and I had a time finding one!! Figures..I’d come across them many times when I wasn’t looking.
Nancy
I love this and I totally want to copy off you. :P
xoxo
-andi
Hey Andi!! Copy away!! ;) Nancy
Amazing detail Nancy! I love it. I need it for my master bedroom :)
Hi Mandy,
Thanks so much :) I can’t wait to get started on the other one and am thinking of something different I can do to it. But I’ve only got a million other things going on at any given time so it is just added to the list. ;)
Nancy
Nancy, this is so darn cute! I love the idea of the compasses on the round tables. Beautiful idea! :-)
xoxo
Denyse
Hey Denyse,
Thanks so much! I love these and have slowly (<--not really lol) changed my home from very warm colors (reds, golds, tans etc) and a Tuscan-ish theme to a more coastal, cottage-y , eclectic (and colorful! blues, teals, yellows, coral) so I really need one of these tables now. I'll get to it one day! ;) Nancy
Your tables are really nice, what a great job you did. I have to ask you how you painted the middle shelve of the table. I feel like if I tried to do that it would come out really bad because you are working on the underside. I think I would have all kinds of brush makes because there is not much room to work. I know it is a silly question but I am just getting into painting furniture and need to learn the tricks of the trade if you do not mind. Once again your work is really nice, thank you for sharing with us.
Debbie
Hi Debra,
The blue area? I actually used a flat smallish artist’s brush to go around the edges. It’s easy to fix if you get a bit of paint where it doesn’t go…just take a small brush and touch up. I did that on this table. :) In the end, no one knows!
Hope that helps
Nancy
Love what you did with this table! I have the same table I found on the curb and I gave it a face lift several months ago. It was my first attempt at using milk paint and I haven’t been completely satisfied with the results. Now this just gave me some inspiration. Thank you so much for sharing your talents in this tutorial Nancy!
Hi Marie :) Thanks so much! Yes, these tables are usually easy to come across at the thrift store but free is always best! ;) The round shape make them perfect for a Compass Rose design. I have only used Milk Paint once or twice but haven’t really gotten a good feel for it. I need to try it on a few more things myself. Nancy
Love your table, Nancy! You really do some amazing work… :)
Hi Karen!
Thank you so much :)
Nancy
This is gorgeous, Nancy! You never cease to surprise me:) This would be perfect for our “Blue” theme this week! We are hosting a sixteen week fall party challenge, each week has a different theme. I hope you’ll consider sharing! http://www.confessionsofaserialdiyer.com/get-your-diy-on-fall-party-challenge-week-1/
And I know you’ve got lots of fun blue projects! :)
Aw thanks so much Christy :) I’ll come by and link up! (and yes, I do love blue ;) ) Thanks for the invite! Nancy
So, so beautiful, Nancy! Your talents always amaze me! Love the nautical element, too. Hope you’re having a great week!
~Abby =)
Hi Abby! Thank you so much!:) I’m not having a great week…been pretty sick, ugh! Hope you are having a better week than I! ;) Nancy
Nancy, I know I already told you how much I love this table. This is probably one of my favorites. Just wanted to stop by again and say thank you for linking up to our Get Your DIY on! I hope you’ll find some time to come back again :) Hugs!!
Mandy @ The Hankful House
Aww thanks Mandy! :) xo
What a stellar job – awesome table Nancy!! I too enjoy the quiet calm of repetitive painting work… kind of is therapeutic or meditative…
Thank you Krista :) So glad I’m not the only one! It is wonderfully relaxing really. Nancy
What a great idea for a round table. I have a round table that I painted years ago for my son’s room when he was little. He has since outgrown it and I’ve been wondering what to do with it. My entire house has a beach cottage theme, and the nautical star would fit in perfectly. I only hope that it will turn out as nice as yours. It looks absolutely beautiful!
Thank you, Alice. Yes, that would be perfect for yours too! I have total faith that yours will be just as nice! :)
Nancy, I love this! WOW! Great job…pinning it!
Thanks friend! …and thanks for the pin too! :) Nancy
Hi my beautiful friend! I told you I really loved this table! I’m featuring it tonight at our Get Your DIY on Fall Party Challenge! Thanks so much for sharing it. If you’ve been working on a fall wreath, come by and link it up! :) XO
Awww thanks so much Christy! That is so wonderful!! I don’t have any wreaths but I’ll be linking up to some of your other parties. :)
xoxo
Nancy
I absolutely love this!! It’s ironic because I literally just purchased those knobs off of a shop on etsy almost 2 weeks ago and have been anxiously awaiting their arrival! I love the blue mix you did. Do you happen to have the recipe for that? Does the color match well to the knob?
I may have to borrow your clever idea with this table and do a compass too (hope you don’t mind!)! How did you paint in the lines? Did you use painters tape? Looks so tough!!
Amazing work!
Hi Tina,
Thanks! and Oh yes, those knobs are great! I don’t actually have a recipe for it but it was easy to mix and match. :) You just add a little of one or the other to get to the correct tint to match the knob.
For painting in the lines, no, I didn’t use painter’s tape but you could. I have a pretty steady hand so just painted free hand. (not tough, really!)
Thanks again!
Nancy
At the point that you have sanded, and painted it and are ready to sand over it, I noticed that the wood that shows through is a dark wood….after you sanded it, did you stain it so that the darker stain shows through after sanding or is that a wax????
Hi Mary,
Nope, the color of the wood stained wood is showing from underneath. I’m sure it looks a bit darker than it is because of the contrasting white. If I don’t have to sand something completely down to the wood (which I usually don’t) then the original stained portion shows through nicely. :)
Hope that helps!
I love this! What brush(es) did you use to paint the detailed points of the rose?
Hi Susan!
I did this one a long time ago but I am fairly certain I used an artist’s script liner brush. It’s what I always use to get those fine points, thin lines, etc. I have the most control with it over others. Hope that helps! :)
Love it! You put a lot into this little table that ost would not have! Perfection!
Thanks Rose! :) I love doing the compass rose design! xo
I love this table! I also have a question for you. I always seem to have a problem with the darker colored paint dust from sanding smearing onto the white or lighter colored paint that is the base. It’s so frustrating to try and clean that off (I usually have to use a lightly damp cloth and Q-tips to remove it. Do you have any secrets to share that might help me to not have that be an issue?
Thanx!
Hi Kristina!
Thanks! :) Yes, that can sometimes be a problem. The only thing I can really offer is to make sure the paint is really dry before sanding. I would think the damp cloth might make it worse? I don’t think I’ve done that but I do believe I’ve done the exact same thing with q tips before! ;) Another idea would be to poly coat it before you sand. That might work better. Sorry I’m not much more help!
Nancy. Just want to tell you how much I enjoy your blog I have learned so much and it has been a god send since my husband recently passed away. I enjoy doing it and it keeps me busy and I earn a little money! I am going to try the compass rose on a small hexagon table that I found for $5.00. Wish me luck. Thanks Jeanette
Hi Jeanette!
Thank you so much for the kind words. :)
I’m so very sorry you lost your husband. That’s a difficult void to fill but I’m glad that the blog has been helpful in your healing. And that’s so awesome that you enjoy doing this and you are making money too! Yay! The hexagon table will be perfect for a compass rose! Good luck and fun xoxo
Nancy, tell Christie thank you! She gave me this link for painting a compass rose and I could hug you both! This is what I have been looking for to paint on a $7 round turquoise coffee table! I think I will try the stencil since I am not an artist! I can’t wait to get started and appreciate all your great information on your blog. Happy Valentines week! XOXO
Aw, I sure will, Cecilia!! :) And oh yes, the stencil makes it a breeze! Hope you have a wonderful rest of your week!! xoxo
What does it mean “pinning it 4 later? What stencil? I did not see a stencil.
Oh that just means to “pin” it to Pinterest to save it. If you don’t do Pinterest, you can just disregard that! :) And I’m not sure what you mean about the stencil. There is no stencil for this project. I just share how to hand draw it on and paint it in. :) xo
Love the white and blue together. Do you have a stencil of the star ? I can’t draw a straight line …lol..
thanks
Lynn
No, I’m sorry, I sure don’t! I drew this one by hand. Maybe I will create it again and design a graphic that can be printed out at some point! :)
I love this. I’ve also done one similar but mine is on a kitchen table. Will wax make it safe for liquid spills etc? I worry about it…
Debbie
Hi Debbie, yes, wax will be great for liquid spills however, be cautious with anything hot. Hot things can damage/mark the wax. If you are going to use it often, I would seal it with a good poly instead of wax.