Super Easy Way to Update Wood Stained Furniture
Do you hate sanding and staining to update wood?
I can safely say it’s not at the top of the list of my favorite things.
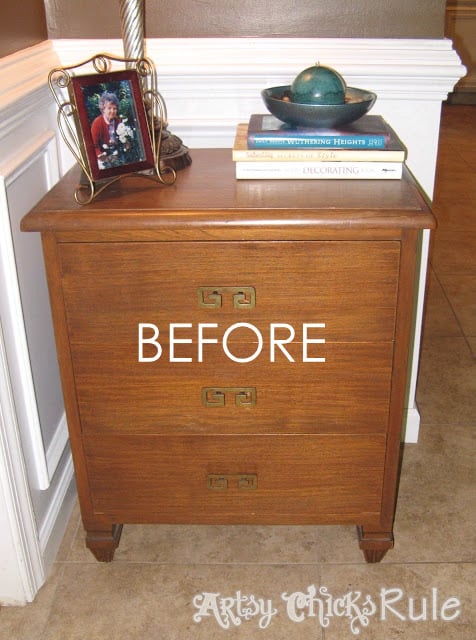
What is one of my favorite things….is transforming things like this…..
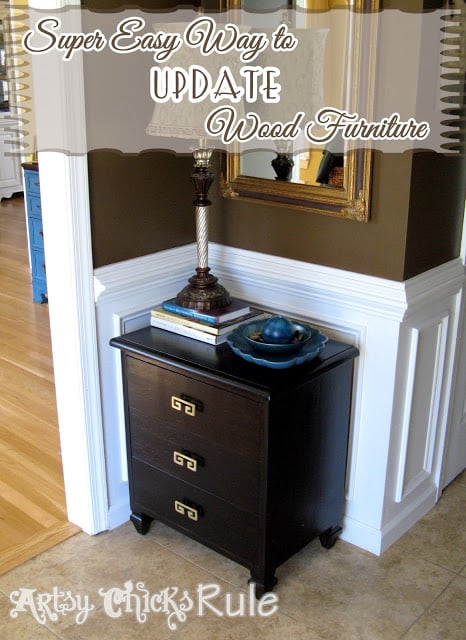
So I’m going to show you a super easy way to skip those steps and still update wood furniture.
Besides using Chalk Paint, I’m going to show you how to either refresh a piece of stained furniture or change the color completely.
…..and make it look like new—>without sanding.
Ok, well, that is not entirely true. You will have to sand.
But only a little.
Promise. Just enough to take the shine off and that’s it.
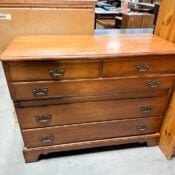
I picked up this nightstand for $10 at one of my local thrift stores. Check out those cool handles. I just love those.
So, not too bad, right? The finish was nice enough just not the right shade for me.
It did stay like this for a few months until I decided whether I would paint or refinish it.
I decided to do neither.
I wanted it a darker color of stain but didn’t want to go through that whole process.
So I chose to use Minwax PolyShades.
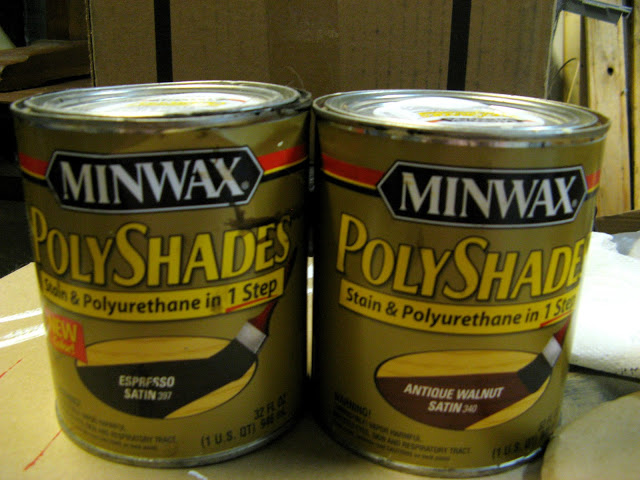
I blended these two shades until I came up with the color I wanted.
I am always blending. I don’t think I ever just use anything as it comes. ;)
Start with some very fine grit sand paper to lightly sand the whole piece.
You want to do this just enough to remove the shine so the Polyshades will have something to adhere to.
I don’t count that as sanding, by the way. So easy!
“Sanding” is that thing you do for hours on end with an electric sander. Ugh.
Next, be sure to wipe away the dust well and then apply the Minwax PolyShades with a foam or bristle brush.
NOTE-I’ve used both to apply regular basic stain ~and~ the Polyshades. But a good quality bristle brush gives better control of product with poly in general (and is the only thing I use when applying any type of Polyurethane typically) Remember, the Polyshades does contains poly (poly and stain in one). So the choice is up to you. This was a small piece and I didn’t want to mess with clean up so I used a foam brush. But just to be clear, regular paint style brushes are easier especially if you are new to this product. (I’ve included affiliate links for these items below for your convenience. See full disclosure here.)
MATERIALS LIST
- Purdy Stain Brush
- Minwax PolyShades in Antique Walnut
- Minwax PolyShades in Tudor (this is the closest shade to Espresso they have available now)
Here it is with one coat.
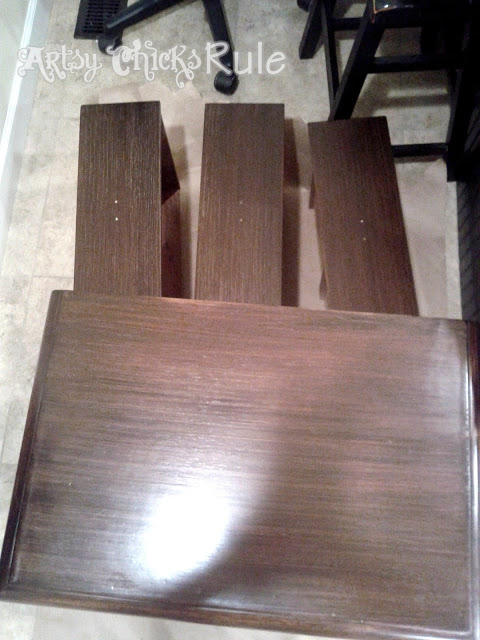
Sorry for the awful picture quality on this one.
I ended up doing about 3 coats, letting it dry completely (read the can!) and sanding very lightly in between coats.
If you just want to freshen up the color and shine you could stop at one coat.
I wanted this one a bit darker so I mixed in more of the dark poly and layered the nightstand with two more coats.
Several thin coats are much better than one thick coat….always!
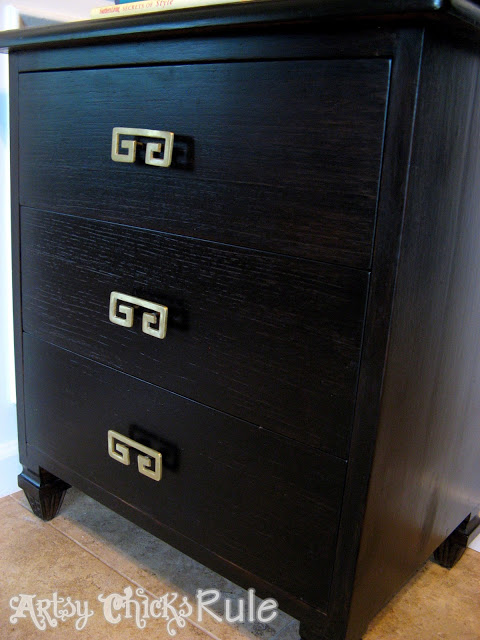
I polished up the hardware and it was good to go. That’s it.
How great is that???
Looks like a brand new piece of furniture.
For $10 and the cost of the Minwax Polyshades (of which I have a bunch left for other projects).
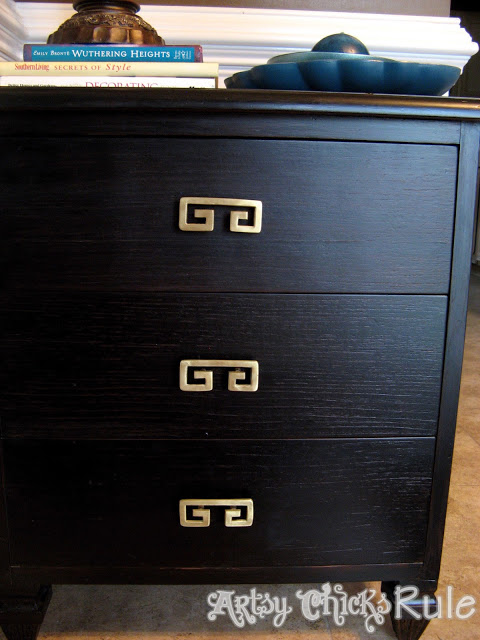
And it truly was a super easy way to update wood.
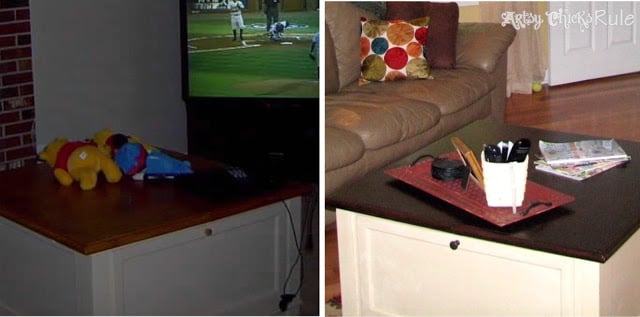
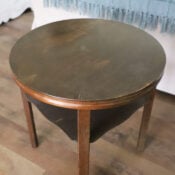
I also did a quick update with 2 coats on this family room furniture….taking it from an “orange-y” oak to a beautiful, rich deep espresso/walnut color.
Before/After of the coffee table…
(before pic is 9 years ago right after we moved into this house so excuse the mess.
Note Winnie the Pooh. Aww, my son is a teenager now…sweet memories.)
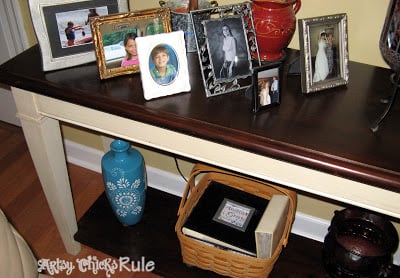
..and I only have an “after” of the sofa table but it was the same “orange-y” color before.
Want to see some of these projects in “live” time? Hop on over and follow along with me on INSTAGRAM. I’m always sharing in my stories as I’m doing projects, finding new furniture, fun finds….just all the day to day behind the scenes.
I think it is amazing stuff and I just love the ease of it.
Here is another piece I did basically the same thing to.
Before…. (also $10)…..and after…(MinWax PolyShades on the drawer fronts, Annie Sloan Chalk Paint in “Cream” on the rest)
Want to know about 26 other chalk style paints?
I’ve got the low down for you right here! >>> 26 Types of Chalk Style Paint For Furniture
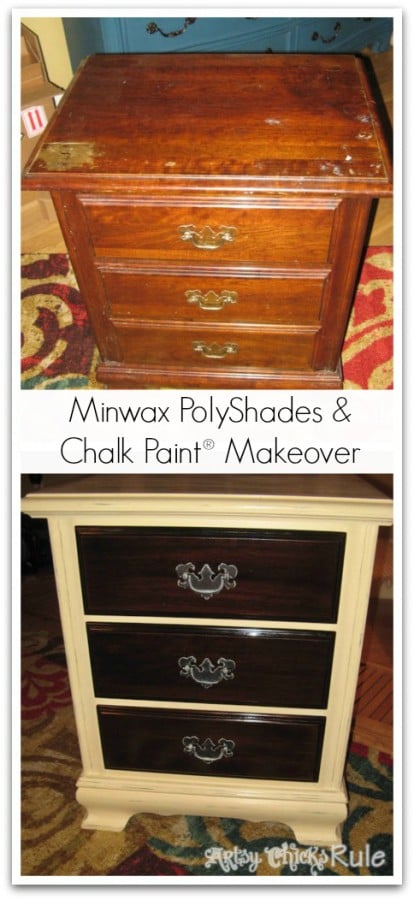
These were all very easy projects using 2 great products that don’t require a lot of prep work.
I finished them in no time.
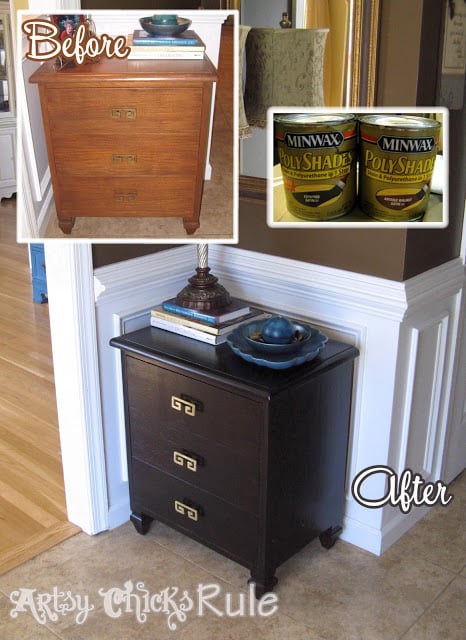
Definitely an inexpensive & quick way to transform and update wood on a piece you may already own or one you might pick up at a garage sale or thrift store.
Nothing beats a nice sanding, stain and refinish job but this is a great way to change up your furniture quickly & easily for fresh new look.
Want to read about another super easy stain that I use and love?
Click this post, here and here to read all about it!
Pin this photo to update wood and save for later!
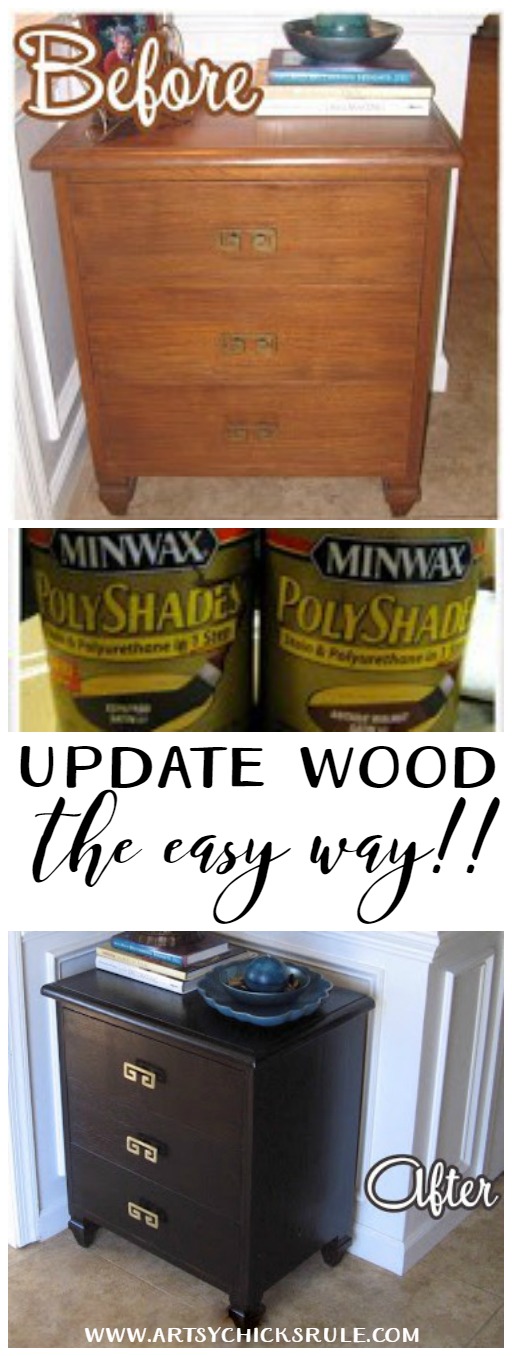
Have you used Minwax Polyshades to update any wood furniture?
I’d love to hear about it!
Want to see even more “before & after” furniture makeovers?? Click here.
And be sure to check in next week when I share how I transformed this lovely!
UPDATE!! You can see it now, here!






Nancy! You are my idol. :-)…I wish we lived closer :-(
Thanks Denyse! lol…..so do I! :)
I love this redo! Thanks for sharing. I have been following you on Facebook but now I am your newest blog follower!
~ Darlene
http://www.MyHoneyBunch.CO
Facebook = My Honey Bunch
Thanks Darlene!
So glad you came over from FB! Thanks for the follow. :)
xo
Nancy
Love it! Seriously have to give this a whirl! Great stuff Nancy!
Thanks! :) You should! It’s easy and really changes up your furniture.
xo
Nancy
I know exactly how I want to use this technique! I have a coffee table I’ve been wondering how to paint or redo. This will be perfect. The legs are in great shape, but the top needs some help. Pinning this!
Thanks for sharing!
Perfect! I’m sure it will look great! That’s what I did with my family room furniture. The base of both tables were great I just didn’t like the orange color of the tops anymore.
It’s amazing how much it changed the look of the room!
:)
Nancy
I used “Classic Black” on new unfinished kitchen cabinets. I used two coats and used steel wool for a light sanding between coats. They turned out wonderful! After they were installed, I used paste wax to provide protection for them. Everyone asks where we purchased our cabinets. Thanks for the tip, I never thought to use it on previously stained items.
Now I have some ideas where to use some more of the “Classic Black”.
Oh I bet those did turn out beautiful! Great idea to use the wax over them.
So fun to get those wheels turning isn’t it?? More projects! ;) I always have several going at once!
Thanks for stopping by!!
xo
Nancy
These are some awesome transformations! I love what you did with all the pieces!!! I’m a new follower of your blog as of right….now! =) Thanks for sharing this!
Thanks so much!! I love the transformation too. :) So much so that I’m constantly transforming something in this house at all times! ;)
Thanks for the follow! :)
xo
Nancy
I saw you linked up at Ginger Snap Crafts.. and this looks easy to do!!
I am co-hosting a link party this week called Tell Me Tuesdays! I’d love for you to come check it out and link up!!
Beth @ The First Year Blog
Thank you Beth! I’d love to come link up…thanks so much for the invite!
xo
Nancy
PINNING! this is awesome! I’d love for you to share it with my readers http://www.addhousewife.com/2013/01/pin-inspiration-party-time.html
Thanks so much for the kind words Micki! :) I’d love to share it!
Thanks for the invite!
xo
Nancy
I never would of thought of doing such, but I like it a lot. Thanks for sharing the steps.
Thank you. It is an easy way to transform old furniture for sure.
Thanks for stopping by
:)
Nancy
I love the transformations! The dark stain is great. I’ve been hunting for an older dresser for our master bedroom and after reading what you’ve said about chalk paint in your last couple posts, I think I’m going to try that on the piece that I get once I find it. I also love the Minwax Polyshades. So much easier than the traditional stain, wipe off, then seal. Just brush it on! Thanks for the inspiration!
Hey Sharon!
Me too. Yes, I am loving the darker stains now. And yes, the polyshades are a little shortcut to the Can’t wait to see your chalk painted dresser!!
xo
Nancy
LOVE the first one!! Well, all of them actually, but that first one! Wow! What a difference that made!!
Thank you Melissa :) Yes, I think so too! ;)
thanks for stopping by!
Nancy
Love, love, love this! Those handles are fab! Looks super simple! Thanks for sharing!
Jenna @ http://www.rainonatinroof.com
Thank you Jenna :) I love the handles too! That is what got me. And all polished up against that dark stain….love.
Thanks for the sweet words!
xo
Nancy
Wow that does sound easy. I love how much more modern the pieces look with a darker wood tone. Great job! Thanks for sharing.
It really is Christa. :) Very!
Thanks for stopping in!
xo
Nancy
Very cool, and love the color of the walnut/espresso blend on all of the pieces you refreshed. I am always on the lookout for easy to use products that give great results. Thank you for this post.
Hi Jan :)
Yes, that is a favorite of mine. It is so rich looking and the perfect shade. You probably can’t tell too well from the pictures but the wood grain is still visible which I just love.
You are welcome! I hope it was helpful.
:)
Nancy
This is really, really good. The possibilities are endless with this and it’s definitely something I’m going to be trying very soon! Found your link on Liz Marie and I’m now following you. Plus, pinning your project. I really need to remember this!
Have a great day!
Angela
Thank you Angela! Yes it is really easy and can really freshen up those old pieces!
Thanks so much for the follow and the pin! :)
xo
Nancy
I love these! Great idea, rich and beautiful!
debbie
Thank you Debbie! :)
Nancy
I love this! You are amazing girl :)
xo-Tanya
Aww thanks Tanya! :) I don’t know about that but you are sweet to say it! ;)
Hope you are having a great weekend!
xo
Nancy
Oooo, I love this idea! Do you think it would work on wood floors?
Hi Jean!
I am sure you could actually although I have never done it so I cannot say as to the end result or the best way to do it! I think this might be best for smaller projects honestly. I would consider trying this on stair steps or a small bath but I probably wouldn’t do it on a large area room.
Just my opinion from using the product :)
nancy
Love your stain technique Nancy and how beautiful these pieces turned out! You have inspired me to redo some pieces now!!! Thanks so much for linking up to It’s Party Time!! :D
Thanks Heather! :) It really is a nice, easy way to change up furniture without all the mess of sanding, staining etc. I love easy. ;)
Thanks for hosting the party!!!
Hope you had a great weekend.
xo
Nancy
Wow, they both look fabulous! What an amazing transformation on both of them. Always so inspiring to visit your blog!! Thank you so much for sharing with us at A Bouquet of Talent this week. Have a wonderful week. :)
Hugs
Kathy
Aww thank you so much for the sweet words Kathy!!
I hope you also are having a wonderful week!!
As always, thanks so much for hosting the party!
xo
Nancy
It looks great!! (and esay!!) I love to refinish furniture and will have to look into polyshades! Thanks for sharing! Julia @ http://www.juliakendrick.com
Great, thank you!
It is easy, you should try it!
xo
Nancy
Hi Nancy!
I want to thank you SO MUCH for this tutorial on how to easily update wood stained furniture. I have a beautiful golden oak pedestal table and chairs that were just so dated. So, with the help of your tutorial I re-stained them with the Minwax black satin PolyShade. The entire project turned out GORGEOUS and the table and chairs look brand new! Thank you again Nancy for such an awesome tutorial. Love your site! Megan
Aww that means the world to me! Thank you so much for the kinds words and taking the time to comment. :) I am so glad your table and chairs turned out so beautifully! I’d love to see a picture some time. I’s so glad to have you here Megan!! :) I hope you have had a wonderful weekend!
xo
Nancy
I was wondering if you had to wipe the stain and let it dry before you added another coat or if you just put it on like a coat of paint and let it dry. I am redoing my bedroom furniture and I want the look you achieved with the nightstand but i dont know how to “stain” I did one drawer and it looked more like I painted it rather than stained it, Is that what you did??
Hi Melissa,
No, there is no wiping like that with this product. You do literally apply it like paint…or like the finish poly. This product sits on top of the piece where as stain penetrates the wood. This is an easy fix to get the look of a deeper or darker or even a different color stain without having to go through the process of sanding completely down to the bare wood and then staining and polying, etc. So yes, it will resemble “painting” when applying. I do sand very lightly between coats. Hope that helps! :)
Nancy
Nancy – great project and the finished piece looks fantastic! Thanks for the helpful directions, tips and photos – all quite good.
Thank you!
Fantastic use of Polyshades, Nancy. All of these projects look great!
-Bruce
Thank you so much Bruce! It’s such a great product for easy updates! ~ Nancy
Hey girl…I was googling Minwax poly shades in esspresso to see if I could find a comparison between the satin and the gloss and your night table came up ha ha! I’m in the process of redoing a beautiful french provincial dining table I found at the thrift store. Love the dark stain. You used satin, right? I’m thinking that’ll be fine. I already bought it but wanted to be sure. Your pieces really look so much more up to date. Love what a little stain can do! Also. I went to sisters unique yesterday, got some paint and forgot to get more wax, ugh!! Oh well! See ya! :)
Hey Christy! That is so funny. Yes, I use Satin in most everything….and I love the dark stain too. It’s amazing how different it makes things look! Oh, I bet that table is going to be fantastic…you always find great stuff! I haven’t had a chance to get in to Sister’s Unique yet…soon!! Next time you’ll have to let me know and I’ll meet you there and say hi!! ;)
Wow! You are so talented. I have a dresser that my husband has already completely sanded. (Bless him!) Our original plan was to paint it black (not wanting to put much time or money into it), but I have been pondering more of an espresso stain. After seeing your finished piece, I thought Minwax polyshades might be the way to go. But since it is already sanded, would you recommend a stain?
Hi Nancy,
Hmm, well, honestly, if it were my piece and already sanded completely down (down to the bare wood), I would use a regular stain and then put a poly coat over top. Polyshades is great for those times you want to update and maybe not want to do all the sanding work. Sort of a “quick” change or update. You can do either of course, that is just what I would do. :) And thank you so much for the sweet words! Nancy
Thank you, Nancy. Stain it will be.
I love this. I have been wanting to refinish my living room furniture that’s rockin’ golden oak like it’s 1995. I started with one small end table and spent an entire weekend stripping and sanding, and one year later, there it is, still sanded and unstained. I know everyone’s into painting furniture these days, but I absolutely do not want to paint my gorgeous solid oak furniture and hide that beautiful grain.
This looks like a great solution. I’m hoping that since my furniture is in good shape, that this will go without a hitch. Thank you for the tips.
I’d like to add that after hours of Pinterest browsing, all I could find were pins for painting furniture and instead reverted to Google. Bam! Your link was second in line. Good meta tags.
Hi Shawna,
Thank you so much. :) I love painting furniture but I have to agree, there are just some pieces I could not bring myself to paint either. Oh, and thanks so much for the feedback on my site. That is great to know. :) Would love to see how your pieces turn out. Nancy
Hi – this is great!! I was wondering what you would do if the wood had some damage. I want to do this to a small desk I bought, but there was an inch-size cut in the wood on the top which I filled it in with wood putty. Now that the putty is dry, but I’m afraid that will show through if I use the Minwax PolyShades on top of it. What do you recommend? Also, what grit sandpaper do you use? 220? THANKS!
Hi Alicia, it’s hard to say without seeing it. If I really didn’t want to have to sand the entire piece down to restain/poly I would probably try matching that one spot with a bit of regular stain (to match the rest) and then apply the Polyshades over the whole thing. BUT, in all honesty, it would probably be best to sand it down and do it the old fashioned way since you have the damage.
With Polyshades, for the first “rough up” 220 should be fine…in between coats I was use something finer, like 320 or more. Hope that helps. Nancy
Can you do this if it is laminate wood? I am new to your blog. Thanks for all the great ideas!
-Cara
Hi Cara,
If you mean laminate as in the plastic layer that looks like wood…..no, I wouldn’t use it for that. But you can paint it with Chalk Paint®! ;)
I actually used Minwax poly on a laminate table top and it looks great. You do need to sand a bit on the top to remove the shine of the plastic but it adhered nicely.
Hi Amanda,
That is good to know! I have not tried it on laminate but I suppose if you sand it, it should work! :)
Thanks for letting me know!
Happy New Year!!
Nancy
You have a serious knack for breathing life into old furniture pieces! I really dig the color of the stain… it makes the gold drawer handles POP! Keep up the good work…
Hi Josh,
Thank so much!! :) I do love how the gold knobs pop in the after picture…love the contrast!
Nancy
Thanks for the great pics and steps to redo an old piece of furniture. I have 4 dining chairs from my parents house that look like they have been through a war. They are a worn walnut now so I am thinking of doing them in an espresso and recovering the seats. This is the only site that told me I could get this accomplished without a ton of sanding- which I hate doing! So thanks for helping me get started! I am hoping to have them ready for extra chairs at the holiday gatherings! eek! Better get going!
Oh that is great! I would love to see them all finished! :)
Nancy
Hi! I love the work you did! I recently made a bookshelf and stained it with the intent to put a polyurethane coat on it, but the stain brought out the flaws in the wood (note to self: inspect the wood better before putting the time in to make something :) ) and the stain is rather blotchy (even though I used wood conditioner). Anyway, the dilemma now is whether to paint over it (black) or apply the polyshade in a espresso. Any suggestions? If I went with paint over the stain, would I need to prep in any way?
Hi Danielle,
Thanks so much!
Well, let’s see….you could try staining with a deeper colored stain to possibly hide that. If that doesn’t work, you could try the Polyshades product in Expresso. If you want to paint over the stain itself (not the Polyshade) wipe away as much of the stain as possible, (I would probably sand it a bit) and then apply an oil based primer coat over that…then paint (oil or water based).
I am sure there are other ways to accomplish this but this is what I would try.
Hope that helps!
Nancy
I also bought “orange-y” oak furniture from thrift store. How long was the process for the $10 nightstand? Looks great! I have no experience, this is first time. Thanks in advance.
Hi Lorraine,
I completed that in one day. I did several coats to get it that color you see. With the shades I chose it really does take that orange-y color away! :)
Nancy
Dear Nancy,
I am new to your excellent blog!
My sister found it and told me to go straight to it!!
She was right; you are so talented, have great taste and then you combine all that good stuff with your most outstanding teaching skills for people like me who are all thumbs :(
I hope that it’s not too late ask you a question concerning the Minwax Polyshades.
I have a few end tables in my husband’s den and he won’t part with them but I wanted to lighten them, rather than darken them.
Does Miniwax Polyshades have the capability of transforming a very dark brown end table into a bleached, beach-y pine look?
Sorry for the long question.
And thank you so much in advance for any words of wisdom that you might have for me!
Your blog is just so fantastic and I will share it with all my friends, as my sister has with hers!!
My daughter and niece love it also!
God Bless & Happy New Year!!
Penny Maynard
New York
Hi Penny!
Thank you so much!
Never too late to ask. :) The best way to go about lightening those tables would be to sand them down (or painting them). Unfortunately, the PolyShades won’t give you the effect you are looking for. You can sand them down and then use one of MinWax’s White Washing stains to get the look you want (or even Chalk Paint…I did a “Beach” sign and used new wood but made it look like “driftwood”). I have some plans to use the MinWax White Wash stain in the New Year on a pretty big project! ;)
Thanks so much for all of the nice words about the blog! :)))
Blessings to you in the New Year!!
Nancy
Hello,
Just found your blog tonight via Pinterest and love it! Thanks for posting about something besides just painting wood furniture. My husband doesn’t like painted wood, so I’m stuck with keeping my pieces “in the past” (or so I thought!). You’ve also opened my eyes to projects right around me. I was thinking of resurfacing our kitchen cabinets, but making them a darker stain just might work!
One question though . . . in the second to last picture (the one where you only poly’d the drawer fronts and painted the rest in cream chalk paint) . . . it looks like you did something to the handles. I’m wondering if you used Rub N’ Buff on them (in silver)?
Hi Janelle,
Thanks!! :)
Those handles were sprayed with Oil Rubbed Bronze spray paint and then I used a bit of the cream paint to “dry brush” over edges of them. I then sprayed them with Satin Polycrylic to seal it.
I should update the post to address that! Thanks for bringing that to my attention. :)
Nancy
This is a great blog. Someone just gave me 3 oak bar stools. I need them to be darker to match. How do you think this process will hold up to people sitting on them and putting their feet on the bottoms. Do you think this will be durable enough? Thanks
Hi Jon,
I think it will be like any other poly product in that respect. Plus, anywhere you have feet constantly going will get wear as I’m sure you know.:) I have bar stools that are not painted/stained by me and they do have normal wear at the “foot” bar where people put there feet. But yes, the PolyShades should be just like any other finish in that way.
Hope that helps!!
Nancy
And thank you, by the way!
Have a great day!
Nancy
I am so glad I found your website. My living room tables are more than 30 years old but still quite timely style. Several years ago I changed the oak finish to a very dark walnut. Recently I decided I wanted another end table so started watching Craigslist and found a table that is almost the same style but it will need to be refinished to match. I got bid from a local furniture refinisher for $225. YIKES! All the other sites went the traditional route of stripping, etc., and I just don’t have the patience to do all that. You have given me hope that I can do this myself! Thank you!
Hi Suzzanne,
Oh my, yikes is right! That’s a lot. Yes, you should be able to match it pretty closely with one of the products. Definitely cheaper than $225! ;)
Nancy
Hi Nancy! I love your stuff! I have a question, when using the mini wax what do you use to seal it with? I’m new to the restoring thing. Thanks!
Thank you Jennifer :)
Well, if you are using stain…then you would probably want to seal it with polyurethane. (there are other options such as wax, though) If you are talking about the PolyShades here, then you don’t need to seal it because it is a stain/poly in one. You can for better protection but it is not necessary.
Hope that helps!
Nancy
I have a fairly old Mexican Mahogany dining room set waiting for me to refinish it. It has been a chore to get the years of spills and grime off of it. I want to use the Bombay Mahogany PolyShades to try and make it match my current dark cherry dining room hutch. I have washed a couple of the chairs off with Dawn and hot water and taken some Formby’s refinisher to them. It seems that they are now not totally coming clean, or the finish is only partly coming off. Will I be able to just go ahead with the PolyShades over what I have started, or do I need to strip them completely down to be able to use this product on them. Think I’m in over my head! Alternative is to break out the spray paint with primer! Helpful advice appreciated!
Hi Ann,
It’s hard to say without seeing it…but from what you are describing it sounds as if it will not cover well and/or look right. You would want a fairly even (and evenly colored) surface underneath. I’m not sure I would try to cover what you are describing with the PolyShades. It’s probably best to strip completely and start fresh.
Paint is always a fun alternative! ;)
Good luck!
Nancy
So glad I stumbled across this today! I am going to be redoing all of my living room tables and sofa table (4 in all) in Annie Sloan’s Old White and really, really, really did not want to have to paint the table tops but I was going to anyway because I’m so afraid of trying to restain them as a beginner. I’ve looked at different tutorials that seem a little too difficult for me, being a rookie at this, lol. But your method looks easy enough that I am going to give it a shot. Thank you, thank you!
Hi Debbie,
Oh that’s great!
Just be sure to use a good brush (I like Purdy) and do thin even strokes. Try not to “work” it too much…it will level somewhat.
Good luck! I am sure they will be beautiful! Send me a photo of them before and after if you think of it!
Nancy
I really love what you did with the first one. I think it almost looks like some kind of Chinese cabinet with the final result. It’s the combination of the handles and that dark color you managed to mix together. Great work!
Thank you Jessica!
so I am not paint or stain savy but i think i can do this. I just got a nice tall chest from my mom and it really needs so serious redoing. i’m gonna show this to my hubby so he can refinish the chest for me. reading other comments, i read about someone who redid their kitchen cabinets. question: can this stain be used for laminate cabinets? and two, what is the wax seal? is that like paint or like a piece of wax that you rub on? told you, i’m clueless to this. and just one more question, what is the durability of this stain process? now i’m thinking of staining our dinning table and chairs…LOL…. my poor hubby.
thanks, carmen
Hi Carmen,
I would not use this on laminate cabinets because I’d worry about proper adhesion. The wax is just that…a furniture wax. You can use it to seal your pieces instead of poly but there is some upkeep with it.
The polyshades have great durability…just like stain/poly done the regular way, in my experience. Just remember to lightly sand just enough to create “tooth” (a touch of roughness for the PolyShades to grab onto)
Good luck!! (sounds like my house!! ;) )
Nancy
Hi!
I just found you and I am going to hold on like a dog on a leash! What great information. I’m going tomorrow to buy the Poly Shade. I think I just found the product I have been seeking and now I know exactly how to use it. Boy, am I a happy girl. I won’t miss anymore of your site. I just signed up!
Haha Linda!! I just love that!! ;) So glad my post inspired you!
Hope you have a great week!
Nancy
Your projects look great and what an amazingly simple product! I wonder if we have something similar here in Australia? I have so many items to revamp but have been putting it off because I also hate sanding things back :)
Thanks Jodie! :)
I am not sure if it is available there but it is a great product (I hate sanding!lol) I actually just used it on a particle board top (that I thought was solid when I started sanding) It’s an antique cabinet that I had intended to go the old fashioned route of sanding/staining/poly. BUT the particle board top threw me! (I think it was replaced at some point-the rest is solid wood) And…I REALLY wanted the wood look so I used PolyShades. Turned out pretty good, I think! I’ll be posting about it soon. :)
Nancy
Hi. I am totally newbie in this area.
I have a fancy dining table with a pattern in it. My husband bought new chairs which he fell in love when he saw. Unfortunately, it is not going along with the color of my table. I cannot return the chairs and feel so stuck with the whole thing. Can you please help me?
Hi there!
It sounds beautiful! One option would be to paint the chairs. It would give you a 2 toned look in the room which is nice in some cases …and it wouldn’t look then, like you are trying to match the table. You can see my 2 toned dining room here . And other than that it is hard to say without seeing photos of the table/chairs. If the chairs are a lighter wood, you may be able to use the PolyShades in a darker shade to match the table. If they are darker, you would need to sand and restain/poly (the old fashioned way).
Hope that helps some!
Nancy
Thank you Nancy for the inspiring work!! You did a great job on this one! I am itching to give my coffee table a brand new finish. I suppose you did this more than a year back, so can you tell me if this stain that you used last well? Also, my coffee table is kinda dark chocolate color and it makes the room look darker so I want to stain it a lighter color… Do you think that will work with this product? Going from dark to light? Hoping you can guide me :)
Aww thanks so much Vidya! ;) The pieces I have done are holding up fabulously! As far as going lighter, the only way you would be able to do that is the old fashioned way (or painting)…sanding completely down to the bare wood and restaining.
(and I am SO sorry for the late reply! I somehow missed a bunch of comments on different posts on my blog and am going back and answering them all now)
Nancy
Your blog has given me hope! I have 2 solid wood office chairs which are finished in dark cherry with a hard clear coat. They are very nice, but look terrible with my dark brown desk. Do you think that PolyCoat will work to change the dark red to dark brown? Thanks for your blog and for your help.
Hi Victoria!
Aw thanks so much!
You can probably change the tone of the wood, yes. But, depending on how dark of a red it is, it may end up very dark in the end. You could try a lighter shade first (is there an inconspicuous place you could try it?) and see if it will change it enough without making it too dark? I would probably try mixing a lighter and darker color like I did with the Espresso. (Covering over something already dark, even red, may end up very dark. That’s why I suggested trying the lighter shade first if you can)
Hope that helps some! :)
Nancy
Wow! Those are great! You are very creative & talented!!
Thanks so much! :) I love the ease of using this product and changing the color of the wood..or just refreshing an old piece!
Nancy
Hi Nancy! As usual, another great great piece! I love all your pieces – lol. I purchased this insanely gorgeous chest of drawers for $20! She just wanted to get rid of it because it was big and taking up room. Not sure what to do with it! If I posted a pictured or sent it to you, do you think you could give me your opinion? Most people I asked said to refinish it. The detail on the drawers is what makes it so gorgeous! It’s like almost an “art deco” type of design. My one idea was how you did your piece – chalk pain the outside, and stain the front of the drawers. Now I’m not sure what to do – or where to put it! lol
Thanks! :D
Hi Lilli!
Aw thank you! :)
Yes, send me a pic of it…Id love to see it and help you out!
You can send it to my email nancy @ artsychicksrule . com. :)
Nancy
Thank you I will definitely do that. I just had carpal tunnel surgery on my right hand yesterday, and now I’m down for a bit (NOT happy about that at all!) Once I can get to the dresser, i’ll send you some pics! :D Thank you again!!!
Oh no! Feel better~!! I am with ya…don’t like to be down for any reason! Healing (quick ones!) thoughts coming your way! ;)
Nancy
I have another question!!!!! Have you ever used anything other than wax on top of ASCP? I read some people use varathane spar urethane. Have you ever tried that instead of the wax? I wanted to use it for a side table that will have drinks and laptops etc on and off of it? WDYT? :D Thank you!!!!!
Oh yes, absolutely!! On many pieces actually, large and small, furniture and home decor. I’ve used oil based and water based. I like water based best.
I have quite a few posts with projects done with poly. Off the top of my head, my kitchen makeover post and my kitchen island makeover post. Both of those I used a poly product! Take a look in my “Before & After” tab in the menu here on the blog to see more detailed info on both of those! ;)
Nancy
OK great to know. I thought I was married to that wax…. its not the easiest thing to work with, especially with one impatient hand! Im going to try it – thank you AGAIN!
Nancy,
I have a retro ( 60’s) hutch in my dining room. It’s in good shape, but I just got a new( used ) dining room set in perfect condition in a dark wood ( looks like the Poly Shades espresso) My hutch is an orangy fruitwood. I’ve been looking to buy a new server to match my new set, but you’ve inspired me to try the Poly Shades. Question- my hutch is in 2 pieces and heavy. Can I leave it in place and refinish it? I noticed you had your piece horizontal. Will it turn out ok staining it vertically? (drip marks)
Hi there!
Hmm, just to note, the orange underneath will still be somewhat visible (depending on how deep the color is) and so will affect the end color. Meaning, it may not match perfectly to the other.
Also, I get ya on it being heavy! (my china cabinet is a 2 piece-r and I had to take mine apart to paint it a couple years ago..I have a post on that) But…I would not refinish it in place. You can, of course, but I think a better quality job would be to take it apart, do the staining, let it cure for a bit then replace it.
You can always get drip marks….just go back around once you’ve applied and basically finish and look for them. I’ve been known to miss them a time or two! ;)
Hope this helps some!
Nancy
Wow! I am so impressed you have kept up with all of the comments for this one post for so long!! That’s amazing! And yes, I totally love your style and the beautiful finish of your pieces. I have been thinking of tackling the small oak bathroom sink cabinet with a darker finish. I wonder if this product would work for that. Do you have any experience in that area? Thank you!
Hi Lisa!
Aw yep! I always try to answer everyone who takes the time to comment on my blog. :)
Thanks so much! As far as the bathroom cabinet, I don’t see why not? It is a stained wood? It is just like any other piece of furniture, if so.
You would go about it the same way then!
Good luck! :) OH and as I always suggest, if you haven’t worked with the PolyShades on anything before, be sure to play around with it on a scrap piece of wood first. (to get a feel for the product and how it applies, etc) Or even better, pick up a small furniture item (10-15 dollars) at the thrift store and make it over before tackling your bigger, more important, job.
Hope that helps!
Nancy
Hi, my local store did not have espresso, so I went with Black and Mahogany. Do you know if the black will mix with the brown or should I get the espresso?
Thanks!
Hi Bryan!
Yes, my locals do not carry the Espresso anymore either but have had readers tell me they have it at their stores (but it’s not on the website that I can find). BUT if you can’t get it then mixing might be a good choice. Espresso is/was a nice, true dark chocolate-ish color. You could try mixing the two you mentioned but I’d go very light on the black. And remember, the Mahogany does have a red tone to it. Their newer shade Tudor may work for you. I used it on a recent project here … https://www.artsychicksrule.com/2014/02/thrifty-french-chair-makeover-annie-sloan-chalk-paint.html
Hope that helps!
Nancy
Would this method work on a table top that has many coats of polyurethane?
Hi Melissa,
I don’t see why not. Keep in mind that the finish color will always be somewhat affected by the original finish color. (You cannot really “lighten” with PolyShades) If it’s thick and uneven I would sand it well enough to smooth it out before apply the PolyShades.
Nancy
I am planning to refinish an oak dining room table along with 8 slat-back chairs. Ugh. This set is still in new condition, but happens to be “Honey Oak” color and we prefer “Expresso”. It has very little sheen. So this project seems very similar to your 3 drawer dresser, but I am concerned about the Minwax Polyshades drying too quickly as I work on the large Table. The top is made of has 3 sections (20″ x 60″) including the center leaf. Do you think it would be difficult to coat a 20″ x 60″ section quickly enough to avoid “blending” issues? Would I be better off using a 2-step approach (separate stain and poly)?
Hi Brian,
My thought on this….is the chairs would be do-able with the PolyShades. Well, it’s all “do-able” with the PS. But that doesn’t always mean I would do it! ;) I would go the regular sand/stain/poly on the table top. I redid our dining table top (https://www.artsychicksrule.com/2012/11/china-cabinet-and-dining-table-re-new.html) and didn’t use PS for that. For something that large I just wouldn’t go with the PS. The chairs would probably be easier done with the PS than a full sanding/stain and poly though.
But then you have matching issues. You could refinish the table top first …and then work to match the chairs to that with your PS.
Hope that helps!
Nancy
Nancy,
Thank you so much for your input. My table is in “new” condition so I would rather not sand it to the bare wood. So my question is:
“If I want to follow the same steps you used on your table, does that mean I must sand to the bare wood to get the Stain to penetrate?” I am looking to obtain a dark Expresso finish.
Followup question:
“Would there be a possibility of adding some type of “thinner” to the Polyshades to enable it to be used on the large table sections without drying too rapidly?”
Thanks again for your insights.
Brian
Brian,
You are very welcome! Hmm, I just really wouldn’t try to restain it without sanding down to the bare wood. It shouldn’t be too much trouble to get to it. I think for a large table top, that much of a focal point in a room, you just really want it done right. Although I LOVE PolyShades, it does have it’s ‘place’. This is, in my opinion anyway, not it’s place. Take the little bit of extra time and do the sand/stain/poly. I think you will be very happy with the outcome. As far as the thinner, well there are things you could probably try adding to it, but again, I wouldn’t.
I really reserve PolyShades for smaller items, items that need a “refreshing”, etc, but not larger pieces. It’s so great (and easy!) for those types of things but can be a bit tough to work with anyway (in the darker colors) so adding the size of the table exacerbates that. I don’t think you will be happy with it if you have dark streaks all over your pretty wood table top. :)
Have you considered painting the chairs and/or base (and sand/stain the top) to cut down on the amount of sanding/staining you have to do? It’s one option unless you want the entire wood look which I totally understand.
Anyway, hope that helps!
Nancy
Nancy,
I appreciate your honest opinion. I will discuss these options with my wife to figure out the best approach also considering painting instead of staining. One last question, have you ever used a “sprayer” with Polyshades?
Thanks again. I’ll take a picture of the set tonight and send it if I can figure out how to attach the jpg.
Brian
You are welcome. No, I have never used PolyShades in a sprayer.
Would love to see a photo of it. You can send it in an email to me. My email address is nancy (@) artsychicksrule (dot) com.
Nancy
Great tips. Will have to give it a try on some of my older teak outdoor furniture! :)
Thanks Jackie! :)
Thank you for this helpful guide! I have a 20+ year table that is a hideous shade of orangey oak and while I would love to just paint it and go on, the hubs does not love painted furniture like I do. So we agreed to give it a darker stain color. I wasn’t keen on a full on sanding especially since the chairs have both spindles and carvings. I’m truly hoping this technique does the trick.
Hi Michelle,
You are so welcome! :) I dislike highly that color of oak too! lol Darker is the perfect choice. Be aware that depending on how “orange-y” that oak is, your finish color will be affected by that somewhat. So keep that in mind.
Good luck!
Nancy
What would be another brand of chalk paint I could use. I don’t have Annie Sloan in my area. Also, I’m new to the whole chalk paint trend. Is it a paint or I’m even seeing waxes, just not sure what to get. Home Depot would be where I would be shopping if that helps. :)
Hi Julie,
It is indeed a paint. It’s just a different type of paint. The wax goes over top to “seal” it. Chalk Paint needs to be sealed.
You can try General Finishes Milk Paint. I have a few posts here on my blog about them. I have really enjoyed using that paint too and it does not need a sealer.
There are many other brands of chalky finish types of paints but I don’t have any experience with them. You could try a search of google for that term “chalky finish paint” and probably find quite a few.
Home Depot carries a brand of chalky finish paint although it might only be available online.
Hope that helps some! :)
Nancy
Hi,
I love your color choices, beautiful work! I’m refinishing a kitchen table and I wanted to know can I make a custom color using Minwax Wood Finish Stain without poly?
Thank You, Debbie
Hi Debbie,
Thanks so much!
Absolutely! I mix stains/PolyShades/paint all the time! Actually, I hardly use anything that’s not been mixed by me. ;)
For example, if one shade of stain is a bit too dark you can add a lighter stain to it until you get the desired shade.
Hope that helps!
Nancy
That looks amazing! I have got to try this. Does this work on all wood? What if there are scratches in the wood?
Thanks Lindsay! I have some new products I’m just testing out that I’m really loving! Be sure to sign up to posts so you’ll see them when I post about it (if you are interested!)
And from my experience, yes it should work on most wood. Since you won’t be doing a complete sand the scratches will still be there. If there are scratches that you don’t want in the finished product I’d say do a full sand/stain/poly job. BUT if you don’t mind them, and they are not bad, this will work. The little coffee table I did had imperfections in the finish but I liked the character it added to that piece.
Hope that helps!
Nancy
Hello, I want to do this to our kitchen table because the stain does not match out new house floors and cabinets. If I use the poly shades, do I have to put a sealer or wax on it after? Thank you! Lori
Hi Lori,
No, no sealer is needed with PolyShades because it is a stain and poly in one so seals itself! :)
Nancy
Hey- You are awesome, that is exactly what I needed to hear- I have an extra step- I bought brown wood stools but I have to saw them down? am I crazy, and then I need them darker- I think it will be a great project!
Thanks for this post! I have a rocking chair that I would like to re-do for my son’s room. It is a natural wood with a sealer over it. Dare I try and sand it in the rungs and hope that I get all of the sealer off? Or do you think I should figure out a paint color?
Hi Hannah,
Oh my, yes, chairs of any kind are my least favorite project to do!
How dark do you want it? Dark? If so, you could lightly sand (you don’t have to remove all of the sealer, just rough it up a bit) and apply the PolyShades. OR there is another product I’ve used recently that is “wipe on” that might be a good solution for this chair. It’s Java Gel (*for dark, they have other shades) from General Finishes. Since it’s wipe-able, it might be easier to apply. Lastly, yes, painting would be an option, but unless you are using something like Chalk Paint (that needs no prep) you’d still have to sand a bit and prime.
Chairs just take time no matter which option you choose (unless you have a paint sprayer which would be my choice for painting chairs)
Hope this helps!
Nancy
My wife and I just found a big old rocking chair, and I was looking for easy ways to paint it without having to do a lot of stripping and sanding. The Chalk Paint looks to be the perfect answer, but I really love the two-tone idea! I’ll be thinking how to do that with this piece. Thanks!
Hi Jason,
Two tone would look great on a rocker!
Good luck!
Nancy
I love all those pieces, Nancy! I have a coffee table and end table that I’ve had for years and been trying to decide what I wanted to do with them. After seeing yours, I think I just decided.
Which do you find easier to use…. the Polyshades or the Java Gel Stain? I already have the Java Gel Stain, but have not yet used it. When you answer, keep in mind this is ME you are talking to… not some uber-talented person like you! :) xo
Thanks Karen!
Hmmm, they are a bit different actually. I like them both for different reasons. The Java is probably easier to get a more reliable finish with. The PolyShades is easy too but can be a bit picky sometimes….but it does create a very lovely finish. I will continue to use both.
And you are silly!! ;)
xo
Nancy
Nancy, I have a uestion. I saw the nightstand you did using Poly Shades and Chalk Paint. The one with the dark drawers and the rest painted cream and have looking for the perfect combination of dark and light to refinish a bedroom set. My question is…can you use Poly Shades over a primed/painted/poly finish or should I stick with paint for that? You do beautiful work and I love your unique ideas. Thanks!
Hi Tammie!
I would stick to paint with a previously painted surface. PolyShades is good for a wood stained finish that isn’t too damaged.
It’s a great way to freshen up or even darken a lighter shade of wood.
Thank you for the kind words too! :) Much appreciated!!!
Nancy
hey! i just saw your post on pinterest. I love it! Will the stain cover well over damaged furniture?
my kitchen table has been completely destroyed by my 3 children. scratches, marks, and a big round spot where nail polish remover was spilled and it took the stain off.
would i have to sand more because of all the damage?
Hi Amanda!
Well, for that I would definitely go the “old fashioned” route of refinishing. The PolyShades is good, but not that good! ;) It’s great for freshening up an old piece with minimal damage. Or even darkening up lighter wood stained furniture.
But for extensive damage, definitely a complete makeover is in order.
You can read about how I did this exact thing to our dining room table here … https://www.artsychicksrule.com/2012/11/china-cabinet-and-dining-table-re-new.html
Nancy
Omg, I am in love with your beautiful finished products! I’m trying to match some thrift night stands with a dresser I have but my espresso poly (gloss) turns out red! :'( would you know why/how to avoid?? I had also thought about mixing with another poly I have but was kinda scared till I saw this post… Now I’m just wondering which did you use more of to get that dark rich color? Or was it 50/50?
Thanks a bunch!
Aw thanks so much Grace!
Hmm, I’m so curious as to why that color is turning red for you? It’s a very dark color. Maybe the underlying color has a lot of red in it? You are using PolyShades, correct?
I don’t remember my ratio now, but I’m guessing 50/50 might be a good place to start. Try a small batch of that and see how it looks. Then mix a larger batch to finish your nightstands.
Hope that helps! :)
Nancy
Loving the espresso satin finish.
Thank you!
Nancy
I love this! Thank you so much for sharing! Can you please tell me what brush you used? I tried to follow your directions on an old cabinet and my brush strokes were visible. Any advice you have to offer would be greatly appreciated. Thanks!
Thanks Larissa!
I have used several different kinds. On this particular piece, I do believe I used a sponge applicator. Brushes work best however! The key to getting this product to look smooth are long, even, lighthanded (very) strokes. Also, making sure you have enough product on to spread out. Otherwise you will end up looking uneven also. So apply a bit more product, and use light handed even strokes. You can go back over areas if they look a bit streaky too. (with the brush, until they look more even)
Good luck! :)
Nancy
Hi! I just finished putting on the first coat of polyshades in espresso on my first DIY wood shelf. There are some areas in the corner where the coat was a little thicker. What can I do for those uneven areas? Thanks!
Hi Darci!
Sounds like what happened was…when you were brushing and applying the polyshades, it gathered towards the edges as you came to the end of the piece. (which can happen) When that happens, just lightly brush over those edges, wipe away a bit of that poly and go over the whole length again to get an even finish.
For areas that have already dried that way, you can try lightly sanding that area a bit to remove some and apply a fresh coat. (being careful to keep a light hand on those edge strokes so it won’t gather again)
Hope this helps! :)
Nancy
I had read a blog that said use hidden gripper primer first on laminate and then polyshade. I did that and my first coat of minwax is streaky and after a few hours is very sticky. Please help. Maybe by morning it will be dry enough I can apply more coats.
Hi Wendi,
Oh, I wouldn’t suggest using that primer under a product such as PolyShades. The idea is to be able to see the wood grain and with a primer it would be all but hidden.
Typically with PolyShades you are wanting to refresh the finish that is there or darken it a bit (but not covering completely the wood grain)
Stickiness should go away but it could be the two products interacting with each other.
I would probably remove everything down to the wood and begin again. Sorry, probably not what you want to hear but it is what I would do in this situation.
Once you are down to the wood, you can use PolyShades or Stain with a Poly top coat (what I would do with bare wood).
Hope this helps!
Nancy
Hey there! I see this project is old but you know your stuff so I’m going to take my chances! :) What would you us to protect or seal the top once your done? I’m dying to take on our beat up dining room table but I’m pretty sure it would need a top coat of some kind! Thanks for the fantastic ideas!!
Oh… I finally found the answer in one of the comments! Yay! Thank you for the inspiration!!
Oh yay, very good!!
Have fun!! :)
xo
Nancy
Beautiful. Did you seal it with anything or did the Polyshade seal itself?
Thanks! No, the Polyshades has poly “built in”. No need to seal it.
Hi Nancy, while doing a lot …. and I mean “A LOT” of research on the Minwax Polyshades I came across your site and I found a lot of great information here. I do have a question for you, but I don’t know if you will be able to help me with this question.
I did 3 coats of the Espresso Polyshades in Gloss on my Pub Height Kitchen Table. It turned out really nice, but I found it way to glossy. So, I went out and purchased a can of Minwax Wipe-On Poly in Satin Sheen and applied, so far, 2 thin coats and of course with light buffing in between with 0000 Steel Wool. I like the sheen a lot better now.
The question I have is: Can I mix a little bit of the Minwax Gloss Espresso Polyshades with the Minwax Wipe-On Poly in Satin so I get the exact sheen I want? With just the 3 coats of the Polyshades in Gloss, it almost looked to plastic and that is why I want to mix them to get the sheen I am looking for.
Thank you
Marg Jackman
Hi Marg,
Hmm, I wouldn’t mix those two. I don’t think you’d get the desired end result even if you did. I would continue as you are (applying it then applying the satin finish) since I’m guessing you’d like to use up what you have. :)
Hope that helps!
Nancy
These look great! What is your opinion of gel stains? Do they work as well?
Hey Karen!
I think I might have talked with you on email but yep, I LOVE the gel stains! They are really easy to work with. :)
And thank you!! I am really enjoying having them!
xo
Nancy
Hi Nancy, I hope this isn’t too late to get an opinion. I have used black and mixed polyshades outsied on an old fence and shed trim and will now consider it for a wood laminate kitchen table. BUT, I bought an old mahogany cabinet for bedroom storage. Tall, slim, simple with Mirriored doors. Good shape. Dark shiny stain. (But not that super-shiny, ultra-finished look of some ugly-era furniture.) The color is not bad but a little “yellow” for the room. I was going to paint it a very dark caponata color but i really like to see the grain, so haven’t. (I did prime and paint the interior and the shelves)
Question: Can I mix a latex color paint into a clear poly to get the color I want and still see the grain? And if so, any suggestions? I don’t have any extra wood just like this to experiment. I see this as “refreshing” the already dark color rather than refinishing. Thank you so much for your thoughts.
Hi Sharon,
I wouldn’t mix those two products. Your results will be unpredictable.
What I can suggest, if you just want to slightly darken and or “refresh” the wood, is to use a more pale shade of Polyshades.
Something that would darken it just a bit but still allow the grain to show through.
OR you could try another product I use and love…General Finishes Gel stains.
You can give a light sanding and apply the gel stain, then follow with a coat of clear poly. If you do a search on my blog here (search box is in the right sidebar), for “gel stain” you will be able to see some of the projects I’ve done using it. :)
Good luck!!
Nancy
Hey Nancy! Hope it’s not too late to get some advice! I have been stalking your projects and am IN LOVE! I recently bought a honey oak colored changing table from a garage sale and was told it was real wood… Got delivered and it is NOT real wood al the way through. Seems to have a veneer top over some pressboard. If I lightly and super carefully sand, think I could has polyshades to darken it to more of an espresso color? Our crib is expresso and I so badly wanted to make this match, but now I’m lost!
Aw thanks Kristen! :)
Is the veneer layer real wood? If so, you can lightly sand (then clean well) and then apply the polyshades. That should work just fine.
If it is “fake” wood, then you may have a bit more trouble with it adhering and looking nice.
Good luck!!
Nancy
I am using Bombay mahogany on a piece that is golden oak in colour. I have two coats on but it is still the golden colour with a bit of a reddish tinge. Do I keep adding more coats? The pplyshade was picked up at a restore so wondering if it has expired? It looks dark in the can!
Hi Donna,
Did you stir really well from the bottom? I have found that after these sit for awhile the coloring will settle to the bottom leaving the more clear-ish poly at the top.(it will probably look dark in the can even if it’s thick at the bottom)
Try stirring really, really well again. If that’s not it, then I would suggest mixing in another color, such as Espresso Polyshades, if you are trying to get it darker.
That one is very dark. I actually just used it again recently all by itself (not mixed) and had forgotten just how dark! ;)
Hope that helps! :)
Nancy
Hi!
What about if the wood has a polyurethane coating on it? Would your technique still work if i sand it and apply the stain?
Thanks so much :-)
Hello,
Yep, this would work perfectly for that. It’s actually a stain and poly combined so it won’t be “soaking in” to the wood. It’s great for refreshing an existing finish and/or creating a darker finish. For example, orange-y oak to a nice, dark walnut…without having to sand down completely to the wood to refinish.
Hope that helps! :)
Nancy
What a helpful tip. Thank for your goof idea. It gets me more ideas for my some old furniture.
You are welcome!! :)
Hi Nancy! Great tutorials! When would you choose to sand a piece to completely remove the old finish, stain, and put a poly on vs this process? Does it just depend on the condition of the piece, such as pretty scratched up? Just bought a pretty scratched up round table from a thrift store and am in the process of sanding to remove the old stain to restrain it. Thanks!
Hi Tony! Thank you! And yep, you can pretty much tell if a piece to “too far gone”. If it’s really scratched badly, or gouged, etc., you really should sand all the way down and start again. (with stain, then poly, etc) If it’s lightly scratched, just faded or a bit worn, then the PolyShades is a great fix. This product has come in so handy for me on multiple projects, like this one, for example. But nothing beats a good, old fashioned, stain and poly!
Thanks!! There’s so many products out there and videos giving different advice, so it’s very helpful to have a comparison of when to do one vs another.
You are right about that!! And you are very welcome!
Hi Nancy!
Awesome tutorial. I just refinished a nightstand (I applied 2 coats) and it looks fabulous but I was a bit worried about how long to let it dry before putting anything on it. Can you remember how long it took before the wood was cured and the smell went away? I was wondering if I should put a coat of something on it to seal in the smell and protect the top – does it chip away and would you suggest a top coat of something or did it work just fine as is?
Loving the colour of yours!! Wish I saw this post before I started my project – I might have gone for espresso instead of black – but in any case – very happy with how it all came out!
Hi, That’s great! No, I wouldn’t put a top coat as it doesn’t really need it since the top coat is built in. Plus, anything you put on will also have a similar smell. The smell usually dissipates mostly after about 24-48 hours. 30 days is always a good rule of thumb for any finish (cure time) but you can lightly use it after a few days. :)
Hi Nancy,
I just found this post. I am looking at making my desk a darker shade to match the rest of my furniture. Since it is a desk is there a seal or some time of top coat that I should put on so the finish is not all soft and able to write on? Or will the poly stain not leave the top soft and susceptible to dents from writing etc.
Thanks so much! I’m so happy I found this page. I can’t wait to give it a try.
Hi Chelsea,
The Polyshades has the poly top coat built in so it will be just as durable as if you’d stained and then applied poly separately. No other topcoat is needed with that product. There are other options to making darker stain (the easy way, also!) so take a look at this post before you start. I still love Polyshades, and it certainly has it’s place, but I also love this other method and use it quite a lot. Good luck and have fun! :)
I know this is a super old post & probably a question that has been asked already – (please be patient, I just found you! And I’m just starting in the DIY world.) Would this process work it there is damages to the wood that are corrected with wood putty? I just completed a hugh fusion mineral paint project. I don’t know if it was the putty I used or the paint but, the paint didn’t like the putty. I can’t tell you how many times I sanded and applied another coat but, it was probably at least 10 coats.. and I swear I can still see a difference in the color where the putty was used. And the color I used was super dark. So, now I have two end tables that have a lot of damages to the tops of the table and I don’t know what to do with them. I was going to paint them but, after the fusion project – I’m a tad scared. Do you have a post about how to address damages to the wood before painting or staining?
Your amazing and I appreciate anything you can suggest!
Hi Laura! :) Hmm, it depends on how dark you are going. If you are using a very dark color, like Espresso, etc, than it may work. Typically though, this is reserved for a light refinish. (not in color but in the amount of work to be done) That’s so odd about the wood putty and the paint. I’m guessing they just didn’t play well together! I am sure it was putty that can be painted, correct? Is the damage to the tops so much that a light sanding wouldn’t take care of?? Here is a post on a table that had a bit of damage but I left it … https://www.artsychicksrule.com/old-thrift-store-coffee-table/
So depending on the amount of damage and the color you are going for, this might be able to work for you! Good luck!! xo
Nancy, While doing some research on DIY options in changing out Orange colored wood furniture to a darker more Expresso color, I came across your blog. As a novice in working with refinishing, I was relieved to learn there is an option without full stripping. I have a few questions if you don’t mind. Like the previous poster, I apologize if you have already addressed these.
1) I have some Mahogany bar stools that I want to use for our covered outdoor deck. Can you add a Marine Poly on top of the Polyshade to help with weather proofing?
2) You mention sanding between coats. Can you describe how much sanding is required? Just a enough to create a roughed finish or something more?
3) For a true expresso finish, what shade do you recommend?
Thanks so much!
Hi Cheryl! Yes, it is SO nice to have some other options out there. It can be daunting to think about fully refinishing sometimes.
Yes, you should be able to but it’s hard to know for sure without knowing the exact products you are using.
Sanding between coats is just very lightly smoothing things out so your finish is nice and smooth. You won’t be doing a lot of sanding in between. Use a somewhat fine sandpaper to do this.
The espresso is very dark. If you are after that look, then use straight product. If you want a more “mild” espresso, not as dark, but still dark enough…use it mixed half and half with another lighter color, such as Walnut, or Tudor. They have variations in hue (reddish, brown, etc) so go with the one that best matches your finished desired look.
Just to throw another product at you that might work for you, check out this post here. (you can also do a search on my site with the term “java” to see more I’ve done with it)
Good luck!
This is awesome!