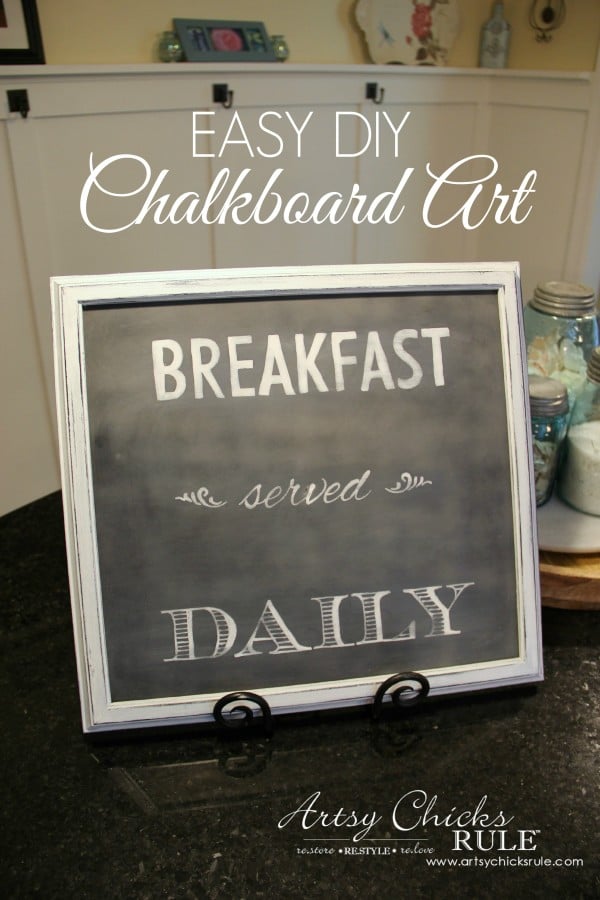
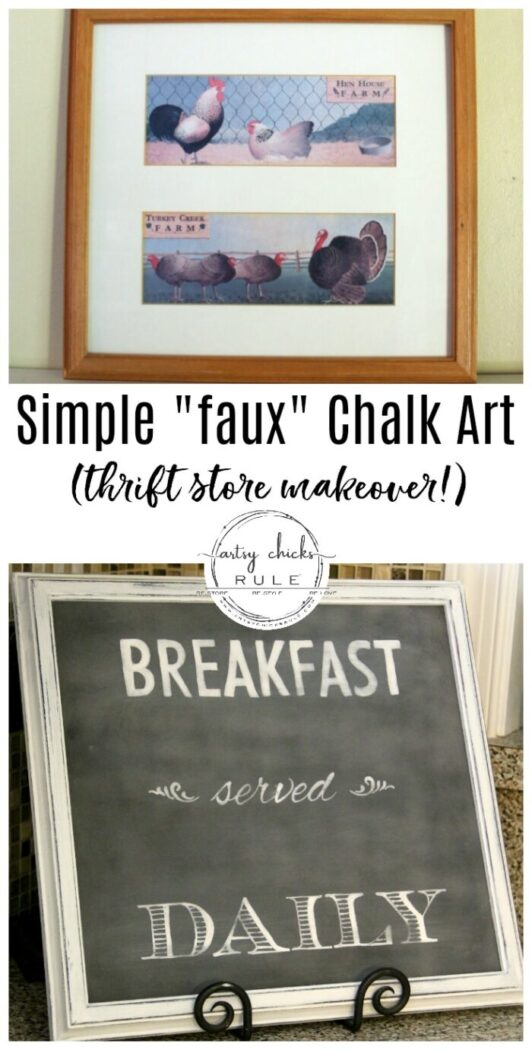
Create your very own “Breakfast Served Daily” sign for your home! Follow along to see how I created this “faux” chalkboard art for it!
I have some fun news today. I think so anyway! ;)
A few friends and I have gotten together and are going to be sharing “Trash to Treasure Transformations” the second Tuesday of every month!
So not only are we sharing our furniture makeovers every month, we’ll now be sharing just about anything we’ve found to makeover.
Love it!
I’m excited because that is right on up my alley.
I love, love making over thrifty finds.
Just like they say….one man’s trash is another man’s treasure. Or a woman’s. ;)
That’s what this entire blog is about.
Even my tagline says…..
RE.STORE RE.STYLE …and RE.LOVE, right?
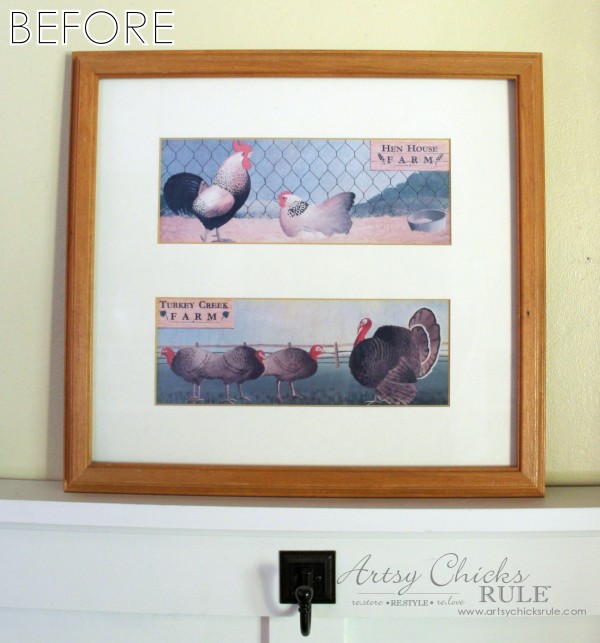
So let me show you what I did with my thrifty find.
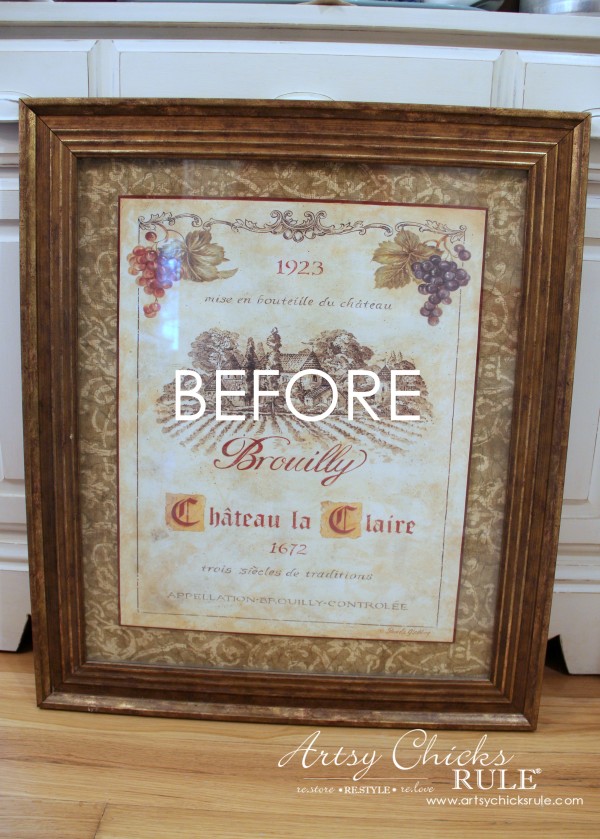
This old rooster print, probably from the ’80s.
It was $2 at the thrift store.
You can find old prints in frames like this all day long.
Some of the thrift stores around me have gotten crazy with pricing things lately though.
I’ll never understand how they can price a really nice wood end table, $8 and price an old print, $10!
I’ve seen it, many times.
Anyway, I love these old prints, you can do so much with them.
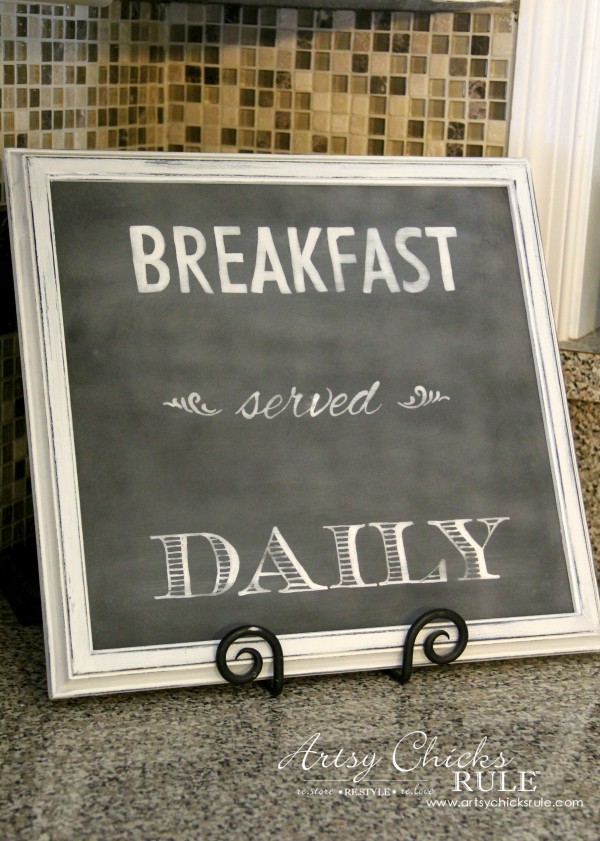
For this one, I decided to create some chalkboard art.
Breakfast Served Daily
Here’s how I began…..
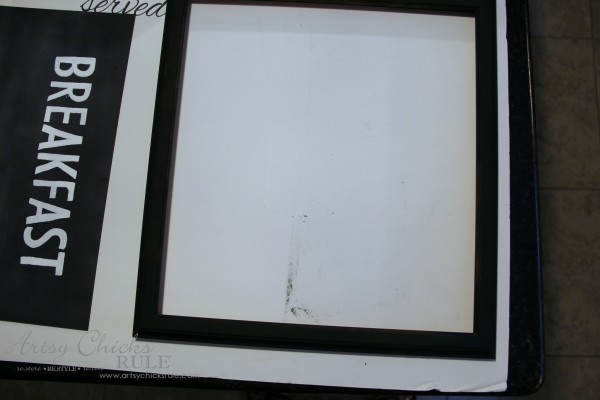
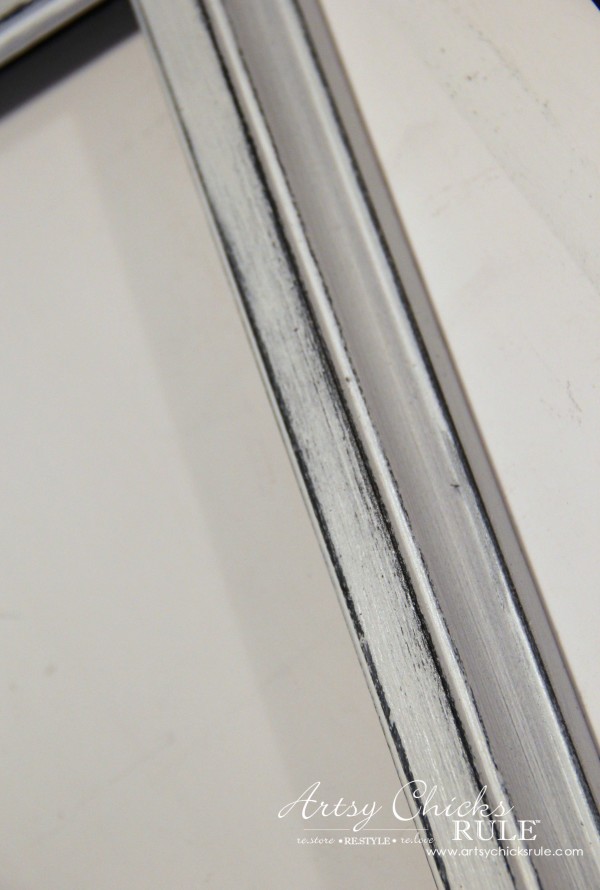
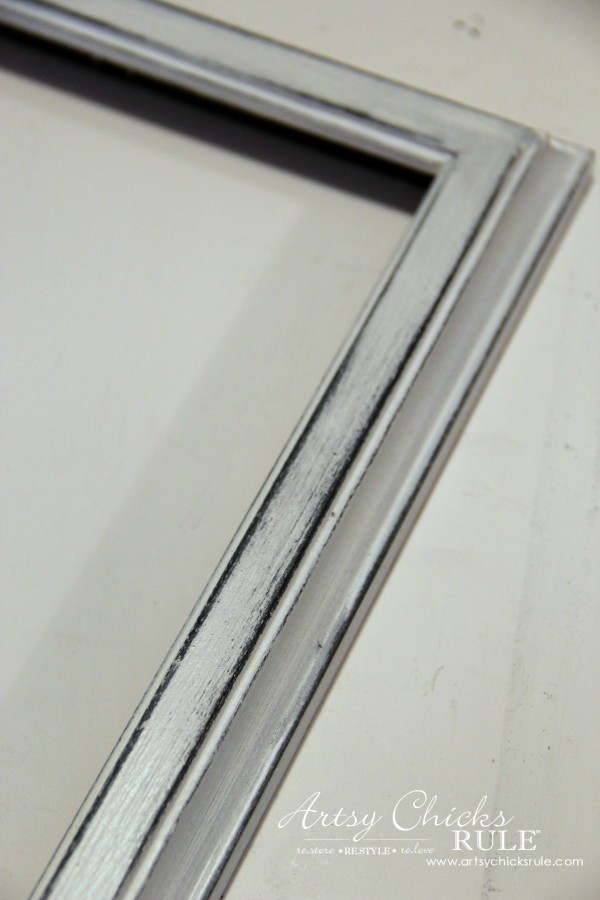
I spray painted both the glass and frame with flat black spray paint.
I used flat because that would be similar to a chalkboard texture.
I then painted over the black frame with Pure White Chalk Paint.
I used the spray paint underneath so it would show through when distressed.
Plus, using spray paint under, and Chalk Paint over, pretty much ensures you will only remove down to the black layer. (not beyond, which I didn’t want)
I then took a damp rag and lightly wiped away a bit of the Chalk Paint.
After it was dry I sprayed a coat of clear sealer over it.
Easy!
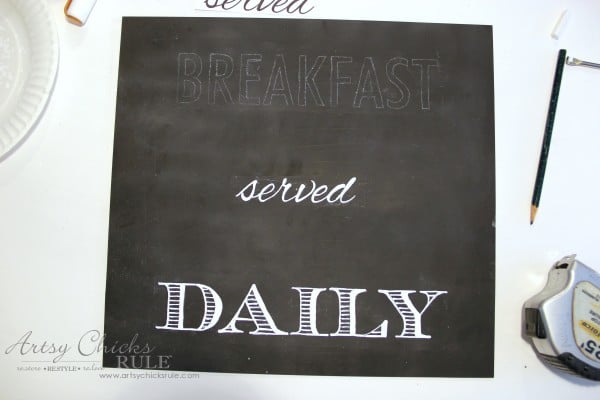
Here is the glass that I spray painted black. (flat)
After the paint was dry I rubbed chalk all over it and wiped it away.
(this gives it a “chalkboard” look even though I’m not really using it as such)
Then I created this free printable and printed out my lettering.
I cut out the words and rubbed white chalk on the backside.
Next, position them and then trace the letters with a sharp pencil.
This will transfer the white chalk (as you can see in the word “breakfast” up above) so that you can then paint in the letters.
I will sometimes use a brush but this time I used a handy, dandy Chalk Ink pen which just makes it super simple!
What to see a bunch more other transfer methods?? I’ve created a post with all of my favorite ways to transfer graphics to projects. You can see it, here.
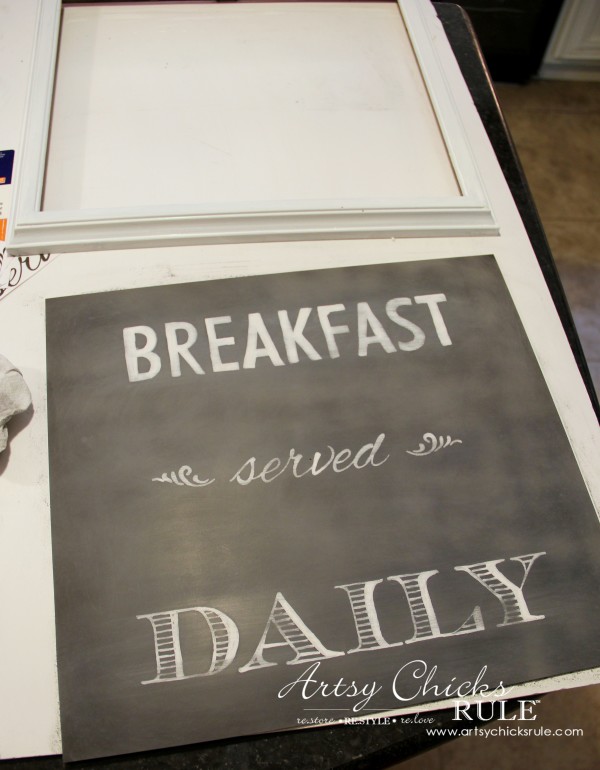
After I finished coloring in the lettering (and it was dry) I lightly sanded to distress.
This makes it look a bit more “chalky” too.
Simple, I tell ya!
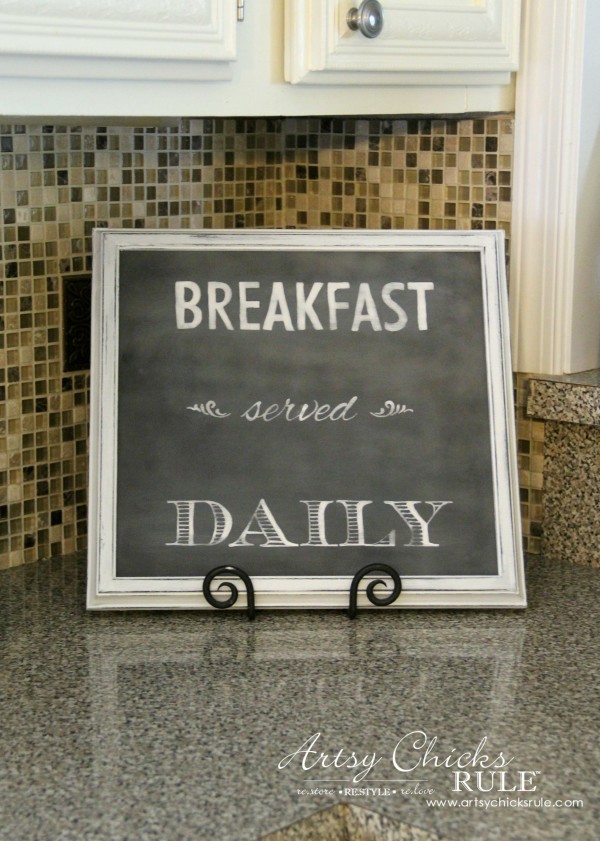
Then just place back in the frame….and viola! … Chalkboard Art.
It can be hung on the wall (and even has the hang-y thing on the back all ready to go!)
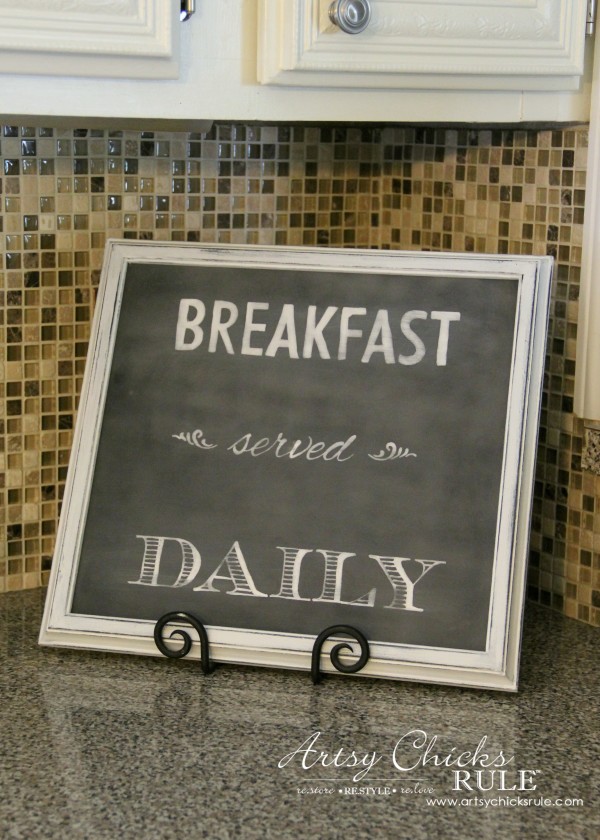
…or like this…
I’m not quite sure where it will go…or even if it will stay.
I’ve run out of room for things like this!
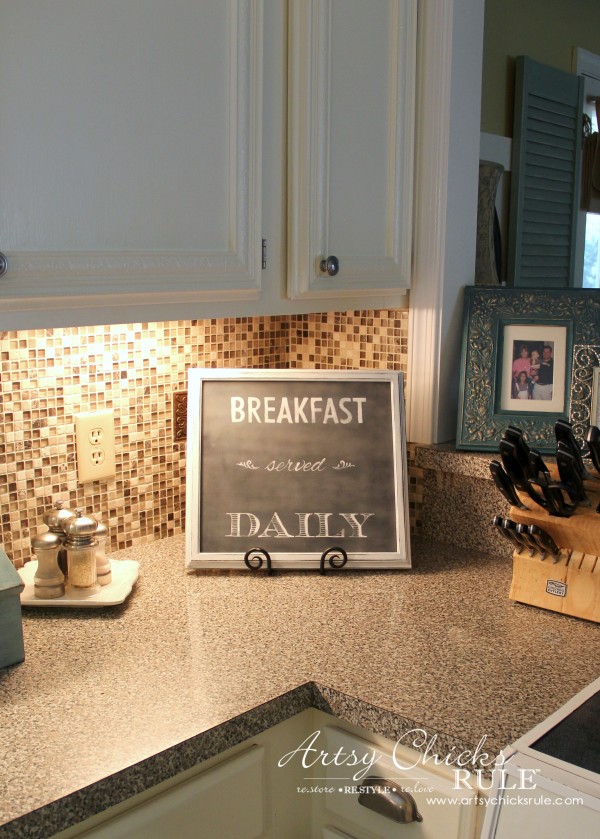
Maybe it will go with the change-up in the dining room. We’ll see.
(with the under cabinet lighting)
I do sort of like it here though.
Proudly displaying that “Breakfast is Served Daily” here….hee hee…
Not altogether truthful, however.
It depends on what you classify as breakfast. ;)
Anyway, I hope you will enjoy this new series. Lots of inspiration for budget-friendly decor.
And …being able to envision things in a whole new and different light.
PIN it to save it!
Now it’s time to go by and see what kind of treasures my friends created out of their thrifty finds this month!
I consider you the “queen of chalk paint”. And I need some advice on that. I just tried Annie Sloan chalk paint. I used the coarse stiff flat brush that came with it. Was that a mistake? (is it for wax instead of paint?) What type of brush do you use with chalk paint on furniture? Things didn’t go well, I am going to have to sand and redo and I am used to painting, usually don’t have this problem. Too streaky and thick, globby, even after a few coats which isn’t surprising considering the bristles on the brush. I tried to thin a bit of the paint and then ended up with drips. First I painted a small metal item. Washed it first and let dry. Painted two coats. That wasn’t streaky or globby but when I tried to buff the wax, the paint chipped off in places. Perhaps I should have waited a day between painting and waxing? Fine if one wants a chippy look but I didn’t really. I would appreciate some pointers here. Obviously chalk painting has a learning curve, one that I am willing to learn. I love your chalk paint projects and the colors of Annie Sloan paints. Thanks for your help! :)
Aw, that is so sweet Gwen! ;)
Okay, on the brush, yes, sounds like you painted with the wax brush. (was it round with a flat end?)
Annie Sloan carries paint brushes but I’ve always just used regular paint brushes. I like Purdy brand the best.
Sounds like possibly the wrong brush and/or the paint was too thick. You only need a small amount of water to get it a bit thinner usually. You can also lightly sand after the paint has dried to smooth things out a bit before you put your sealer coat on. (wax or poly)
For painting on metal, I would do very thin, even coats letting them dry well in between. Since paint is “wet” you can possibly remove some of the first coat if you go over it too many times, or too roughly on subsequent coats.
So light handed, light coats each time. Let it dry well, overnight would be good. Then wax and buff. (apply the wax with an old rag/like tshirt material)
You can also give the metal item a light sand beforehand if the paint is not sticking well. (I have done it both ways with good luck)
Yes, is really does take a bit of a learning curve but once you get the feel for it you will be on your way! :)
Just a note, I also seal with poly sometimes. I’ve done both on metal (either/or) with good results.
Hope this helps some!! :)
Nancy
Nancy I think your sweet chalkboard art looks so nice in the corner of your kitchen counter. How smart, I never thought to actually paint the glass black. These would make fabulous gifts too! Looking forward to following this new Trash to Treasure Series!
Nancy I love how you layered the paint on the frame- and the faux chalkboard look is perfect! Great job replicating your inspiration piece for only $2!
Your sign is SO much more than the Birch Lane sign. I would never have even looked twice at their sign. With the great distressed frame, your artful design of the lettering, both font and wording is so creative!!! I love it!
Want to be inspired, learn new skills, discover all the tricks to furniture makeovers, creating new out of the old and more? You'll also receive my FREE ebook "Creating Fabulous Finishes" PLUS access to my private Printables Resource Library, too!
Sign up to get the Weekly Newsletter! Our emails include an unsubscribe link and you may opt-out at any time. Your information will *never* be shared or sold to a 3rd party.


")
")
")

")


")
")


Love it, Nancy!! I was wondering if your husband and son were that lucky lol. It looks like a real chalk board! :)
Haha not! ;) On the weekends yes, but daily. Not so much. lol
xo
Nancy
It turned out so cute, Nancy! Looks perfect on your kitchen counter. :)
Thanks Lauren! :)
Nancy
I consider you the “queen of chalk paint”. And I need some advice on that. I just tried Annie Sloan chalk paint. I used the coarse stiff flat brush that came with it. Was that a mistake? (is it for wax instead of paint?) What type of brush do you use with chalk paint on furniture? Things didn’t go well, I am going to have to sand and redo and I am used to painting, usually don’t have this problem. Too streaky and thick, globby, even after a few coats which isn’t surprising considering the bristles on the brush. I tried to thin a bit of the paint and then ended up with drips. First I painted a small metal item. Washed it first and let dry. Painted two coats. That wasn’t streaky or globby but when I tried to buff the wax, the paint chipped off in places. Perhaps I should have waited a day between painting and waxing? Fine if one wants a chippy look but I didn’t really. I would appreciate some pointers here. Obviously chalk painting has a learning curve, one that I am willing to learn. I love your chalk paint projects and the colors of Annie Sloan paints. Thanks for your help! :)
Aw, that is so sweet Gwen! ;)
Okay, on the brush, yes, sounds like you painted with the wax brush. (was it round with a flat end?)
Annie Sloan carries paint brushes but I’ve always just used regular paint brushes. I like Purdy brand the best.
Sounds like possibly the wrong brush and/or the paint was too thick. You only need a small amount of water to get it a bit thinner usually. You can also lightly sand after the paint has dried to smooth things out a bit before you put your sealer coat on. (wax or poly)
For painting on metal, I would do very thin, even coats letting them dry well in between. Since paint is “wet” you can possibly remove some of the first coat if you go over it too many times, or too roughly on subsequent coats.
So light handed, light coats each time. Let it dry well, overnight would be good. Then wax and buff. (apply the wax with an old rag/like tshirt material)
You can also give the metal item a light sand beforehand if the paint is not sticking well. (I have done it both ways with good luck)
Yes, is really does take a bit of a learning curve but once you get the feel for it you will be on your way! :)
Just a note, I also seal with poly sometimes. I’ve done both on metal (either/or) with good results.
Hope this helps some!! :)
Nancy
Nancy I think your sweet chalkboard art looks so nice in the corner of your kitchen counter. How smart, I never thought to actually paint the glass black. These would make fabulous gifts too! Looking forward to following this new Trash to Treasure Series!
Thank you Marie! :)
I’m excited about this series too…should be fun!
xo
Nancy
love all three of these projects, trash to treasure is going to be something i look forward to xx
Oh yay!! Hope you will enjoy it! :) I think we will. I love a challenge!
xo
Nancy
Nancy I love how you layered the paint on the frame- and the faux chalkboard look is perfect! Great job replicating your inspiration piece for only $2!
Thanks Jen! :) Looking forward to more transformations!
Nancy
Your sign is SO much more than the Birch Lane sign. I would never have even looked twice at their sign. With the great distressed frame, your artful design of the lettering, both font and wording is so creative!!! I love it!
Aw thanks so much Judy! :)
It’s really a doable project too!!
Hope you have a great weekend!
xo
Nancy