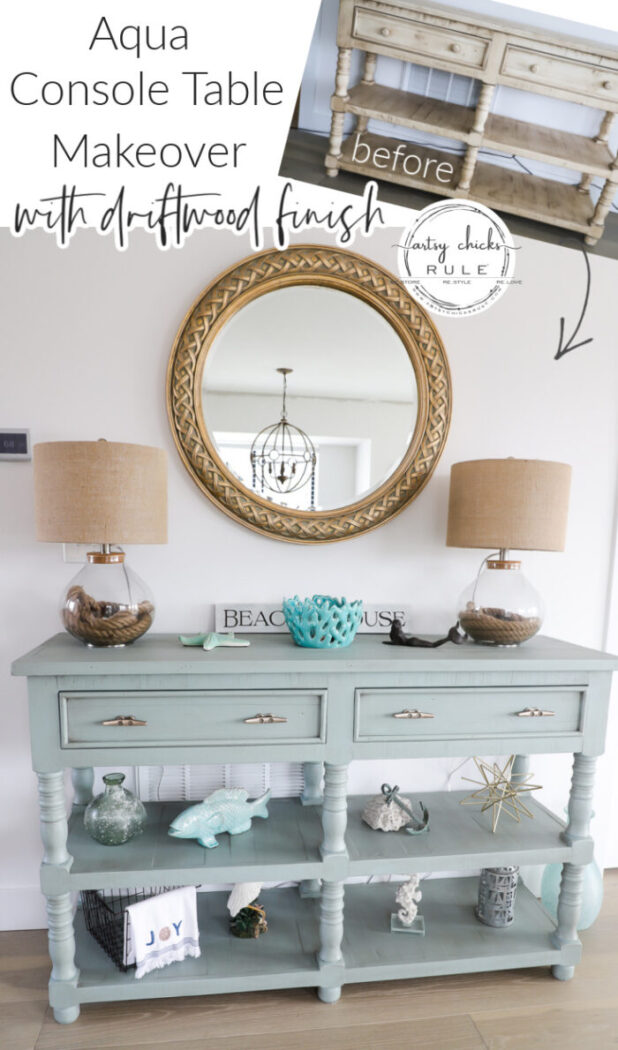
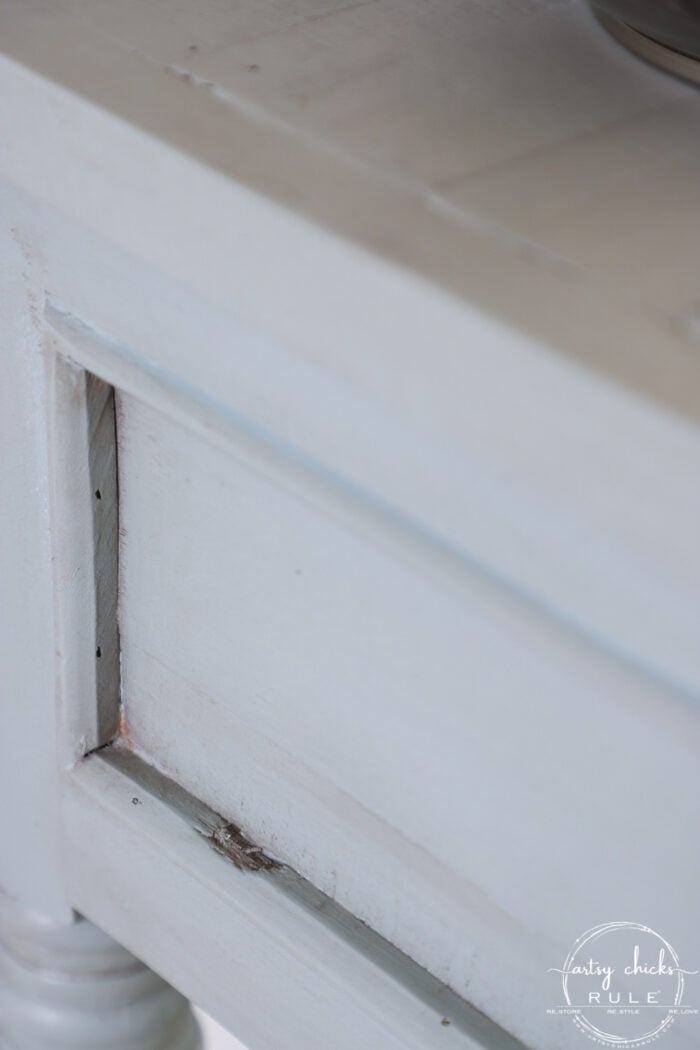
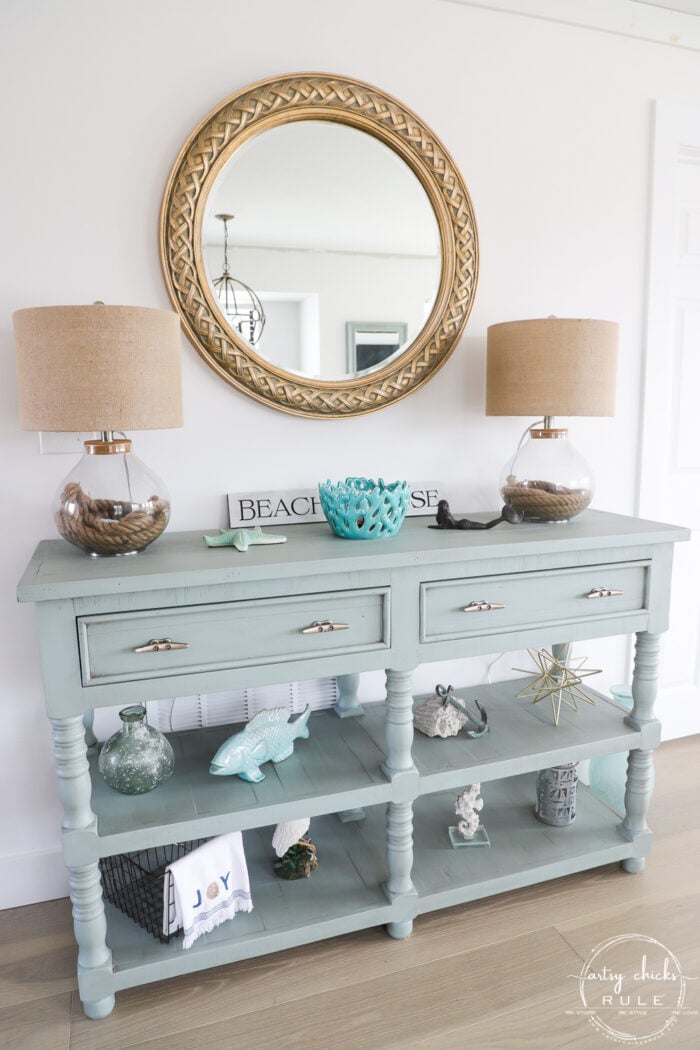
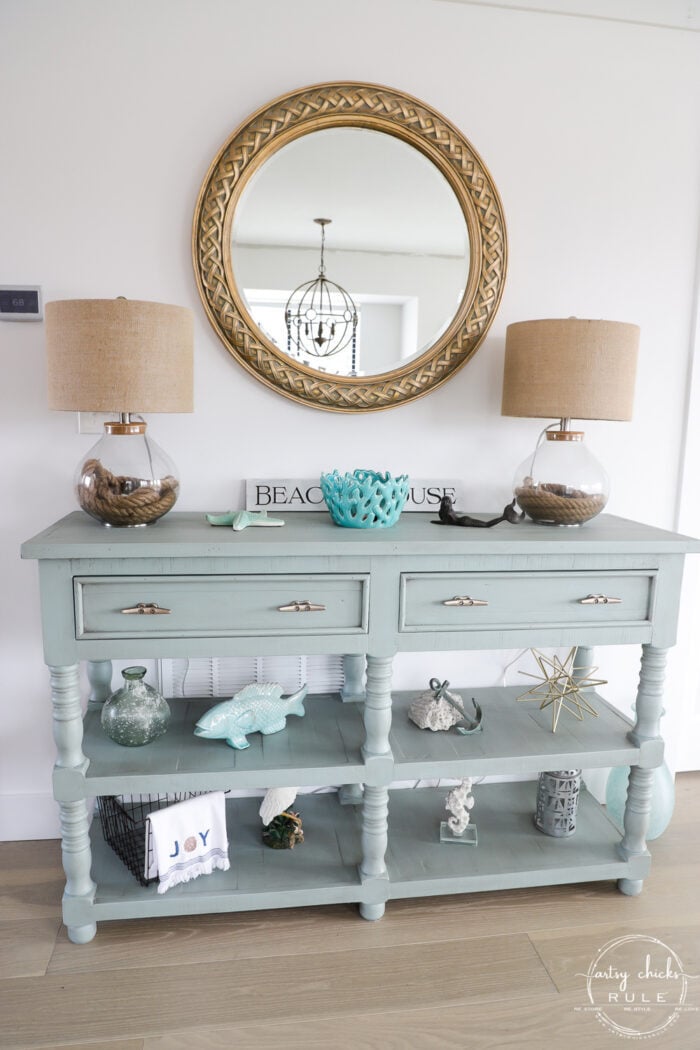
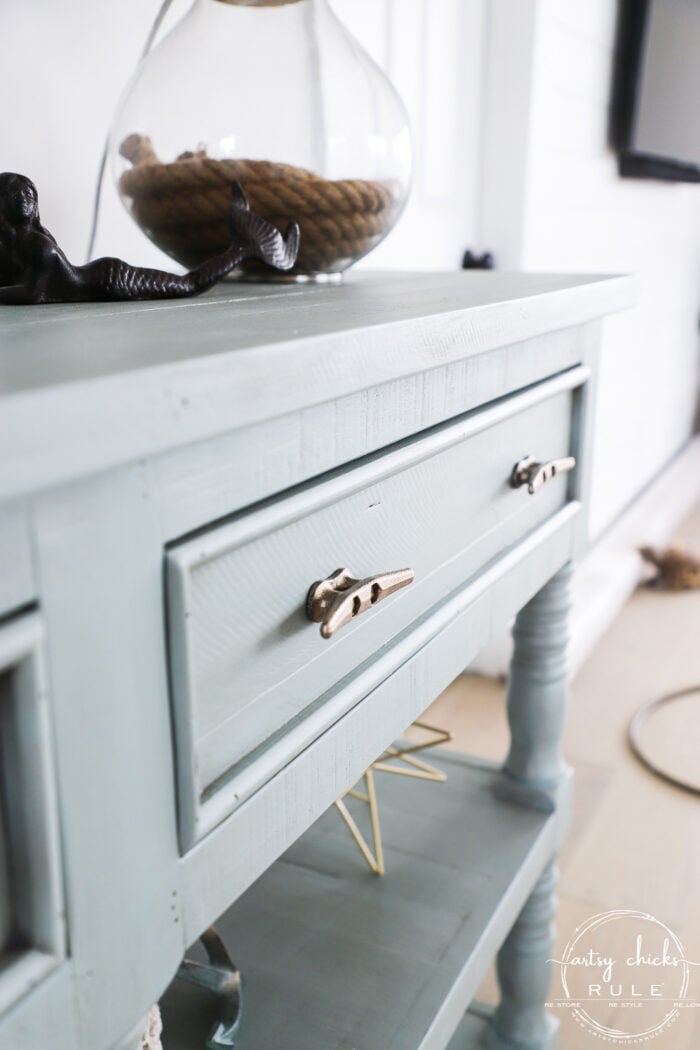
This previously yellow furniture find got a new look… a coastal aqua console table with a gorgeous hint of driftwood to finish the look!
Hello, hello my sweet friends!
I hope you have had a wonderful week. It’s been ahhhmazing here! Yippee! In the 70s but such a tease because it’s going to drop back to normal 50s (mostly)…boo.
But that’s better than the 30s, right! One hundred times yes. I’m so ready for warm weather and sunshine.
And why we are busting it at the beach condo to try to get it ALL done (even the kitchen) by summer.
We’ll see how it goes! Might be wishful thinking. lol
Which brings me to today’s project…
Aqua Console Table (with driftwood stain)
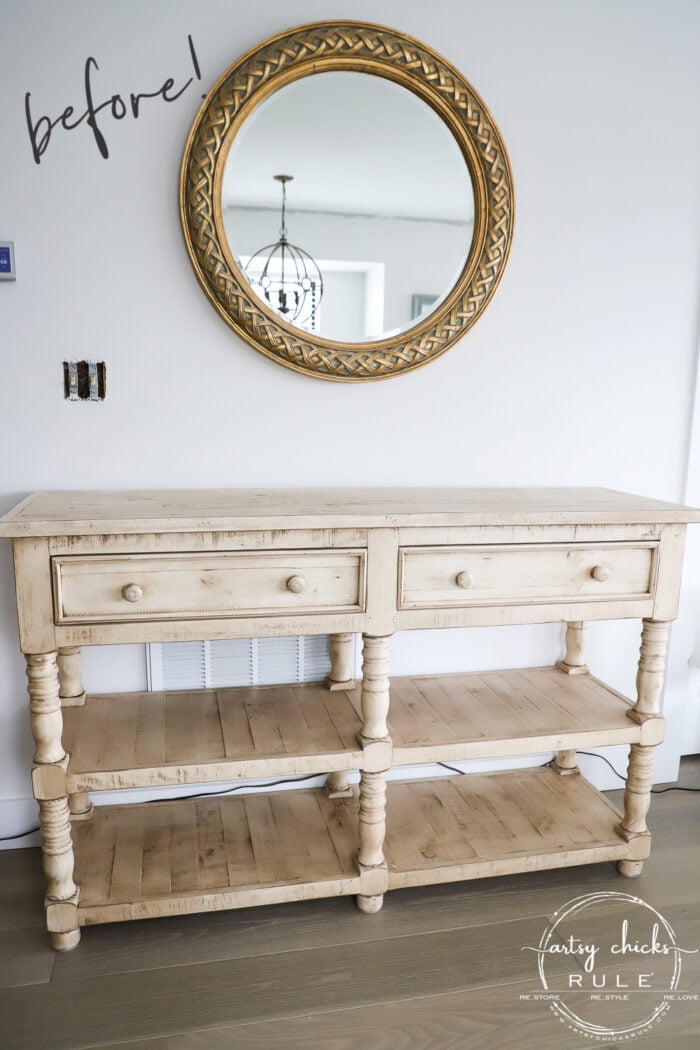
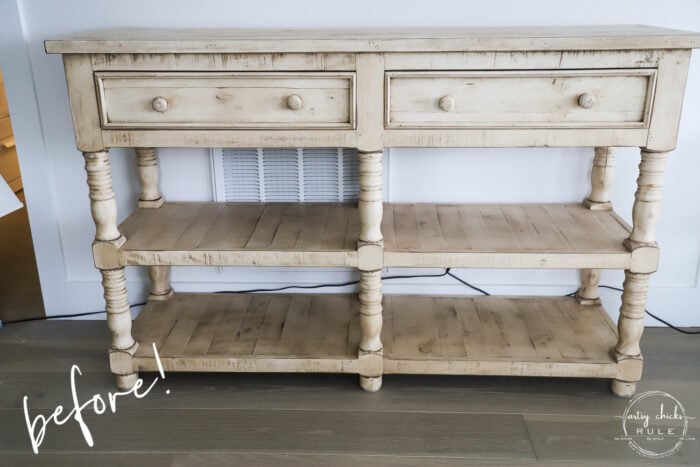
Remember this one?
We found it at the Home Goods in the OBX right after we bought our place.
I loved it but not the color. I knew I’d paint it or do something with it all along, just not sure what.
Until now!
This is what I did…
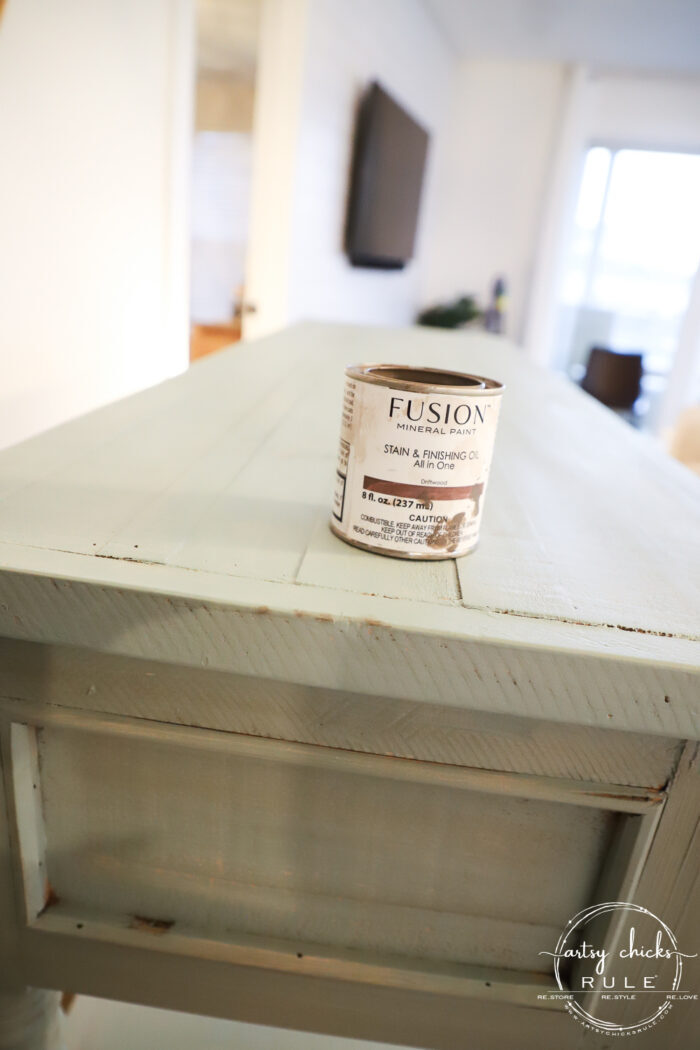
I wanted to keep some of that uh…shaded, worn, aged look so decided to top my paint with the same Driftwood Stain (and Finishing Oil) that I used on our dresser. You can see that project here >>> Driftwood Stain Dresser
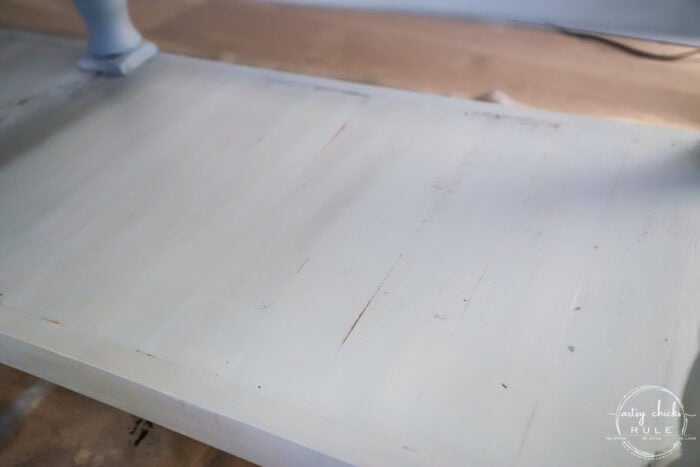
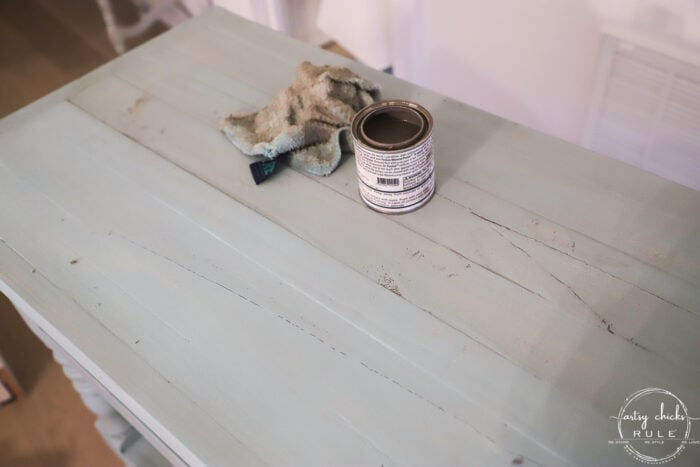
So I used my big fat paintbrush (linked above) that works best with Fusion paints (in my experience anyway) to apply 1 coat of the French Eggshell paint.
You can see above where I left some of the dark showing through. I didn’t want to fully coat the piece so one coat was plenty.
I did go back over a few areas that I thought were too thin but not the whole thing.
When I share the finished pictures, you can see the other areas like this above that I left unpainted. (on purpose)
Once the paint was dry, I started rubbing on the Driftwood stain.
This was actually my first time using it and so I was learning to get a feel for it as I went.
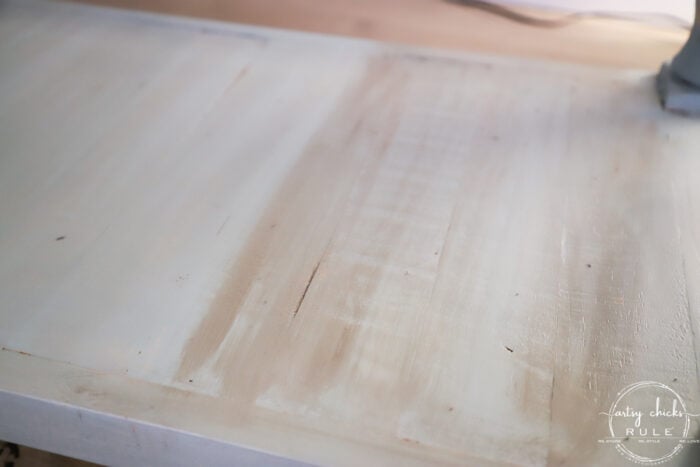
I rubbed it on with my washcloth (I don’t recommend a washcloth, an old T-shirt-type material will work better) and wipe it back off with the other half of the washcloth. (I split it in half)
You can see the left where I’ve applied it and wiped it back. The right side is undone yet.
Want to see some of these projects in “live” time? Hop on over and follow along with me on INSTAGRAM. I’m always sharing in my stories as I’m doing projects, finding new furniture, fun finds….just all the day to day behind the scenes.
The right side after applying but before wiping back the excess.
The perfect amount seems to grab and hold. I love the subtle effect it gives.
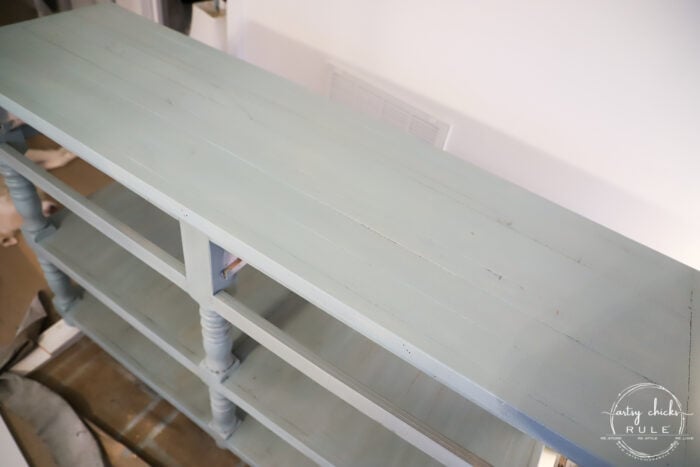
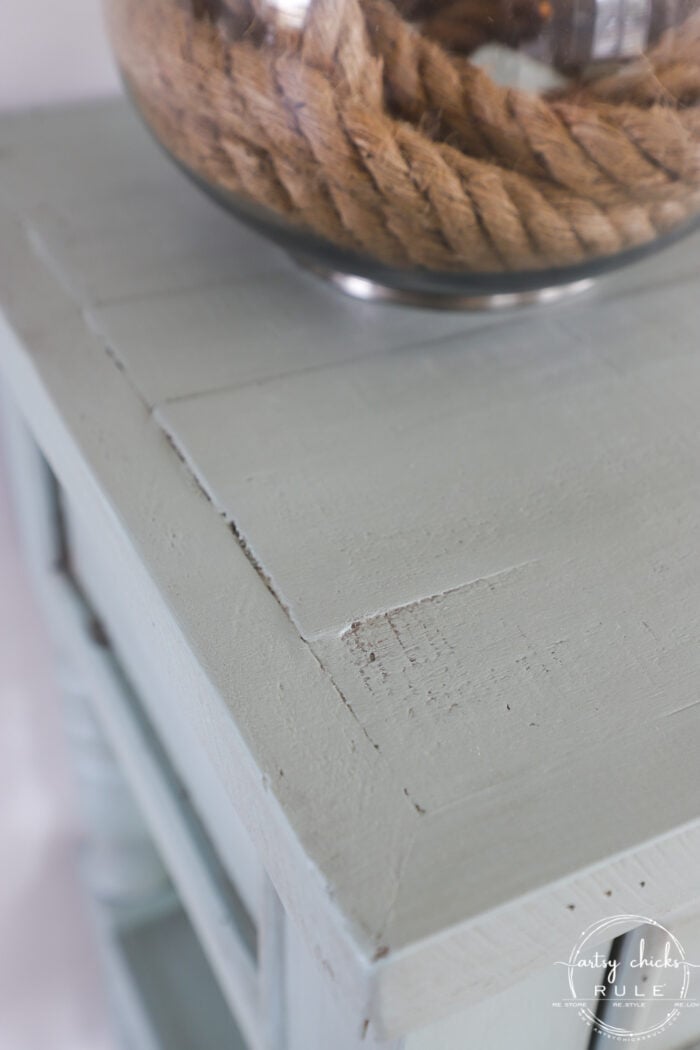
In the photo above you can see the two bottom shelves I’ve applied the Driftwood stain to.
The top is just painted. See the difference??
I wanted to be very detailed in this post so you could really see how different it looks, etc.
By the way, this was super easy to do too.
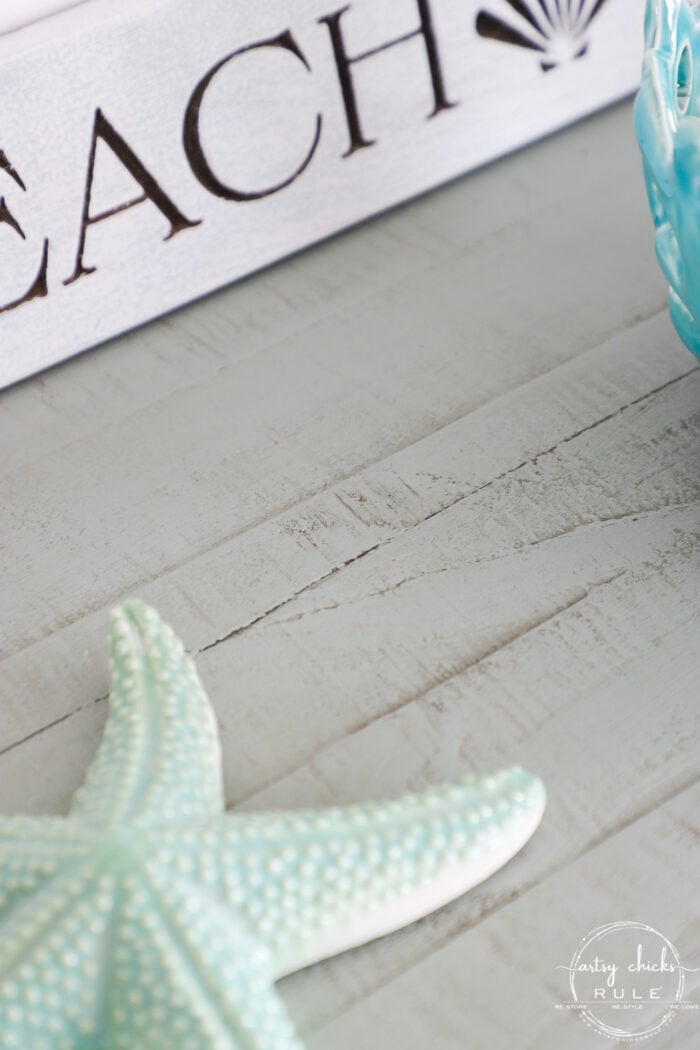
So, me leaving some of the dark shadowing behind kept it looking like this…
Plus the Driftwood stain added to that look too.
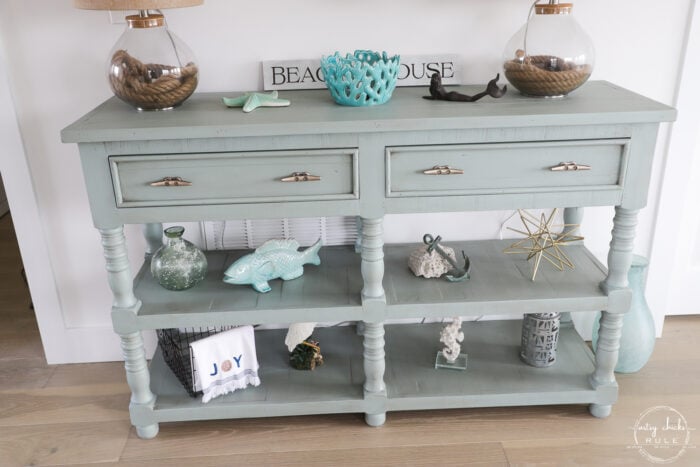
I love that it looks like this is how the aqua console table came to me. Looks like it was meant to look like this!
Don’t you think so too? :)
Love the little imperfections.
And new lamps!
I just found those at the OBX Home Goods the same weekend I painted the console. They are super cool…you can open the top (it’s a cork) and put whatever you want inside. They came with the ropes which I love but I’m also going to add a large shell and maybe a starfish on top of the rope.
Won’t that be pretty??
Don’t mind all of the other decor on it because that is not how it will be when I finish decorating.
I really have nowhere to put “all the things” right now and I will also be changing things out here and there, etc.
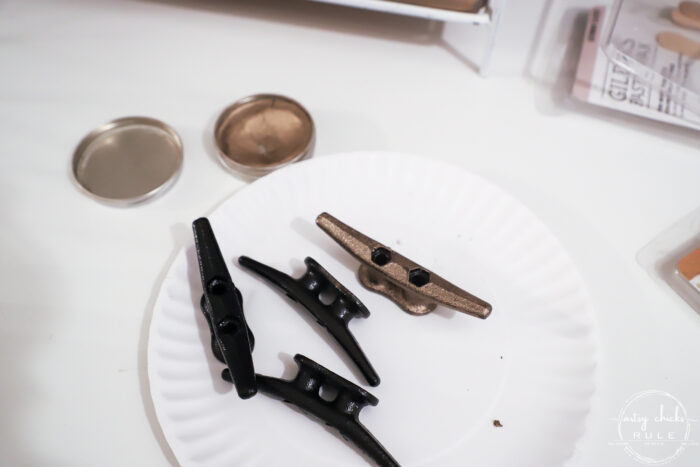
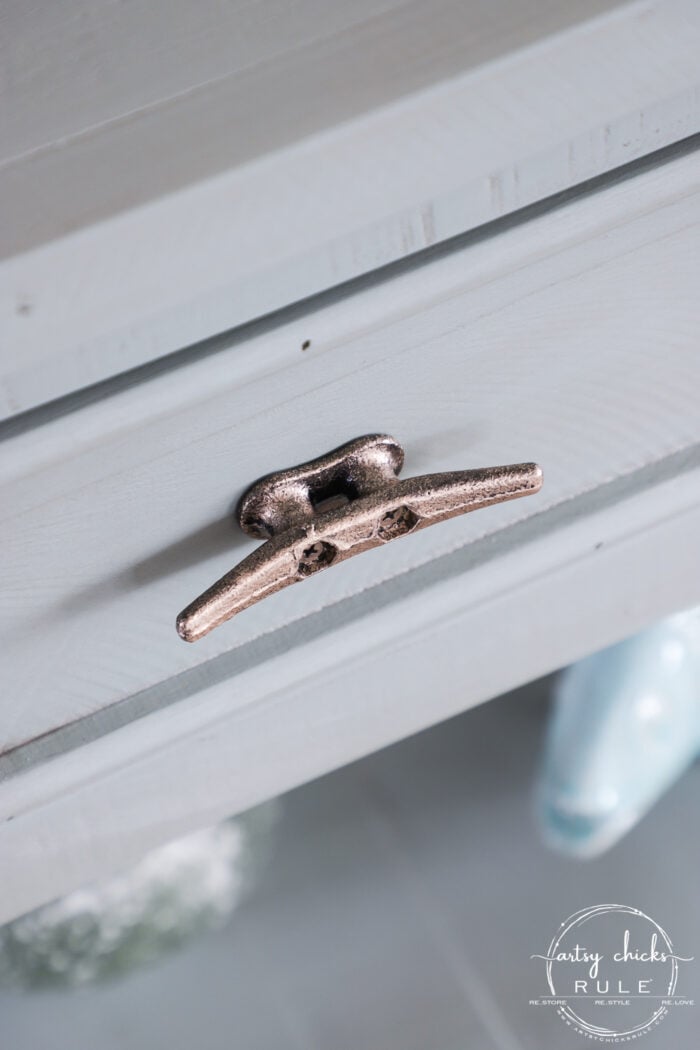
OH! And the hardware…
I used these cleats that I bought for our entry wall but they were too small.
I ended up keeping them figuring I’d use them somewhere…and I did. Yippee!
They are perfect for this pretty new coastal aqua console table.
To change them from black, I simply rubbed some of my Gilder’s Paste over them. (everything is linked in the box above)
I wanted some of the black showing through, sort of like the wood on the console.
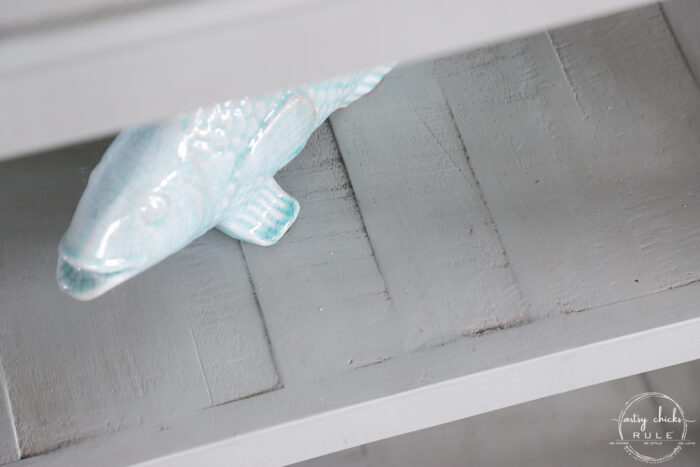
And I should mention that sheen. Just look at that finish. I LOVE that both the Fusion paint AND the Driftwood stain and finishing oil don’t require top coats.
They both leave just a hint of sheen which is perfect.
And I couldn’t leave you without a little Ryder, could I?
We call this the legless pose. Haha!! He’s so funny.
He bends that leg back so far under him it looks like he’s lost his leg. (it’s usually so far under that you don’t see any of his paw like you can a bit above)
PIN it to save it!
So, what do you think? Are you loving this Driftwood Stain as much as I am??
I’m hooked!! haha Really, I love it lots.
I am looking forward to trying it on yet something else soon.
Tried it?? Let me know what you think!
I love this! I really need to get some of the fusion paint and driftwood stain to try. Your posts make me want to move to the beach myself just so I can decorate that way and not feel like it would be out of place.
I love it! I don’t have the guts to paint my furniture a color, but this redo is inspiring! The aqua is so fresh and I agree that the driftwood stain highlights the nooks and crannies! Thanks for sharing your projects, tips and tricks! I always enjoy seeing the before and afters!
So glad Ryder posed for the photo shoot!! :) He’s such a handsome boy and that table, holy smokes, it is gorgeous!! I love how you combine elements to make the piece your own. Beautiful! Love the rustic, beachy vibe you achieved!! You have to be thrilled.
May you get all the work done at the beach with time to spare!
Have a great weekend!!
I think the original look was meant to say “driftwood,” and to me it just says “meh.” I commend you for even bringing it home 😂 Actually, it does have a nice shape, but the color wasn’t appealing. Now it sings, Nancy! The stain on top of the new color suit this table much better, it does look authentically aged.
Love this combo!! It’s definitely on my to try list. I was questioning the staging until you mentioned at the end LOL. Can’t wait to see more of the condo!
Thanks, Julie!! And haha, yes!!! So funny, I was (like I usually am) on “automatic”. I never actually “styled” that piece (I mean not really, just kinda put things on it). Things just got put there since I have nowhere else to really decorate with them yet. (I plan to add some wall shelves and such…plus new nightstands, etc etc, bathroom wall shelves) And so when I painted that I just put everything back on it!! lol I usually even take a photo of the finished piece plain also (without any styling) but didn’t do that either! I was editing photos back here at home saying to myself, why did I put all that stuff back on there and where is my plain “after” photo? OOPS! I will have to take more photos next time I’m down and upload them in the post. :) xo
So pretty, Nancy. The color is perfect for the beach and the hardware fits. I would imagine that a beach 🏖 place has been a dream of yours for a long time and now it is a reality……. so have fun this summer. Take Ryder for a swim 🏊♂️
Looks so good! I like the fusion paint and stain I think better than chalk paint. Now they need to add some colors in their line of products. I have read some are mixing their own colors but I’m not into that at all!
So beautiful. I love this finish. Ryder, well he’s always beautiful and perfect lol. I spent a week in Duck in the Outer Banks and I never wanted to leave. Enjoy!
Being a fan, one that loves the beach, but lives well inland, I have a silly question. When you’re there working, do you take time to enjoy where you are and soak up the beauty around you? Your projects are so beautiful, and your beach home is being transformed right before our eyes. But…each time I relish in your talent, I find myself hoping that you’re taking time to just relax in the fulfillment of a dream. My goal this summer is to take a few days to be near the ocean. Thanks for letting us all dream with you.
Oh, Lyn…honestly, and I’m sad to say, no! Not as often as we should. We try to do some small things like go for a walk around our neighborhood here or maybe an early morning sunrise here and there but it’s been mostly all work and no play for months. I think we feel like we just want to get it done so we can sit back and enjoy! But you are right, we should make more time for that. :) I hope you make it to the ocean this summer! xoxo
I love that color! The cleats are so cool too! Have a great weekend! I’m headed to the east coast of Florida to visit family and soak up a lot of sunshine….oh how I’ve missed that beach!
Love the new look. yes, the driftwood stain is perfect. The console, to me. doesn’t look as “chunky” as it did when you bought it! I definitely is a major improvement. I like the items on the console. If it were me, they probably would be lined up like little solders ! Thanks, too, for the details on the application and the stains and paint. Really does make me think I ” can do that”! Of course, I love seeing Ryder! How is he and did you raise him from a puppy? He is so cute and photogenic! Can’t wait till next Tuesday to see what your next project will be. Have a wonderful weekend.
Thank you, Sue!! And yes, I sure did. We had lost our sweet Lexi girl (she “grew up” with our kids and it was heartbreaking to lose her) and I missed her so. We found him through a friend and here we are! :) I hope you have a wonderful week! (and by the way, you CAN do that! ;) ) xoxo
Thank you, Nancy for this beautiful makeover idea! Love it!
So many things in your home are exactly the same as in mine! Now, I see your gorgeous pup, and he looks just like my beautiful girl, who is actually a Great Pyrenees. Is that your boy’s breed by any chance?
I love the idea of using Driftwood Stain for this — the effects of dark wax have never “wow’ed” me– photos look too swampy sometimes. Do you think this stain would be as effective over chalk paint too? Also, I have pieces that I want to change the hardware on… will wood filler work for the old holes?
Oh yes, I understand that. I have used dark wax many times in the past but it’s definitely not my go-to! I prefer a lighter touch these days. Yes, you can use this over chalk paint too, however, I would first seal the chalk paint with a coat of poly beforehand. The reason for that is chalk paint is porous and will most likely take too much of the Driftwood stain and it will overtake whatever color you used and become dark. If you apply poly first, it will seal the CP and you will get that nice, light effect that you can wipe away in areas, etc. (wood filler will work for holes, yes)
Hello! I love everything you do!!! But I have a question about the “driftwood stain and finisher” is that a water based product? Can you apply it right over top of any paint? Thank you! Can’t wait to see what else you come up with!!!
Hi Katrina! No, that is not water-based. But yes, you can apply it over paint. Just let the paint sit for at least 24 (preferably 48-72) hours before applying it. You want the water to have a chance to evaporate from the paint first. :) xo
Want to be inspired, learn new skills, discover all the tricks to furniture makeovers, creating new out of the old and more? You'll also receive my FREE ebook "Creating Fabulous Finishes" PLUS access to my private Printables Resource Library, too!
Sign up to get the Weekly Newsletter! Our emails include an unsubscribe link and you may opt-out at any time. Your information will *never* be shared or sold to a 3rd party.


")


")
")
")
")

I love this! I really need to get some of the fusion paint and driftwood stain to try. Your posts make me want to move to the beach myself just so I can decorate that way and not feel like it would be out of place.
Yes, you do, Laurie! It’s really great, especially that stain. :) xo
I love it! I don’t have the guts to paint my furniture a color, but this redo is inspiring! The aqua is so fresh and I agree that the driftwood stain highlights the nooks and crannies! Thanks for sharing your projects, tips and tricks! I always enjoy seeing the before and afters!
Oh, but you are missing out on all the fun! ;) It’s only paint…you can do it! Thanks, Kara! xo
Love what you did with driftwood stain. Also love that your dog seems to match all your projects! 😊🐶
Aw, haha, yes he does, doesn’t he?!! :)
So glad Ryder posed for the photo shoot!! :) He’s such a handsome boy and that table, holy smokes, it is gorgeous!! I love how you combine elements to make the piece your own. Beautiful! Love the rustic, beachy vibe you achieved!! You have to be thrilled.
May you get all the work done at the beach with time to spare!
Have a great weekend!!
Yes, my star of the show! :) Thank you, Christina! Hope you have a great week! xoxo
I love how this turned out. Definitely going to have to try this!
Yes, do!! Thanks, Donna! xo
Love the coastal beachy look. The aqua color and driftwood stain are spot on..
Thank you, Rita! xo
I think the original look was meant to say “driftwood,” and to me it just says “meh.” I commend you for even bringing it home 😂 Actually, it does have a nice shape, but the color wasn’t appealing. Now it sings, Nancy! The stain on top of the new color suit this table much better, it does look authentically aged.
Yes, I agree! Haha, I didn’t love the color at all either, Marcie but the bones were good! xoxo
Simply beautiful! Yes, it looks like it’s always been that way and your finishes are superb. Thanks for the inspiration!
Thank you, Lacey! xoxo
Love this combo!! It’s definitely on my to try list. I was questioning the staging until you mentioned at the end LOL. Can’t wait to see more of the condo!
Thanks, Julie!! And haha, yes!!! So funny, I was (like I usually am) on “automatic”. I never actually “styled” that piece (I mean not really, just kinda put things on it). Things just got put there since I have nowhere else to really decorate with them yet. (I plan to add some wall shelves and such…plus new nightstands, etc etc, bathroom wall shelves) And so when I painted that I just put everything back on it!! lol I usually even take a photo of the finished piece plain also (without any styling) but didn’t do that either! I was editing photos back here at home saying to myself, why did I put all that stuff back on there and where is my plain “after” photo? OOPS! I will have to take more photos next time I’m down and upload them in the post. :) xo
So pretty, Nancy. The color is perfect for the beach and the hardware fits. I would imagine that a beach 🏖 place has been a dream of yours for a long time and now it is a reality……. so have fun this summer. Take Ryder for a swim 🏊♂️
Thanks, Shirley! Yes, it really has! :) (a little note…Ryder does not like the ocean (waves…scaredy cat) but loves a pool! lol) xoxo
Looks so good! I like the fusion paint and stain I think better than chalk paint. Now they need to add some colors in their line of products. I have read some are mixing their own colors but I’m not into that at all!
Great job again – thanks so much for sharing!
Thank you, Vicki! Yes, their color line is lacking a few I’d like to see. But mixing is always an option but can be a pain too. xo
So beautiful. I love this finish. Ryder, well he’s always beautiful and perfect lol. I spent a week in Duck in the Outer Banks and I never wanted to leave. Enjoy!
Thank you, Debra! Oh nice! I love Duck too. (we are down by south Nags Head area) xo
Happy for you. A bit jealous too lol.
Thanks much. I think this is just what I need for the coffee table I need to redo at my beach house on the OBX!
Awesome yes! You will love this and it will be perfect for your beach house, neighbor! xo
Being a fan, one that loves the beach, but lives well inland, I have a silly question. When you’re there working, do you take time to enjoy where you are and soak up the beauty around you? Your projects are so beautiful, and your beach home is being transformed right before our eyes. But…each time I relish in your talent, I find myself hoping that you’re taking time to just relax in the fulfillment of a dream. My goal this summer is to take a few days to be near the ocean. Thanks for letting us all dream with you.
Oh, Lyn…honestly, and I’m sad to say, no! Not as often as we should. We try to do some small things like go for a walk around our neighborhood here or maybe an early morning sunrise here and there but it’s been mostly all work and no play for months. I think we feel like we just want to get it done so we can sit back and enjoy! But you are right, we should make more time for that. :) I hope you make it to the ocean this summer! xoxo
Huge improvement!
Thank you, Mandy! xo
Gorgeous!!
Thank you, Uta! xo
Nancy, it is absolutely perfect now! It BELONGS at your beach place! Whoo hoo! Looks great!
Aw, thanks my sweet friend! xoxo
Love it. Color is gorgeous .
Thank you, Ina! xo
I love that color! The cleats are so cool too! Have a great weekend! I’m headed to the east coast of Florida to visit family and soak up a lot of sunshine….oh how I’ve missed that beach!
Thank you, Cecilia! Oh yay!!! Have so much fun!! I hope you are enjoying that warm sunshine! xo
I adore this piece! It is so perfect for me! Job well done!
Thank you so much, Rose! xo
Love the new look. yes, the driftwood stain is perfect. The console, to me. doesn’t look as “chunky” as it did when you bought it! I definitely is a major improvement. I like the items on the console. If it were me, they probably would be lined up like little solders ! Thanks, too, for the details on the application and the stains and paint. Really does make me think I ” can do that”! Of course, I love seeing Ryder! How is he and did you raise him from a puppy? He is so cute and photogenic! Can’t wait till next Tuesday to see what your next project will be. Have a wonderful weekend.
Thank you, Sue!! And yes, I sure did. We had lost our sweet Lexi girl (she “grew up” with our kids and it was heartbreaking to lose her) and I missed her so. We found him through a friend and here we are! :) I hope you have a wonderful week! (and by the way, you CAN do that! ;) ) xoxo
Love this look. Haven’t tried fusion paint but it looks like I might have to now.
Yes, do! I think you will really like it, Patricia! :) xo
This is a beautiful piece. I adore the color, but I actually liked it better before the stain. I’m weird that way!
Thank you, Lizzy! Aw, I totally get that, not weird in the least! I like it both ways, so I can see it! :) xoxo
I think this is just perfect. Great job!
Aw, thanks, Phyllis! xo
Thank you, Nancy for this beautiful makeover idea! Love it!
So many things in your home are exactly the same as in mine! Now, I see your gorgeous pup, and he looks just like my beautiful girl, who is actually a Great Pyrenees. Is that your boy’s breed by any chance?
Oh, that’s so neat, Diane! He looks very much like one (and gets mistaken for one often) but no, he is an English Cream Golden Retriever. :) xo
What an amazing find. I love this piece. Thanks for sharing
Thank you, Ivory!! I really love it now! xoxo
I love the idea of using Driftwood Stain for this — the effects of dark wax have never “wow’ed” me– photos look too swampy sometimes. Do you think this stain would be as effective over chalk paint too? Also, I have pieces that I want to change the hardware on… will wood filler work for the old holes?
Oh yes, I understand that. I have used dark wax many times in the past but it’s definitely not my go-to! I prefer a lighter touch these days. Yes, you can use this over chalk paint too, however, I would first seal the chalk paint with a coat of poly beforehand. The reason for that is chalk paint is porous and will most likely take too much of the Driftwood stain and it will overtake whatever color you used and become dark. If you apply poly first, it will seal the CP and you will get that nice, light effect that you can wipe away in areas, etc. (wood filler will work for holes, yes)
Beautiful! I love how the project turned out. FYI the link for the Driftwood stain no longer works.
Thank you, Krista!! Oh, shoot…but no worries, I have a fix for it coming up soon! ;) xo
Hello! I love everything you do!!! But I have a question about the “driftwood stain and finisher” is that a water based product? Can you apply it right over top of any paint? Thank you! Can’t wait to see what else you come up with!!!
Hi Katrina! No, that is not water-based. But yes, you can apply it over paint. Just let the paint sit for at least 24 (preferably 48-72) hours before applying it. You want the water to have a chance to evaporate from the paint first. :) xo