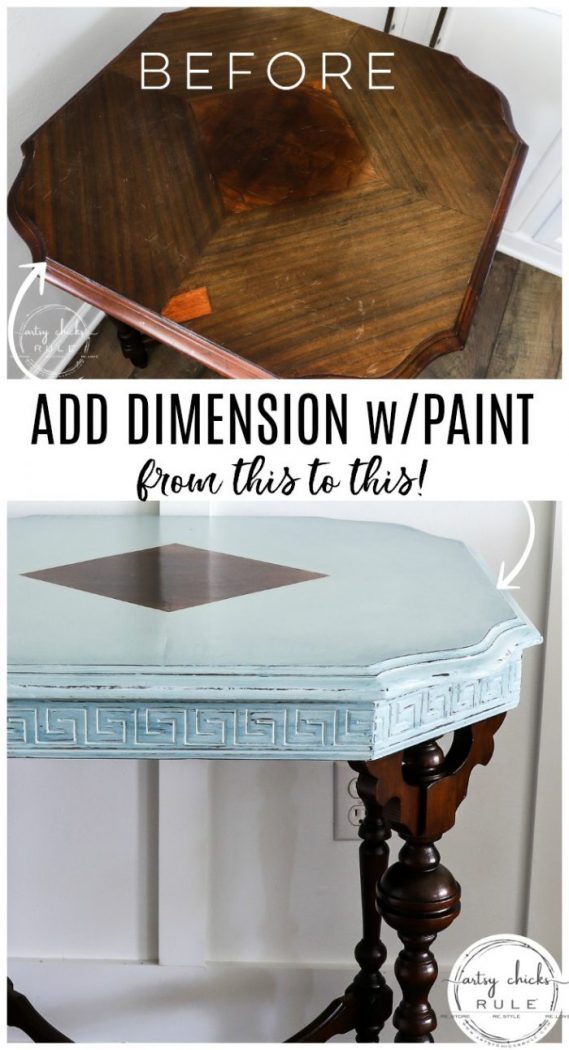
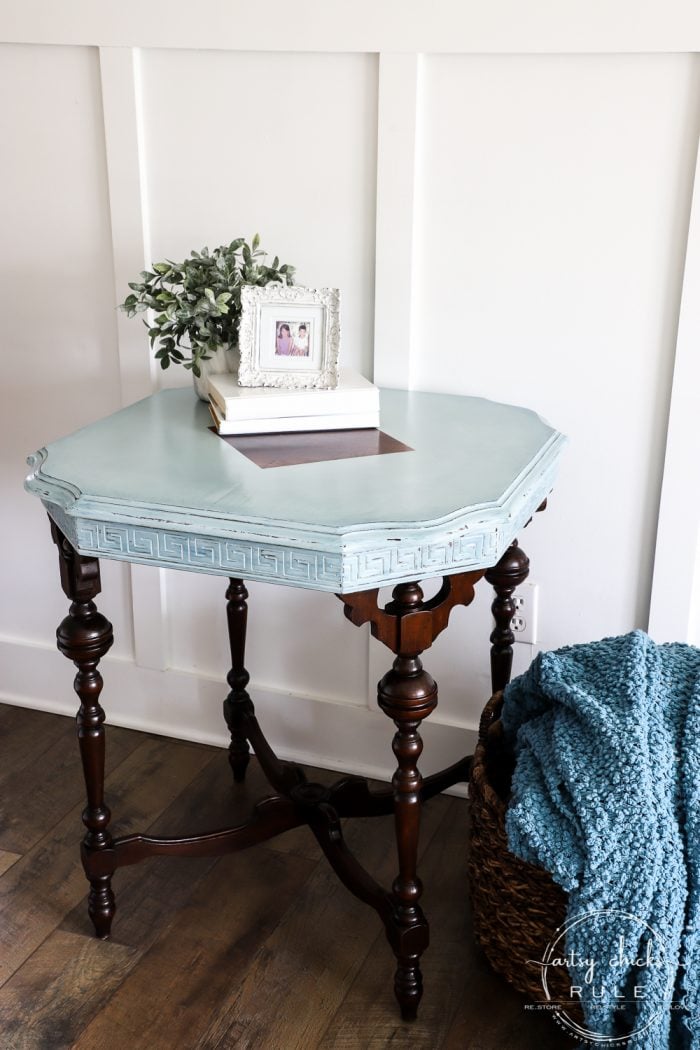
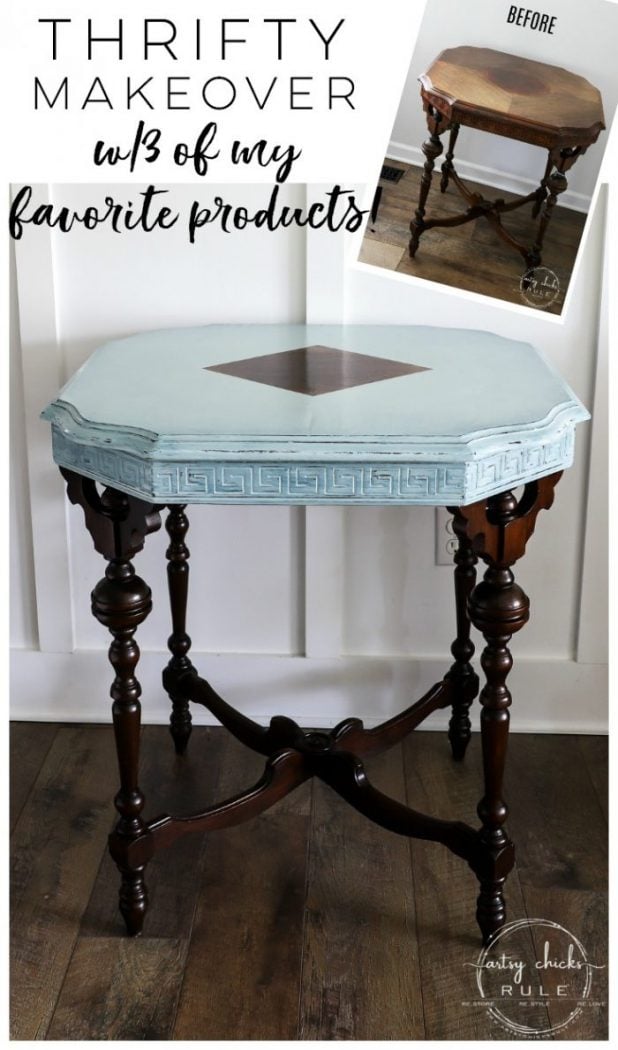
Rustoleum Chalked Paint Serenity Blue (antique table makeover!)
Today I’m sharing an antique table given a makeover in the beautiful Rustoleum Chalked Paint Serenity Blue!
Happy Valentines Day sweet friends!
I hope you have a day filled with love. It’s low-key, and always has been, for my hubby and me.
With both of our birthdays during the first part of February, we are usually celebrated out! lol
But I do have an exciting post for you today. I’m sharing this beauty of a table.
My husband and I were out and about a few weekends ago and we happened to drive by an antique/thrift-type store.
Well, they had a few pieces of furniture outside and you just know that means I have to stop and look!
No way can I pass that by. ;)
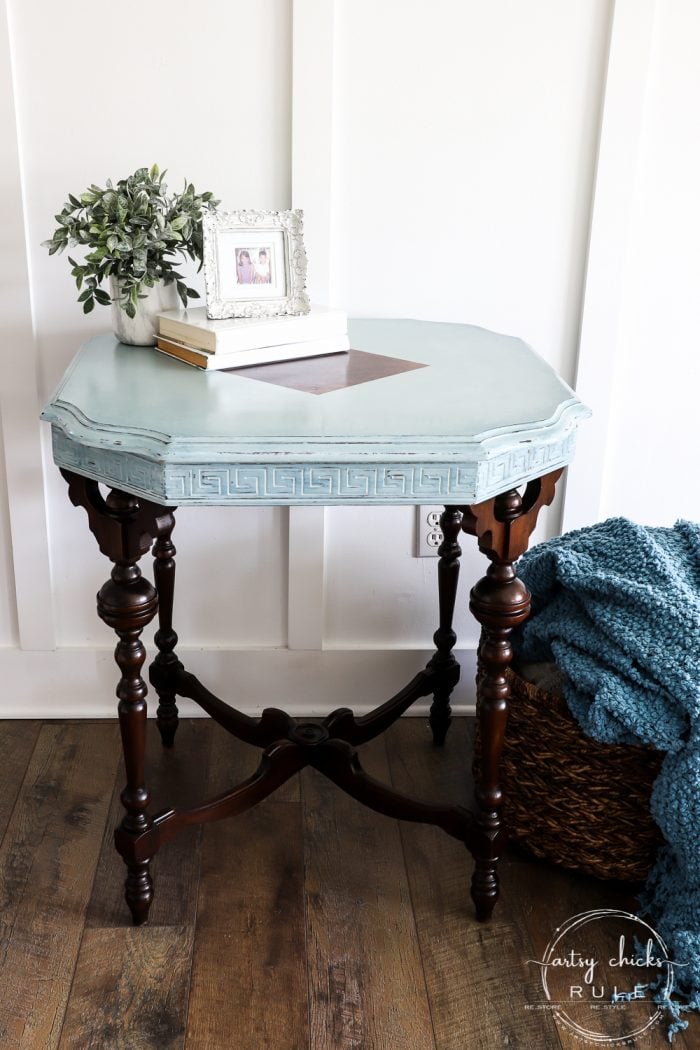
And I found this table…
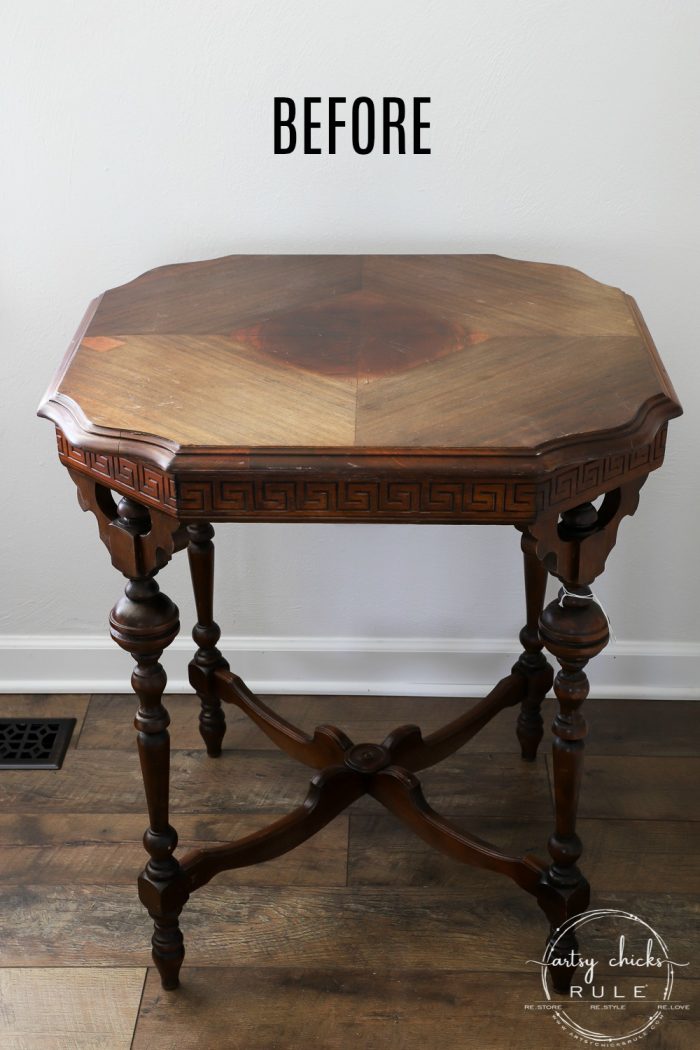
I paid $38 for it.
Can you believe that????
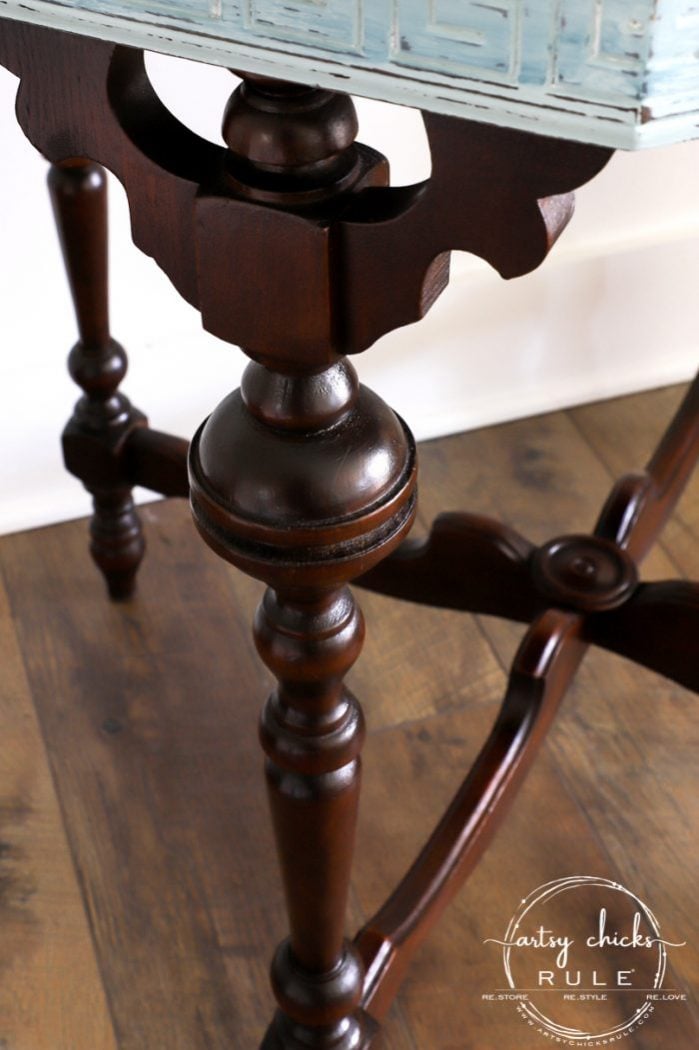
I mean just look at that woodwork down below. Gorgeous!
I snagged it right there and took it home.
Rustoleum Chalked Paint Serenity Blue Antique Table Makeover
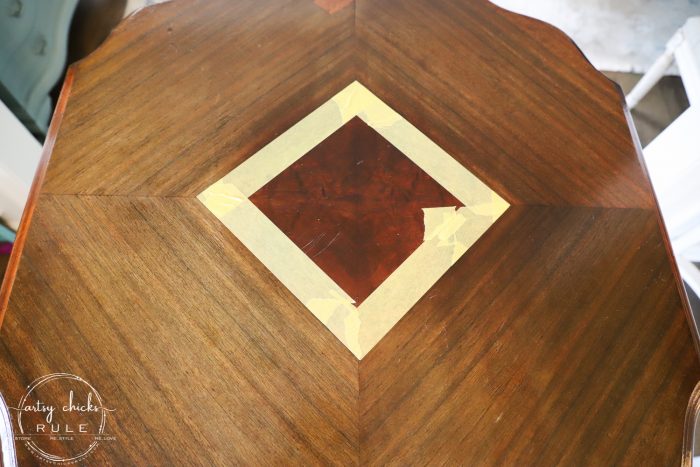
Here’s the top…
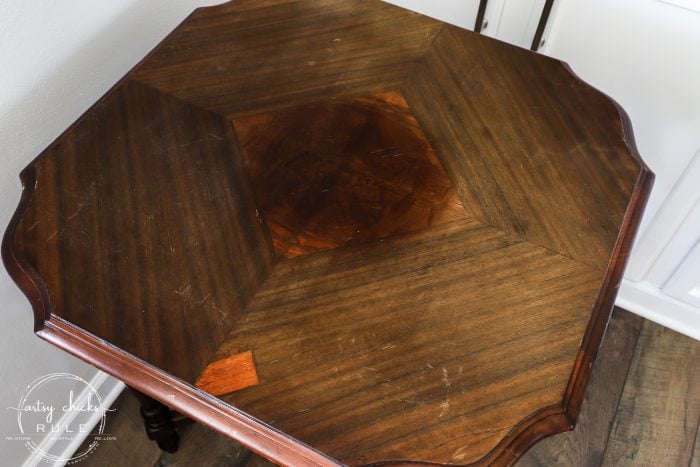
I really wanted to refinish that pretty top but what the heck with the piece of wood there???
A repair, most likely. A very bad one, unfortunately.
I typically will restain or refinish the top of pieces like this and paint the bottom.
But that weird piece of wood, would just just fly with me.
If you follow over on Instagram, you might remember I asked you guys in my stories if I should paint the top and refinish the base instead.
And that was an overwhelming YES!
Want to see some of these projects in “live” time? Hop on over and follow along with me on INSTAGRAM. I’m always sharing in my stories as I’m doing projects, finding new furniture, fun finds….just all the day to day behind the scenes.
Which worked out perfectly, I might add, because I don’t think I’d have been able to paint the base of this piece.
I mean, just look at that…
Stunning woodwork.
But I’m getting ahead of myself. :)
One of my followers over on Instagram sent a message to me saying maybe I should leave the square/diamond shape in the middle natural and paint around it.
Well, duh!!! Why didn’t I think of that? lol Brilliant!
Really, best idea ever. Thank you, Laurie! xoxo
So that is exactly what I did and I couldn’t be more thrilled.
See? I just love this community of crafty people, all of us giving and sharing ideas and inspiration. So good.
I started by wiping the whole thing down very well.
EDIT: OOPS!! I mentioned further down that I let this one sit for a couple of weeks before I added the top coat, etc. So the mind fails after a while! ;)
One of my lovely readers asked me if I needed to seal the wood before painting and ack, it hit me! I totally forgot to include that information.
So, here goes…
I did indeed seal the wood top before I painted it. It’s the kind of wood that is notorious for staining and “bleeding”.
I used Shellac (in a can) and applied it to everything I was planning to paint. (see below)
It’s a good thing too, if you notice some of my up-close photos of the edges further down, where I sanded, etc, you’ll see a few tiny bits of brown-red bleed-thru here and there. I am sure it would have been much worse had I not sealed it beforehand.
As far as sanding, I didn’t do any. If the wood is in pretty good condition, it’s usually best to leave it be and just seal it up. Sanding it can make sealing the wood a little bit tougher. (from the dreaded bleed-thru)
Thank you, Cecilia, for bringing that to my attention.
MATERIALS LIST
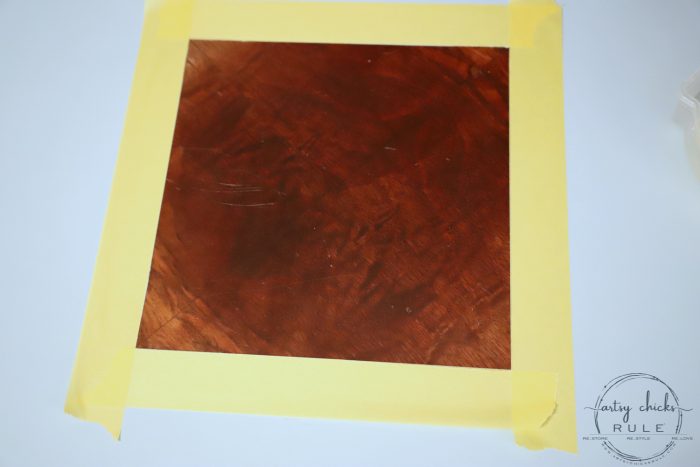
Below is where I taped off the diamond-shaped area in the middle.
I thought I wanted it very “contrasty”, with white paint and that dark wood color.
So I painted it white.
And I hated it!! haha

It was all wrong.
Too stark.
Just no.
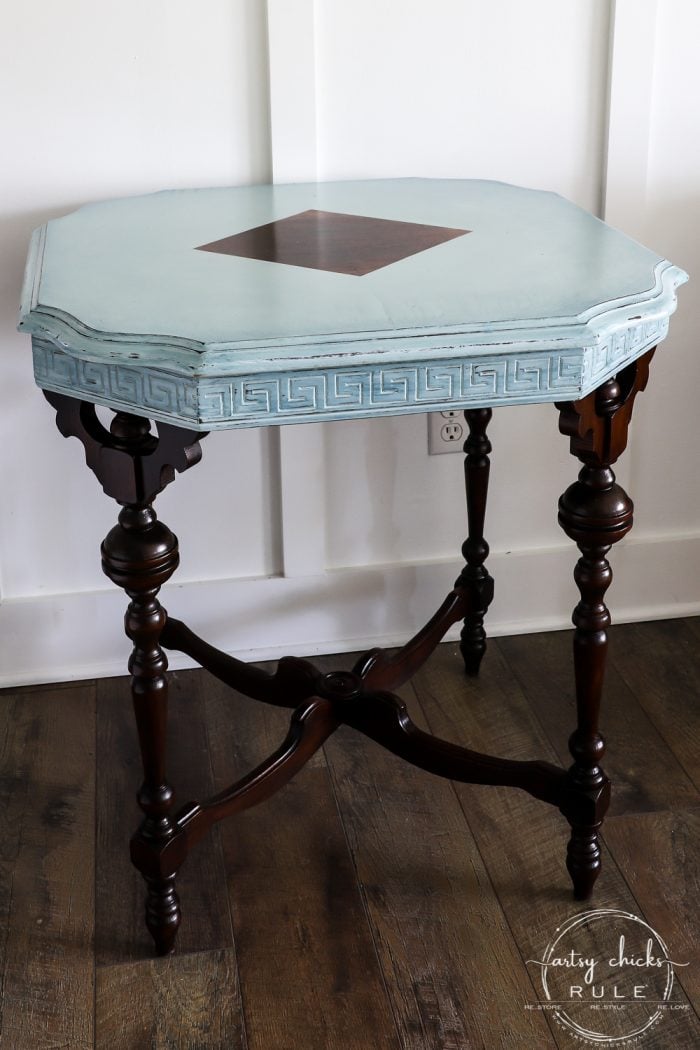
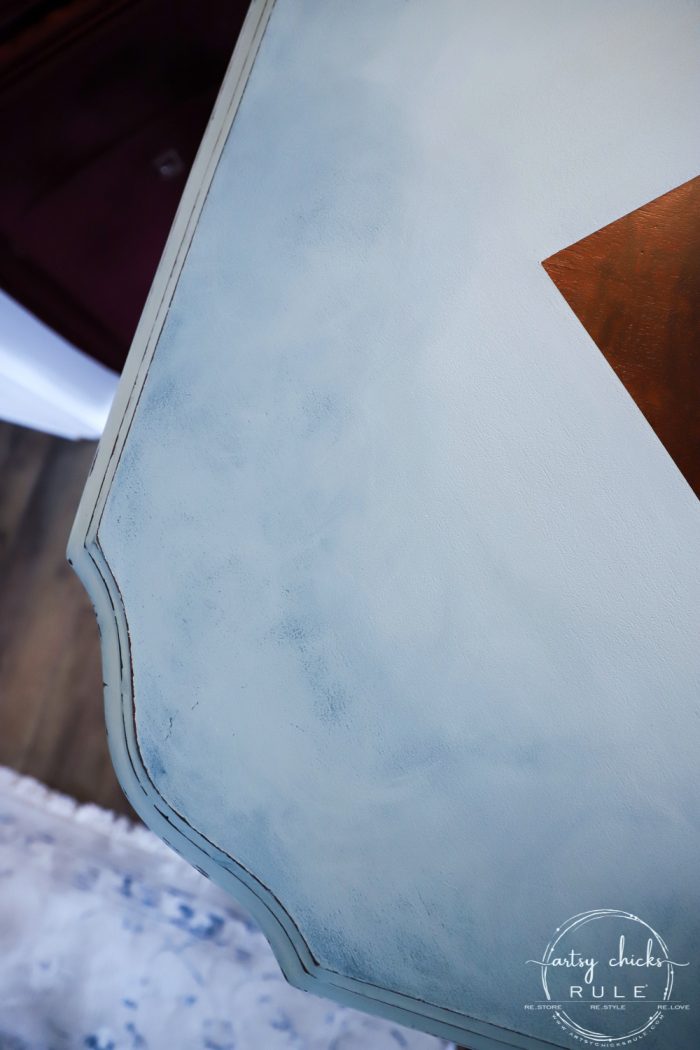
So I switched gears and painted it in this lovely blue, Rustoleum Chalked Paint Serenity Blue.
I hadn’t really tried this color out on a big piece of furniture so thought that’d be a great time to do it.
It’s such a lovely color. It’s similar to Duck Egg Blue but not exactly the same.
I feel like it’s a little softer and bluer.
But just like the Linen White, I use often, (also Rustoleum) this goes on like a dream.
By the way, as you can see there, I decided to use a foam roller to apply the paint.
I really wanted it as smooth as possible.
If that paint is unavailable, you can try this one, French Eggshell. I have switched to mostly Fusion paints (love them!) and also sell them in my shop, here.
I realized that I didn’t get a shot of it after I painted it blue. It actually sat almost finished for a couple of weeks.
I wasn’t loving how “flat” it was looking.
This table has so much flair and leaves that diamond shape in the middle, even more so.
I felt like the straight Serenity Blue was a little flat for this particular piece.
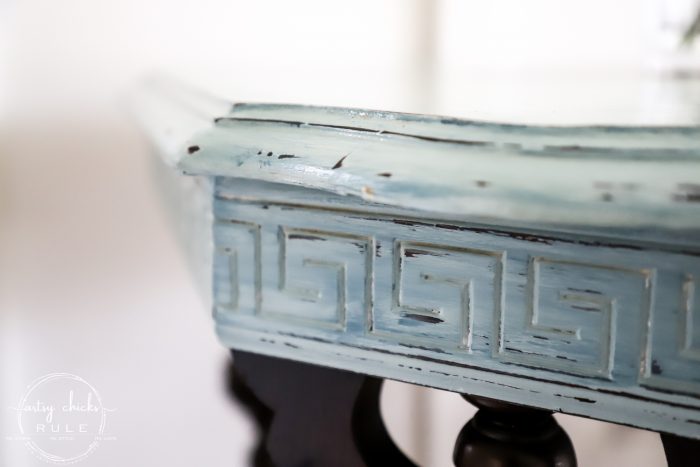
So I decided to add some dimension to it with a bit darker paint (Aubusson Blue) around the edges. Similar to what I did on our coffee bar.
You can see that project/post, here >>> Aqua Dresser Coffee Bar
Here it is…..
Fail!!! haha
Yep, it was um, not so good on the first go-round.
So just like with the first coat of white paint, I had to back peddle a bit and consider what I needed to do.
By the way, this photo was after I had “worked” it a bit.
I think the problem here was that I went too dark, too fast, and with too much paint.
At this point, I had already been trying to rub away with a damp rag and with a damp clean rag dipped in the Serenity Blue paint.
I should mention that I sealed it before I applied the darker paint so that I’d better be able to wipe and blend, which is definitely what you want for this look.
Long story short (I worked on it for a while), I ended up adding more of the Rustoleum Chalked Paint Serenity Blue paint around the middle.
And then touched up with a darker blue around the edges. (very, very lightly and partially mixed with the lighter blue)
After that dried, I took some fine sandpaper and sort of lightly buffed around in circles, all around the inner edge to soften and remove more of the darker shading/color that was left.
And that did the trick!
I also lightly sanded all the edges to distress and bring out some additional detail.
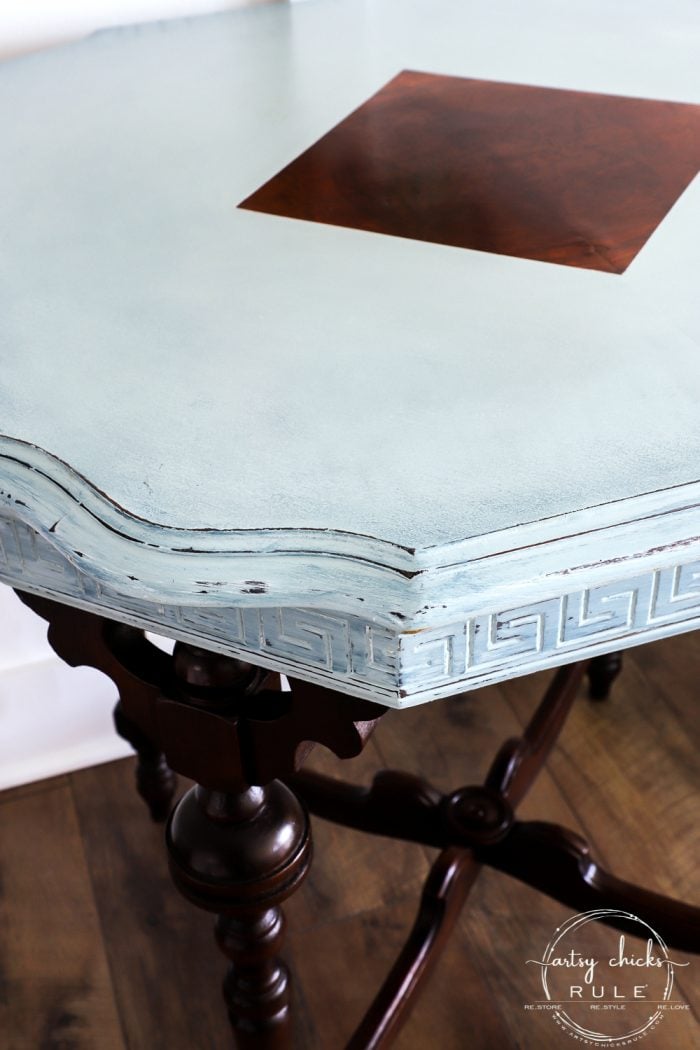
All I really needed on this one was a “hint” of depth.
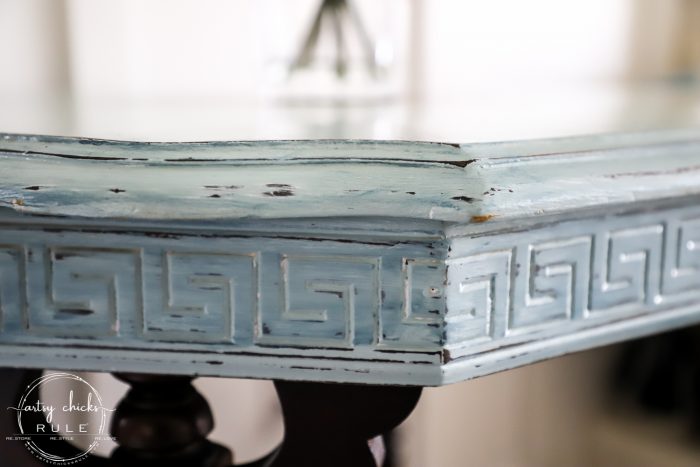
The star of the show is the diamond in the middle…and that bottom, scroll-y dark goodness!
The Greek key design is pretty cool, too, though.
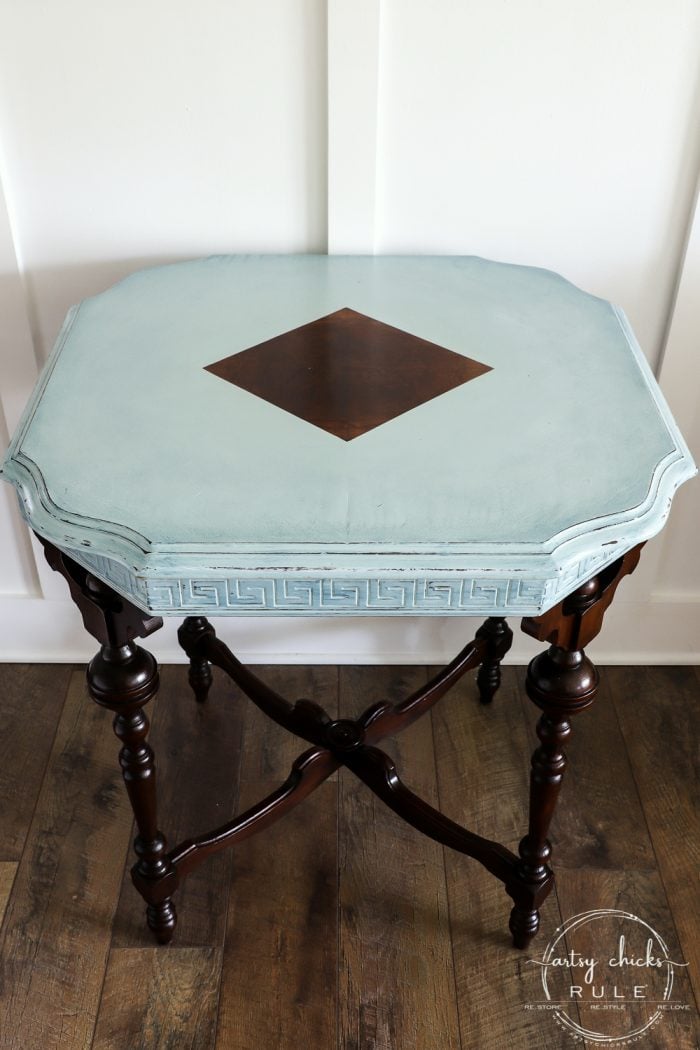
Okay, so let’s talk about what I did with the base.
Not a lot!
Restoring that base was as simple as taking a rag, dipping it into my fave gel stain (linked below), and wiping it on!
No kidding.
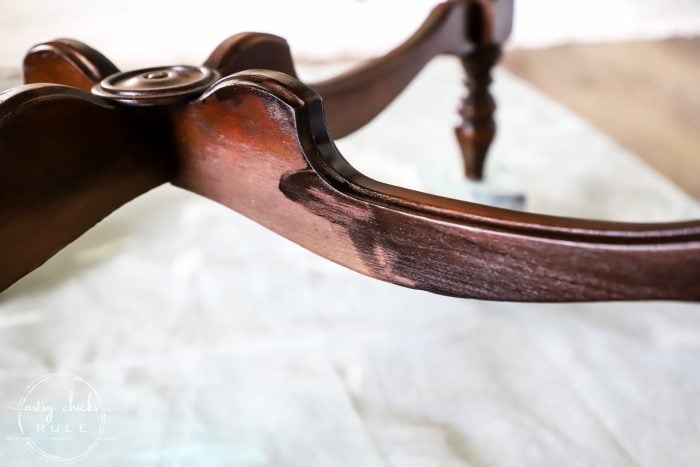
It literally brought it back to life. So gorgeous.
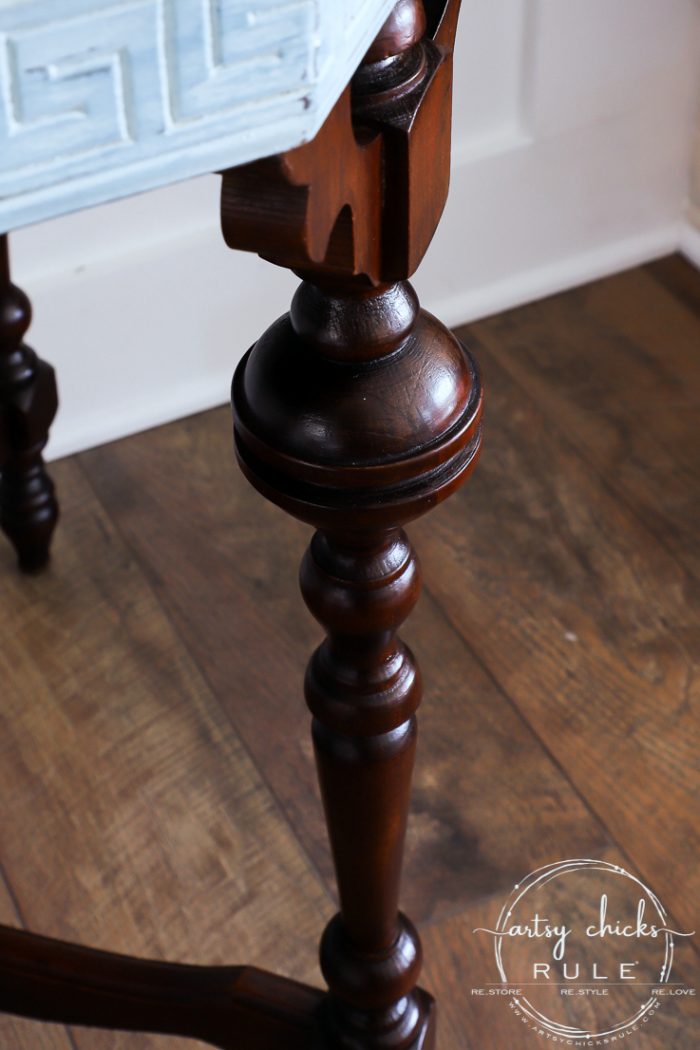
The base and the top got sealed with one of my favorite sealers, still to this day.
High-Performance Top Coat.
OH! And I forgot to mention, I used the same gel stain on the diamond in the middle.
After my paint was dry, I taped it off so I could apply the stain.
By the way, it’s totally fine to use this gel stain with the water-based poly I used.
However, you will absolutely need to wait about 3 days to apply it. I like to wait at least that long, sometimes up to about a week.
See the subtle shading and dimension?
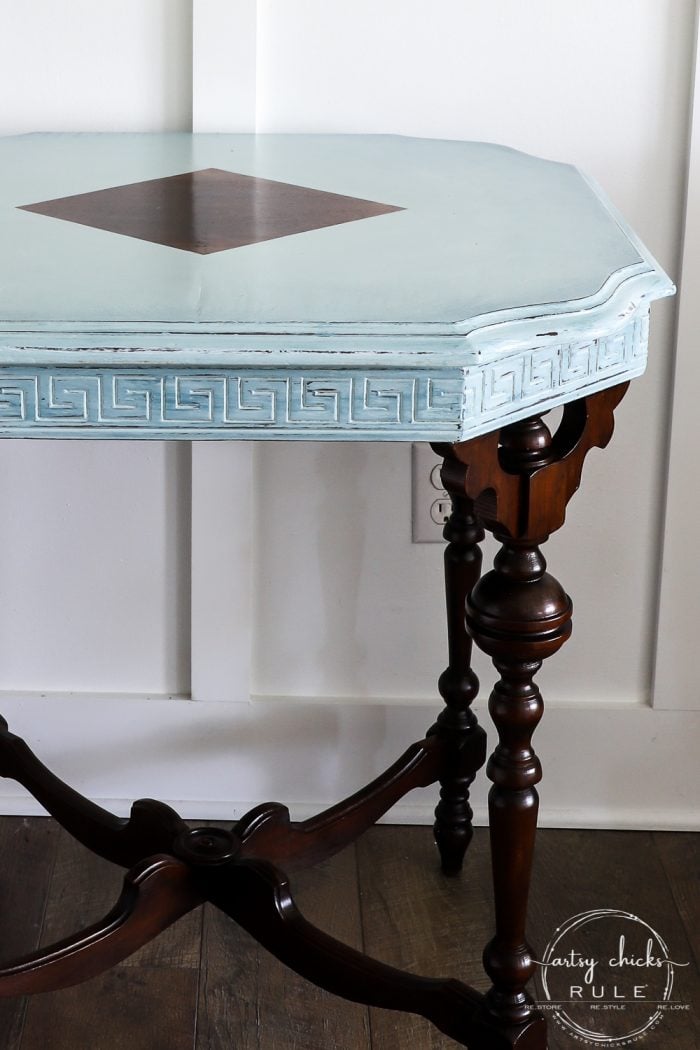
To me, it just has that little bit of a glowing look. The edges are darker going into a lighter, brighter center area.
Here’s some up-close detail on the top.
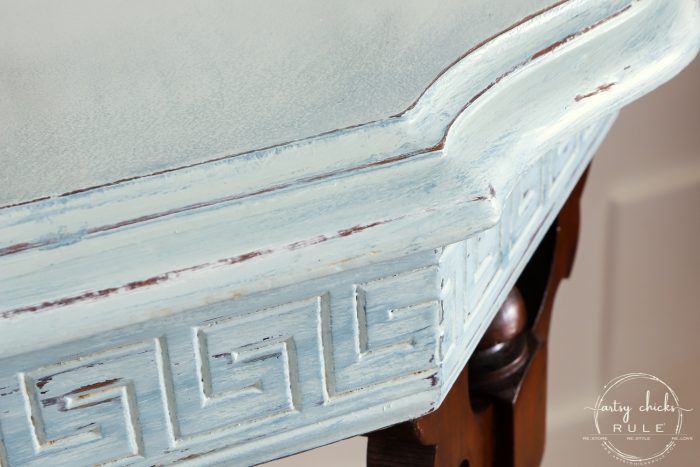
See how little darker blue it took?
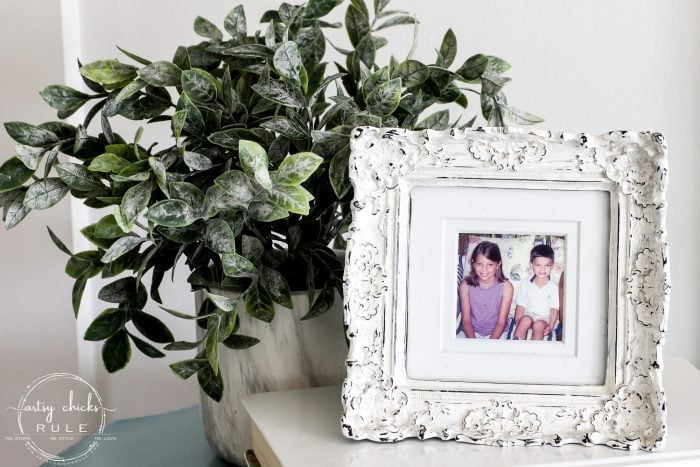
Those cuties of mine, oh, about 16 or so years ago!
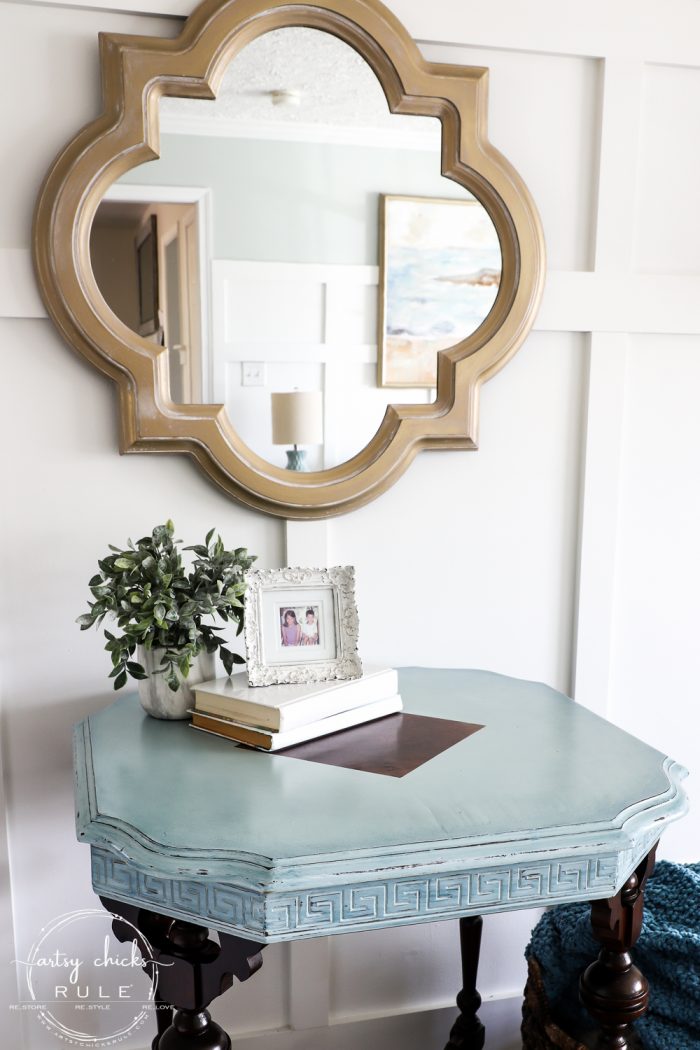
I’m really happy with how this one turned out!
I’m not used to painting the top and staining the bottom of most pieces but I’m really liking the look.
And that pretty diamond in the middle…I am so glad I didn’t paint over it.
PIN it to save it!
Hope you all have a wonderful weekend!
And remember, sometimes projects take a detour and you just have to roll with it.
It almost always turns out just fine. And sometimes even better than you first imagined.
Be sure to check back in next week when I share this fun makeover (with TILE!!).
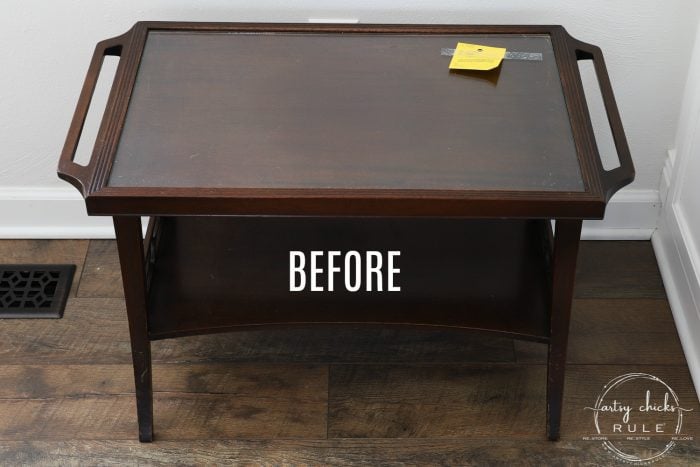
UPDATE!!! See it now, here!!
xoxo

")


")

")


Oh its just gorgeous….looks like it belongs in some French chateau. Well done ?
OH yes!! It really does, it’s such an elegant table. :) I am hoping I did it justice! Thank you, Kaz! :) xo
Oh Nancy, while this was a lovely table before, it SINGS now! Wowzers! Lovely idea with the diamond. And your persistence paid off with the top. Lovely! Way to go!
Have a great weekend!
Thank you, Christina! :) You are right, it was such a lovely table to begin with! Persistence is one word!! ;) I’m glad it finally came together!! Have a great weekend!! xoxo
Hi Nancy, I love your work. I have painted an old cabinet with regular water based wall paint. It is a bright blue in a semi gloss finish. Is their a white or lighter blue glaze i can put over top to make it not so bright? Maybe i could use a wax? Thanks for your help. Denise
Thank you, Denise! :) General Finishes has a white glaze called Winter White that you could try. Here’s a bookcase I used it on to tone down the blue paint…. https://www.artsychicksrule.com/bookcase-makeover-coastal-blue-white-glaze/
You could also use white wax, Annie Sloan has one that I’ve used also, you can see that project here… https://www.artsychicksrule.com/giverny-chalk-paint-makeover-white-wax/
Hope that helps! xo
why do you torture the viewers of this blog??????here’s the deal……
1) PICTURE OF BEFORE
2) PICTURE OF AFTER
3) LIST OF MATERIALS
4) STEP BY STEP VIDEO OR WRITTEN EXPLANATION OF PROJECT
I’m sorry, I’m confused Helene. Are you saying you wished I would have included those things??
I did post a before, after, list of materials and written explanation.
I do have some tutorials with videos but I realistically could not do that with every post I do here. It is just very time consuming to create the videos and that is not something I source out for others to do for me.
As far as a more in depth tutorial of what exactly I did on the painted portion of this project, well, as I mentioned in the text of the post, it was a fail to begin with so I worked through it. Unfortunately, when I am working through a project like that, doing techniques that I have not yet fully mastered or that go awry, it is sometimes hard to give exact details. I did the best I could on this one. I’m sorry if it didn’t meet your expectations. :( I hope it at least inspired you and/or you enjoyed seeing the makeover, products used and the details I did share for the project.
You really scored on this one. Someone really loved that table to take such great care of those intricate legs and carvings. Usually, they are chipped and broken. The wood is just unbelievable too. This one was perfect. You were smart to grab it…..Its a treasure. Beautiful. Can’t believe someone let it go.
Didn’t I?? $38? So crazy. And yes, I think you are right about that. It was really in very good shape. Thank you, Wendy! :) xo
I LOVE the peek-a-boo diamond!
Me too, Melanie!! The star of the show here! :) xo
What a great idea, Nancy! I have a desk with a very sad finish but one drawer with beautiful inlay. I’ve been agonizing about painting it, and you’ve convinced me to leave the drawer unpainted. That diamond shines and the blue is such a lovely contrast to the dark base.
Oh yes, leave it unpainted! It will look lovely! It’s so hard to paint some of these old pieces, I agree. Good luck with yours! :) xo
Wow!!! Simply gorgeous! I’m such a sucker for vintage wood furniture with beautiful details like that, and you did a fabulous job. Thanks for tip about using the gel stain to freshen up the bottom of the piece. I bought a quart of GF gel stain a while back to use for a project, and didn’t end up needing it, but now I know I can use it spruce up already stained pieces. Thanks!
Thank you, Vicki! :) Me too, they just don’t make them like that anymore! And oh yes, I’ve used gel stain to refreshen up so many old stained pieces. It’s really perfect for that. I’m planning to do a post on that soon, actually. I just love it! xo
I love it! What is your favorite brand of gel stain?
Thanks Cheri! :) General Finishes! I love them and have used them so many times. Several colors, but Antique Walnut and Java are my go-to’s. xo
Did you use a sealer on the base before you used the gel stain?
No, nothing went on before the stain and you wouldn’t want to. You want the stain to soak in a bit. Sealer goes on after. :) xo
Happy Valentine’s Day Nancy! What an amazing table to find for that price – score! You worked so hard to get this table just right and I love it! I really appreciate all the information you shared here with us, and I am a big fan of the General Finishes gel stains too. I love this table!
Thank you, Kaycee! :) Wasn’t that a steal for $38??? Would love to find more like that! And yes, this one was a little bit of a challenge in the paint department! ;) Thankfully it all worked out. And the gel stain, isn’t it the best stuff?? I absolutely adore how it makes old wood come back to life! Thanks again, Kaycee!! xoxo
This turned out gorgeous, and I love the subtle darker blue that is around the edges!! XOXO
Thank you, Christy! :) xoxo
WOW! It turned out beautiful! It’s comforting to know that you have to play around with the colors too! The final product is perfect with the darker blue for depth and the wood really came out stunning with the gel stain. Did you need to prep the top before painting? You mentioned that you wiped it down but not sanding or prepping to avoid bleed-through. Hope you are enjoying a big box of chocolates for Valentine’s Day! XOXO
Oh my gosh, Cecilia!!!! Thank you for reminding me that I did indeed use a sealer. I have edited the post to reflect it. I totally spaced on that. I started this project weeks ago and then it sat. When I came back to it to finish, and then write this post, I completely blanked on that step. But yes, absolutely, with that color of wood….it definitely needed a sealer for bleed-thru. I have learned my lesson many times on that…the hard way! ;) And no, I didn’t sand it, just Shellac, then paint. And no, no chocolate…yet! But I did receive a lovely orchid from my sweet dad earlier today. Hope you have a beautiful, chocolate, flower filled Valentine’s too! xoxo
Gorgeous!!!!!
Thank you Wendy! :) xoxo
I am thinking of doing an entire old staircase, which has a redwood, mahogany stain with aged varnish and grime in it. UGH! The spindles have many curves, much like your table base. I need your suggestions. I’d like to change the stain to walnut. Do you think, after cleaning, sanding, prepping with conditioner, that gel stain would do the trick? Your thoughts and advice are welcome!
Hmm, if it has all that grime, old varnish, etc, on it, if it were me, I’d probably start with a remover such as Citristrip, then sand after that. But it can be a little messy so that’s a personal call. Probably definitely try to do that on the spindles though. It will be hard to get all of that off by sanding those. Unless you would consider painting those maybe white? If they are that mahogany color I would use a sealer like Shellac beforehand if you paint them white. Yes, I think you can use gel stain after all of that but you could also use regular stain if you are doing all of that prep work and starting basically from scratch. Again, if that were me, and I had a freshly sanded surface, I’d move over to regular stain instead. This is all with the idea in mind that you want to turn a darker mahogany stained wood into walnut. Good luck with whichever you choose and I hope this was helpful!! :) xo
Hi there, while I like the technique that you used and the color choices I keep thinking that the Greek key design should be emphasized as well. It, too, is a great carved detail that has been “whitewashed” out. :(
Robin
Aw yes, I can see that. That particular part didn’t turn out quite like I’d hoped. I thought the distressing I gave it would bring out the raised areas more. I didn’t really want to distress too much though as I was afraid it would “bleed”. :)
I saw this on Instagram and had to come see the post and pin it. I love this makeover.
Aw, thanks so much Leanna! :) xoxo
Wow! This is so breathtaking! Thanks for sharing your fail. You showed us how great you can remake something if you just keep trying and not give up. Thanks for sharing and for the inspiration!
Just lovely, Nancy! I love the fact that you left the top square to match the legs!
Thanks so much Julie! :) xo
So happy to see you didn’t paint those beautiful legs! It makes me cringe when I see pics of beautiful antique furniture that has been loved and cared for since day 1 painted over with chalk paint! If the piece has no flaws don’t paint!! You gave life to the part that was in distress and enhanced the part that was still beautiful!
Oh yes, they were too pretty to paint, for sure! Thank you, Donna! :)
So you usedGF Antique Walnut gel stain? I love it! That Rustoleum Chalked Serenity Blue is about to go on a French Provincial Dresser. Thinking of using the gel stain to refresh a dining set. What sealer do you use on gel stain? Thanks, Nancy!
Oh yes, I love their gel stains! I have used several on their gel stains but most recently I am really loving their gel topcoat (that can be rubbed on instead of using a brush). I really love it! But you can also use water based poly if you wait several days for it to cure first. :) xoxo
Hey Nancy! Beautiful color! I use Rustoleum quite a bit. I redid my dining pedestal with winter fog which is like a country grey, and the farmhouse chairs I washed a denim into the scroll work. Did you consider washing the Greek key edge with the dark stain? It may make them pop! Mychelle
No, but that’s a great idea!! I will try that next time, this one is long gone! :) xoxo