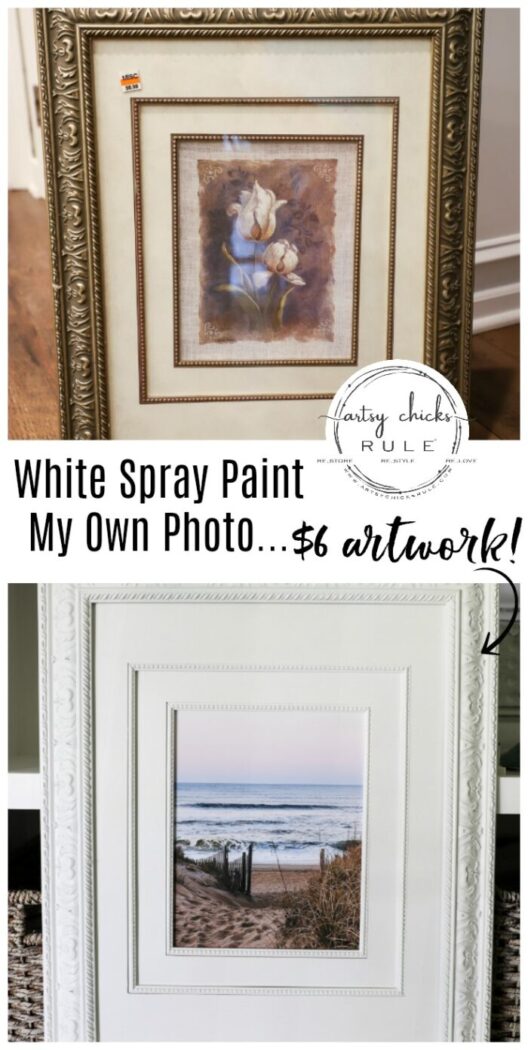
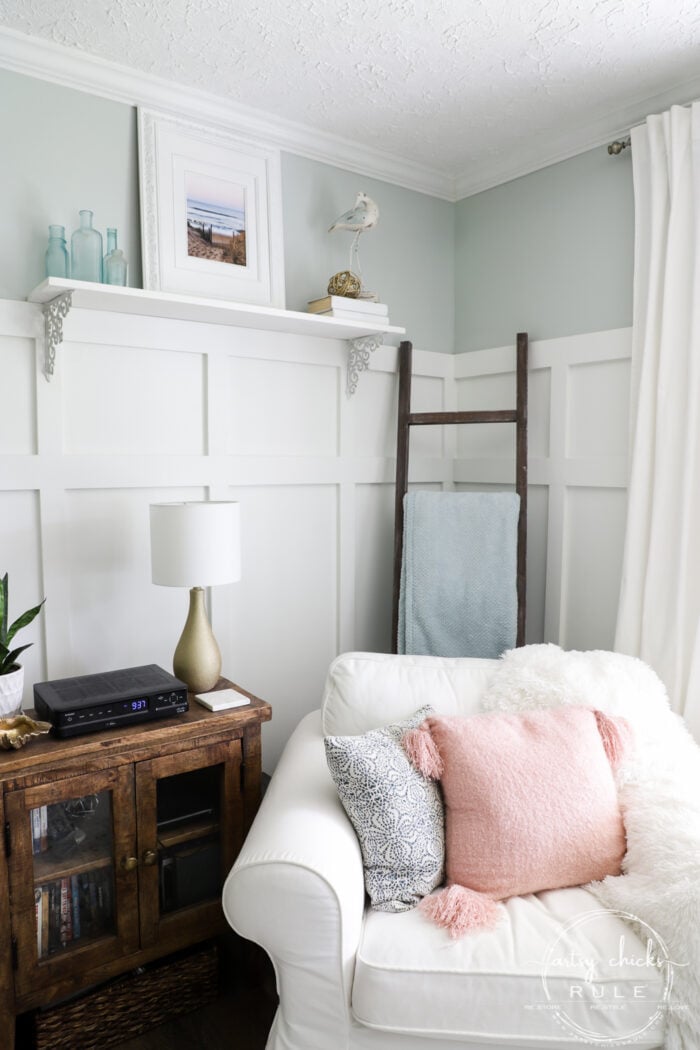
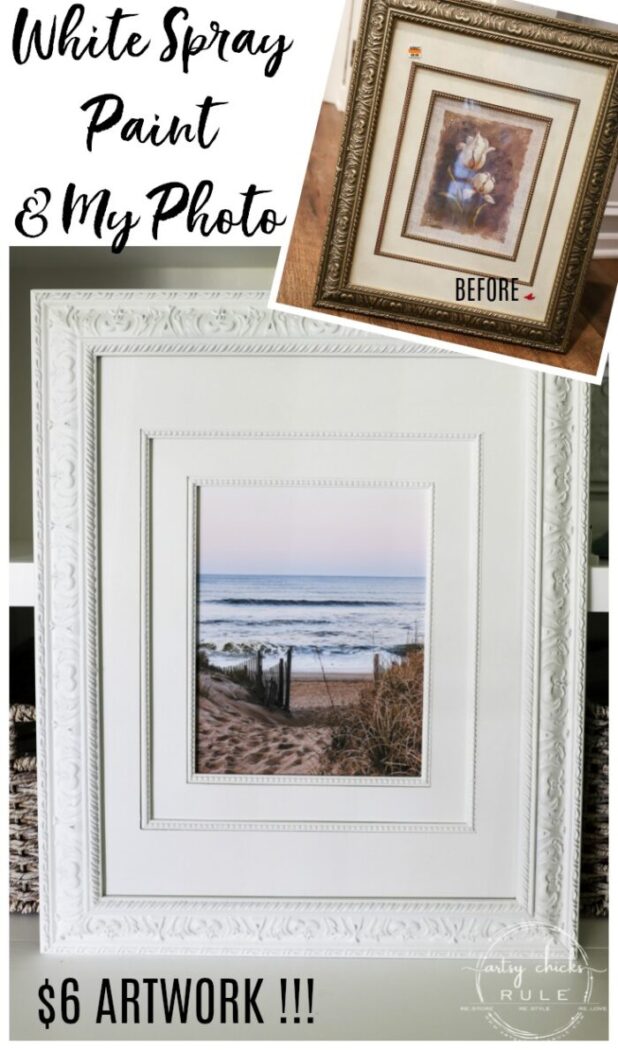
$6 Beach Scene Wall Art (thrifty makeover!)
That’s right. SIX dollar beach scene wall art. This thrift store find was the perfect backdrop to one of my most favorite beach scene photos…on a budget!
See that??
White spray paint and my own photo were all it took to makeover this $6 thrift store find.
Now that is a bargain!
I mean have you even priced artwork lately? It can be pricey.
Or have you tried to have your own photos matted and framed?? Oh my, even pricier sometimes.
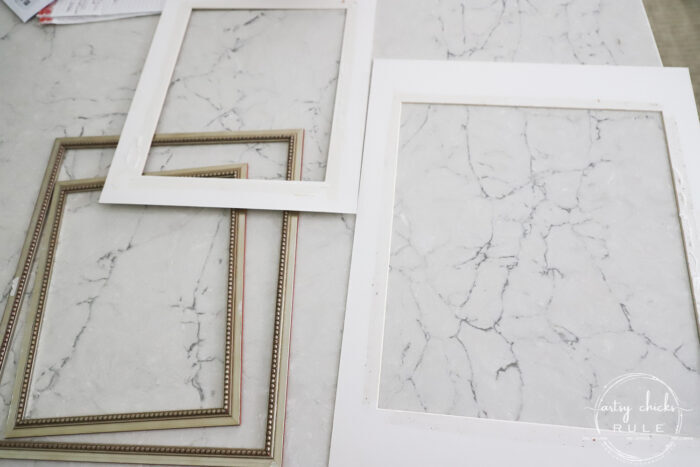
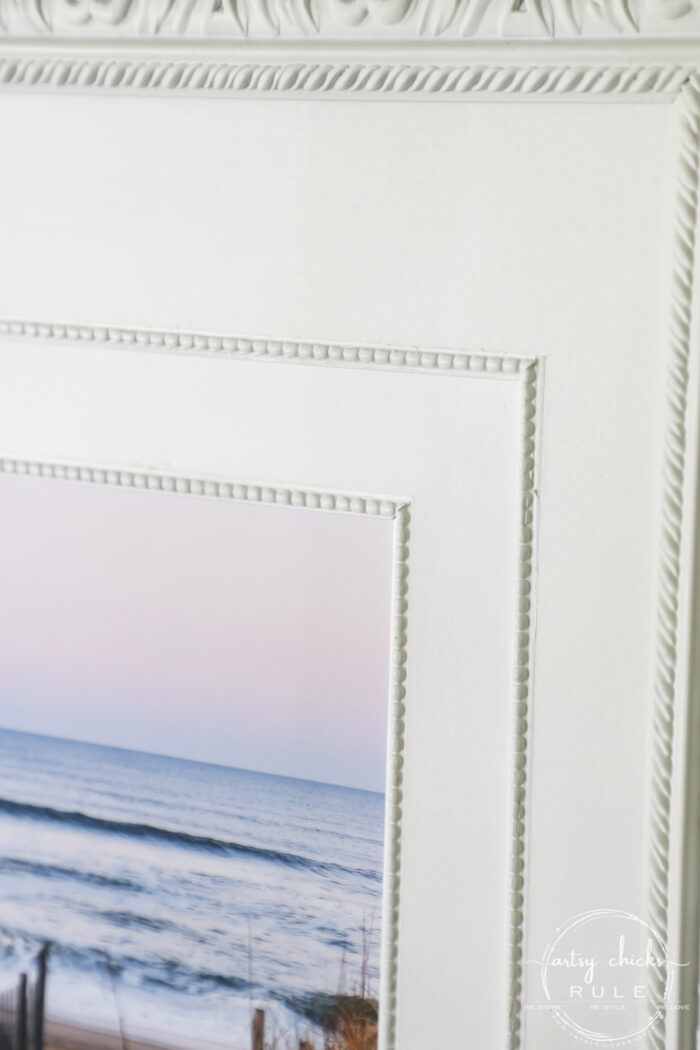
So these old framed (and matted…or double matted like this one, even better!) prints at the thrift store are great finds.
$6 Beach Scene Wall Art
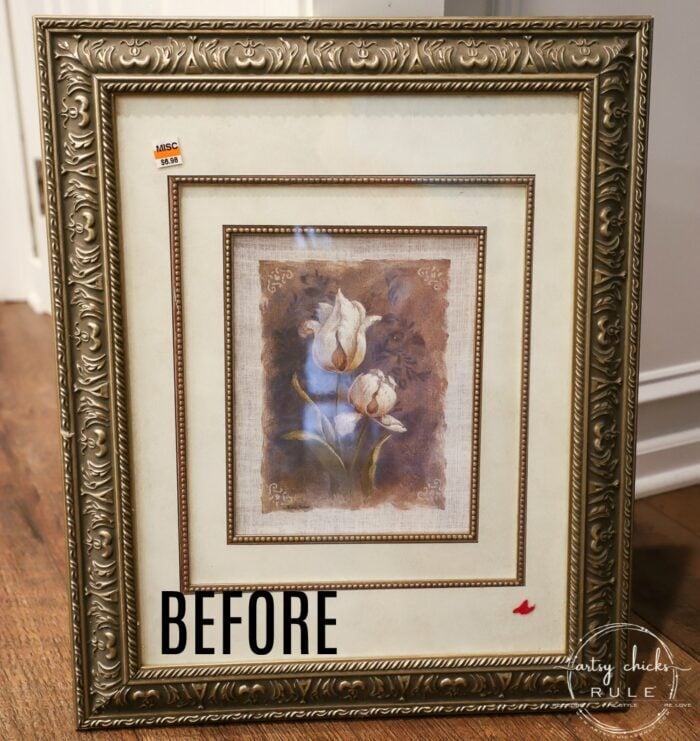
I’ve actually had this one in my garage for a while. So, it may have been one I got half price, for $3, I have no way of remembering.
BUT, even at $6, it’s a steal.
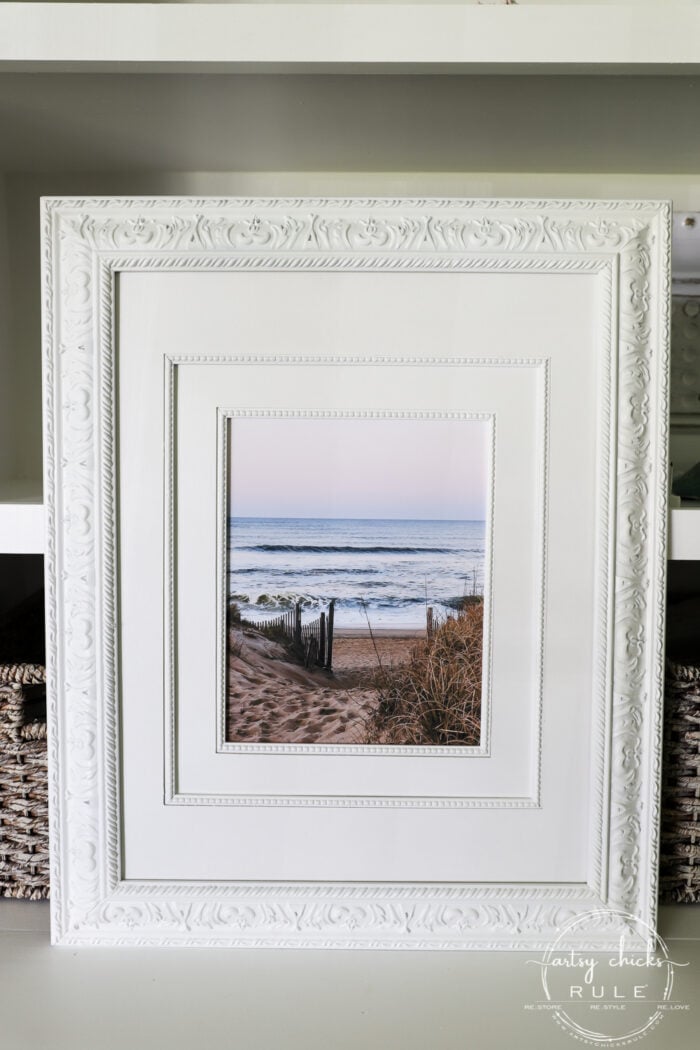
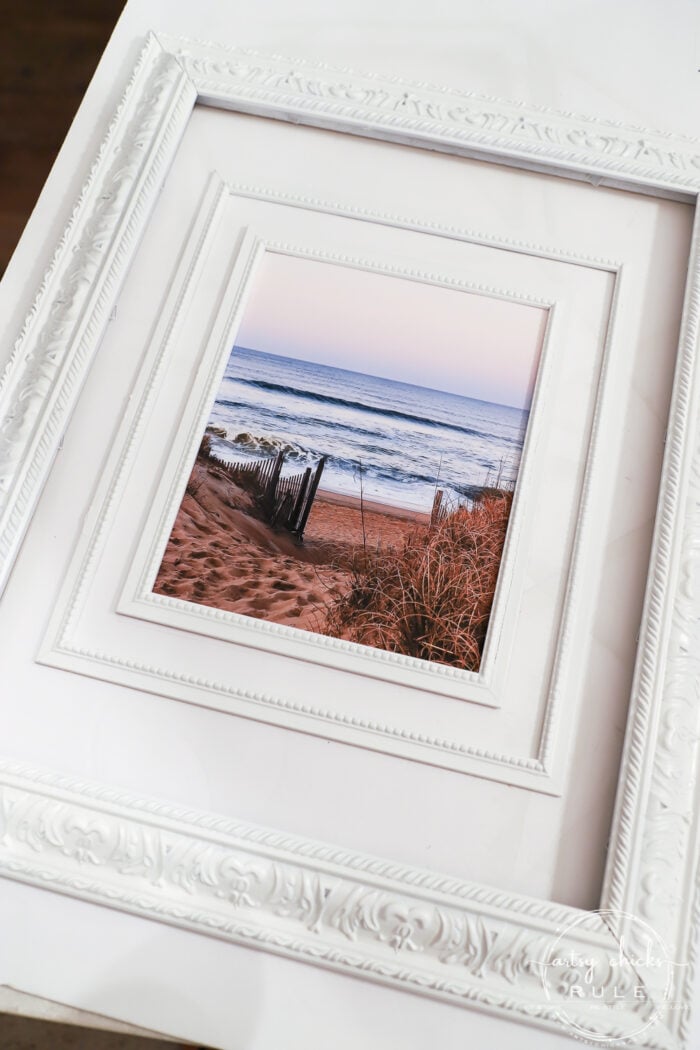
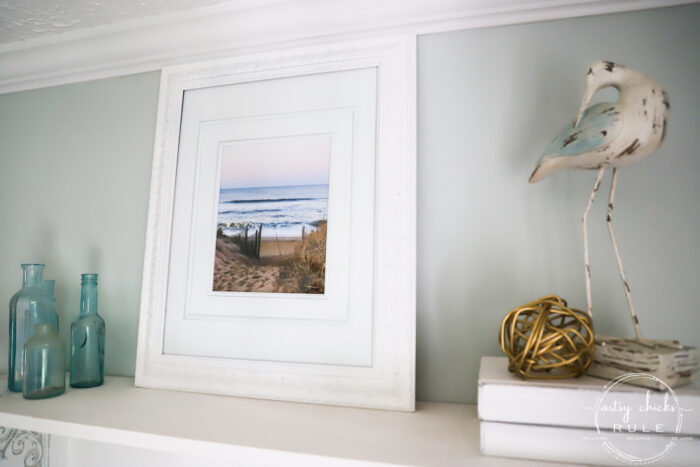
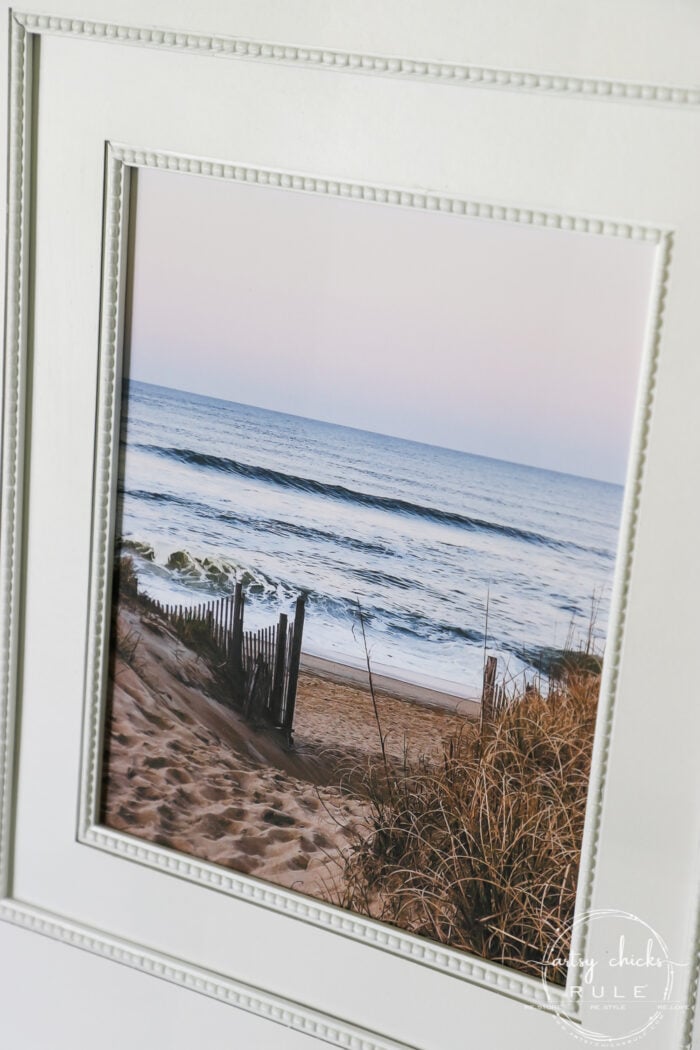
I love the look of a double mat and knew I wanted to do use this for one of the photos I’ve taken of the beach at the Outer Banks.
I chose this one I took in April.
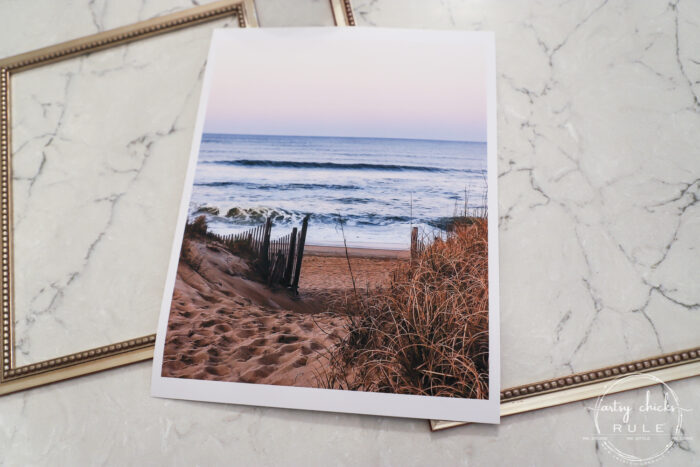
As a matter of fact, if you scroll down just a few rows on my Instagram feed on >>> this page you will see it when I posted it there. (or one of the 3-4 I took of that scene anyway) You can also see the true colors (gorgeous!) as the printed one doesn’t look quite as vibrant as the real thing.
I printed it out on a thickish sheet of matte brochure paper because that’s all I had on hand.
It worked out perfectly.
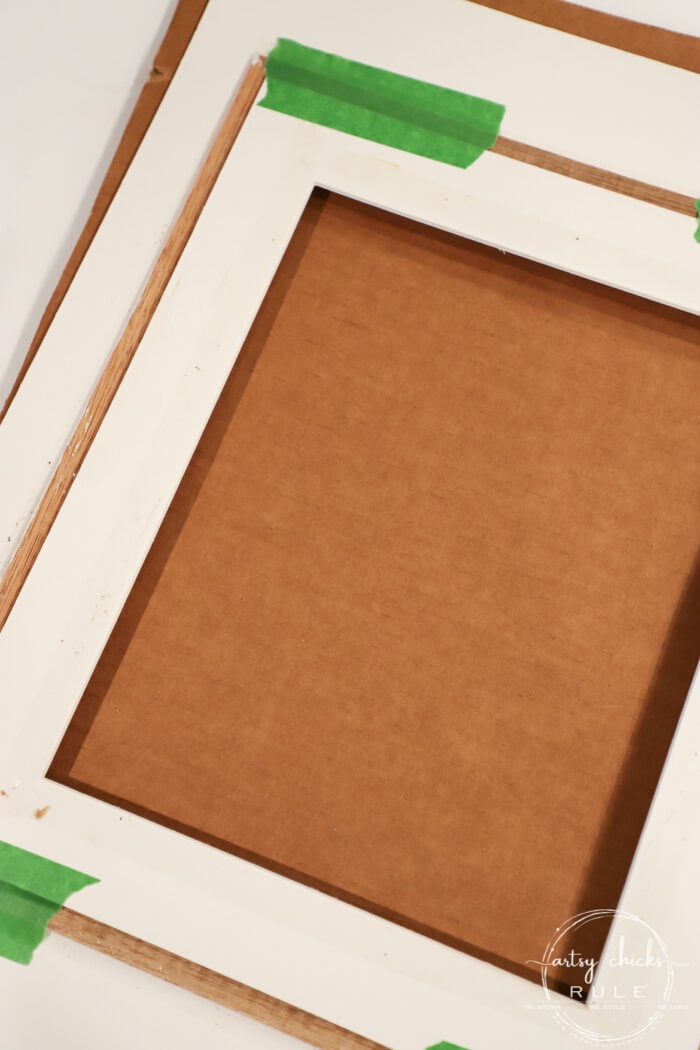
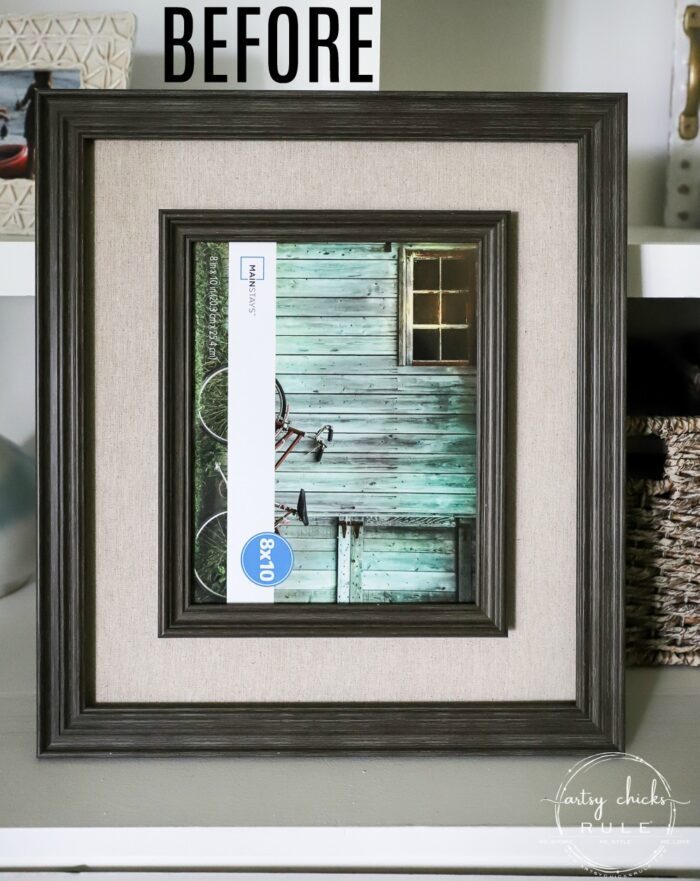
As you can see above, I gently pulled apart the frame and mats.
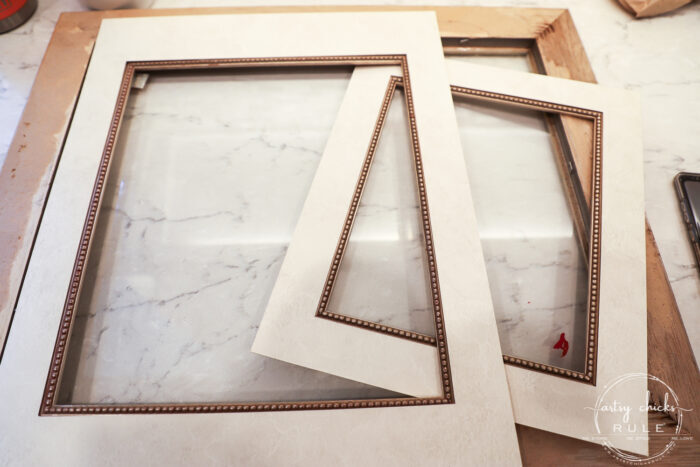
Luckily the sticky part on the back of the mats stayed sticky. Yay!
I could just re-use that sticky when I put them back together.
And when I said above, white spray paint and my own photo were all I needed for this makeover, I wasn’t kidding.
Since the back of the mats had a sticky edge going all the way around, I laid them on freezer paper so they’d easily pull off without ruining the sticky.
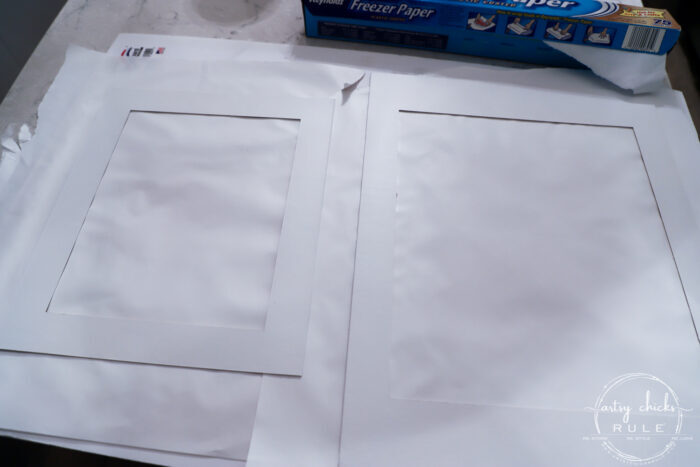
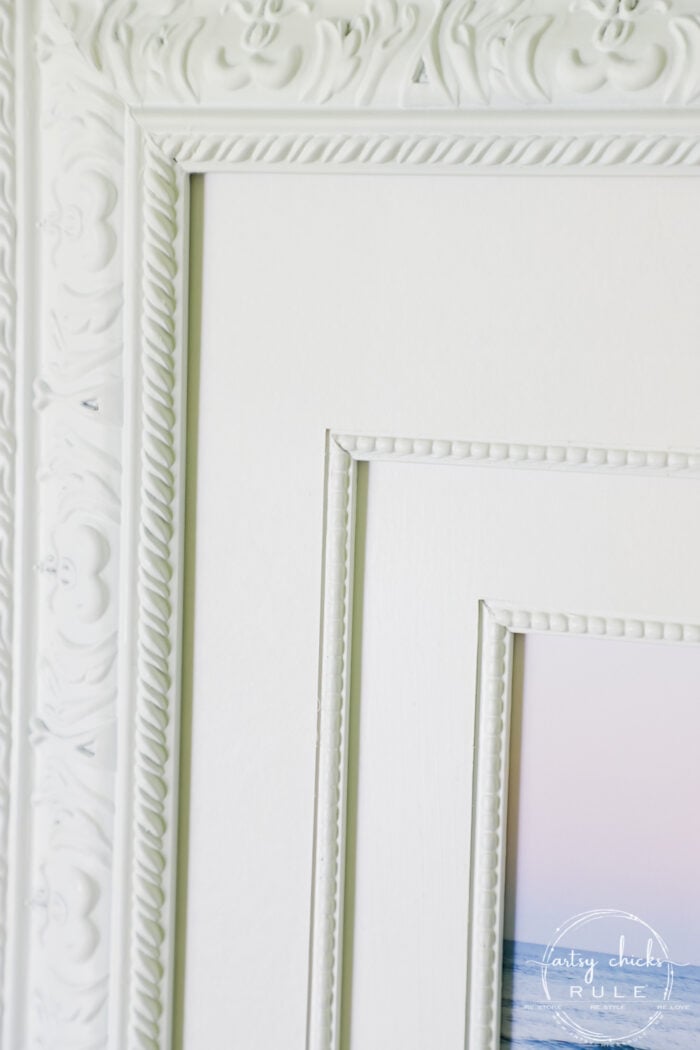
And then I spray painted them white. (I used a Satin White but it came out looking matte-ish on the mats)
I also sprayed the frame (and smaller frames inside the mats) the same color.

I decided not to do any other color, or distress the frames (which I had originally planned to do) because the colors in the photo were just so stunning.
I wanted the photo to be the star of the show!
Which I think was the right choice, don’t you?
You might notice that crack in the corner of the frame in the previous photo. All 4 were like that.
Well, that would just not do so I caulked all four corners.
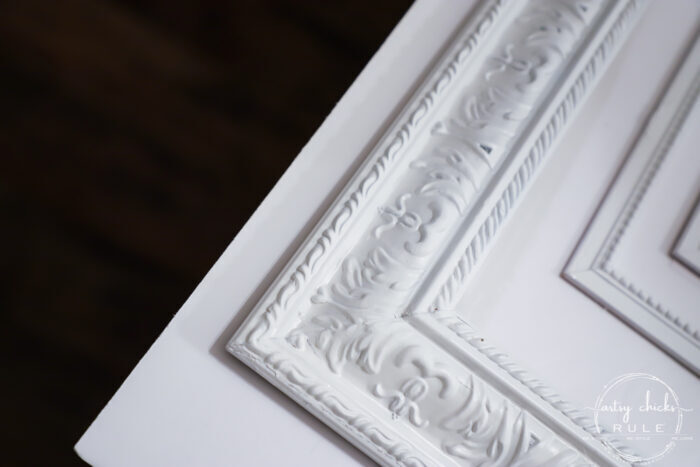
And then hit them with another quick coat of white spray paint.
Here’s how I put it all back together on the backside.
I used tape to hold the one frame and mat to the other. The sticky section of the mats worked great to adhere the frames to them.

Want to see some of these projects in “live” time? Hop on over and follow along with me on INSTAGRAM. I’m always sharing in my stories as I’m doing projects, finding new furniture, fun finds….just all the day to day behind the scenes.
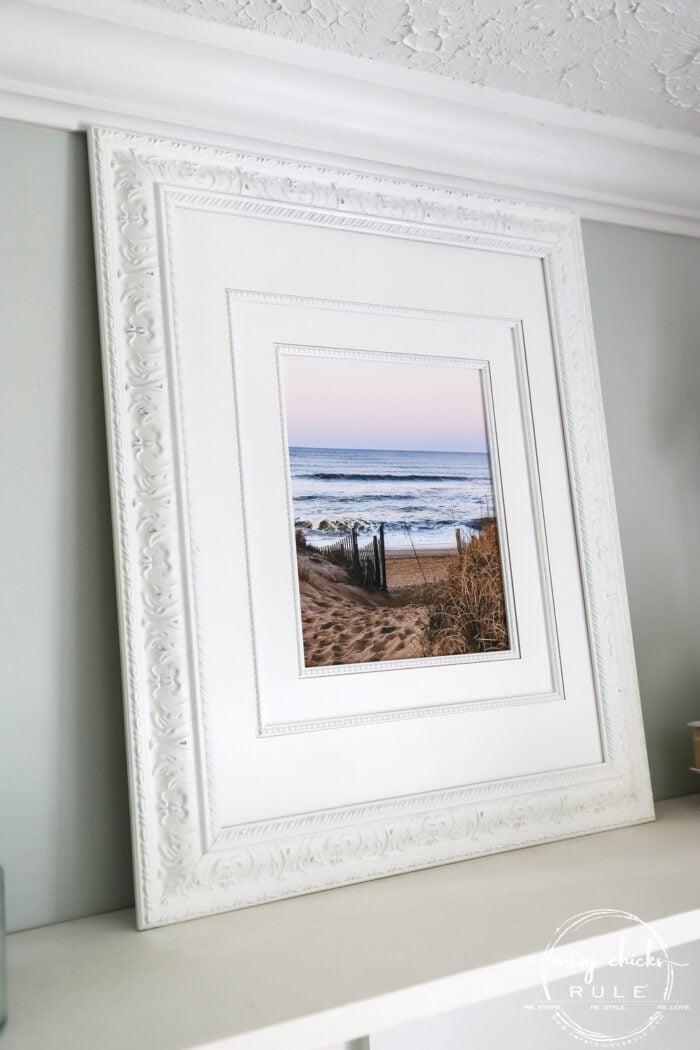
And done!
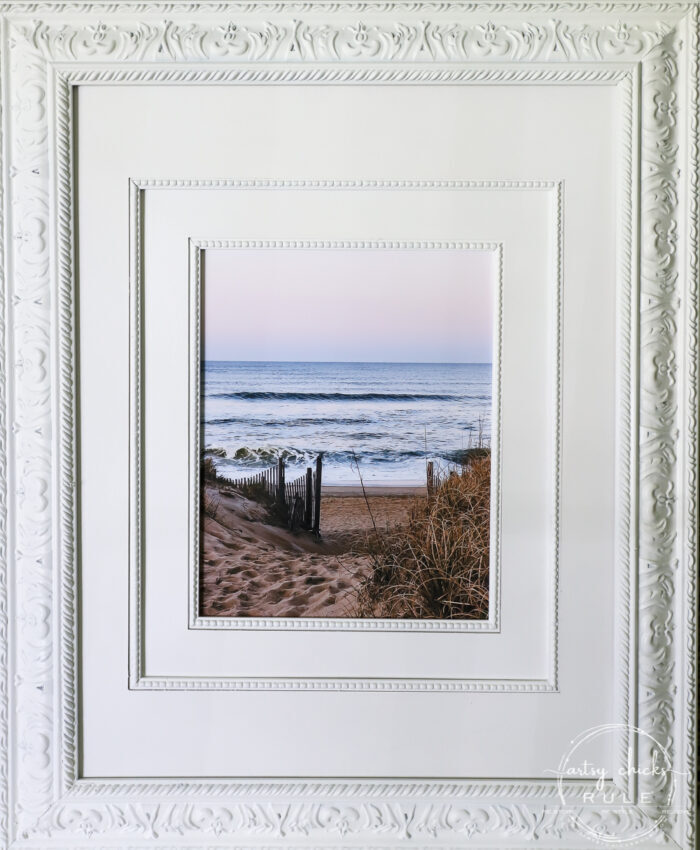
The picture above is without the glass.
For one, it’s easier to take photos with the glass out (no reflections) for the blog.
And two, I like it better with it out. The glass had a slightly dark, green tint that I did not like.
I loved the brightness of the white paint and contrast of the photo that the glass just diminished.
I actually took photos both ways so you can see the difference. (although it’s not so easily seen in the photos as it is in person)
With the glass…
Ha! I know, you probably can not tell a bit of difference, but trust me, it is very much in person.
I should have done a side by side but it was sort of a decision made as I was taking photos, etc.
With glass…
Without…
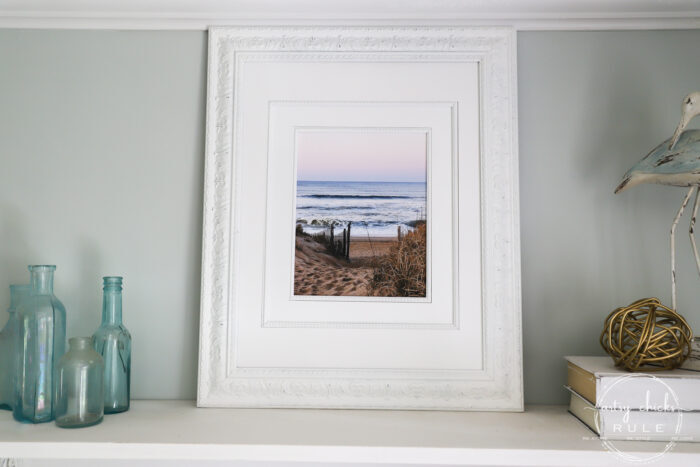
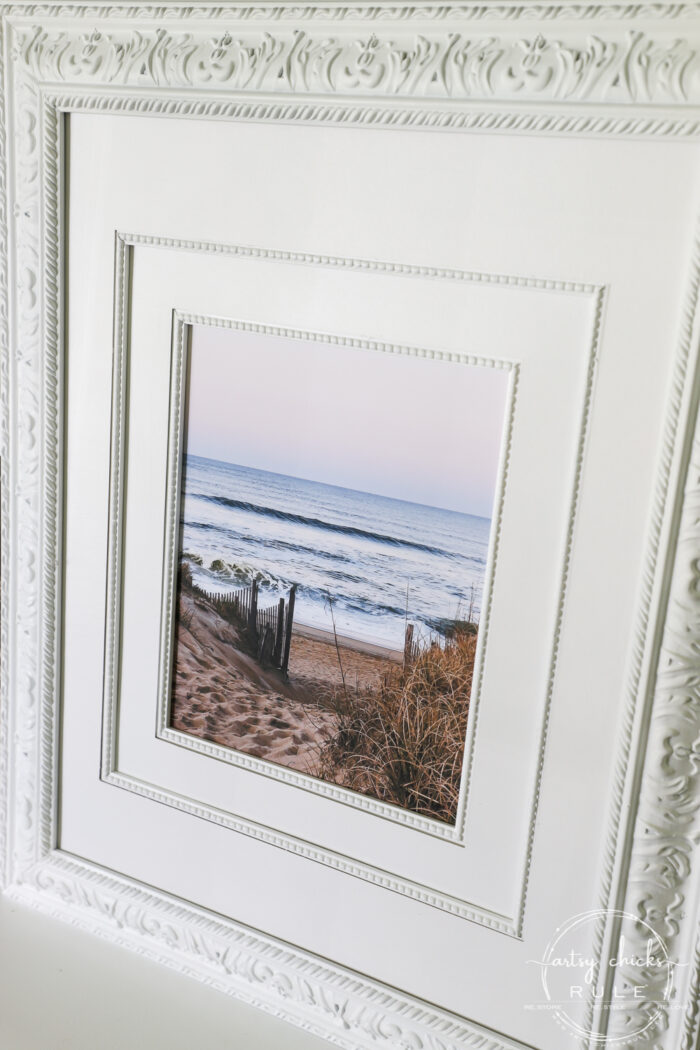
Not only that, it flattened out the look. I was actually liking the step-down dimension of the frames/mats.
Even the paper I ended up printing the photo on was a matte look so it all matches.
So I think I’m leaving the glass out.
A lot of talk about that glass, I know! lol But it was an important factor in the look of this makeover to me.
A few closeups…
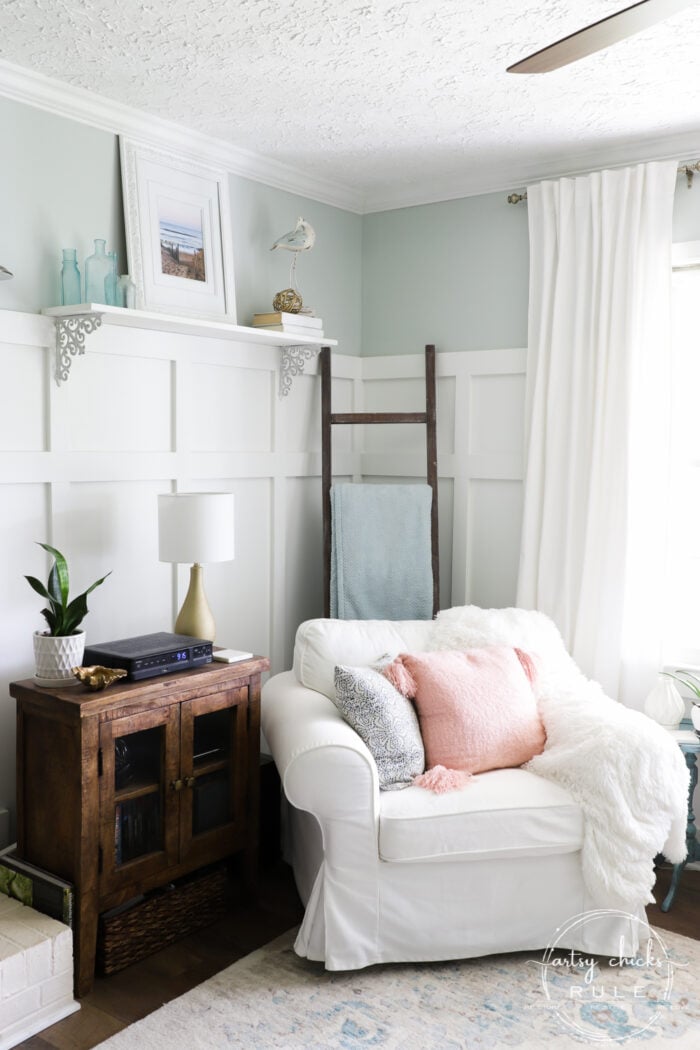
This beach scene wall art is just as pretty as something you might find in the store.
I think so anyway. :) (but so much cheaper, yes!)
So much better without the glass.
Happy with this one, for sure! Saving it for something special. ;)
Here’s another similar project >>> DIY Coastal Beach Prints – Re-Use What You Have!
PIN it to save it!
So next time you are cruising the thrift store isles, pick up one of these old matted and framed prints.
Bring it home and give it a quicky makeover like this with one of your very own favorite photos.
Here’s what I’m sharing next!
UPDATE!! See it now, here!!
Have a wonderful weekend, friends!
xoxo


")


")
")

")

Looks like a million bucks. Something how just a little spray paint can change the look from something bla into something gorgeous..
What in the world would we do without spray paint. :)
Love the frame design and what a beautiful photo. Photo and frame really go well together.
Thanks so much, Colleen! The power of paint, I tell ya! :) xo
That frame is gorgeous! I love the detail on it and your picture is framed just perfectly! Absolutely beautiful!
Thank you, Michelle! :) xoxo
Way to go Nancy!! The photo is gorgeous and the frame turned out so bright and fresh. The frame was a great find and you renewed it beautifully.
Thanks Christina! It always amazes me how paint can completely change something up. Even after all this time, every single time! :) xoxo
Nancy, I love it!!! I will now look more closely at matted frames and you’re right, without the glass.
Thanks, Cheryl!! Yes, do!! Yay to the no glass! Thanks! xoxo
This really caught my eye right away. I can’t believe how amazing it turned out! Your photo is just beautiful. Off to the thrift store I go, hoping to find a double-matted picture frame!
Thank you, Kathy! :) Good luck and have fun on your thrifting!!! xoxo
I love that photo you took, it is absolutely beautiful. The colours are so amazing! It looks wonderful in the refreshed frame.
I actually have a frame sitting around that is almost identical, and now I know what to do with it. Thanks for another great inspiration!
Thank you, Tracey!! Have fun creating yours too! xoxo
Can you tell me where you got the rug you have in this room?
I want a room exactly like yours. The whole thing is beautiful. Each small thing making the whole come together.
Love your style!
Hi Jan, it came from Amazon. If you check out this page, I have a direct link to it. :) And thank you so much!! It makes me so happy to hear that my room has inspired you! Love that. Have fun creating your space!! :) xoxo
what an easy fix to an otherwise not so pretty frame! the photo is great, definitely frame-worthy!
Yes, very!! Thank you, Gwen! xoxo
It’s beautiful! I do want to ask if you could have painted the frame as a whole? I have something similar and have been thinking about how to do it. Thanks.
Thank you, Pat!! And, yes, absolutely! I only took it all the way apart because I had originally thought I’d paint the tiny frames inside the mats a pale brown color and the mats white. But then I decided to paint it all white. If I’d known that from the beginning, I could have skipped pulling it all apart, only removing the original print from behind. (I would still take the mat set out of the frame and paint those separately from the frame, however) Have fun with yours!! :) xo
That looks great -what a great photo!
Thank you, Stephanie! :) xoxo
So beachy, clean, and pretty. Great transformation! The whole space made it to my Beautiful Spaces>Lovely Vignets board. :)
Hi Nancy – After seeing a post or two about thrift store bargains, I think I.m hooked and will store stuff for the winter. All dust making power tools are outside under a canopy – don’t have get rid of saw dust very often, LAZY! Sure would be quicker than making things from scratch, as I do for items I cal sell for more than $50.00.
Marvin’s Tiny Wood Shop
Live edge tables- dining, coffee or end * Cedar chests * toy chests. Bookcases * Quilt ladders, Counter tops * Live edge shelves, bookcases and Ball point pens and FREE ink refills.
Sounds perfect to me!!! :) And yes, it can be quicker than making from scratch. But I am sure yours are amazing too!!
Thanks so much, Lizzy! And aw, thanks so much for pinning too!! :) xoxo
Yep! No glass wins! This is so funny to me, I hope you see the subtle humor too. As I was looking at the photos, I saw the cracks in the corner. I thought, “Now, those have to be caulked.” next comment from you – they were caulked! lol I swear, great minds do think alike….lol Really nice outcome1
Yay to no glass! I was afraid everyone was going to think I was crazy for leaving it out! ;) And yes, lol, that IS too funny!! Love that!!! Thank you, Linda! :) xoxo
Love the style you created! Great idea!
Thank you, Rose! :) xoxo
Lovely! I never would have thought to paint the photo mats, thanks for sharing!
Thank you, Mimi!! :)
Love this!!!
Thanks so much, Beth! :)
Oh, I think I’m in trouble! LOL! I volunteer at our small town community thrift store and I know there are several large, detailed frames that I just may have to “rescue”. I love to photograph nature and I’m imagining some of my favorite photos finding a new home.
Haha, oh oh!! ;) Go rescue them!! Yes, those nature photos would look amazing done this way! :) xo
I love this project! This is absolutely gorgeous! The print looks professional, just beautiful.
I automatically always get the UV glass when I get artwork framed due to our harsh sun, which of course ups the price even more, but it’s worth it to preserve my precious art..:)
I wish you would do more YouTube videos of your projects, any chance?
BTW, you are the first person I have ever subscribed to 🙂 I totally love your style :)Dew
Thanks so very much!! Wow, that is so great to hear!! :) Good idea on the UV glass. And yes, I am planning to do more videos AND have something else along those lines planned too! Stay tuned! xoxo
Gorgeous picture, gorgeous frame! I love mats in the frames. While I’m out looking for thrift goods I always look for packages with mats in them. People sell them for little to nothing. I have quite a collection for my picture gallery. I absolutely love what you did with this one! What a huge difference!
Thank you, Shirley! You are smart, I bet your gallery is lovely! :) xo
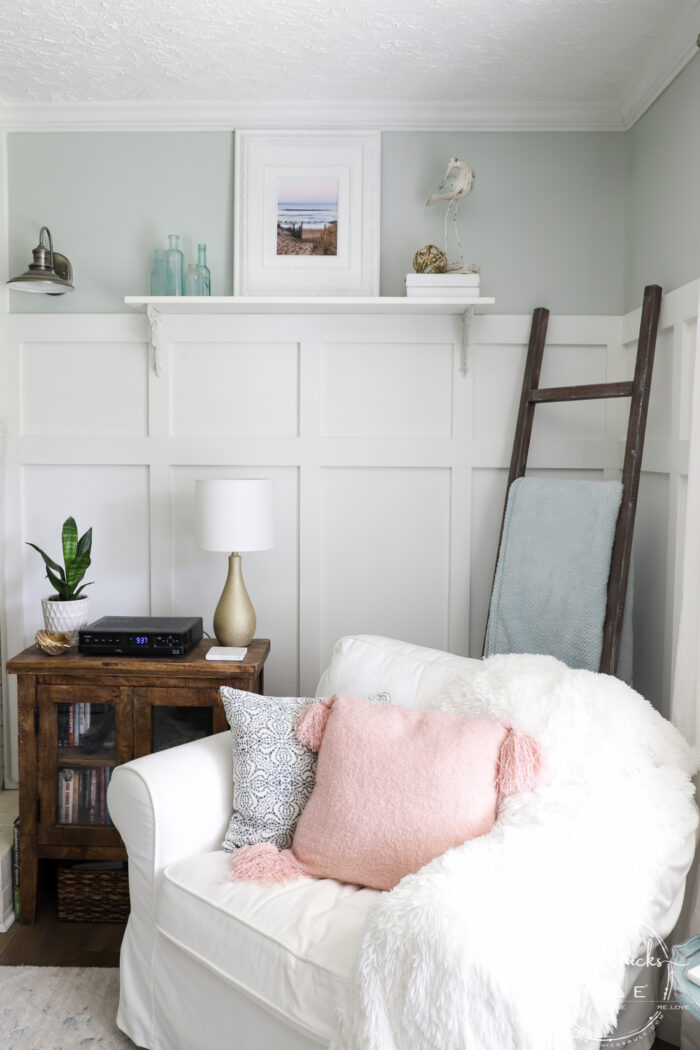
I love this project. Please, please tell me the paint brand and color on your walls behind the picture, that’s exactly what I’ve been looking for!
Thanks, Stacey! :) The paint is by Sherwin Williams, Sea Salt. It’s a lovely color! xo
Nancy,
I love this! Isn’t it amazing how simple it is to change the look of something with just paint? I love repurposing thrift store items.
Thank you, Alicia! xo
Its so beautiful! I’ve been doing this for years for less in my area. My husband makes frames out of beautiful moulding for our photos and paintings now! Thanks for sharing.
Thank you, Heather!
I know that this is an older post, but I am in the process of wanting to change the color of several frames. What brand of spray paint did you use? I tried using an acrylic paint but it doesn’t have a nice smooth finish like yours above.
Hi Rebecca, I always use Krylon or Rustoleum. I don’t remember what I used on this one exactly though. :)