I hope you have had a wonderful week so far.
I’ve been playing catch up in a big way!
I just got back from 4 days in Atlanta at the Haven Blogger’s Conference … with all of my blogging buddies, awesome sponsors and new friends.
I’ll be sharing a little “behind the scenes” in a post coming up later this week.
But for today….It’s “Themed Furniture Makeover Time”
And today’s theme is “Industrial“.
Yikes. What to do, what to do?
I do love a challenge though.
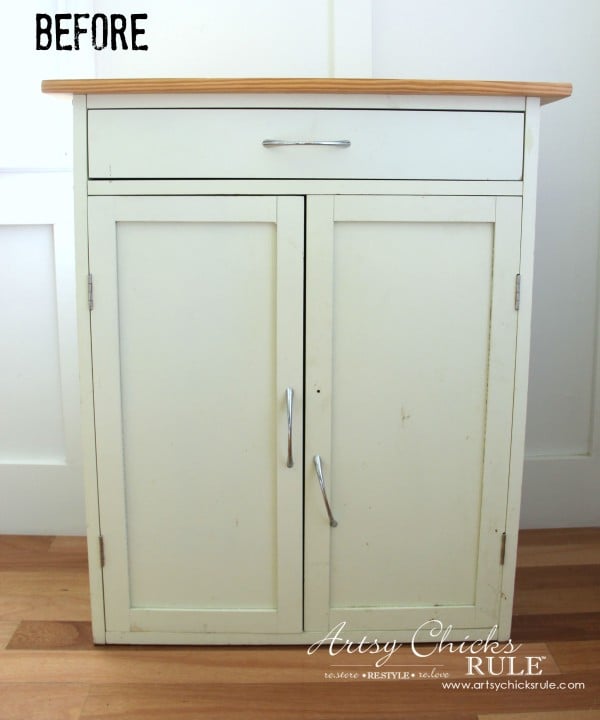
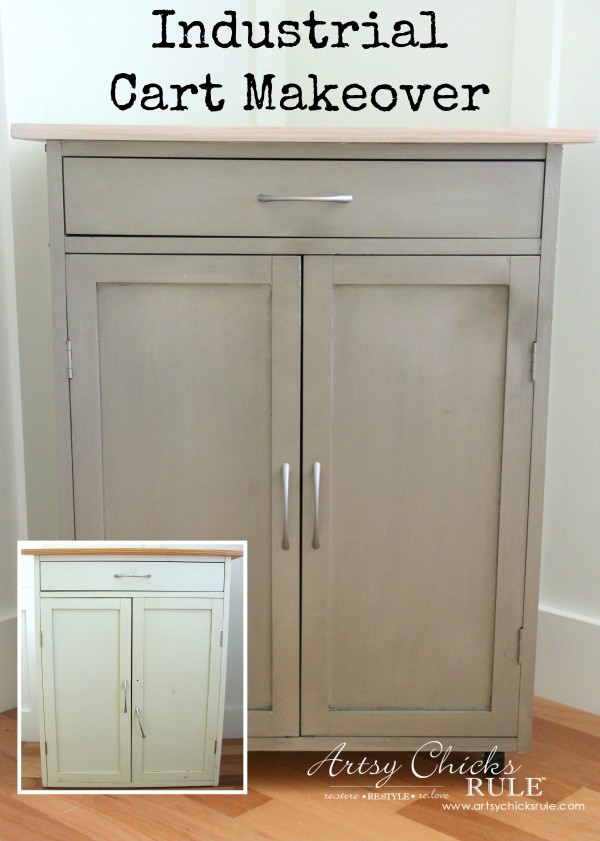
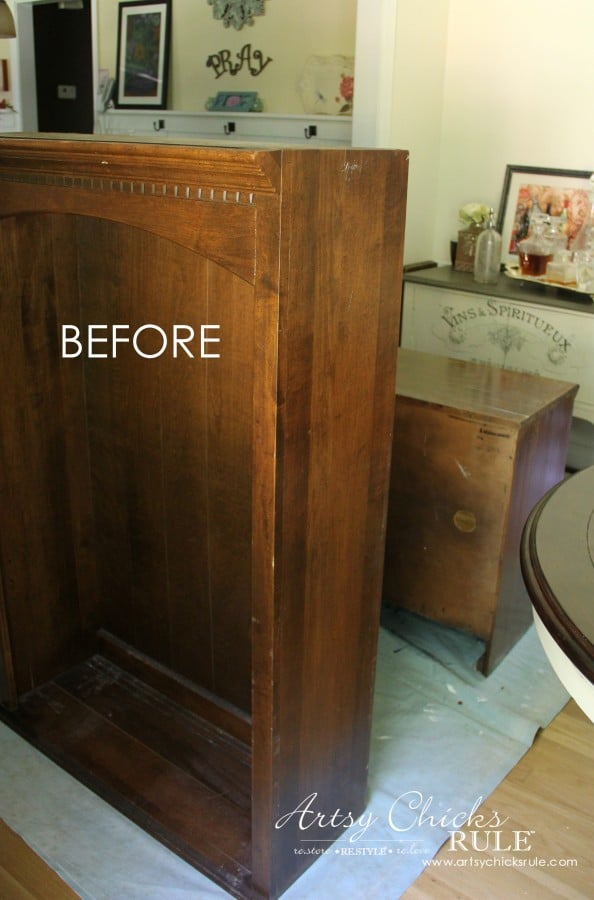
I found this cabinet, cart, whatever at the thrift store for $12….yesterday. (okay, that would be TUESDAY of this week. I’m writing this post on Weds, and hopefully you are reading it on Thurs)
Now that we have that out of the way, here is what it looked like….
Sad little thing, right?
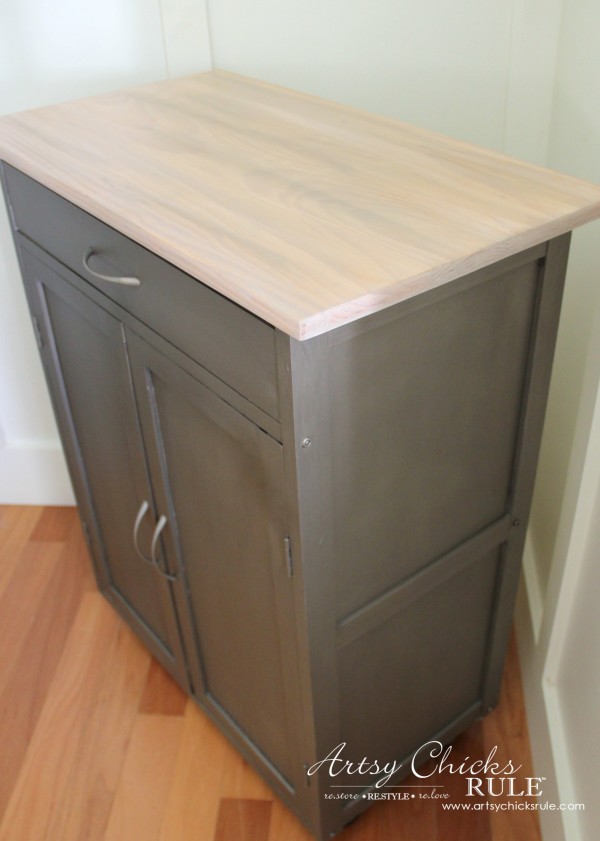
But not sad anymore. It’s now an industrial cart that I plan on using in my garage. Yay!
In case you’ve missed any of the other monthly themed makeovers, you can see them right here—> Themed Makeovers
Soooo… industrial.
I must admit this one was a toughie for me. I do love Joanna Gaines and all of the industrial touches in her makeovers but they just don’t all fit my design style.
I almost had to step out of this month’s challenge but found this little “cabinet turned cart” in the knick of time….and knew exactly what I’d do.
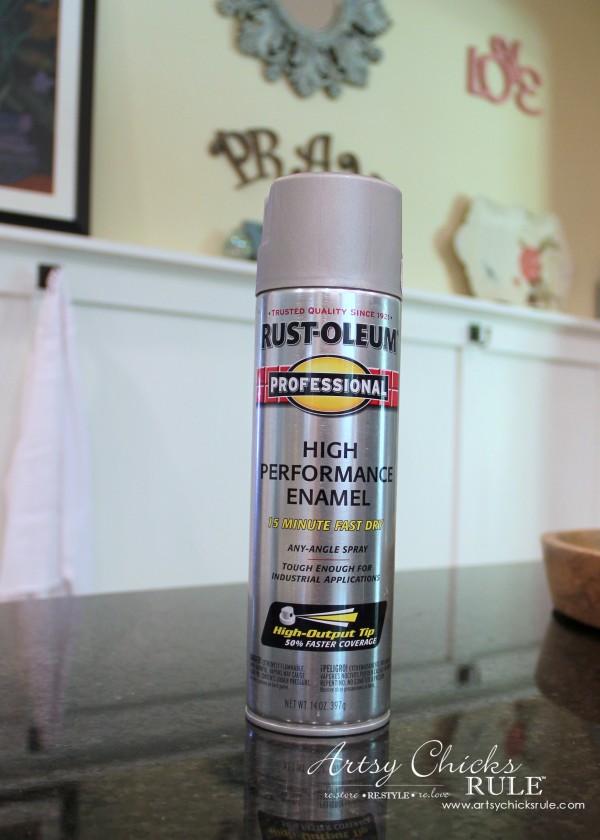
After I picked up the cabinet at the thrift store ($12), I stopped in at Lowe’s and The Home Depot and picked up caster wheels, hardware (which I didn’t end up using) and spray paint.
I did several processes on this little cart that I’ll go over for y’all.
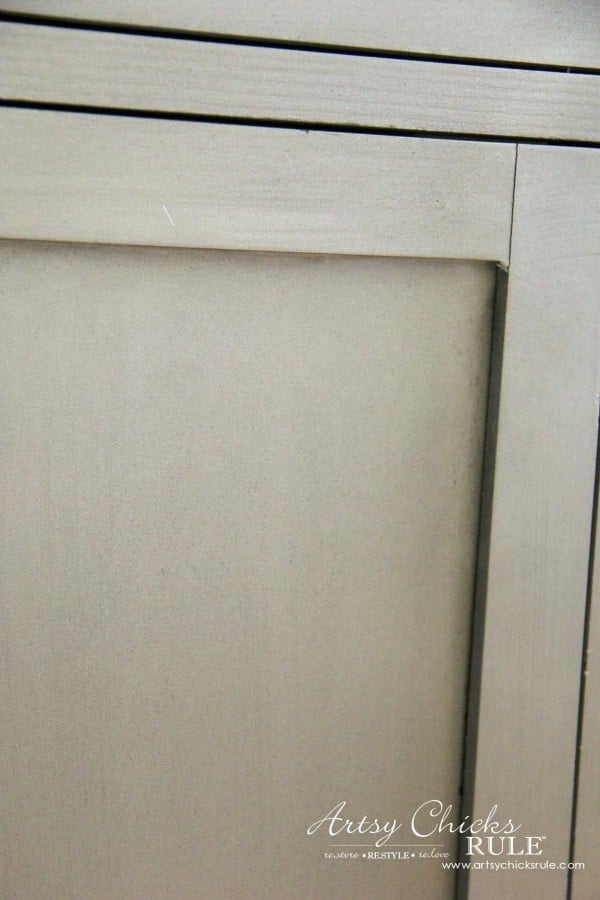
Stainless Steel is the color.
EASY PEASY! I took the cabinet outside and sprayed it all over.
Several coats…..
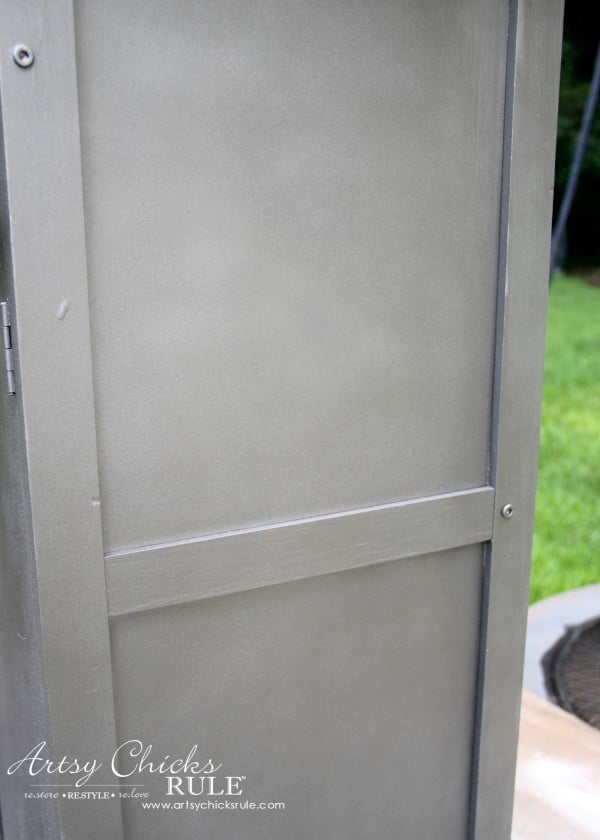
You can see it looks a bit splotchy.
Metallic paint is hard to get even….and even harder with spray paint. (in my opinion!)
But I didn’t worry too much with trying to get it more even.
I had another treatment going over the top of it that would even things out.
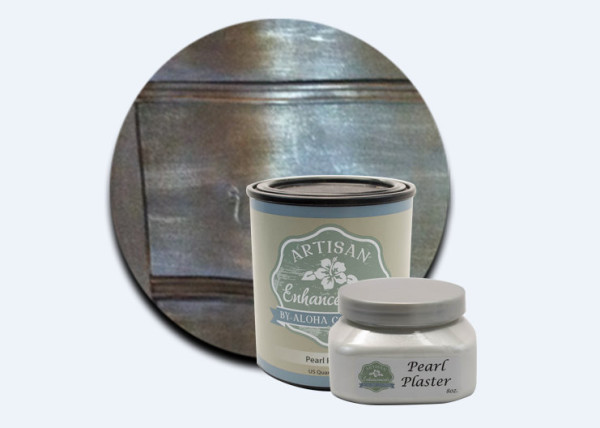
Once that was dry I mixed up a glaze consisting of Polycrylic, Lamp Black Milk Paint (by General Finishes but any black paint will work) and this fab product below….
I’ve used it a few times before (mixed with the poly).
It gives such a pretty iridescent finish and I thought it would be perfect for a metallic look….and it was!
No need to measure, just mix up a little of each. (keeping it thin)
I used a rag to to wipe the glaze all over the Stainless Steel spray painted cabinet.
Then I used a clean rag to go back over and wipe some away.
This is really easy, no perfection of application needed.
It is a rustic, industrial type piece so should not be perfect as you’ll see.
Hard to tell in the photos but I’ll telling ya, that black iridescent glaze was the perfect finishing touch!
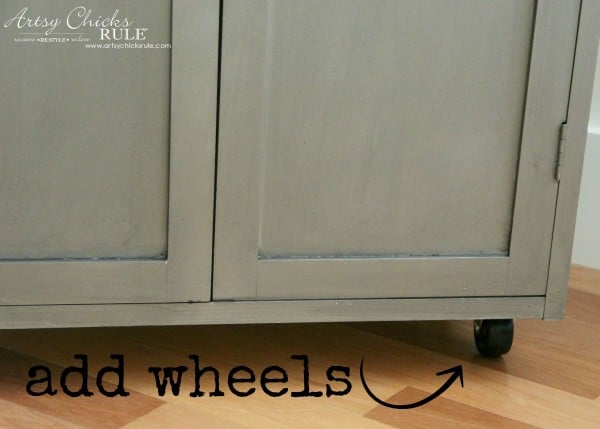
And so, to turn it into a “cart”, I added these caster wheels to the bottom.
Just turn the cabinet upside down and screw them into place.
Voila! CART!! ;)
Anything that rolls is okay in my book. Especially in the garage.
Easy movement!
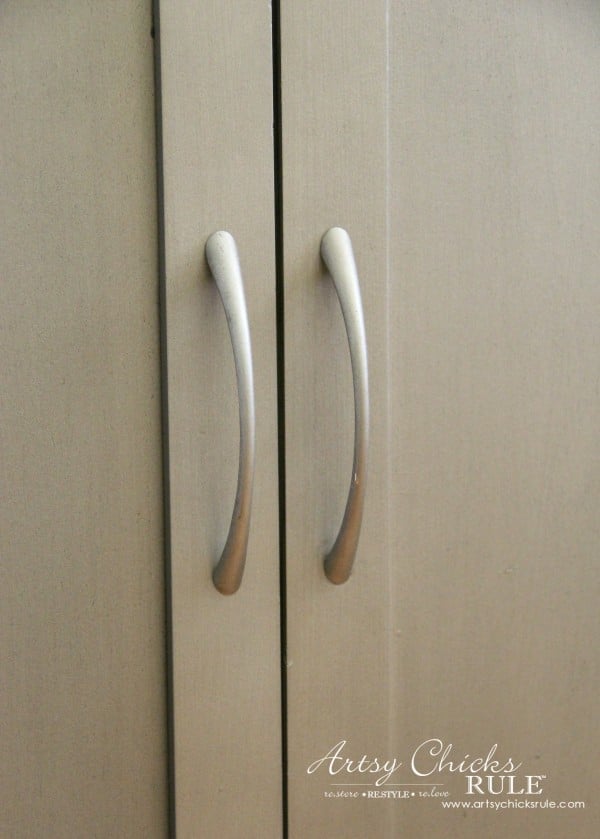
I also decided to use the original hardware.
I just sprayed and applied the same glaze.
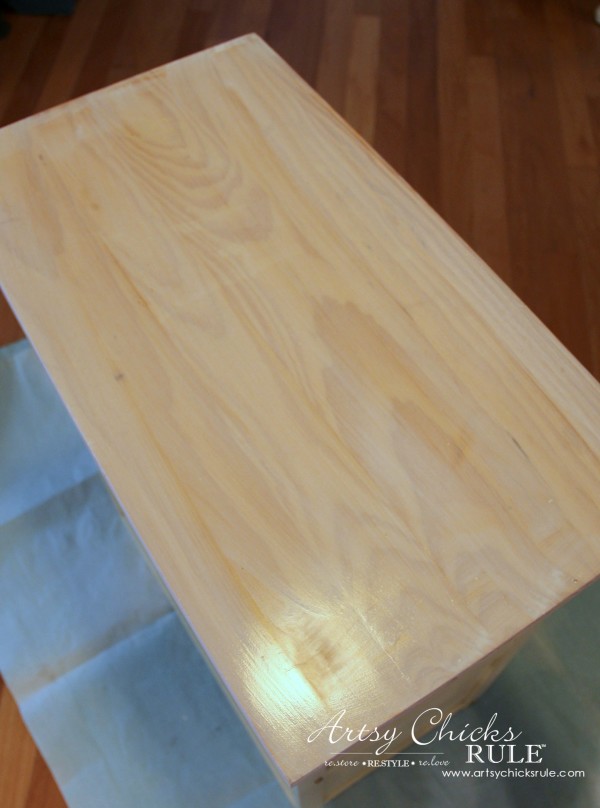
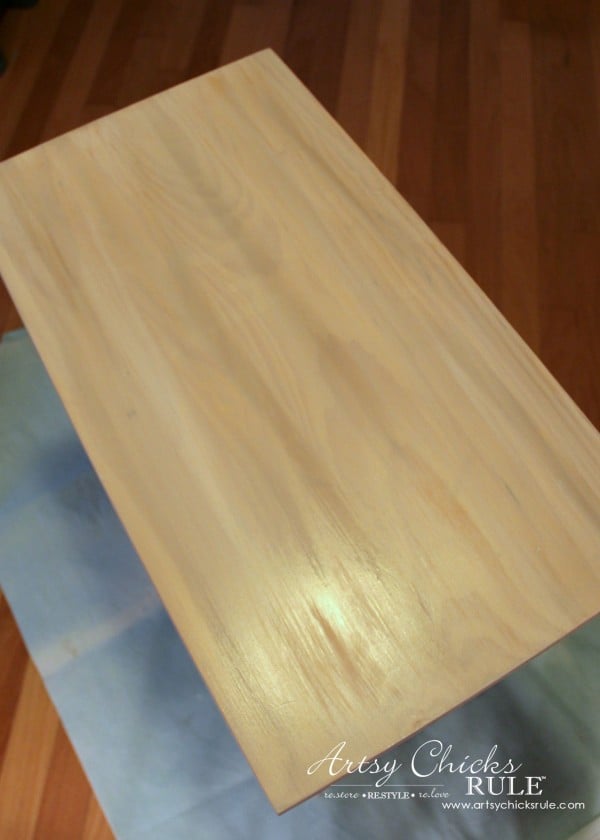
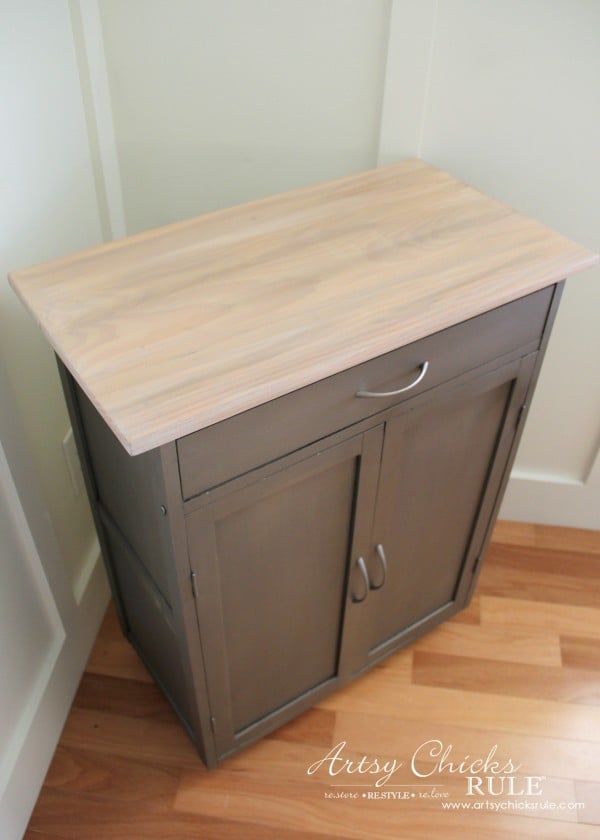
Now….for the top.
Didn’t do a thing to it except clean it. (no sanding, etc)
Then I applied a watery mixture of Chalk Paint to create a “weathered, white washed” sort of look.
I wanted to totally get rid of that orange-y shade.
First coat.
And you guys, this is SO simple. No real rhyme or reason.
Just apply and brush around a bit, long strokes.
I used Pure White (mixed with water, lots of water) and Coco.
Apply the White all over first. Then go back over with the (watery) Coco in places with a separate brush.
Take the brush that had the White on it and smooth out the Coco.
Do that a few times until you get it how you want it.
THEN mix a bit of black paint with water. (again, I used Lamp Black by General Finishes but you can use any black)
Take yet another brush and apply a bit of the black, in strokes, on the top. (only in a few places and very lightly)
Then, take the White brush and smooth the paint again.
You just want to give it some dimension and depth.
I wanted to end up with something in between “weathered” and “white washed”.
If you want more of the “weathered” or “driftwood” look … start with the Coco and add White instead of the other way around.
Once that was dry I added a coat of wax. Annie Sloan Clear Wax.
Come back later and buff and you are done!
So much better than that orange-y orange!
Here’s a couple other pieces I white washed AND weathered (driftwood).
Click the links to see the techniques I used for those.
So even though industrial may not be my thing, I somehow managed to come up with something industrial-ish looking. And something I can actually use, even if it is in my garage! :)
Be sure to see what my friends came up with for this challenge below.
See you soon with a bit of Haven (behind the blog scene!) and maybe even a few pictures of some of your favorite bloggers too! :)
Wow, love that finish! Great interpreation of the industrial theme. I think that’s my favorite part of this link up, seeing how each person interprets the theme. :) Can’t believe I didn’t get the change to meet you in person at Haven, I saw you a few times, but missed all of my chances! :)
Kudos to you for finding, doing the makeover, taking great pictures, and posting about it in ahh…three days!!! You Go Girl! Love your Industrial Cart Makeover Nancy :) Looking forward to seeing your Haven pictures…I’m still upset that I missed it :(
Nancy, that top is totally perfect! I so want to try the technique on something. The whole cabinet is great. I would not want to use it in the garage. I’d put it in the house. Fun theme. Jeanette
I love the stainless steel look! The subtle changes really made a big difference. It will look great in the garage or anywhere else you want to use it.
Wow you are the last minute wonder queen! Love the finish on the wood top and the addition of the wheels makes it so practical. Thanks for stopping by earlier and leaving me such a nice message! :o)
Nancy, that cabinet is simply amazing now. Doesn’t look like the same sad piece at all. I give you extra credit for knockin’ the project out in record time, lol. You work like i do!
Thanks so much Kathy! And haha, thank you !! I did knock it out pretty quickly! I do work best that way at times though!! ;)
As you understand I know!
Nancy
The color you chose was perfect for the industrial look! I’m going to have to try it out on something. That would make a super cute rolling kitchen island too!
I’m loving the storage on wheels and your finish is super. Love the layers! It was good seeing you at Haven and yes, I crazy catching up! I can’t believe you did this in 2 days, you must have been panicked!
I’m loving the storage on wheels and your finish is super. Love the layers! It was good seeing you at Haven and yes, It was crazy catching up! I can’t believe you did this in 2 days, you must have been panicked!
Want to be inspired, learn new skills, discover all the tricks to furniture makeovers, creating new out of the old and more? You'll also receive my FREE ebook "Creating Fabulous Finishes" PLUS access to my private Printables Resource Library, too!
Sign up to get the Weekly Newsletter! Our emails include an unsubscribe link and you may opt-out at any time. Your information will *never* be shared or sold to a 3rd party.


")


")

Such a fun and functional piece, Nancy! Great job on creating an awesome industrial look.
Thank you Larissa! :)
It will surely come in handy hold “stuff” in the garage!
Nancy
Looks good enough to go into the house!!!
Aw, thanks Donna!! :)
xo
Nancy
I love it, Nancy! What a great find! I’m sure you will get lots of use from this little piece. xo
It will be great to hold things with the shelf inside…plus the wheels make it so easy to move about! :)
xo
Nancy
This cart is going to be super useful for storage. I love the look you gave the top.
Thanks Paula! And yes, who can so no to more storage!!?? ;)
Nancy
What a lucky find! This looks very similar to my little kitchen cart. Love the metallic finish! XO
Wow, love that finish! Great interpreation of the industrial theme. I think that’s my favorite part of this link up, seeing how each person interprets the theme. :) Can’t believe I didn’t get the change to meet you in person at Haven, I saw you a few times, but missed all of my chances! :)
Kudos to you for finding, doing the makeover, taking great pictures, and posting about it in ahh…three days!!! You Go Girl! Love your Industrial Cart Makeover Nancy :) Looking forward to seeing your Haven pictures…I’m still upset that I missed it :(
Thanks Marie! :)
Yes…sometimes it just flows so nicely like that! Not always! ;)
And YES, you need to come to Haven next time!!
xo
Nancy
Oh it was so sad, but you brought it back to life! Love it. And go you for finishing it so quickly!
Oh it was Bre! :) Thanks so much!!
Nancy
Nancy, that top is totally perfect! I so want to try the technique on something. The whole cabinet is great. I would not want to use it in the garage. I’d put it in the house. Fun theme. Jeanette
Thank You Jeanette! :)
Nancy
How fun Nancy! What a great deal too – looks really great and such a quick fix! :)
Thanks Jayne! :) It was fun to step outside of my normal box!
And it really was a quick fix, love that!
xo
Nancy
I love the stainless steel look! The subtle changes really made a big difference. It will look great in the garage or anywhere else you want to use it.
Thank you Angie! :)
Nancy
Wow you are the last minute wonder queen! Love the finish on the wood top and the addition of the wheels makes it so practical. Thanks for stopping by earlier and leaving me such a nice message! :o)
Haha last minute wonder queen!! Love that! ;) Yes, I can be at times!!
Thanks so much Lucy! :)
xo
Nancy
Nancy, that cabinet is simply amazing now. Doesn’t look like the same sad piece at all. I give you extra credit for knockin’ the project out in record time, lol. You work like i do!
Thanks so much Kathy! And haha, thank you !! I did knock it out pretty quickly! I do work best that way at times though!! ;)
As you understand I know!
Nancy
Too wonderful for a garage! 8-)
Aw thanks Mary!! I may have rethink!!
Nancy
Nancy this turned out so great! I need to check out that spray paint. And I would love a cart like this for my garage!
Thanks Jen! :)
Nancy
The color you chose was perfect for the industrial look! I’m going to have to try it out on something. That would make a super cute rolling kitchen island too!
Thanks Amy! Yes, I am told it makes a great kitchen cart! :)
Love the color…I might have to try it on something else soon!
Nancy
I’m loving the storage on wheels and your finish is super. Love the layers! It was good seeing you at Haven and yes, I crazy catching up! I can’t believe you did this in 2 days, you must have been panicked!
I’m loving the storage on wheels and your finish is super. Love the layers! It was good seeing you at Haven and yes, It was crazy catching up! I can’t believe you did this in 2 days, you must have been panicked!
Thanks Wendi!! The layers really make it!
Yea, those last minute ones are always fun!! ;)
xo
Nancy
LOVE this makeover! Wow! Beautiful blue and the glaze really sets it apart. The top turned out so beautiful!!
Oops.. love this cart… I followed the link from the chest.