Did you know you can create your very own DIY beach painting? It’s not as hard as it seems!
Hello, my friends!! I hope you have had a wonderful past weekend and a lovely week so far!
I did and oh my gosh, am I so happy that it’s March. Sooo happy.
And so happy Mr. Weatherman is really cooperating too.
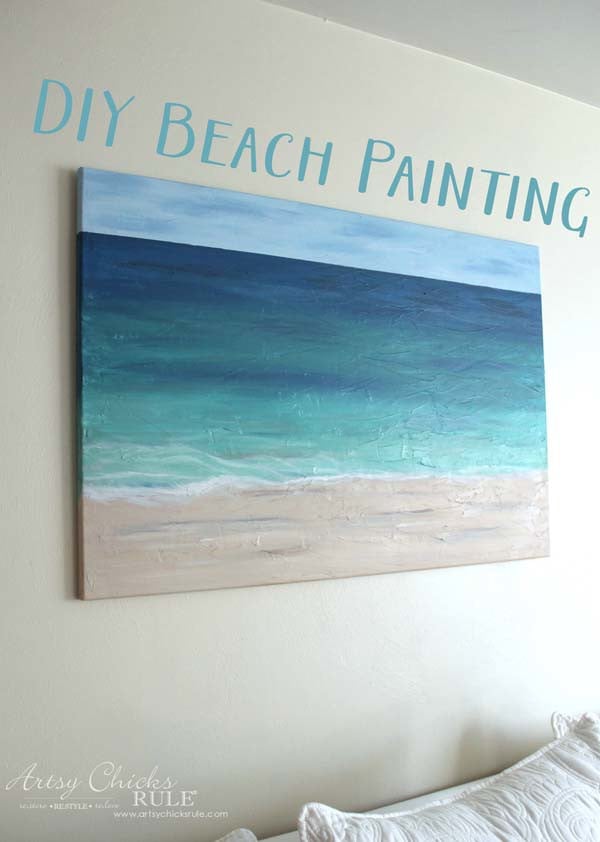
Today I’m sharing a project I’m kind of really excited about….a DIY Beach Painting.
Although…….I wasn’t too sure to start with!
But like I always say, it’s only paint y’all and if at first you don’t succeed, just repaint!!
And so I did.
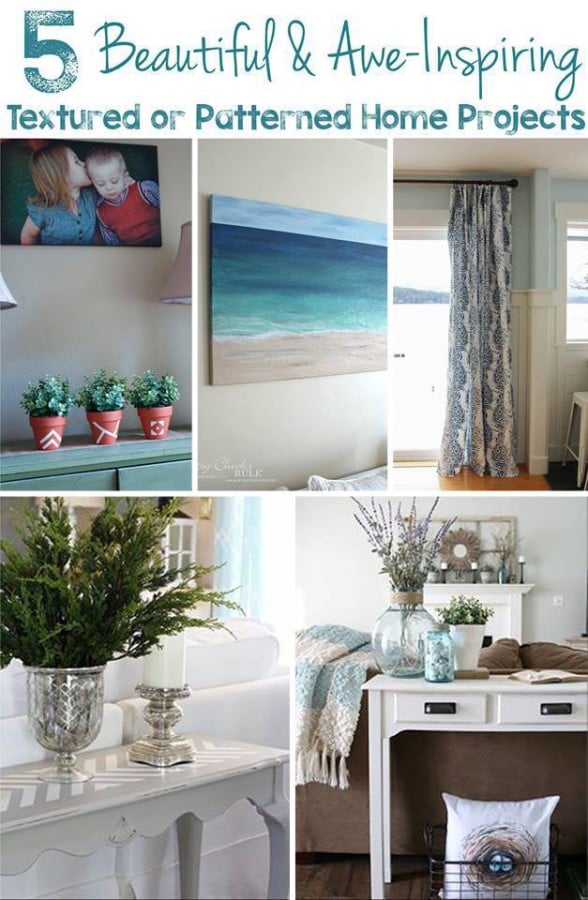
My “Get Your DIY On” friends are back this month too with a new theme…. “textures and patterns“.
So get ready to share yours too!
………………………………………………………………………………….
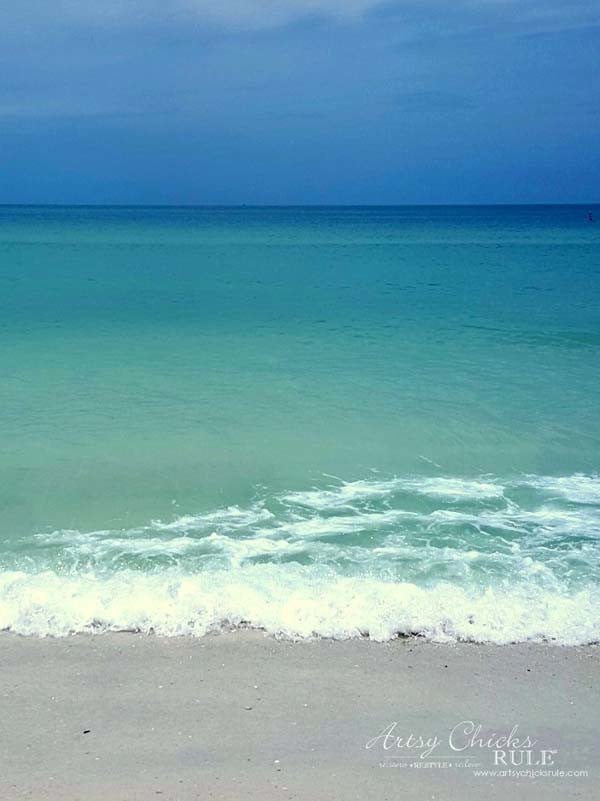
Here’s my inspiration to create something “textured”…..
This photo was a picture I took of the gorgeous water/beach in Florida last year.
Isn’t it just amazing?? (Yes, it really looked like this! I live right by the ocean in VA and our water is not this color..boo. ;))
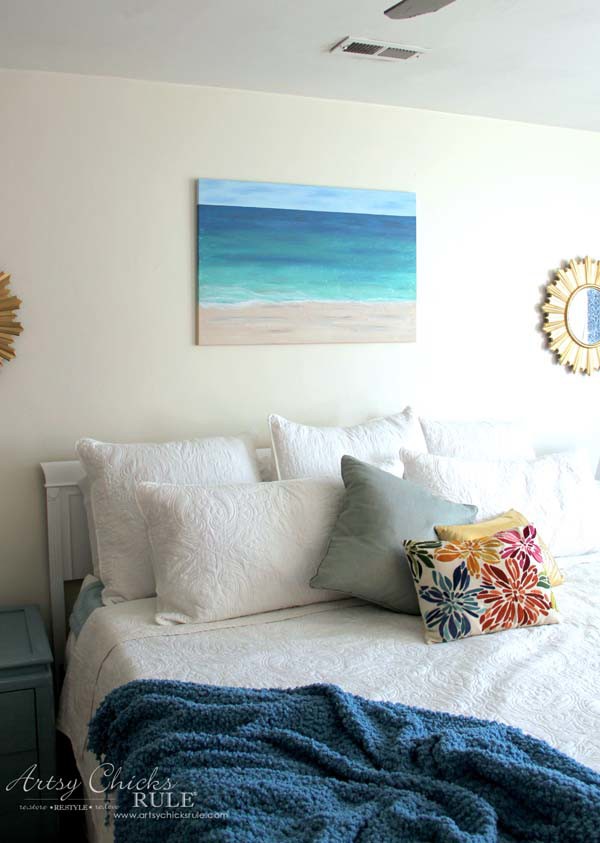
I actually had a canvas printed with this photo but then decided to change our headboard.
The new headboard will be taller and the photo/canvas won’t fit longways.
And so…..the reason for the new DIY artwork, is sideways instead!
It wasn’t all rosy, to be honest, but it wasn’t hard either.
That’s what I love about paint!!
But let me tell you, this is probably not the best tutorial because once I got going, I got going.
I didn’t stop to take photos because I may have panicked a little at my first attempt.
I tried to create a more “abstract” painting and well, no.
So I literally painted right back over the top of everything. (while it was still wet which actually worked out pretty well)
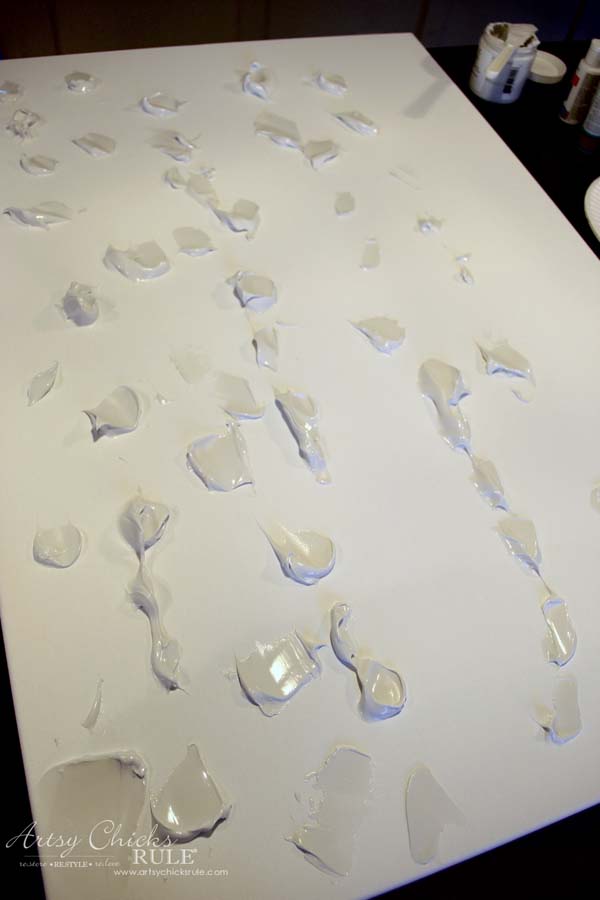
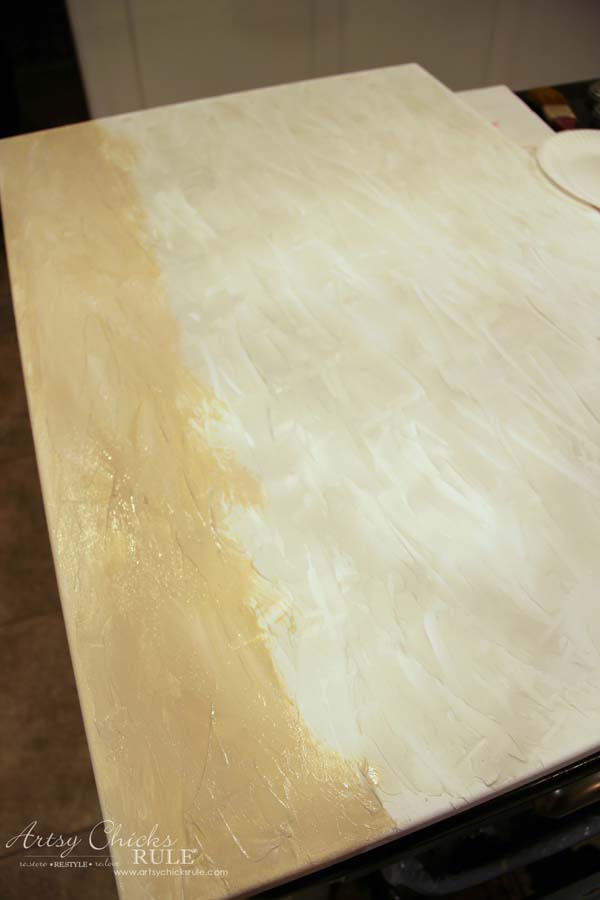
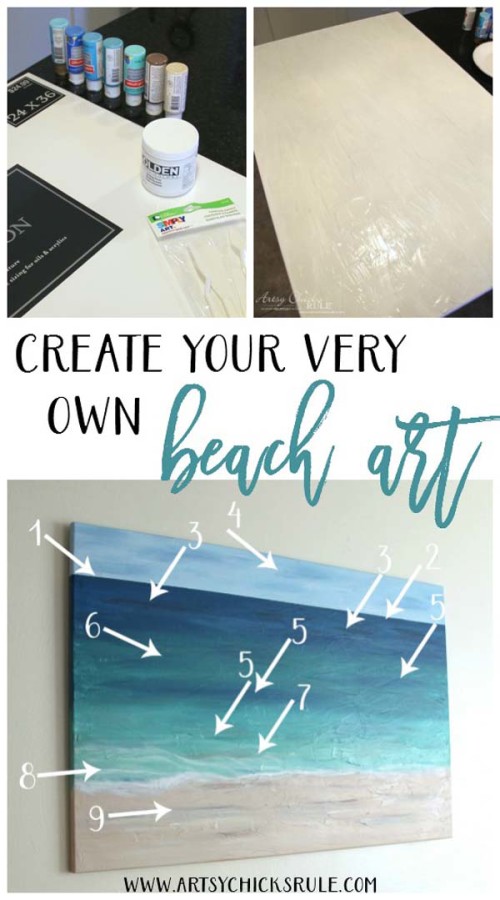
I plopped the molding paste down all over the canvas so I’d be able to spread it easier.
Then I used my handy little tools and spread it all over the board….sort of just like cake icing.
This was kind of fun actually!
Just like Kindergarten craft time.
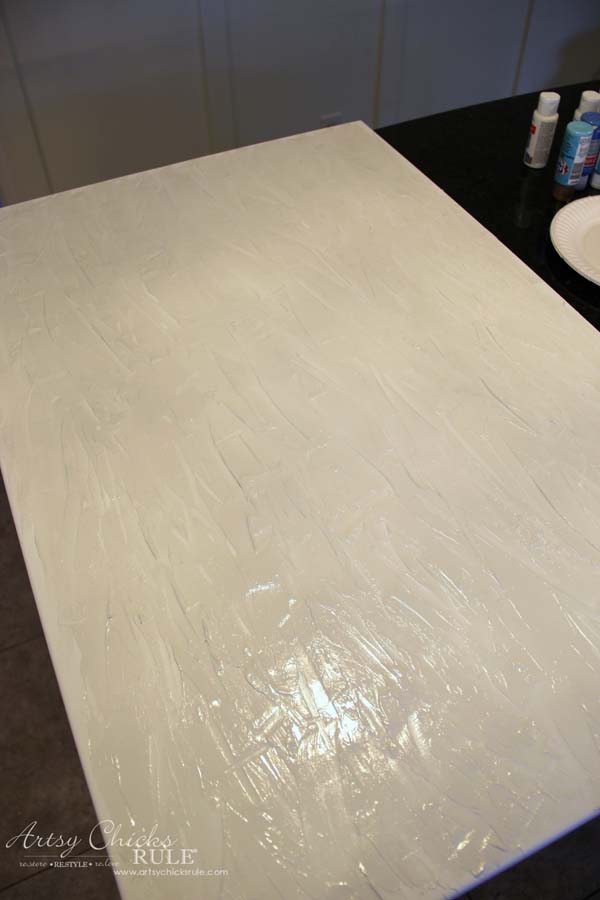
A little better shot of it in the sunlight drying outside.
See how I did it? No way to mess this part up!! Easy!!!
Once it was dry, I started painting the “sand”……
…and adding depth with more color as I went up the canvas…..
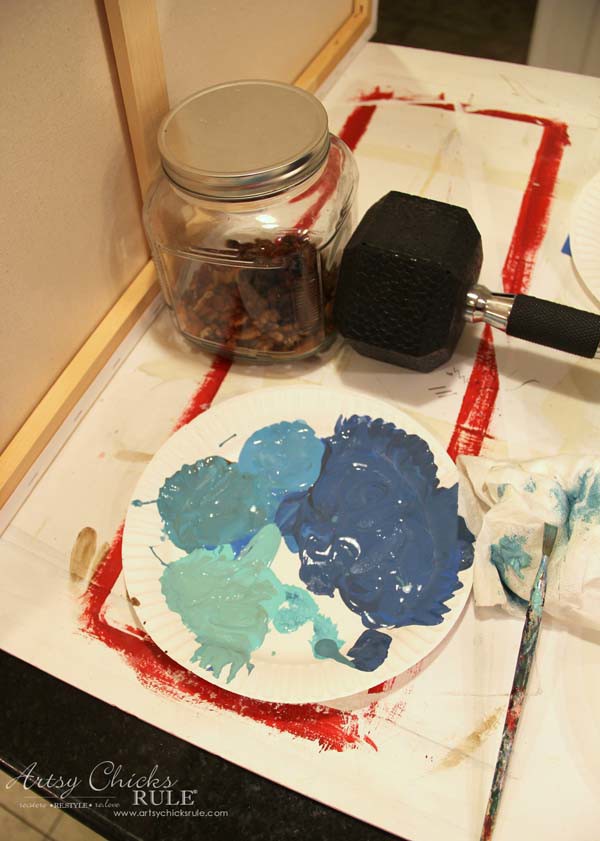
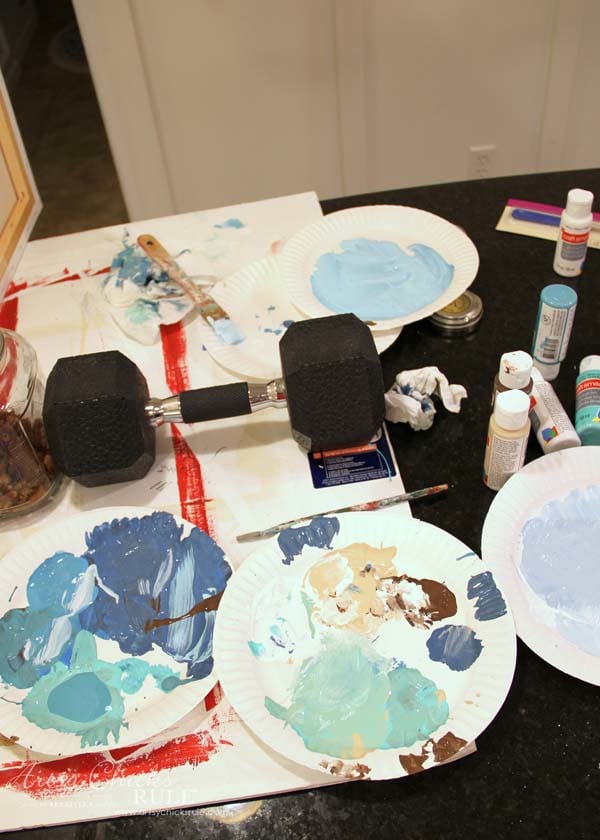
(mixing on my fancy paper plates, like so….)
Want to see some of these projects in “live” time? Hop on over and follow along with me on INSTAGRAM. I’m always sharing in my stories as I’m doing projects, finding new furniture, fun finds….just all the day to day behind the scenes.
This is where it gets a little murky.
I just kept going up and I totally created an “abstract” piece … but I hated it! UGH! lol
It looked like a Kindergarten craft to me and that was not the look I was after.
(Sorry I didn’t take a photo! I really wish I had so I could show you guys! I didn’t even realize it until I was done because I was so entrenched in the whole process.)
So this time I started at the horizon line and attached a piece of painter’s tape across where I wanted it to be.
Bye, bye abstract painting….hello straight horizon line.
During this time, I also realized trying to paint this flat on the island was not working.
I do not have an easel so I created a makeshift one…..
A jar of half-empty nuts and a hand weight!! Haha…I’m so resourceful.
It made it so much easier to see what I was painting though.
Anyway, since I didn’t show you a step-by-step, here is how I will share how I painted it all.
H O W T O:
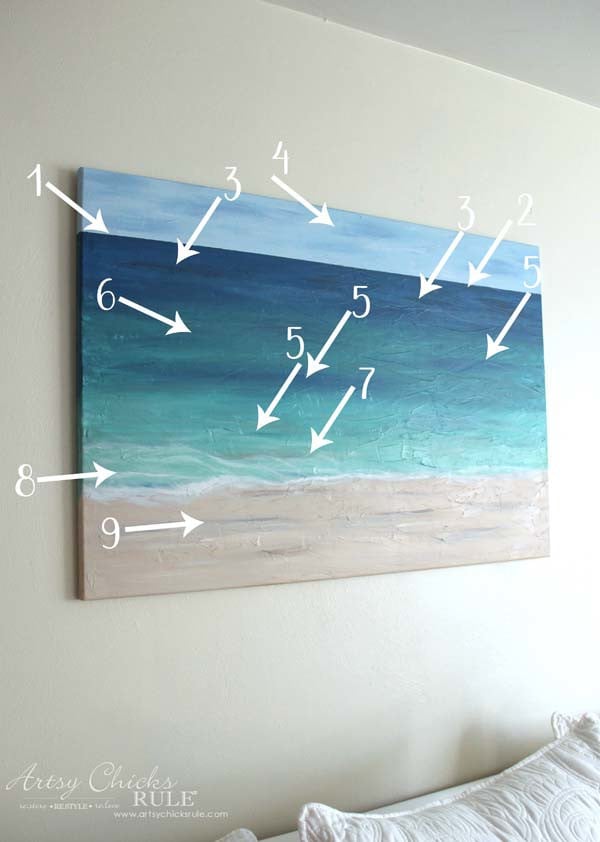
The very first thing I did was create a straight horizon line.
I used the darkest blue there and slowly mixed in white to create a lighter blue as I went down.
Then I actually went back and mixed some darker blue (blue mixed with brown) a little lower for some variation in the watercolor. (as it would be in nature)
For the sky, which was originally a cartoonish blue, I mixed the same blue I used for the water and white (probably 95% white to 5% blue)The neat thing here is that the original blue color was underneath AND still a bit wet. So when I added the new very pale blue over top, it created a nice “clouded sky” appearance with little effort on my part! Love that!
As I went down the canvas, I started adding in more of the turquoise color (the darker of the two I had). As you can see, I also went back in with that darker blue in places. (all the 5’s) I even went back in with that darker blue at the water break link on the beach in a couple of places. Can you see it?
Adding the turquoise (mixed with white and brown to lighten and darken, as needed)
Adding a bit of the darker brown “beach sand” color in the water.
Adding white waves. Not hard at all, just squiggle a few white waves here and there.
I lightened up the entire sand area from what was there and then added in some white and darker brown for depth.
The great thing about painting like this is that the paint is really a dream to work with.
It blends and mixes and ends up just lovely.
AND if you mess up, it’s soooo easy to go back over it and change it up!
I will tell you, I started the canvas using the “cartoonish” colors I bought and only added white to lighten and darken.
I think that was my main mistake. (unless that is the look you are after, of course)
When I redid the painting, I added dark brown AND white to lighten and soften the colors (making them a bit more realistic).
I have to share the “aftermath”…. hee hee
Artists are messy, right?
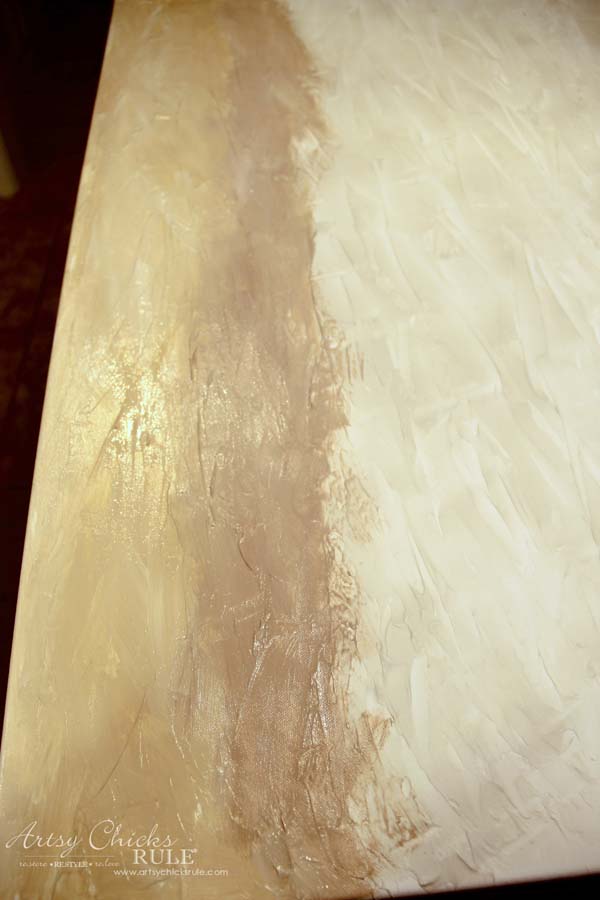
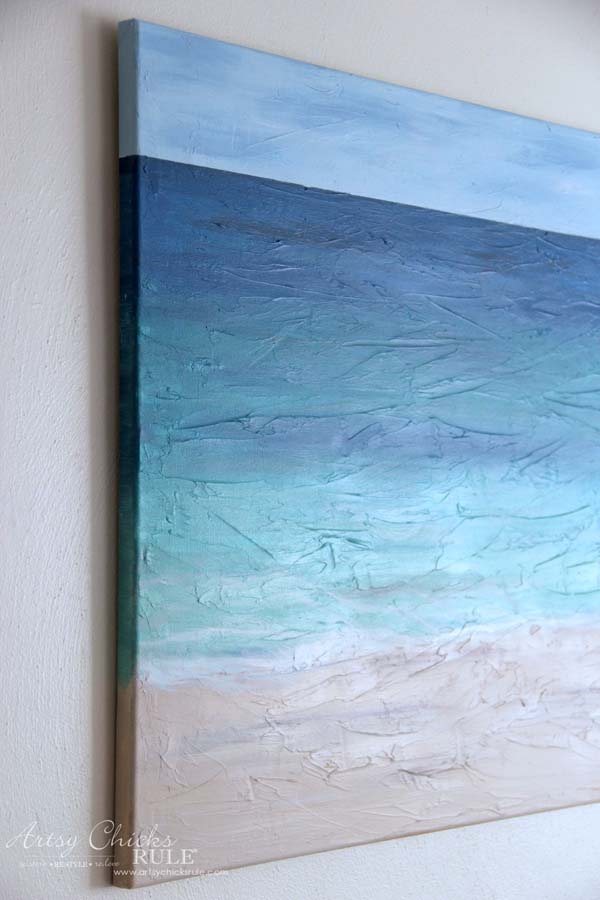
Here you can see that gorgeous texture that totally adds to the look of this painting.
I highly recommend doing this!
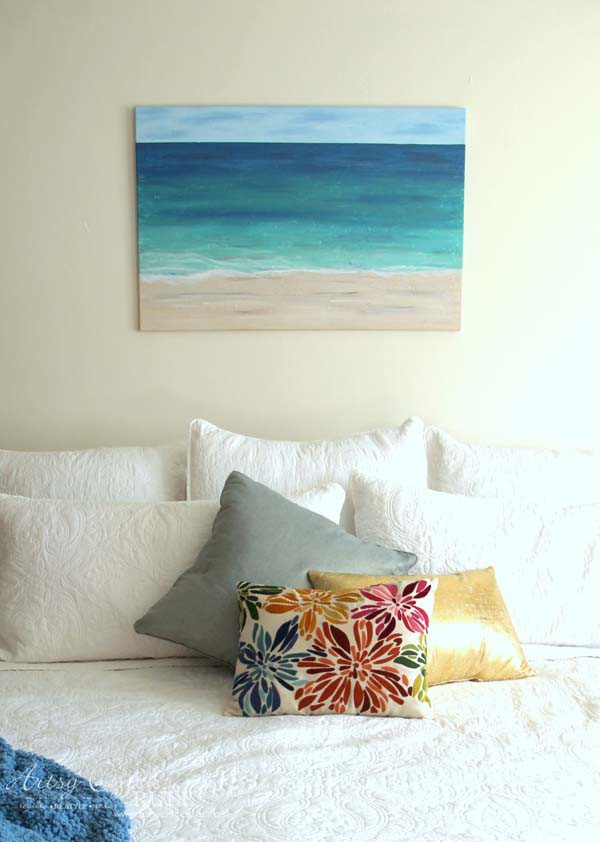
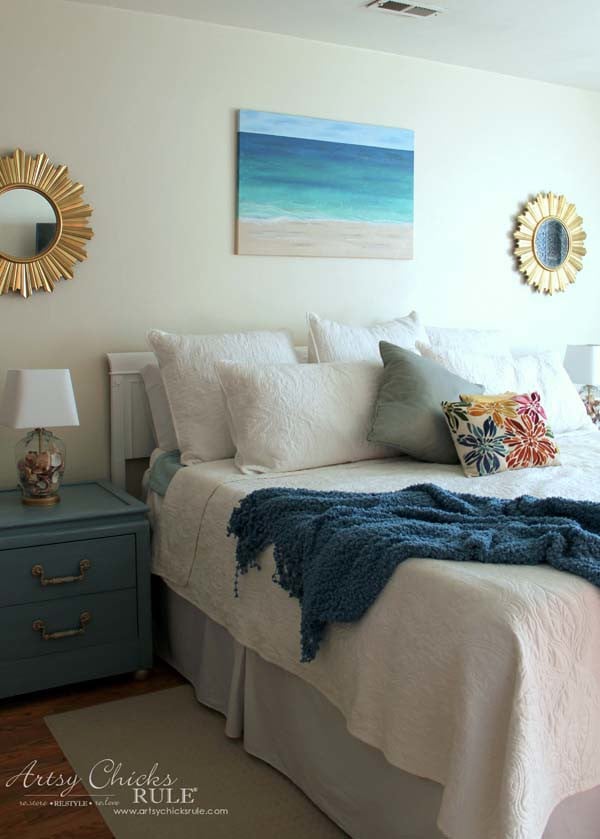
I’ll be sharing those nightstands soon. Yay!
And I’ve still got >>> two “love” signs to paint and hang on each side of the new DIY beach painting.
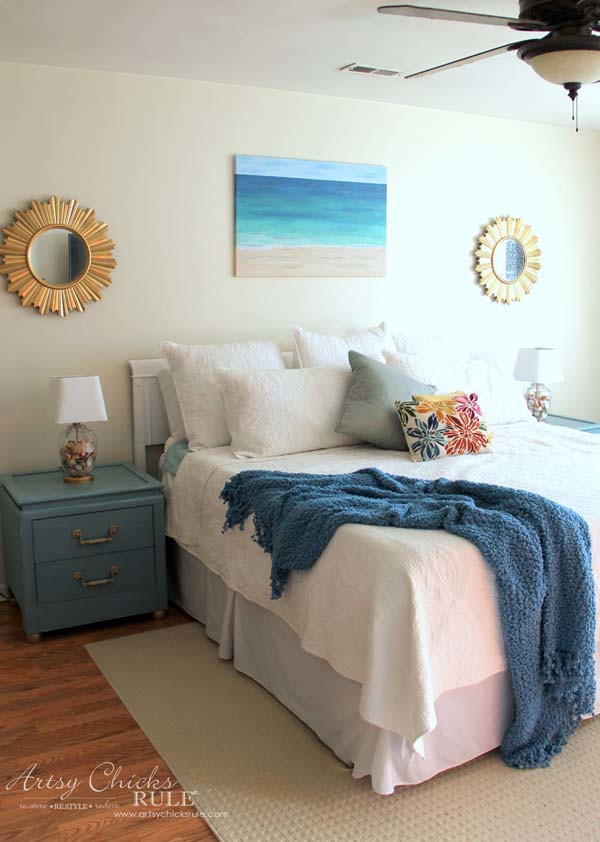
(Hey, y’all remember that rug? It used to live in my family room but we switched and moved it up here.)
I hate that ole orangey wood laminate floor. We put it in about 8-9 years ago and there weren’t many good options then.
I’d love to redo it but…the list is long so probably won’t!
I had considered painting it but that probably won’t happen either.
And y’all, tell me the truth, wouldn’t a gorgeous chandelier look just lovely in here?????
Separating my husband from that fan will be near impossible though.
And a new headboard. Sadly, this one is all but hidden.
I had considered modifying and raising it but decided against it.
Here is the bedding and rug info:
Edited to add that the links I had previously were no longer valid.
This set has obviously been discontinued so I found another set that is similar.
You can find it >>> here.
The rug is also no longer available.
Here is one that is very similar and also made in the USA (and I like it better actually! ;) ) >>> here.
The bed skirt is, well, what I have for now. The white is not a good white for the top.
It ended up looking more grayish. I’m not sure what I will do there yet.
Sometimes you just gotta let it go!!
So I let it go for now.
EDITED TO ADD: See what I added on each side of this DIY beach painting, here.
………………………………………………………………………………………………..
Okay, so to wrap up, add white to the paint to lighten as you go.
Add brown (or even black) to soften and create colors that are a bit more realistic.
Blending is your friend here. There really is no way to “mess up” totally.
It’s all easily fixed as I can surely attest!!
I love to draw (like these >>> pencil drawings of mine, etc) but other than painting furniture, I don’t paint!
So, this was a fun little trial for me.
I am pretty happy with how it turned out.
And YOU can do it too. I hope you will give it a go and create your very own DIY Beach Painting too.
You may just surprise yourself.
Alrighty, let’s see what my “Get Your DIY On” friends created with “texture and pattern” this month…..
Hi Nancy, hoping you are well, I didn’ know you are also an artist in painting on canvas …My Gosh¡¡, such a talented, from Renaissance woman..can do almost everything… ( or Super woman hahahaha), I admire you, really…. by the way , your master bedroom looks fantastic¡¡ fresh ang bright… I have to do something with mine …bufffff
big hug from Madrid
XOXO, Victoria
Hi Victoria! :)
Patiently waiting for Spring over here….and it feels like it’s almost here! Yay!
And thank you, so sweet you are!! haha I don’t know about all of that but I’m telling you, anyone can paint this.
All it is really, is blending colors. Kind of fun!!
I can’t wait to get the bedroom finished!!
xoxo
Nancy
Nancy, your painting is identical to that picture- amazing. I love that your brought in the texture as well. I am not much of a painter but you made it look easy! :)
Nancy, you are very talented. The painting is wonderful. I also love your bedding and yes I think you need a chandelier in your bedroom with a dimmer switch on the wall. We had one in our bedroom and I loved it. It was a small one I found at a Menards store and it was not much (on sale) and was beautiful. It had little shades on it. Tell Hubby you want to make your bedroom romantic and the fan just doesn’t do it. Good luck and I hope he changes his mind.
Love all your posts! Thanks for sharing with us :) I NEED a throw like the one on your bed and in another pic on the page. Can you share a source for those? Thank you!!
Hi Debbi!
Thank you!! :)
I think that one came from TJ Maxx. (most of the ones I have came from there) The white one, on the white chair in my family room is from IKEA though.
I’m a throw hoarder! ;) When I see one I love, I have to buy it!
Nancy
This is so beautiful Nancy! Among the cows and cornfields of Illinois, perhaps I could try this method for painting cow pies! Seriously. I’m weird enough to do that. :P
My Daughter loves the beach so I thought I would give a try as a gift for her birthday. I have one question, did you apply all the paint with the paint tools or did you use paint brushes?
Oh that will be so nice! And yes, I used brushes for the paint. I just realized I left that off of the materials list, sorry! I do have them pictured if you want to take a look though. (I’ll edit the post too)
Nancy
Nancy,
Enjoyed looking at your sight. The painting is lovely and so is your bedroom.
I paint and enjoy other peoples take on how it is done. I like the colors you
used and the way the molded canvas looked later. I have never used molding
paste and you have inspired me to try. I see it in the stores. You make it look
so easy. Thanks for the inspiration and painting.
Thanks,
Sybil
Hi Sybil,
(I love your name, my mom’s name was Sybil too :) )
Thank you so much for the nice words. I think the molding paste adds so much depth and texture (and interest) to the piece. Definitely take a look at it! It’s really easy to use, not easy to mess up!
xo
Nancy
Love the painting! I wanted to try something using modeling paste too! I’m not an artist, just beginning to paint with acrylics. I have an ocean scene I want to do, but I’m waiting until I get a little more experience under my belt. But you did a great job!
Hey!
What an absolutely stunning piece you created. I want to give this a go! I actually found your page on google images looking for a beach inspiration to paint and I think I’ve found the one. Do you reckon I could copy this but without the molding paste???
Hi, I saw a canvas painting of a seashore..and in the sand were small pebbles (actualy tiny pebbles) that seemed to be thrown onto the sand bar and looked so cool.. How do you
get that affect and get those tiny pebbles to stick to the canvas? I was fascinated and hope you can give me some hints on how to do this..I am thinking they used oyster shell and crushed them into tiny pieces.. Looked very pretty..I love that look.
I would think you could use any kind of glue that dries clear. I would finish the painting and let it dry (or use one you already have) and then apply the glue with a brush where you’d want the tiny pebbles or crushed oyster shells and then gently apply those. (pressing a bit to get them into the glue well) Once dry, the glue will not be noticeable and all you’ll see are the crushed shells. :)
Oh this is so wonderful to hear! I’m so glad my painting was an inspiration to you to do your own. :) And thank you for letting me know, too. Blessings! xoxo
I was supposed to be on a beach vacation this week but couldn’t go because of travel restrictions due to the novel coronavirus… so I painted the beach for my living room (that I’m in the process of redoing). Makes me happy to look at it and even though I’d rather be there in person, looking at a painting of the sea brings me peace.
I do have one question… how did you do the waves? I tried many times without success…
Oh, I am sorry you missed your beach vacation but happy you were able to create a painting of it for your home instead. Okay, and for the waves, for the bigger sections of waves, I sort of stippled the brush ends on that one section and then ran the skinny edge of the brush along the “water line” from that. (kind of wiggled it so it wasn’t a straight line) And ran other white fluid “water lines” in the water around that and dividing the water and sand at the edge of each. I’d say to just take a piece of cardboard or something you can practice that on and then once you feel confident with it, do it on your painting.
Thank you for posting this tutorial. I did a small picture first for practice then I tried on an actual panel on a wall in my spare bedroom. It turned out great!!!
I love the painting! It is so pretty and realistic! I love to paint, and this is amazing!! Great job, looks great! I love the texture as well! Makes the whole thing amazingly realistic. Amazing job!
Want to be inspired, learn new skills, discover all the tricks to furniture makeovers, creating new out of the old and more? You'll also receive my FREE ebook "Creating Fabulous Finishes" PLUS access to my private Printables Resource Library, too!
Sign up to get the Weekly Newsletter! Our emails include an unsubscribe link and you may opt-out at any time. Your information will *never* be shared or sold to a 3rd party.


")
")
")

")


")
")

Hi Nancy, hoping you are well, I didn’ know you are also an artist in painting on canvas …My Gosh¡¡, such a talented, from Renaissance woman..can do almost everything… ( or Super woman hahahaha), I admire you, really…. by the way , your master bedroom looks fantastic¡¡ fresh ang bright… I have to do something with mine …bufffff
big hug from Madrid
XOXO, Victoria
Hi Victoria! :)
Patiently waiting for Spring over here….and it feels like it’s almost here! Yay!
And thank you, so sweet you are!! haha I don’t know about all of that but I’m telling you, anyone can paint this.
All it is really, is blending colors. Kind of fun!!
I can’t wait to get the bedroom finished!!
xoxo
Nancy
hey girl this painting looks so good! Great job! And your bedroom is so pretty!
Hey Shawnna!!
Thank you!!! Have a great Thursday! :) (and weekend!!)
xo
Nancy
Hi Nancy, you are a women of many talents.:)) Great job on the painting it goes so nicely in your bedroom!
Hi Sandra :)
Aw, thank you! I’ll be so thrilled once the bedroom is finally done!!
xo
Nancy
Nancy, your painting is identical to that picture- amazing. I love that your brought in the texture as well. I am not much of a painter but you made it look easy! :)
Thanks sweet Mandy!! :)
xo
Nancy
Gorgeous!!!! I love this so much and now I want one too!!
Aw thanks Christy! :) You can paint one!!! Do it!
xo
Nancy
Oh my gosh Nancy!!!! Wow – I’m totally going to try that! Such a nice job – beautiful!
Thank you, thank you Jayne! :) Yes, do try it out!!!
xo
Nancy
Hi Nancy, this is amazing! I love it, and I’ll try it as soon as I can. Thank you for sharing!
You are so welcome and thank you very much! :)
Nancy
Nancy, you are very talented. The painting is wonderful. I also love your bedding and yes I think you need a chandelier in your bedroom with a dimmer switch on the wall. We had one in our bedroom and I loved it. It was a small one I found at a Menards store and it was not much (on sale) and was beautiful. It had little shades on it. Tell Hubby you want to make your bedroom romantic and the fan just doesn’t do it. Good luck and I hope he changes his mind.
Thank you Mary! Yay, see I really need the chandelier. I’m going to show this to my husband! … and tell him that everyone agrees with me. ;)
xo
Nancy
Your artistic talents impressed the heck out of me Nancy – beautiful!
Aw thank you Marie!!! As do yours, me!! :)
xo
Nancy
Beautiful, Nancy! I love it! Oh, how I envy you your talent. Because, NO, my attempt would not even resemble a beach scene!! :) xo
Thank you Karen :)
it was fun to do and you can do it too! Really! xo
Nancy
Love all your posts! Thanks for sharing with us :) I NEED a throw like the one on your bed and in another pic on the page. Can you share a source for those? Thank you!!
Debbi
Hi Debbi!
Thank you!! :)
I think that one came from TJ Maxx. (most of the ones I have came from there) The white one, on the white chair in my family room is from IKEA though.
I’m a throw hoarder! ;) When I see one I love, I have to buy it!
Nancy
This is so beautiful Nancy! Among the cows and cornfields of Illinois, perhaps I could try this method for painting cow pies! Seriously. I’m weird enough to do that. :P
-andi
Andi!! Long time no see!! :)
And yes, you would, I know!!! Love that about you too!!! ;)
xoxo
Nancy
Brilliant piece of art. What is the size of Canvas. Could you please post the link for canvas. The link opens up colors :)
Hi, I’m so sorry!
Not sure how I did that. :)
Anyway, I have fixed the link for you in the post!
Nancy
My Daughter loves the beach so I thought I would give a try as a gift for her birthday. I have one question, did you apply all the paint with the paint tools or did you use paint brushes?
Hi Sharon,
Oh that will be so nice! And yes, I used brushes for the paint. I just realized I left that off of the materials list, sorry! I do have them pictured if you want to take a look though. (I’ll edit the post too)
Nancy
Nancy,
Enjoyed looking at your sight. The painting is lovely and so is your bedroom.
I paint and enjoy other peoples take on how it is done. I like the colors you
used and the way the molded canvas looked later. I have never used molding
paste and you have inspired me to try. I see it in the stores. You make it look
so easy. Thanks for the inspiration and painting.
Thanks,
Sybil
Hi Sybil,
(I love your name, my mom’s name was Sybil too :) )
Thank you so much for the nice words. I think the molding paste adds so much depth and texture (and interest) to the piece. Definitely take a look at it! It’s really easy to use, not easy to mess up!
xo
Nancy
Love the painting! I wanted to try something using modeling paste too! I’m not an artist, just beginning to paint with acrylics. I have an ocean scene I want to do, but I’m waiting until I get a little more experience under my belt. But you did a great job!
Thanks! :) OH yes, it was fun! I really want to try another. I’m playing with watercolors now! So much to learn and do, so little time!! ;)
Hey!
What an absolutely stunning piece you created. I want to give this a go! I actually found your page on google images looking for a beach inspiration to paint and I think I’ve found the one. Do you reckon I could copy this but without the molding paste???
Thanks so much! :) You can absolutely do this without the paste. The paste just gives it some dimension. :)
Hi, I saw a canvas painting of a seashore..and in the sand were small pebbles (actualy tiny pebbles) that seemed to be thrown onto the sand bar and looked so cool.. How do you
get that affect and get those tiny pebbles to stick to the canvas? I was fascinated and hope you can give me some hints on how to do this..I am thinking they used oyster shell and crushed them into tiny pieces.. Looked very pretty..I love that look.
Hi Marilyn,
I would think you could use any kind of glue that dries clear. I would finish the painting and let it dry (or use one you already have) and then apply the glue with a brush where you’d want the tiny pebbles or crushed oyster shells and then gently apply those. (pressing a bit to get them into the glue well) Once dry, the glue will not be noticeable and all you’ll see are the crushed shells. :)
I LOVE your painting! I’m going to try doing this, too- wish me luck! ?
Thanks Rose!! Good luck, you got this! :) xo
Thank you for the inspiration. I wouldn’t have done it without seeing your project and having the instructions and materials list was helpful.
Oh this is so wonderful to hear! I’m so glad my painting was an inspiration to you to do your own. :) And thank you for letting me know, too. Blessings! xoxo
Thank you so much for sharing your technique, i followed it and painted my very first little beach scene of my own. i think it turned out great,
You are very welcome, Kristal! I am so happy it was helpful to you! xo
I was supposed to be on a beach vacation this week but couldn’t go because of travel restrictions due to the novel coronavirus… so I painted the beach for my living room (that I’m in the process of redoing). Makes me happy to look at it and even though I’d rather be there in person, looking at a painting of the sea brings me peace.
I do have one question… how did you do the waves? I tried many times without success…
Thank you!!
kierstin
Oh, I am sorry you missed your beach vacation but happy you were able to create a painting of it for your home instead. Okay, and for the waves, for the bigger sections of waves, I sort of stippled the brush ends on that one section and then ran the skinny edge of the brush along the “water line” from that. (kind of wiggled it so it wasn’t a straight line) And ran other white fluid “water lines” in the water around that and dividing the water and sand at the edge of each. I’d say to just take a piece of cardboard or something you can practice that on and then once you feel confident with it, do it on your painting.
Thank you!!
I love this and want to try it. It’s been 4 years now, how is it holding up? Has the paint cracked off?
Hi Ana, it’s holding up great. No cracking at all. :)
Thank you for posting this tutorial. I did a small picture first for practice then I tried on an actual panel on a wall in my spare bedroom. It turned out great!!!
You are very welcome, Cara! I’m so happy it worked well for you!! :) xo
I love the painting! It is so pretty and realistic! I love to paint, and this is amazing!! Great job, looks great! I love the texture as well! Makes the whole thing amazingly realistic. Amazing job!
Thank you, Leah! I appreciate that so much! xoxo