China Cabinet and Dining Table Re-New
I posted about my Dining Room re-do last week and thought I’d write a few posts about the furniture in that room. I’ll start with the actual Dining Room Set, since it is the main center of attention.
If you want to see a before and after of the actual room you can see it here. (and updated to add how the room looks now, here)


Some fun facts about the set……
We bought it in 1997. The seats have been recovered once. And it has been in 5 dining rooms. (yes we moved a lot….but we have been settled for over 8 years now, Yippee! No really, YIPPEE!, I hate moving.)
It was old, outdated and not what I really wanted anymore. I had been contemplating buying a new set for the last few years. My set only had 4 chairs, several of which had missing or broken parts. (arms, supports, etc) And I just wanted something different. And at least 6 chairs……..
I looked for awhile, off and on, but could not find what I was after. And if I came close, the price was more then I was willing to spend. And truthfully, I didn’t want to spend anywhere near what a new set would cost. That just goes against everything in me.
So I decided to refinish the one I had instead. But that didn’t fix the chair problem. And I had not come across 6 chairs on any of my thrift or garage sale runs.
Until, I came across these one day…..
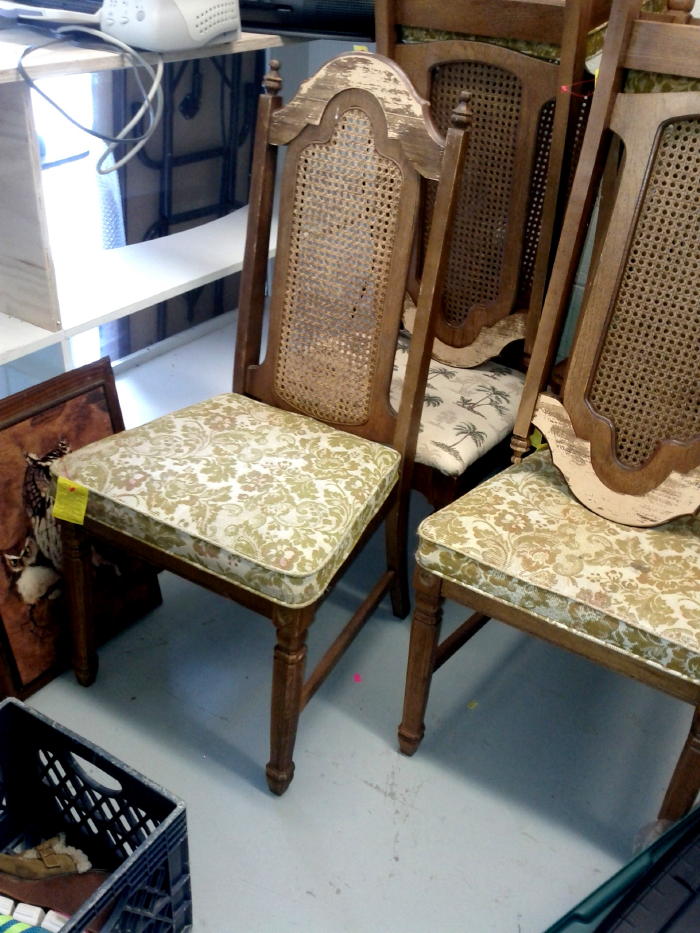
Pretty huh?? Not. And not exactly what I had in mind. But there were 6 chairs for a grand total of 35.00.
I know, they are ultra ugly. Intense vision needed here.
I did a bit of sanding to remove any flaking pieces. And had the little decorative knob thingys cut off the tops of the chairs. I didn’t want those so hubby made ’em go away.
Thanks dear hubby!!
Cause not only do I not sew (that’s another post) but I do not touch the saw!
No sew and no saw! Nope.
You can see below someone started to re-do these already. One chair was as far as they got.
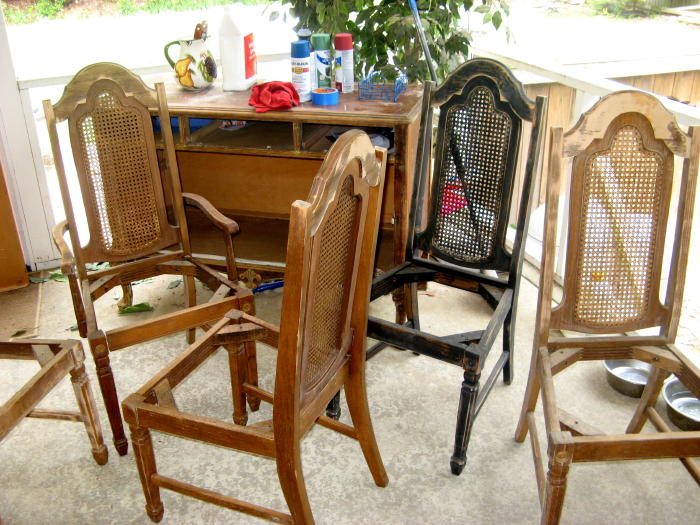
and after a little ASCP in Old White with a bit of dark wax…..(and a bunch of primer spray on that one chair to cover the black that kept bleeding through. Ugh!)
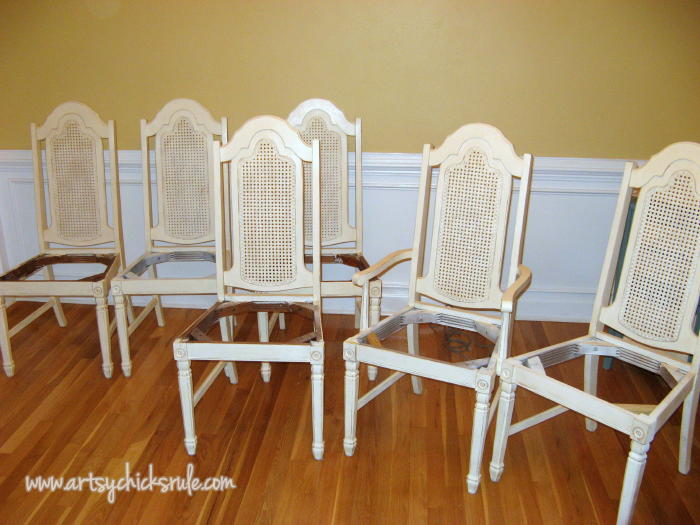
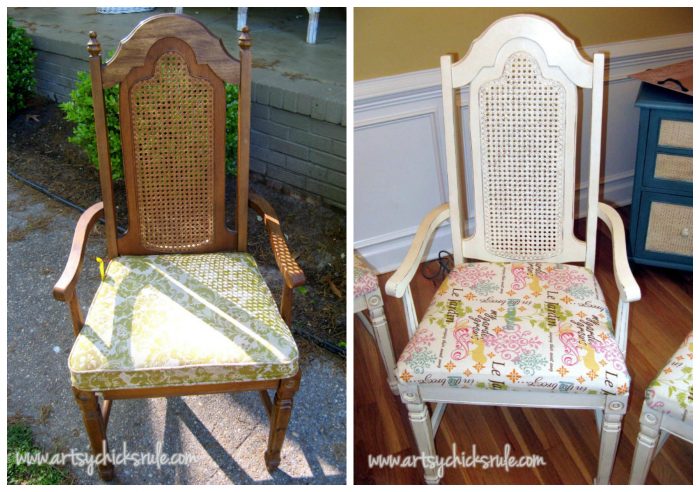
I recovered (and re-cushioned) the chairs with a really cute, colorful fabric I found.
Amazing what a little paint and fabric can do, no?
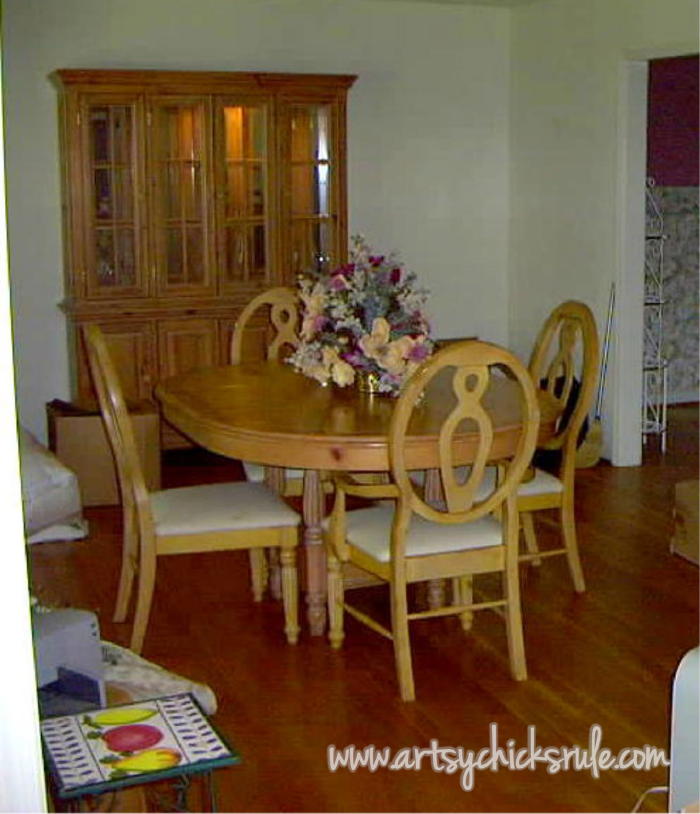
Next, the table and china cabinet. They were wormwood and full of holes. I didn’t want holes so I filled them and went to work. They were everywhere….as you can see.
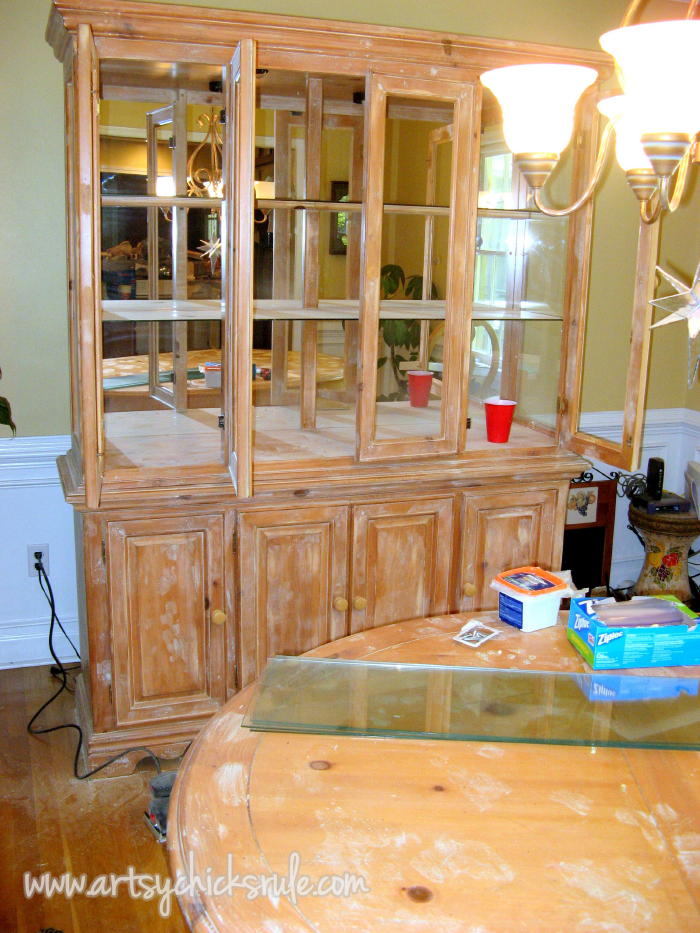
Please disregard the sander laying directly on the wood floor. I would not normally do that but that was next up on our list. Refinishing those wood floors.
You can see the newly refinished floors in the “after/finished” pictures.
That little “adventure” will be another post. ;)
So I removed the glass (of which I later broke 3….I put them in the corner of another room where they would be “safe”….and they were, until I stepped on the corner of them)
Five moves, no breakage, and I manage to do it while remodeling. Hmmm, only me.
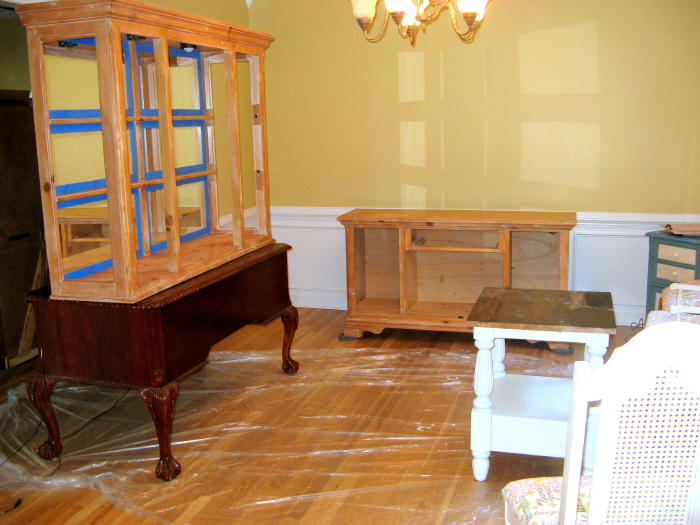
Do you like my work “bench”. The desk? We improvise when needed around here!!
It was later painted too so no worries.
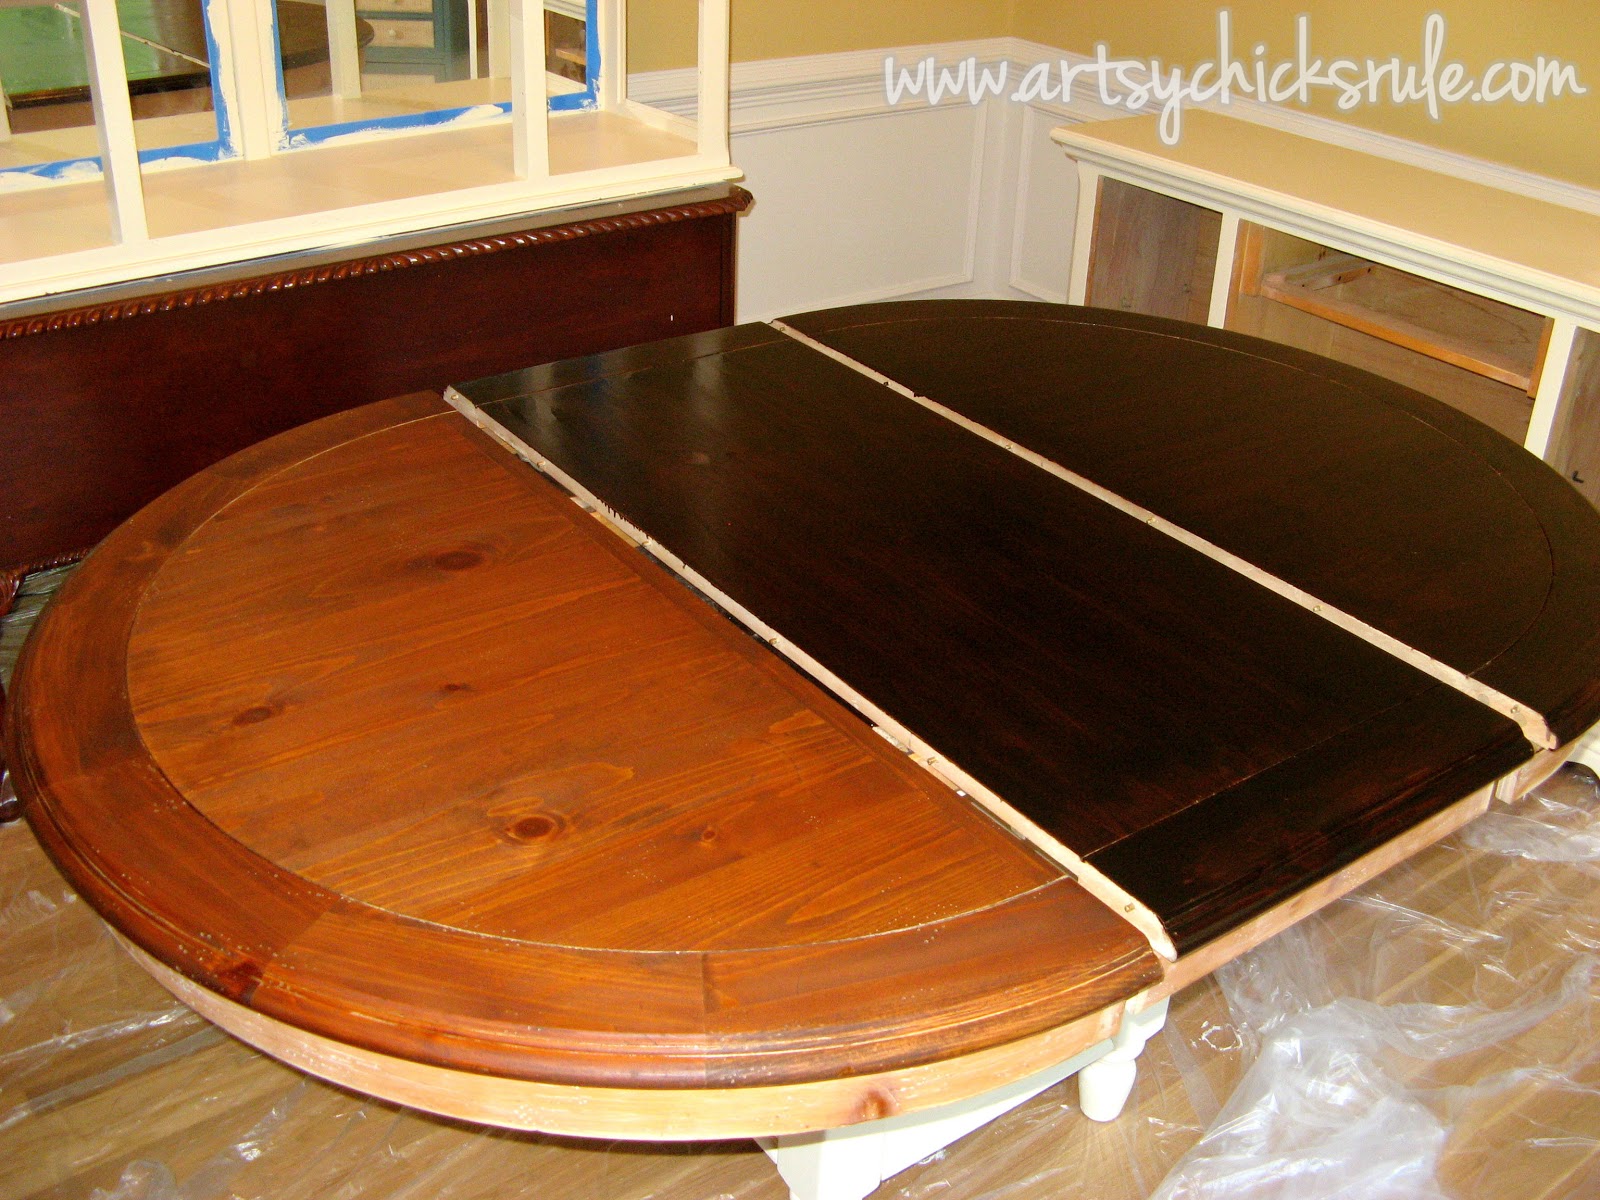
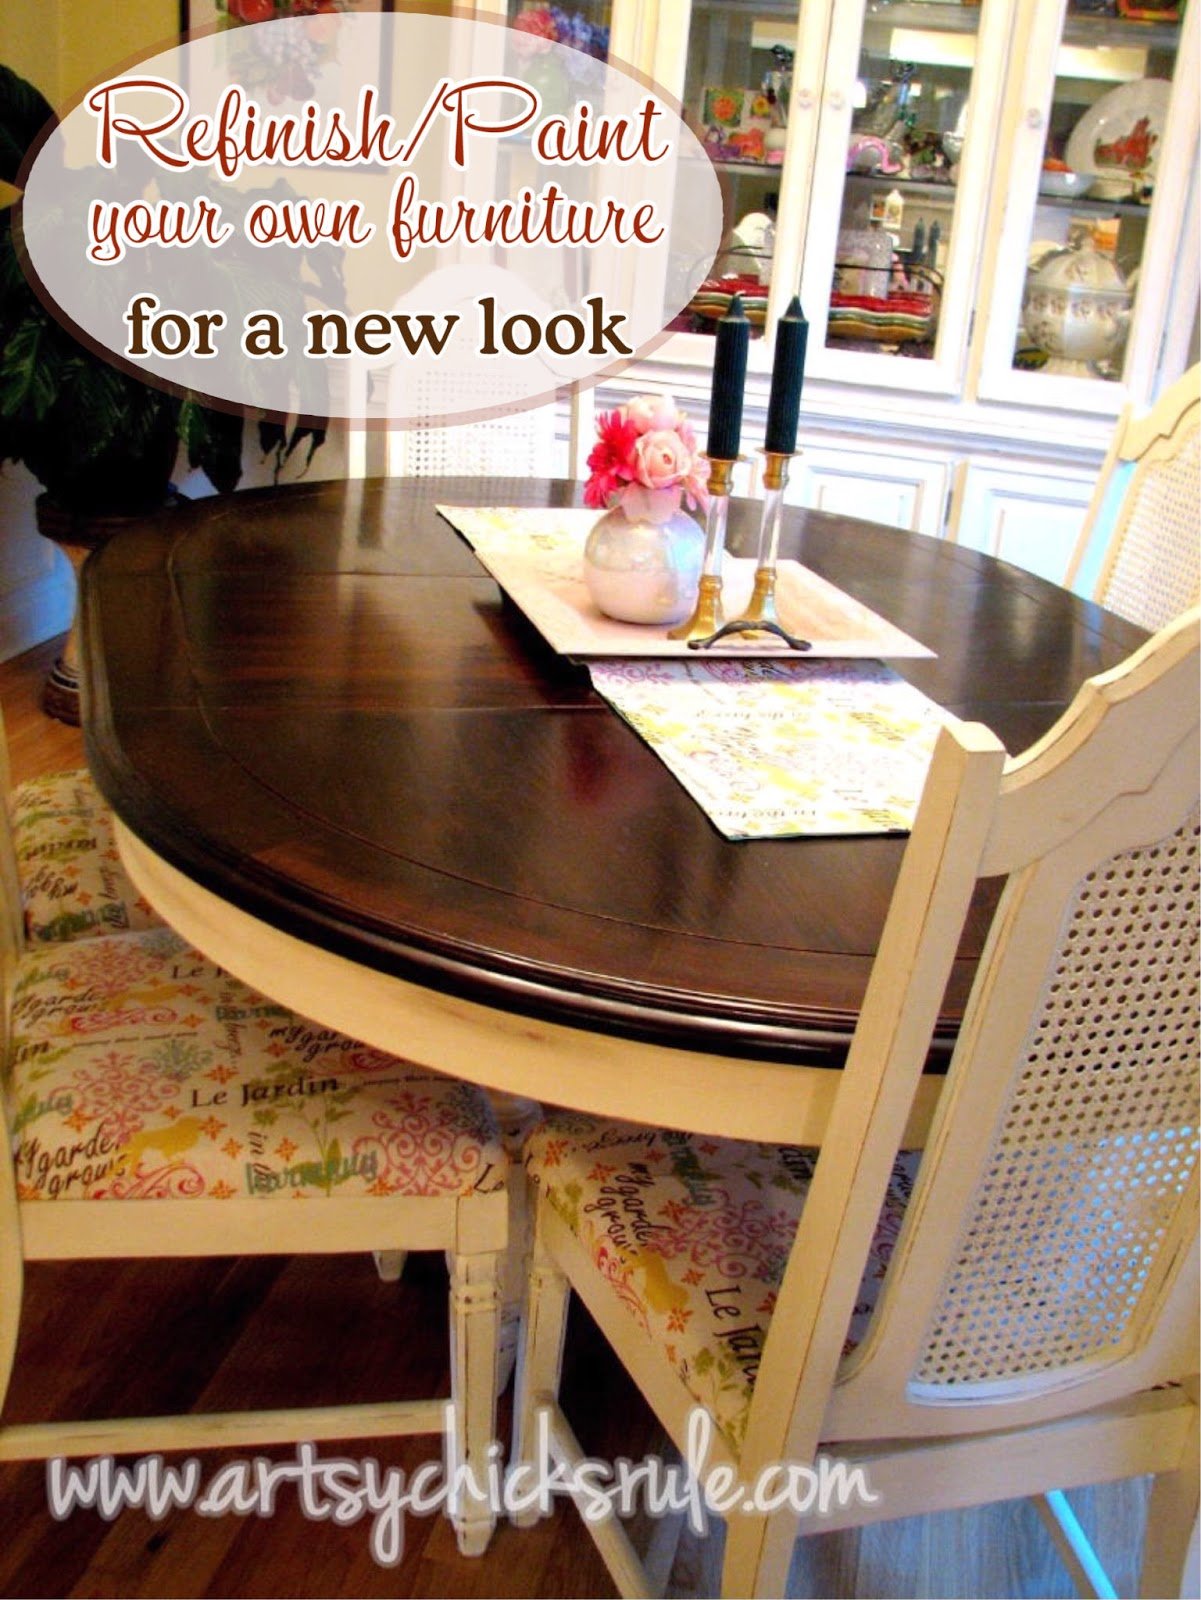
I sanded the top down to the bare wood….so nice and smooth…

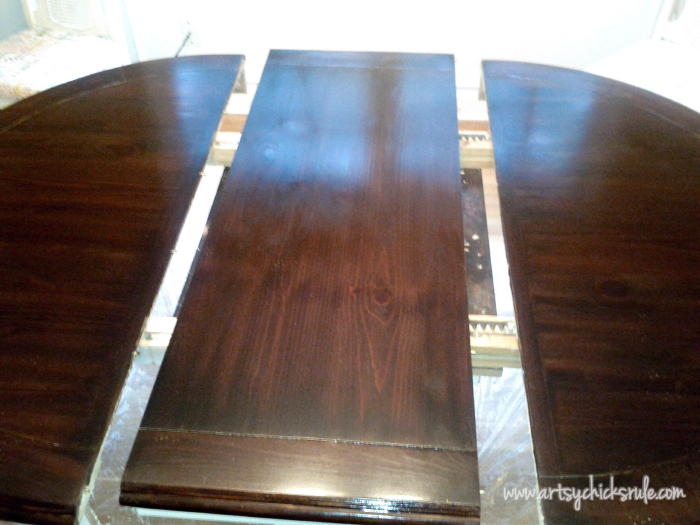
I applied Minwax Pre-Stain Wood Conditionerbefore applying any stain to help keep the stain more even. Then applied Minwax stain in English Chestnut first (on the left)…. and followed with Minwax Walnut over that. I finished up with about 4 coats of Minwax Satin Polyurethane.
I lightly sanded in between the coats for a super smooth finish.
Be sure to wipe away all of the dust before applying the poly!
*and a tip for the poly, move slowly when applying as to not produce tiny bubbles in the finish.
The finish came out so even, beautiful and rich. I am so very happy with it!
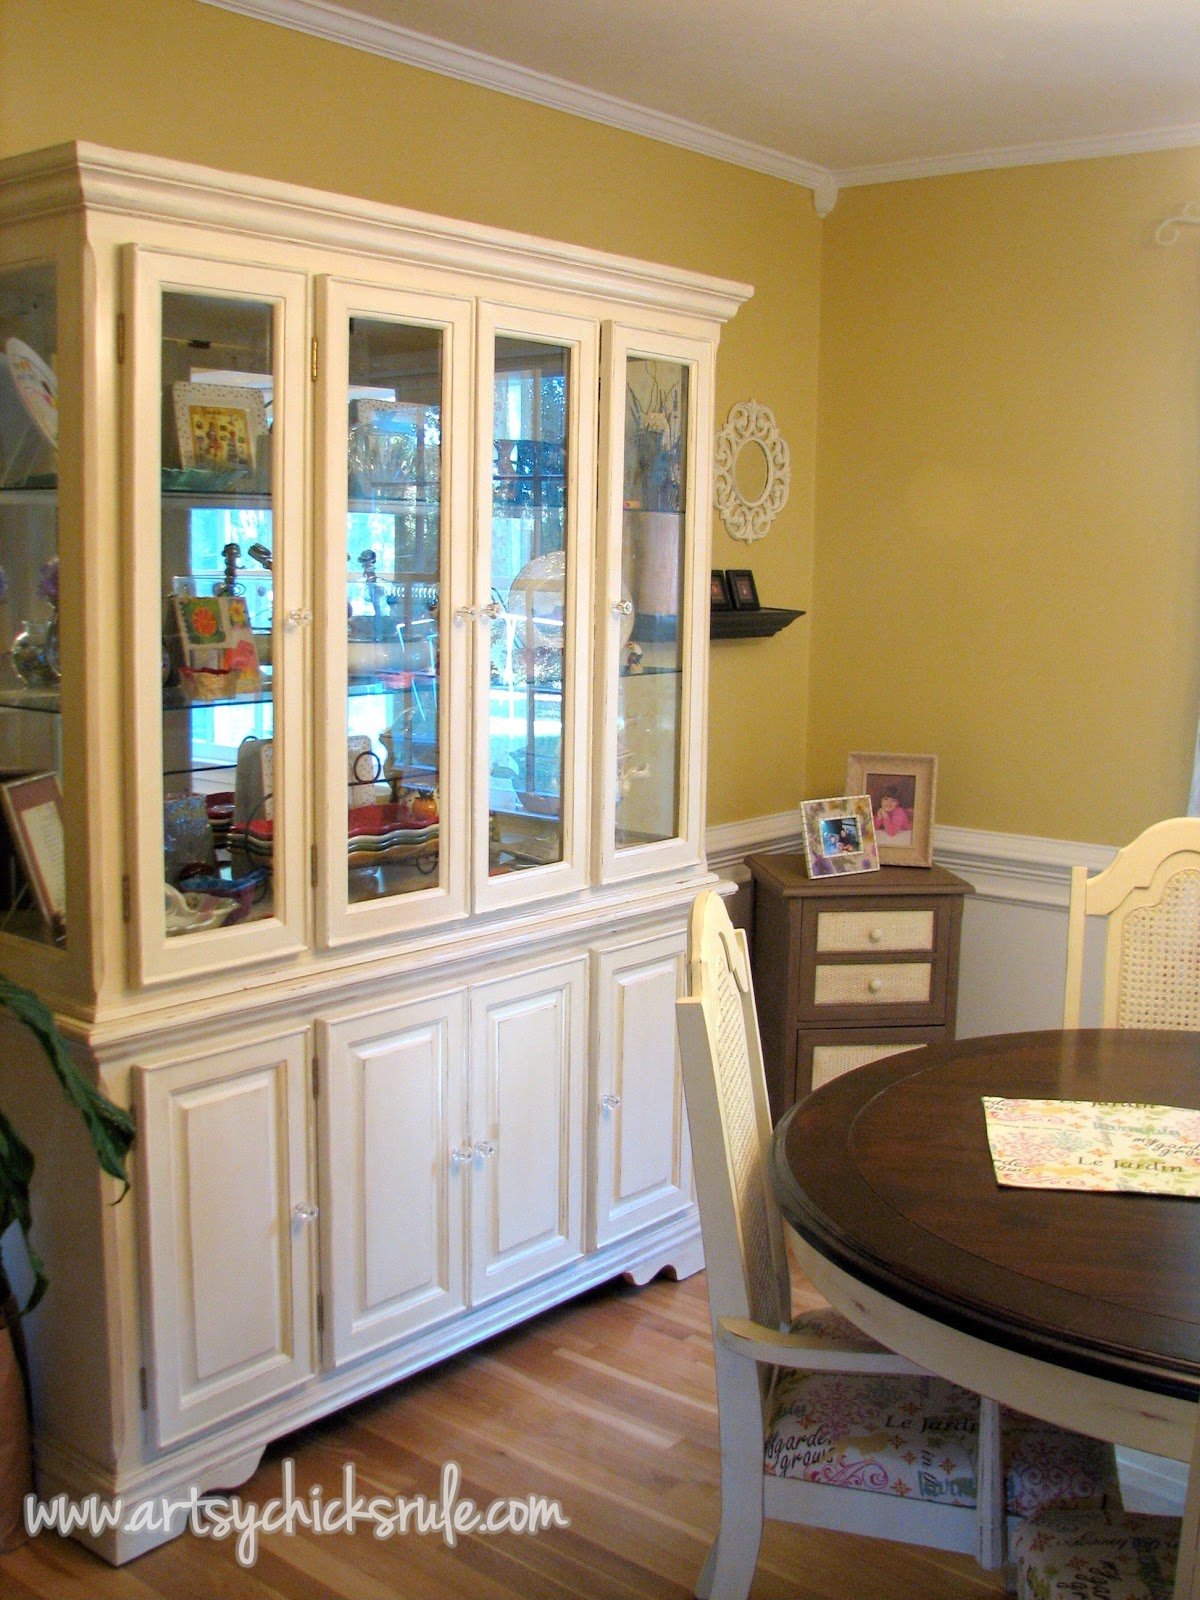
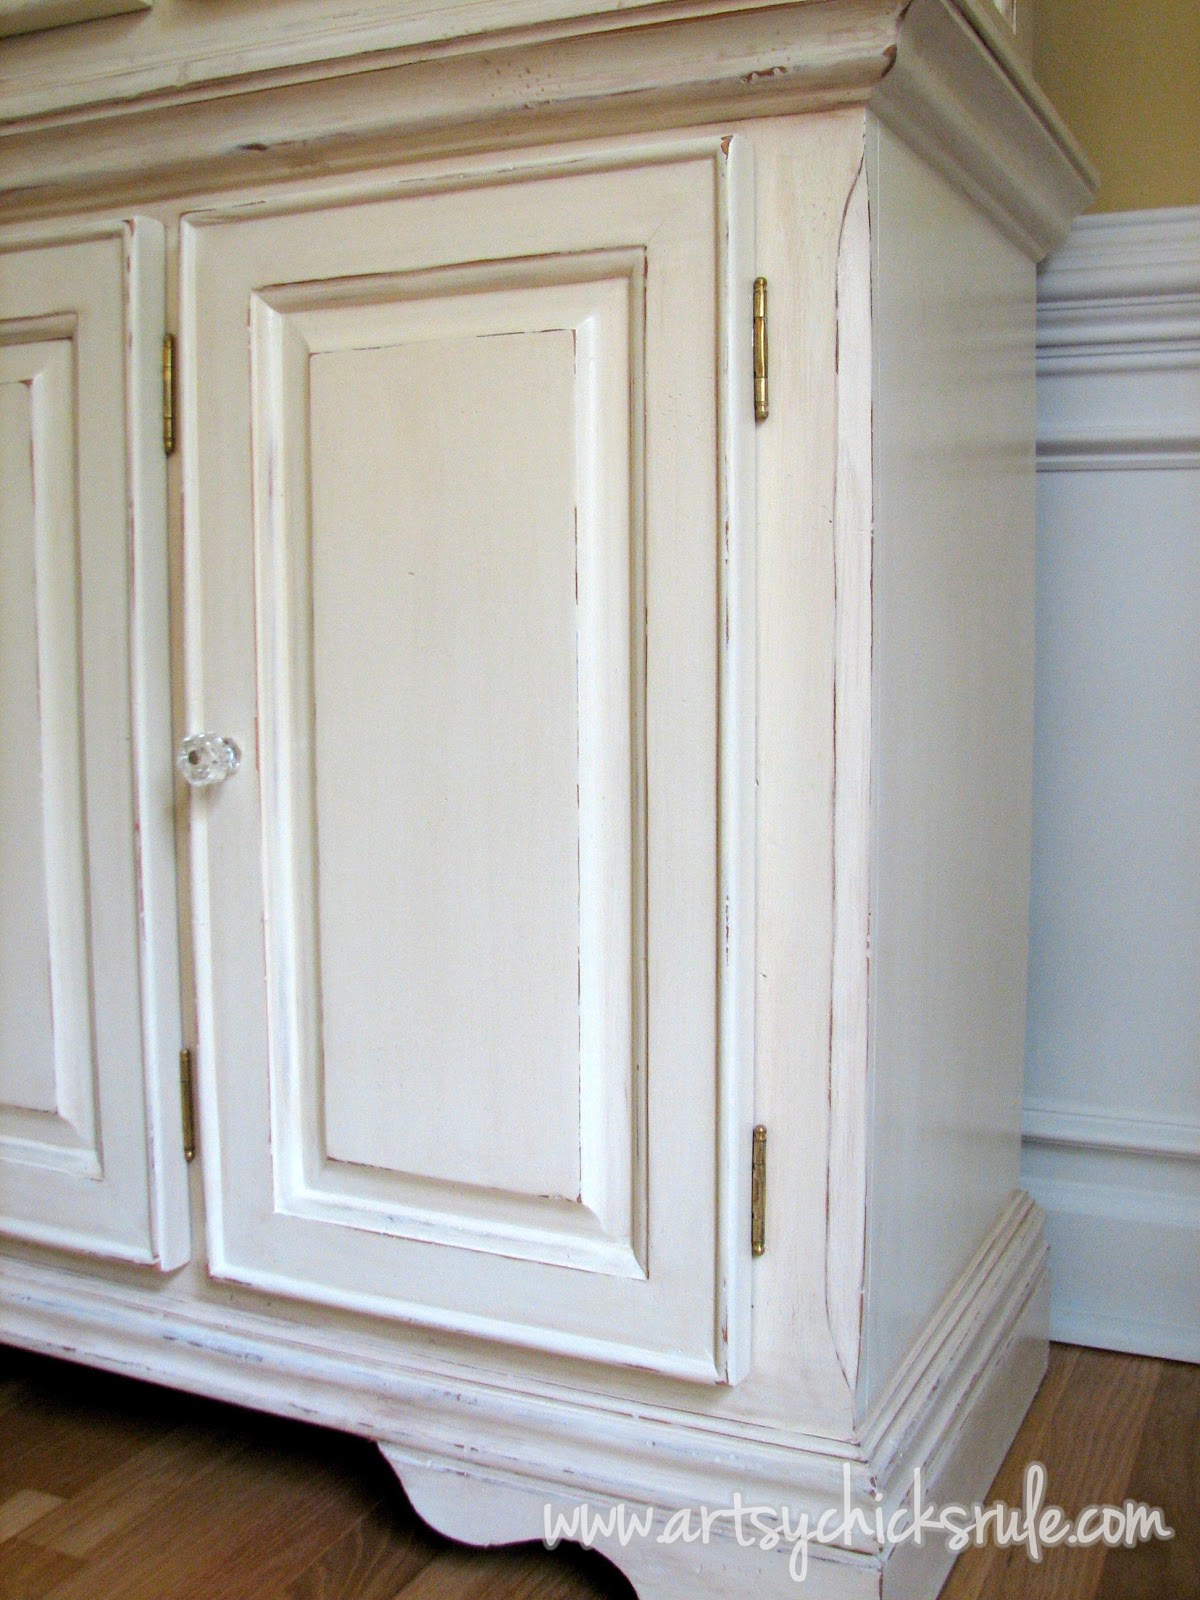
For the cabinet and table base, I used Sherwin Williams paint and primer. One of my other favorite brands! I put a coat of Adhesion Primer on first then put a coat of paint on.The color started out as “Creamy” (color name) but I blended in a little acrylic brown & yellow paint to warm it up a bit.
I distressed the paint with some sandpaper and then mixed a bit of Burnt Umber acrylic paint with water to use as a glaze. I used an old t-shirt scrap to apply the glaze. Wiping on and off where needed.
After the glaze dried I applied one coat of Minwax Satin Polycrylic.
I finished off the china cabinet with new glass knobs…….and 3 brand new glass inserts courtesy of the glass store.

Again, the before in what is now my study….
(directly after moving into our current home, boxes, white walls, pink floral dining wallpaper and all)
And now…..
Looks like a completely different set!
And the best part is it was done “on a dime”!
Instead of spending thousands for a new set, I spent less then a 150.00.
Including the replacement glass.
And it feels like a brand new set.
I just LOVE that!
Do you have a piece of furniture you decided to refinish or paint instead of buy new?


")
")
")


I love it all! What a great price! :)
Thank you ! Yes, it love that…brand new look, little $ spent!
:)
Nancy
How long did this process take you? I want to do my dining set too. Do you have to wait a day in between each coat? Time has been my enemy in this type of projects… I don’t know how to keep the kids and the dog away from something, if it’s in the middle of a common area for a week :(
Forgot to say – your table and cabinet look gorgeous! :)
Thanks so much! I’m actually thinking of having my husband build me a farmhouse style table that I’ve designed/drawn up. I’ll still stain it dark on the top and paint the base so it will look somewhat similar but be more rustic/casual (and rectangle)! I’m always up to something around here!! ;)
Nancy
Hi Melissa,
The process is a few days, at least. You do want to make sure it cures well before “really” using it after it is complete. I did this a couple years ago but typically, I usually wait about 24 hours in between coats. You may be able to do coats in less time with good results though.
Hope that helps!
Nancy
I love it, Nancy! You know I’m still getting the courage up to paint my dining set. I’m getting there…lol
Thanks Denyse. Oh you can do it!! ;) But I know how you feel…I’ve been that way on a few pieces.
Wow what a difference this came out gorgeous I especially love that china cabinet, great job Nancy!!
Thanks so much Dria! It really is like a new set. :)
Did you re-cushion the chairs yourself as well? If so, please share the process. :)
Hi Dilly,
Yes, I did re cushion them myself. It’s actually pretty easy to do! I don’t have a detailed tutorial on that, on my blog, but if you do a search you can find many on Google. Basically you buy the foam and cut it to shape/size and then attach to the chair. (if the old foam is in good shape you can skip this step) Then wrap the new material over and around, and using a staple gun, staple to the underneath board. Then re attach to the chair frame. :)
Nancy
Looks entirely different, great job! I love those chairs!
Thank you Jennifer! Yes, it does, very! I have really enjoyed it since I did it. Like having a completely new set. :)
Have a great day!
Nancy
I have a 18 year old dining room set with exactly the same issues. Just recently I want a more “clean and Light” color to our dining area. I am fairly sick of all of the oak in our home! This make-over is a great inspiration and your designs are wonderful. thanks for shring. I better get busy and have everything ready to tear apart for when the weather gets warmer. Thanks again Nancy
Hi Karen,
I know exactly how you feel! And let me tell you, it’s amazing how different your entire home can look and feel! I am so happy to hear my projects inspired you…thanks so much for letting me know! Good luck with yours!!! I know you will love it…and the wonderful feeling of accomplishment that comes along with it!
xo
Nancy
Looks really great, good job!
Thanks so much Jennifer!
Nancy
I LOVE your kitchen table re-do! This is exactly the look I want for a kitchen table that I recently bought really cheap. I love the table so much but the top is not real wood, it is a laminator particle board top (cannot remember exactly what it’s called), but I’m going to try for the same look that you got! I hope it works!!!
Thanks Kristin! :)
Good luck with you table!! :)
Nancy
I just found your website, AMAZING!! I want to redo my dining room table and chairs and I just love that blue you used on a couple cabinets you posted. Aubusson blue chalk paint. I’ve never refurnished furniture before and am unsure of where to start and finish!! How would I go about painting my dining room table top and chair seats the blue color and the legs of table and chairs a stain color?! Thank you :)
Hi Candice!
Aw thanks so much! :) So you are wanting to paint the top Aubusson Blue and stain the legs? Clean the top well (and you can very lightly sand if the top is “slick”) then paint with the Chalk Paint and finish with either wax or a poly product. I’ve done both. You can see a few in my DIY Tutorials and Before & After tabs. :) Also, on the legs, you can sand down to the wood and restain/poly or depending on the look you are after, you can try a product my Minwax, called PolyShades (I have a few posts on that too). You can’t really go lighter with that product, just darker.
Anyway, take a look around and see if that is of some help. :)
Nancy
What kind of saw did your hubby use to remove those decorative knobs? We have a hand-me-down dining set that we can’t get rid of for now which I’m looking to spruce up…and the knobs on the chair tops are driving me mad!
Hi Stephanie,
He used a jigsaw to cut those off. (and I’m totally with ya on that!! ;) )
Nancy
Love love love it!!!! I want to redo a cabinet as well! Finding lots of inspiration and ideas in your website. What exactly does the burnt amber acrylic paint do? Is it a glaze only for the distressed parts or for the entire piece? If I’m doing robin egg blue for my cabinet, would burnt amber be a good color to use as a glaze? You can tell I’m pretty new to this. I’ve never done anything like this before. Thanks!!!!
Hey Lourdes!
Thank you! :)
Oh yay, I’m so glad!
The burnt umber just served as a sort of glaze to add some depth. There are many ways to do that. I used it on the entire piece but wiped it away as I applied to it would only be in certain spots. Yes, burnt umber or any brownish glaze would look nice over that color of blue.
Have fun, it’s only paint! ;)
xo
Nancy