Coastal Inspired DIY Tile Backsplash Tutorial (anyone can do!)
Installing your own tile is simple with the right tools. Let me show you how to create your very own beautiful DIY tile backsplash in a day!
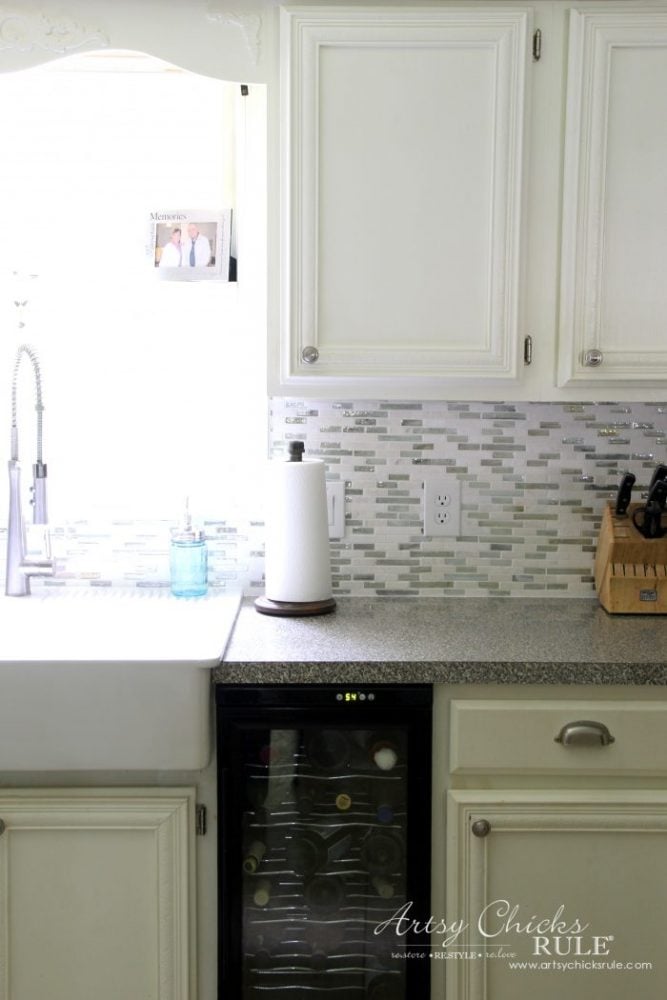
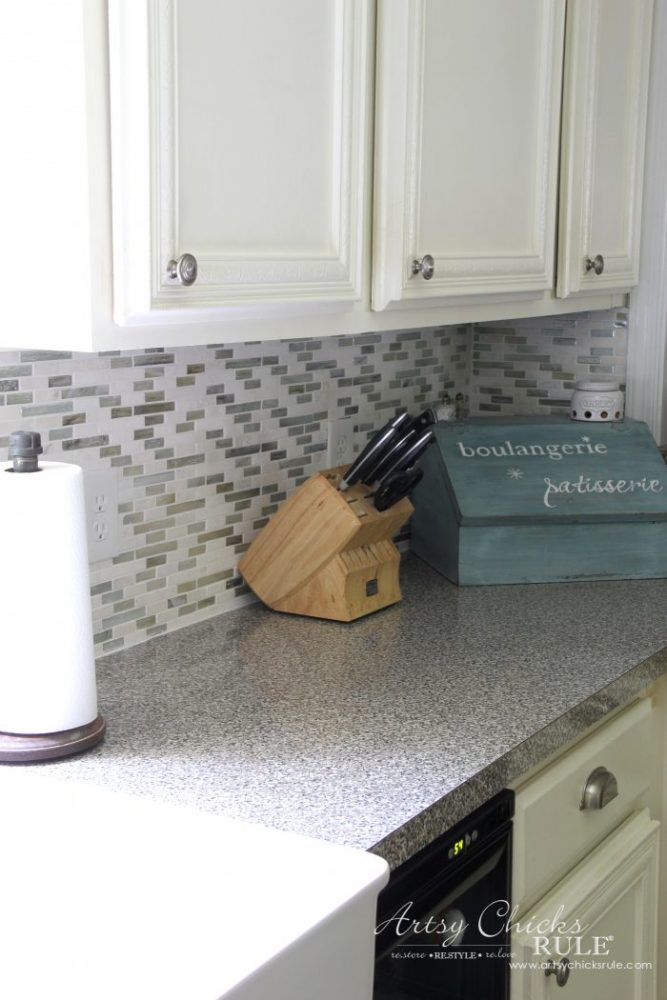
Hello Friends, today I’m sharing my newly installed, coastal-inspired, DIY Tile Backsplash.
You might remember I installed a DIY tile backsplash some years ago and shared it here on the blog about it.
You can read all about it and see it, here, “Kitchen Tile Backsplash“.
I decided to go a different route with applications and products this time.
Okay, are you ready to read all about the new tile?
I’ve since painted the area above the cabinets.
No longer is it dark brown, but instead, a light, soft blue. I’m loving it!
Sea Salt by Sherwin Williams, to be exact. I’ll be sharing that soon.
It’s the same color I used in our Guest Bath and Family Room.
It’s so bright and airy feeling in here now.
I can’t get over how much brighter it is. Plus, the new lighter paint above really helps too.
I had talked about and shared a different tile but ended up deciding on this one.
I found it online at several places, including The Home Depot.
Sadly my HD didn’t carry it so we had to get it from the Richmond, VA store.
My husband happened to be up in Richmond on business that next day so I bought it online and he picked it up for me.
Worked out perfectly….but…. it didn’t look quite as “blue” as it did in the photos I saw online, in person.
Even so, I loved it and decided to go with it anyway and I’m SO glad I did.
You can find it at The Home Depot, here.
And just as a refresher, here is the tile I had in here before…
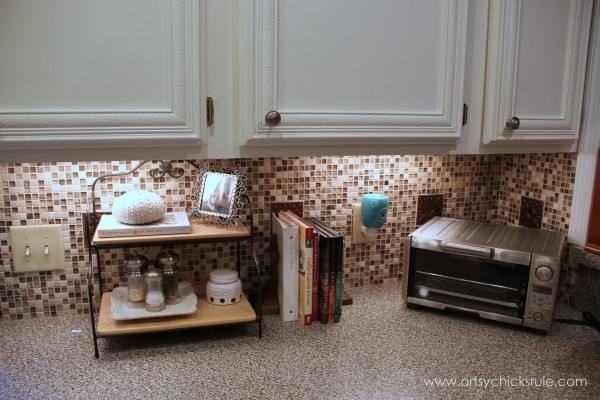
See?
I really loved that old tile but it just didn’t match my decor anymore.
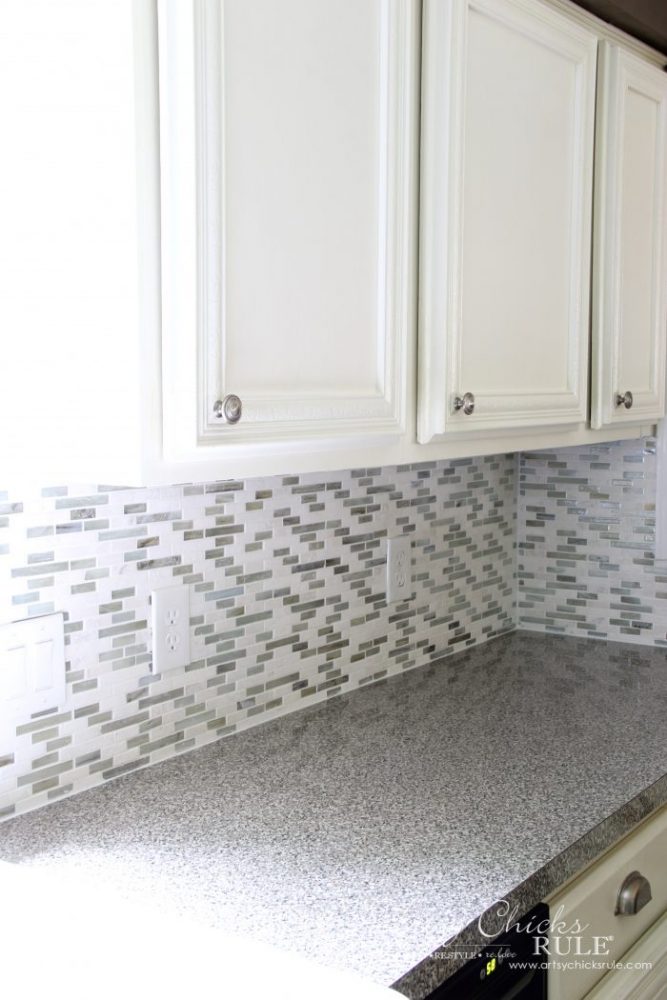
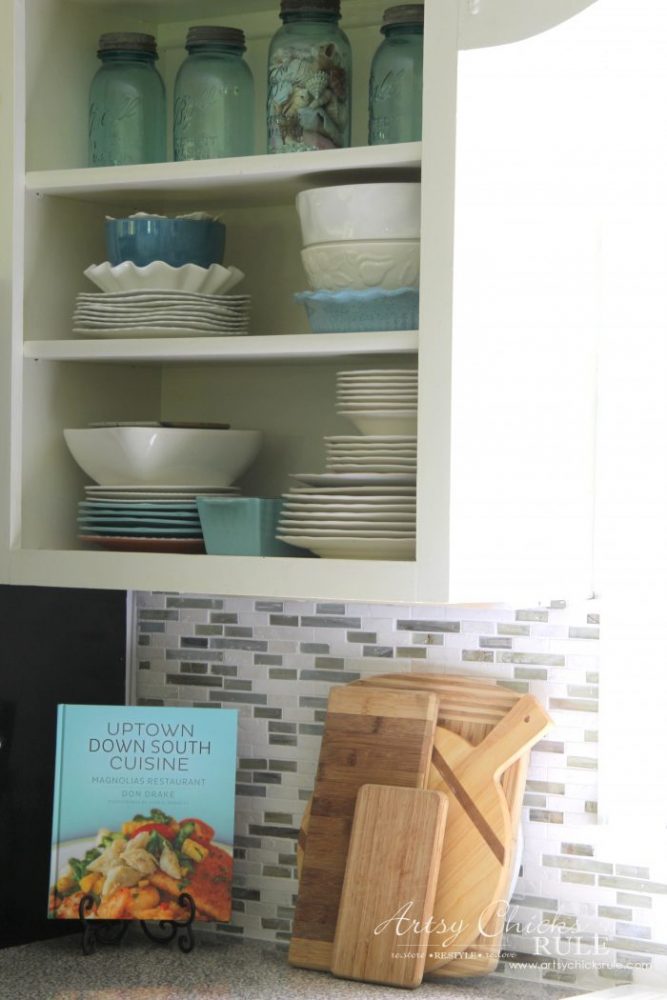
The new tile matches so wonderfully.
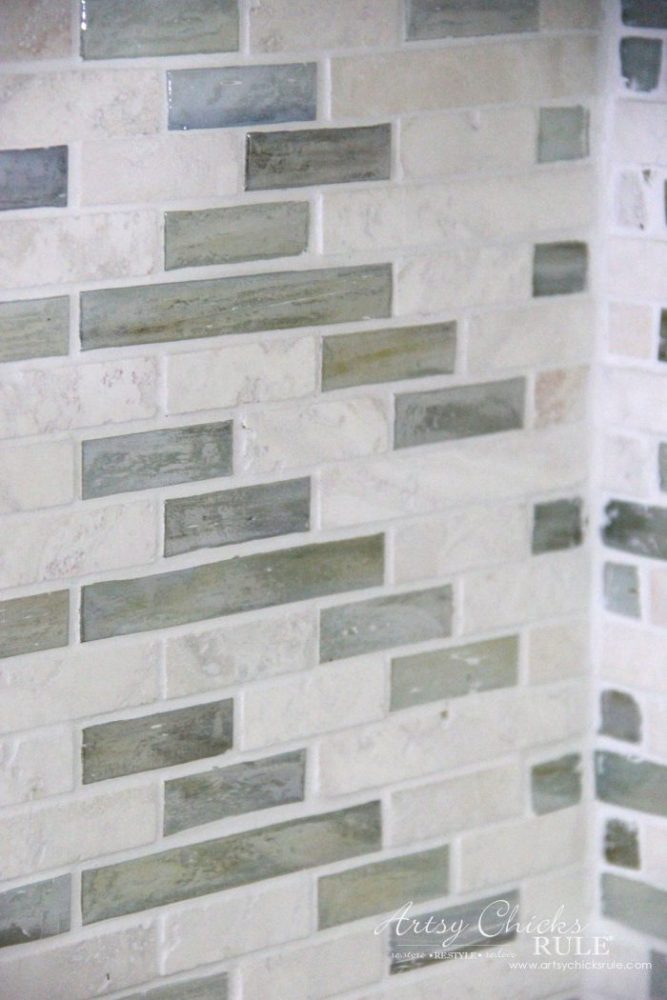
I love how the glass mimics “sea glass” and the travertine reminds me of “seashells”.
Perfect for my coastal home.
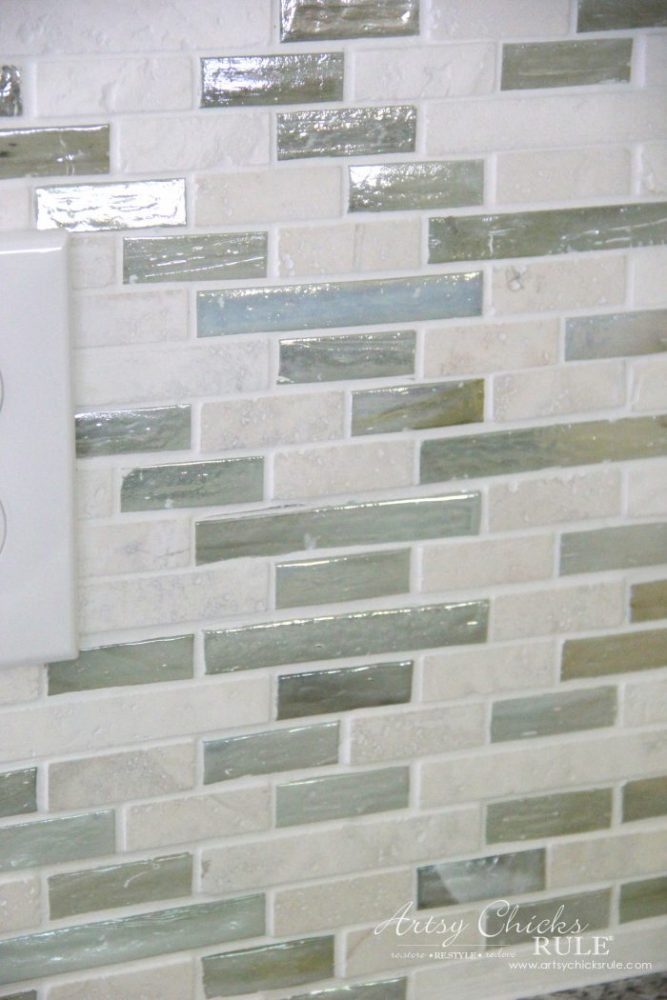
There are subtle blues and greens in the glass tiles.
Alright, let’s talk about the actual doing of the DIY tile backsplash.
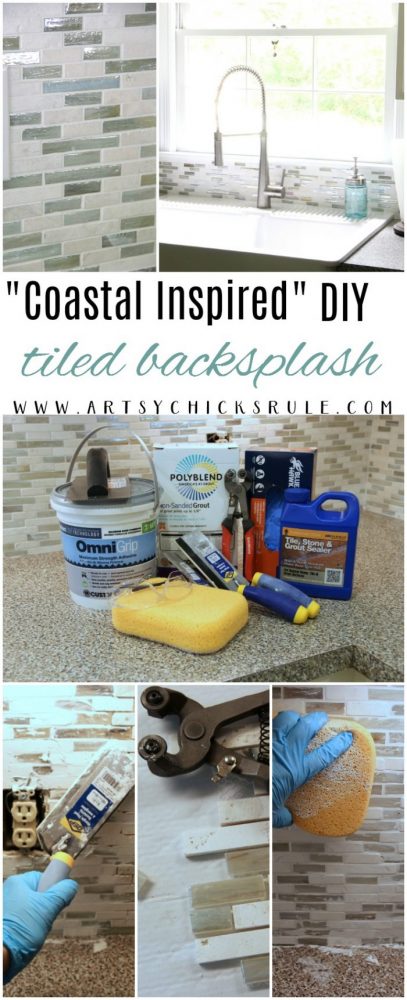
Here are the items I used…..
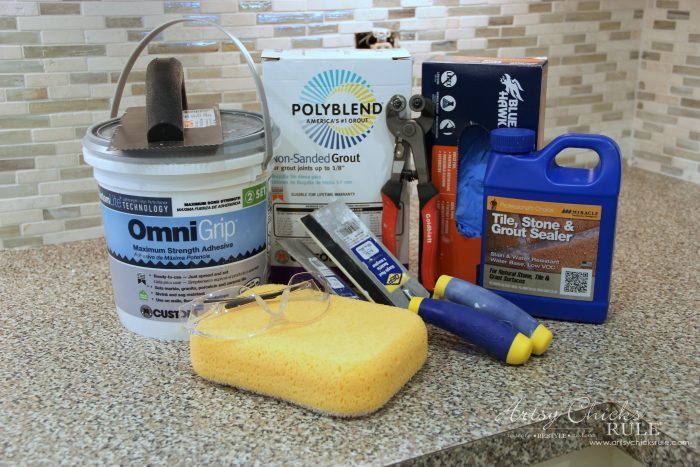
MATERIALS LIST FOR THE DIY TILE BACKSPLASH
- Omnigrip
- Non Sanded Grout (Bright White)
- Tile, Stone & Grout Sealer
- Disposable Gloves
- Glass Tile Cutter
- Safety Glasses
- Grout Float
- Sponge
- Grout Trowel
- Larger Notched Grout Trowel
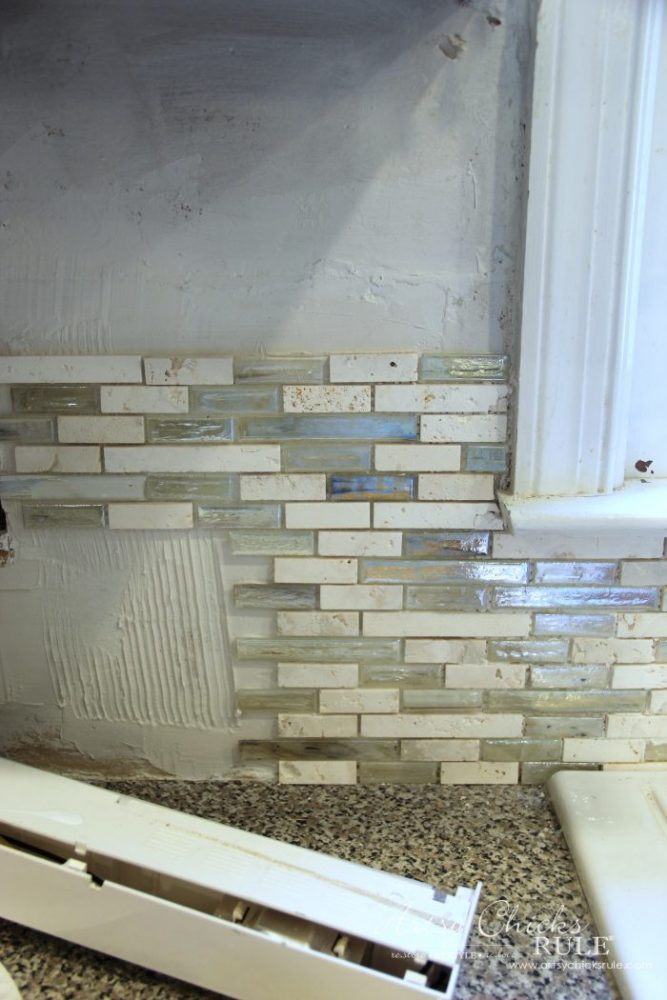
So let’s talk about removing the old tile.
If you took a look at the link I provided above of my previous tile install, you’ll know that I used a product called Bondera.
None of the big box stores carry Bondera any longer but they do have a product called Simple Mat that is pretty similar. I considered, for a split second, using the Simple Mat but I had reservations about the tile sticking properly. It didn’t seem even half as sticky as the Bondera (which was a beast).
So I shelved that thought. I also considered ordering Bondera from the supplier and going that route again.
I didn’t for two reasons.
The Bondera is dark gray in color and would show through in some of the glass tiles I had chosen.
I didn’t want that.
And that beast of a stickiness I mentioned? Well, as good as it was, that’s the other reason I decided against it. It’s great if you never plan on removing it …..ever. Let’s just leave it at that. ;)
I did manage to get the old tile off the wall….along with the first layer of paper from the drywall. Ugh.
We considered cutting out the drywall and starting new but in the end, I decided to paint the wall with primer instead.
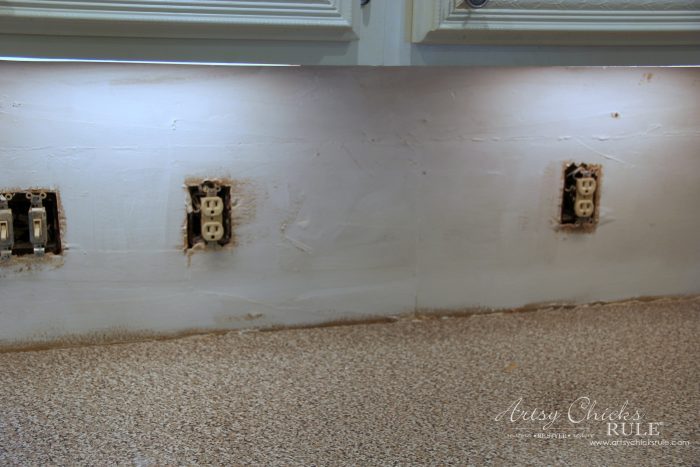
Not so pretty right now, huh?
I was a little apprehensive as I began because the only other tile job I’d done was our upstairs hall bath floor. (with the help of my husband on that one)
And of course not including the previous kitchen tile but I used Bondera, so it was a breeze.
I was worried this would be a mess, honestly! lol
But it wasn’t at all. It was just as simple, really, as using the Bondera.
Yep, not even kidding!
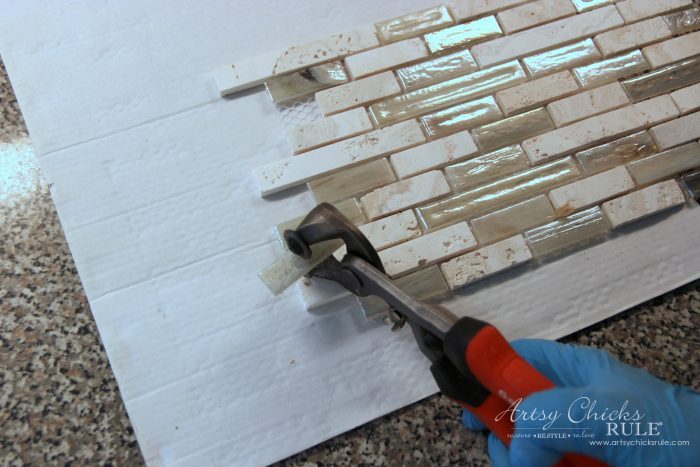
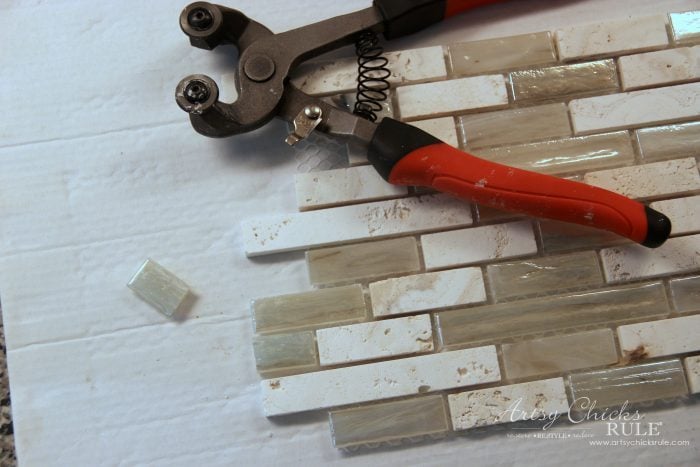
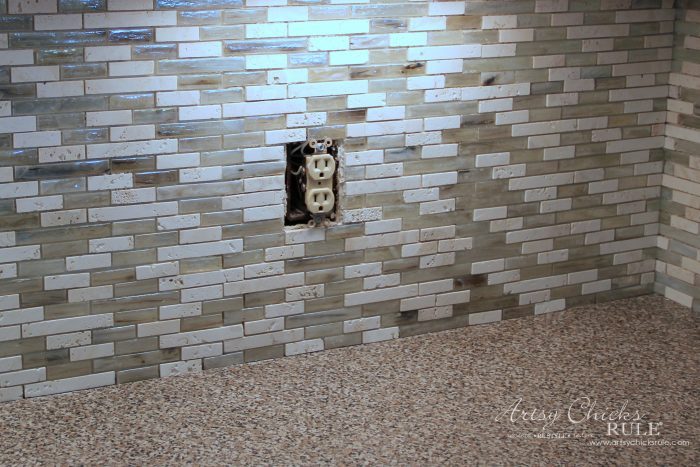
The great thing about the tile I used previously is that they were all square and I didn’t have to cut one single tile. The way this new tile had staggered tile shapes, I knew I’d be nipping.
That was not a big deal at all either. The glass cutter I linked above did a fabulous job…..
See?
Be sure to wear protective eyewear when cutting glass tiles! You don’t want any glass slivers flying up into your eye.
I also wore gloves to protect myself from any chemicals in the products getting onto my skin.
They also helped with keeping little glass pieces from possibly getting into my skin as well.
So instead of Bondera, I used Omnigrip which I highly recommend.
It was so easy to use and held like a champ with no sliding whatsoever.
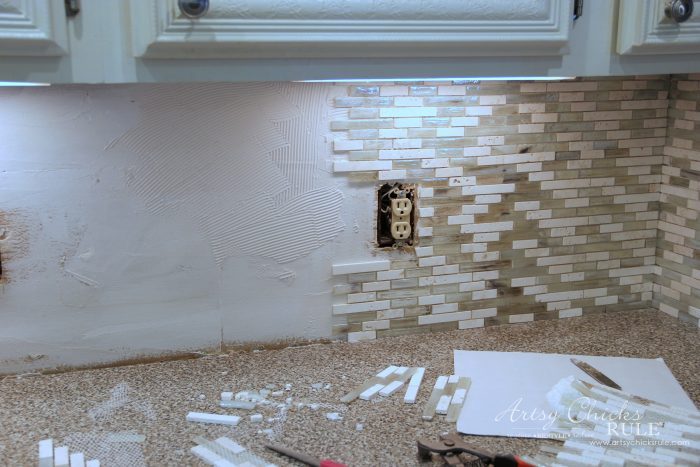
Just apply with the flat trowel (linked above) and then wipe again with the notched trowel.
Attach the tiles to it and press firmly. You can use a level to make sure you are applying them correctly as you go across the wall.
Then just continue across the wall until you are done.
Only apply as much as you need as you go. As in, the amount on the wall for the size tile that you are next applying.
Be sure not to use too much as it will squeeze out the front of the tile spaces. You don’t really want that.
If you do get that, remove it as best as possible.
Once I was done I let it sit for a couple of days to dry.
I then came back with a penetrating sealer (linked above) and sealed all of the travertine pieces.
You will want to do this so the grout won’t want to stick so badly to them making it very hard to remove.
I wasn’t careful about the glass, I just wiped it all over then went back and wiped away the glass area.
You can also seal them before you install them on the wall. Either way is fine.
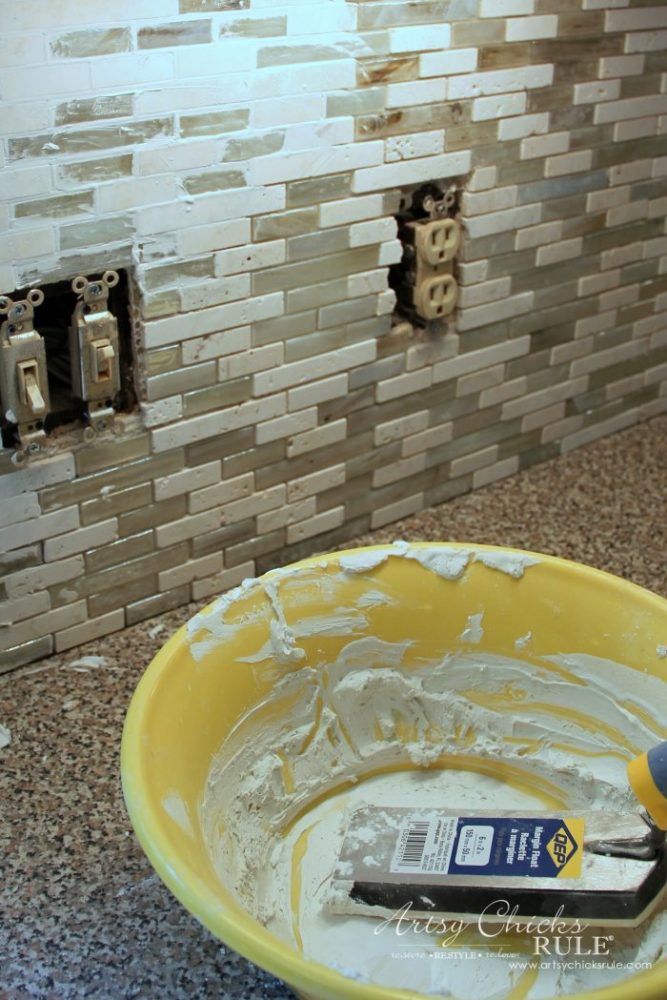
Finally, I mixed the grout. I used non-sanded since I was using glass tiles and didn’t want to scratch them with sanded grout. Plus the grout lines were pretty small so non-sanded grout was a good choice for that as well.
Once mixed with water to the correct consistency, I used the float to apply.
This was the hardest, most labor-intensive, part of the job.
I got my upper body workout in, for sure!! haha
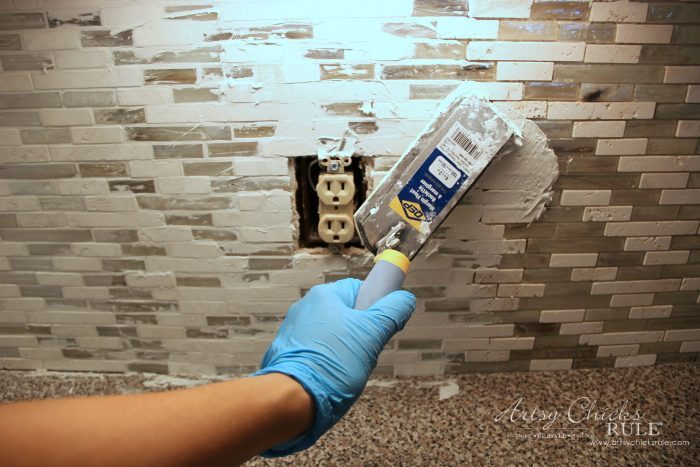
I applied it in small sections, pushing hard to make sure it went into the grout lines fully.
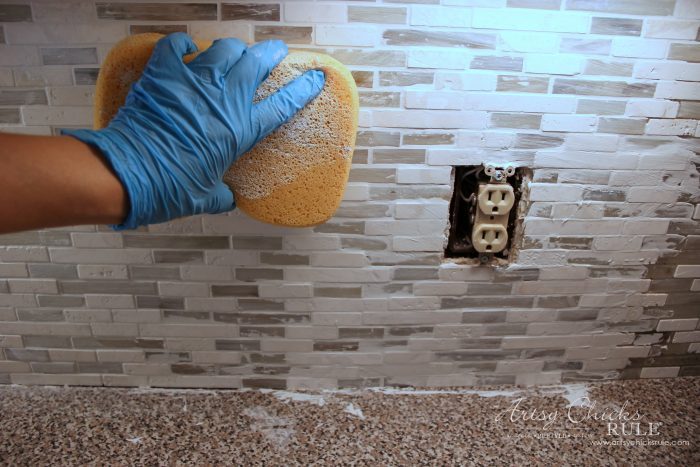
Then I came back behind with a very wrung-out sponge.
I wiped very gently once then moved on to the next section doing the same.
Then I would take the washed and wrung-out sponge (lots of sponge washing here) and wipe the previous section again. I found I needed to do it this way or the grout would be too wet and come out if I tried to wipe too soon. Letting it sit for a bit as I moved on let it harden ever so slightly.
Still, you need to be mindful of this as you are wiping. But you also need to be just as mindful about removing the excess from the tiles so it doesn’t stick where you don’t want it.
This is just a process of repetition. Wash, wring, wipe.
Do this until you’ve removed most of the excess and then let it sit for a couple hours.
Then come back and remove all the residual haze on the tiles.

I let it dry for a couple of days and then used the same sealer to seal everything again, including the newly applied grout.
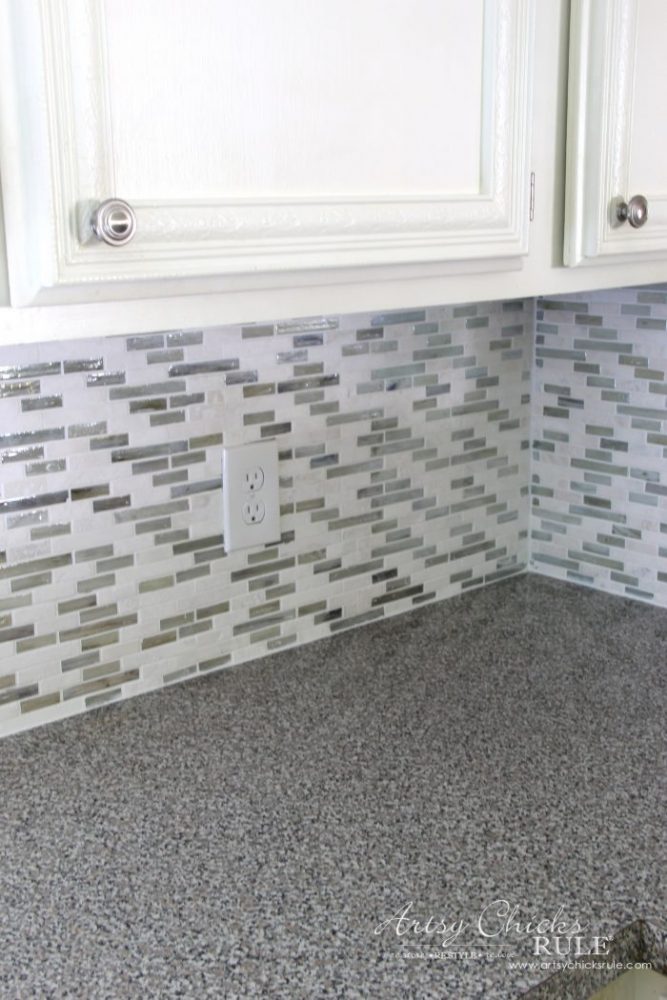
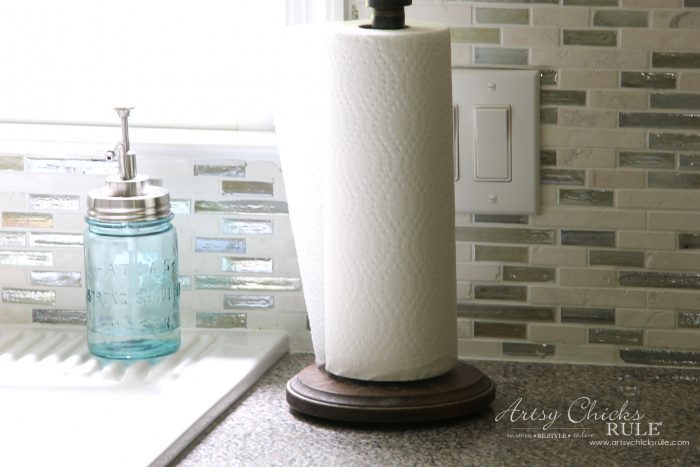
You might have noticed that we (my husband ;) ) also changed out the electrical switches/receptacles with a nice, bright white to match.
You can see some of the colors a little better here…
And I used a bright white caulk around the sink for a seamless seal.
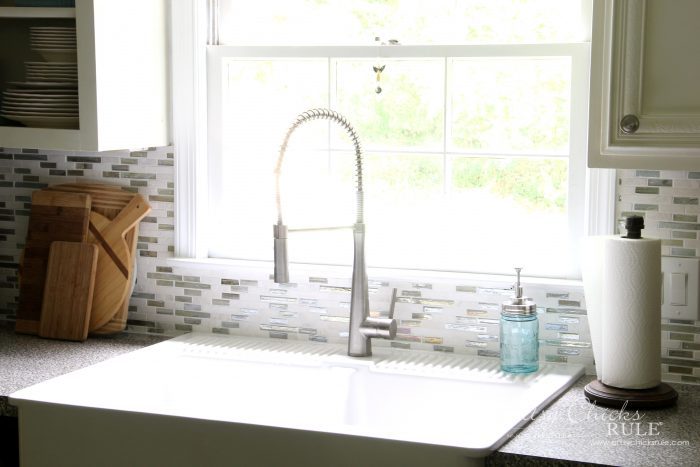
I also decided to remove the piece of trim that was under the window trim.
I installed tile all the way up instead. Love the look so much better.
I adore this >> stainless dispenser top I got for one of my antique Ball Mason jars…..
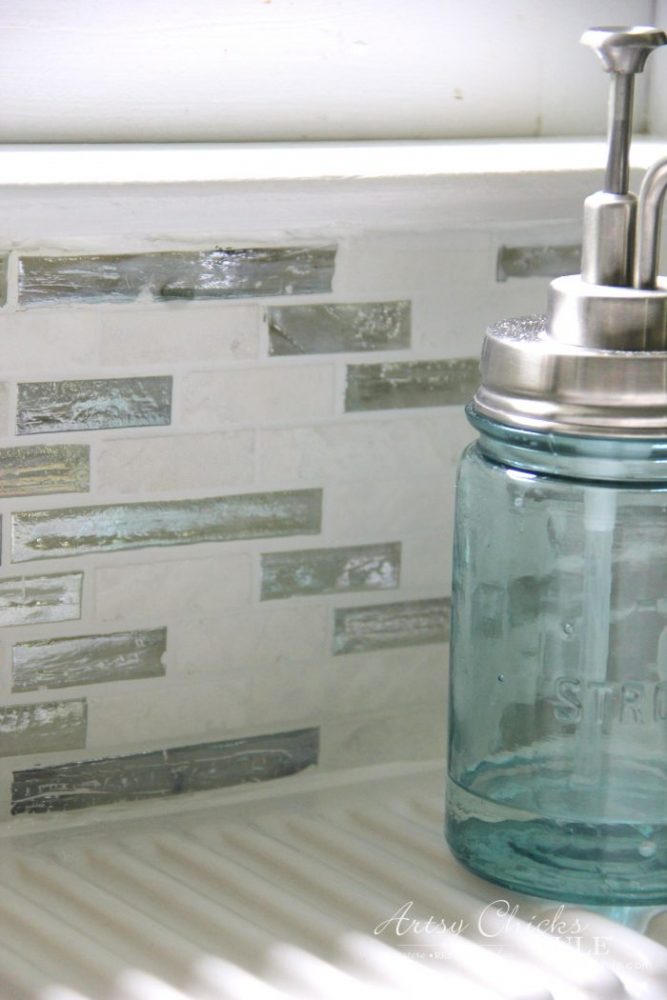
Aren’t those glass tiles so pretty? They have a bit of iridescence to them.
I had planned to use these thick tile pieces as the finish for the edge over here…..but I dropped one behind the refrigerator. lol Ooops!
They were not being very cooperative anyway.
So my husband suggested just using a piece of decorative wood trim.
We always have leftover stuff so he came up from the garage with the piece you see above.
It was lightweight and easy to install, perfect!
UPDATE!! We’ve since completely remodeled our kitchen (same tile though!), see it here >>> Coastal Kitchen Remodel
So thrilled with it.
The new tile along with the new paint above the cabinets have my kitchen looking like a brand new space.
All that’s left to do is repaint the cabinets in a bright white and the island in a pale, soft blue.
Can’t wait! I’m on a roll and will be starting soon. Keeping that ball rolling.
I’ll be doing a review of the Chalk Painted cabinets before I share the new paint, etc. (see the review, now, here!)
I’ll be using the same paint as in the recently made-over laundry room.
I will say I’ve been very happy with these. It’s been over 4 years since I painted them with Chalk Paint, and as you can see from the photos, they’ve held up great. I’ve not had to retouch any of these in 4 years.
So there you have it!
A brand new tile job done without any shortcuts. (Bondera, etc)
And it was oh so do-able! If I can, YOU can.
PIN this DIY Tile Backsplash Tutorial for later to save it!
Have questions???
Just ask in the comments section and I’ll be glad to answer and help if I can.
More home DIY tutorials we have shared here:
- DIY Faux Shiplap (get the look, without the expense!)
- DIY Faux Board & Batten (simple and quick!)
- How To Make a DIY Wood Countertop
- Build Your Own Kitchen Island With Big Box Store Cabinets
- How To Install Laminate Flooring (tips and tricks)
- DIY Crown Mold (easy way to get that wide custom look!)
- Build Your Own Built In Bookcase – Tutorial
- Chalk Painted Kitchen Cabinets
- How To Use Gel Stain On Your Stairs
- How To Paint Light Fixtures Without Removing Them
- How To Build a Permanently Attached Wall Coat Rack
- DIY Floating Shelves Tutorial
- How To DIY a Tile Backsplash (you are here)
- How To Build a Custom Closet
- Remove Popcorn Ceilings The Easy Way
- How To Remove Peeling Paint
- DIY Wood Mantel
- How To Paint a Tile Floor (it works!)
- How To Hang Peel and Stick Wallpaper
See you back here next week with a brand new “trash to treasure” and sharing what I did to these!
UPDATE!! See them now, here!
Hope you all have a wonderful weekend!
xoxo


")
")
")

")

")


hey girl- love the tile! so cool!
Thanks Shawnna!! Hope you had a great weekend! xo
Well, now I’m officially fan-girling. I love your backsplash too. Do you happen to still have the links to the other tiles you considered? The kind you used have been discontinued apparently–womp.
Aw, thanks! And darn, I did a quick search and it is no longer in stock anywhere. I don’t have a link but it’s shown in this post here. Sorry! Lots of new pretties out there though.
Please send me the steps to removing the old tile as I used the same sticky backing. I tried to remove but gave up when it would not budge. Thanking you in advance. Kathy
Hi Kathy,
I don’t really have “steps” to removing it. As I mentioned, it really wants to stay! ;) Which is a good thing but not a great thing if you ever want to change it.
I was told to use mineral spirits to remove. I would have tried that but what I did was start chipping away at the top tiles. Once I had a few off and loose, I began to pull. I am guessing this is where and when I’d use the mineral spirits if I were going to. (spreading it behind the tile to loosen. BUT my tile started coming off with a bit of the paper from the drywall. (so, Bondera was still attached to the tile) I ended up pulling off whole sheets of tile/Bondera. Not great for the wall but as long as it was still intact and not crumbly, I was okay. I still had paper backing as it didn’t remove it all, thank goodness. I did paint it with a primer so that the mastic would adhere well though. I hope this helps. Just start by trying to chip away as a few of the upper edge tiles. If all else fails you can try the mineral spirits or cut the drywall/tile out and install new drywall. That was an option we considered as well.
Nancy your tile is so pretty! I have almost the same counter and knowing what it looks like with that type of tile helps me to decide to go with tile!!! Love it!
Thank you Beth! :) Yes, it always helps to see something first! Good luck! xo
It’s gorgeous, Nancy!! I know you are so happy with it. And Happy anniversary!! XOXOXO
Well done, you must be so proud of your work. Vast improvement
Thanks Elizabeth! I’m so thrilled with how light and bright it looks! :) xo
Big question please. I put multi colored glass tiles on my kitchen backsplash several years ago when they first became popular. At the time I had formica on the wall Ugh! Made such a mess taking that off I had to replace the sheetrock with Hardie board. Now I want to take it down and put up subway tiles. I am so afraid of trying to take the glass tile down. I am a 78Yo widow who loves to DIY and I don’t think I could handle the Hardie board myself.
Love your blog . Always seems to have something that I’m working on. BTW, your new tile is gorgeous. I am also planning on repainting my cabinets so keep writing ;) Any helpful suggestion on the backsplash?
Hi Ann,
If the tiles are up with regular mastic or thinset, I would think you could pry it off. I haven’t done that so I can’t say for sure. Maybe try a pry bar and hammer to pry it loose. Mine peeled off with a thin layer of the paper from the drywall which is not ideal but made it pretty easy to get off. I’m sorry I don’t have more help to offer in this area.
And yes, I can’t wait to get the cabinets painted. It seems they look even more yellow-ish since I’ve put the whiter/brighter tile up. Soon!! :)
Forget about the tile (just kidding); what a beautiful family. Enjoyed seeing the video. The tile is very pretty and a good job.
Aw thanks so much Janice! :) xoxo
That’s absolutely beautiful, Nancy! It truly is perfect for your coastal decor!! You are going to get your house just the way you love it… then you will sell it! :) But you will have fun starting all over again, I am sure! xo
Thanks Karen! I am sooo loving it! Such a difference in here. And yes, haha, you are right!! lol xo
It looks nice and as long as you love it, it doesn’t matter what everyone else thinks.
That’s true, thanks Rose! :)
Really pretty, Nancy! You did a wonderful job. I had glass tiles in my last home, in the shower. It was lovely. I really like to combination of textures you have here.
Thanks for sharing the video, as well. You have a lovely family, and it looks like ya’ll have lots of fun! Love seeing some ‘real’ life!
Thanks Julie! :) I’m so happy with how it turned out…and how it has a coastal feel, too. And thank you, yes, we are pretty silly around here! ;) xo Happy weekend to ya!!
Love your new backsplash! We recently updated my kitchen cabinets and countertops but, I have been reluctant to do tile (but I really want the tile look). You may of inspired me to take the plunge. Do you have any further first time tilling tips or tricks to reduce clean up or really any tip.
Thanks
Lisa
Thanks Lisa! :) I can’t really think of any other tips other than those I mentioned in the post. It truly was not as hard as it seems. I guess the main thing is to clean the sponge out well each time you rinse. It’s quite time consuming but necessary. You want to make sure you get that haze off the tiles. Also, using enough mastic so that they will stick well but not too much that it comes out through the gaps. That’s a mess since you then have to go back and scrape the mastic from in between the tiles. You’ll get a feel for how much is needed as you go. I used a bit too much the first few tiles and had to scrape out but went on from there with a bit less and no more problems. Hope that helps and good luck!! You can do it! :) xo
Can you cut subway tile with a glass cutter or will we need a tile cutter? Looks great and I recruited my husband to help (he thinks I’m joking lol)
I used this type of cutter when I used subway tile in our shower reno. Worked great! I used small nippers to cut the tile for the backsplash. Similar to these.